Page 26 of 80

INSTRUMENT AND CONTROL FUNCTIONS
3-11
3or premium unleaded fuel. Use of un-
leaded fuel will extend spark plug life
and reduce maintenance costs.
EAU13441
Catalytic converter This vehicle is equipped with catalytic
converters in the exhaust system.
WARNING
EWA10860
The exhaust system is hot after op-
eration. Make sure that the exhaust
system has cooled down before do-ing any maintenance work.CAUTION:
ECA10700
The following precautions must be
observed to prevent a fire hazard or
other damages.�
Use only unleaded gasoline.
The use of leaded gasoline will
cause unrepairable damage to
the catalytic converter.
�
Never park the vehicle near pos-
sible fire hazards such as grass
or other materials that easily
burn.
�
Do not allow the engine to idletoo long.
EAU13932
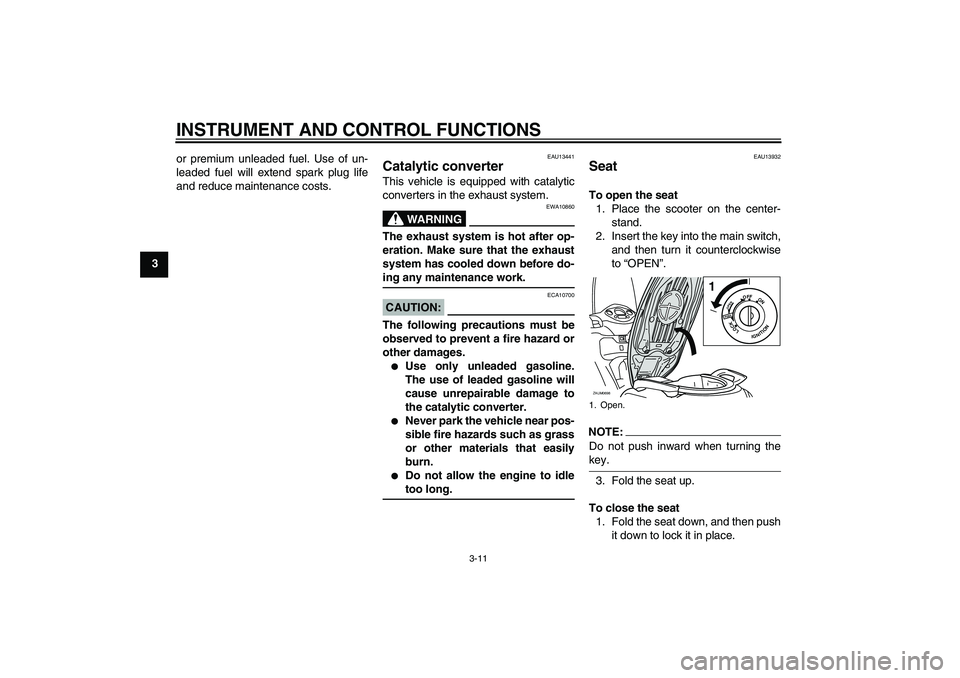
Seat To open the seat
1. Place the scooter on the center-
stand.
2. Insert the key into the main switch,
and then turn it counterclockwise
to “OPEN”.NOTE:Do not push inward when turning thekey.
3. Fold the seat up.
To close the seat
1. Fold the seat down, and then push
it down to lock it in place.1. Open.ZAUM0698
1
PUSHOPEN
OFFON
LOCK
IGNITION
U16PE0E0.book Page 11 Tuesday, May 8, 2007 10:26 AM
Page 27 of 80
INSTRUMENT AND CONTROL FUNCTIONS
3-12
3 2. Remove the key from the main
switch if the scooter will be left un-
attended.
NOTE:Make sure that the seat is properly se-cured before riding.
EAU14541
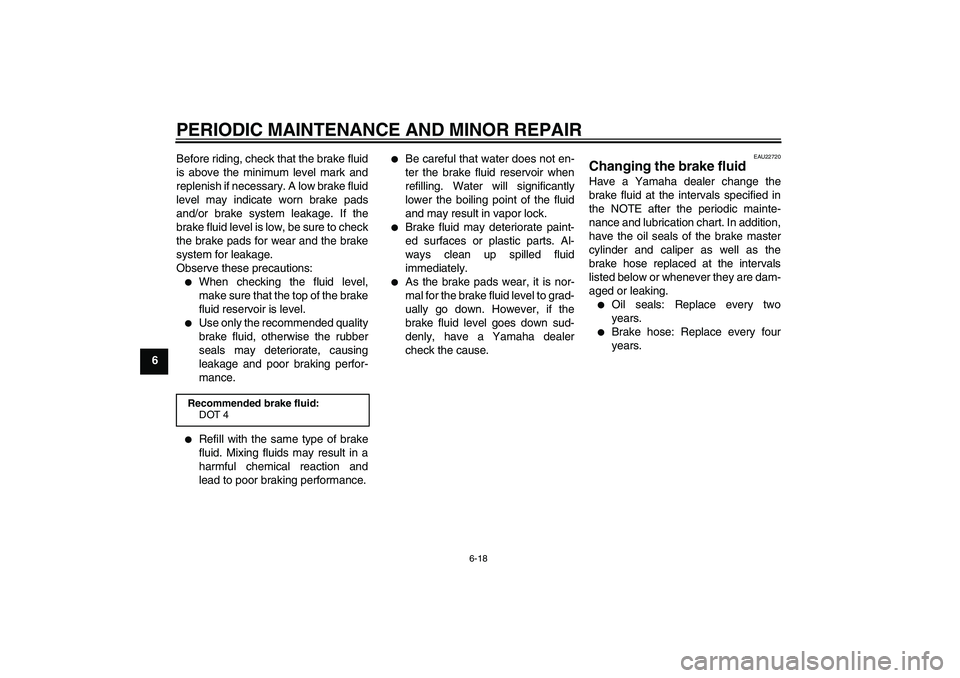
Storage compartment To open the storage compartment
Insert the key into the lock, turn it clock-
wise, and then pull on it to open the
storage compartment lid.
To close the storage compartment
Push the storage compartment lid into
the original position, and then remove
the key.
WARNING
EWA10961
�
Do not exceed the load limit of 1
kg (2.2 lb) for the storage com-
partment.
�
Do not exceed the maximum
load of 185 kg (408 lb) for the ve-hicle.
1. Lock.
2. Front storage compartment
1
2
ZAUM0699
U16PE0E0.book Page 12 Tuesday, May 8, 2007 10:26 AM
Page 56 of 80

PERIODIC MAINTENANCE AND MINOR REPAIR
6-18
6Before riding, check that the brake fluid
is above the minimum level mark and
replenish if necessary. A low brake fluid
level may indicate worn brake pads
and/or brake system leakage. If the
brake fluid level is low, be sure to check
the brake pads for wear and the brake
system for leakage.
Observe these precautions:
�
When checking the fluid level,
make sure that the top of the brake
fluid reservoir is level.
�
Use only the recommended quality
brake fluid, otherwise the rubber
seals may deteriorate, causing
leakage and poor braking perfor-
mance.
�
Refill with the same type of brake
fluid. Mixing fluids may result in a
harmful chemical reaction and
lead to poor braking performance.
�
Be careful that water does not en-
ter the brake fluid reservoir when
refilling. Water will significantly
lower the boiling point of the fluid
and may result in vapor lock.
�
Brake fluid may deteriorate paint-
ed surfaces or plastic parts. Al-
ways clean up spilled fluid
immediately.
�
As the brake pads wear, it is nor-
mal for the brake fluid level to grad-
ually go down. However, if the
brake fluid level goes down sud-
denly, have a Yamaha dealer
check the cause.
EAU22720
Changing the brake fluid Have a Yamaha dealer change the
brake fluid at the intervals specified in
the NOTE after the periodic mainte-
nance and lubrication chart. In addition,
have the oil seals of the brake master
cylinder and caliper as well as the
brake hose replaced at the intervals
listed below or whenever they are dam-
aged or leaking.�
Oil seals: Replace every two
years.
�
Brake hose: Replace every four
years.
Recommended brake fluid:
DOT 4
U16PE0E0.book Page 18 Tuesday, May 8, 2007 10:26 AM
Page 62 of 80

PERIODIC MAINTENANCE AND MINOR REPAIR
6-24
6
CAUTION:
ECA10640
Do not use a fuse of a higher amper-
age rating than recommended to
avoid causing extensive damage to
the electrical system and possibly afire.
3. Turn the key to “ON” and turn on
the electrical circuit in question to
check if the device operates.
4. If the fuse immediately blows
again, have a Yamaha dealer
check the electrical system.
EAUM2180
Replacing a headlight bulb This model is equipped with quartz bulb
headlights. If a headlight bulb burns
out, replace it as follows.
To replace a high beam headlight
bulb
1. Remove cowling A. (See page
6-5.)
2. Remove the headlight bulb cover.
3. Unhook the headlight bulb holder
by turning it counterclockwise, and
then remove the defective bulb.
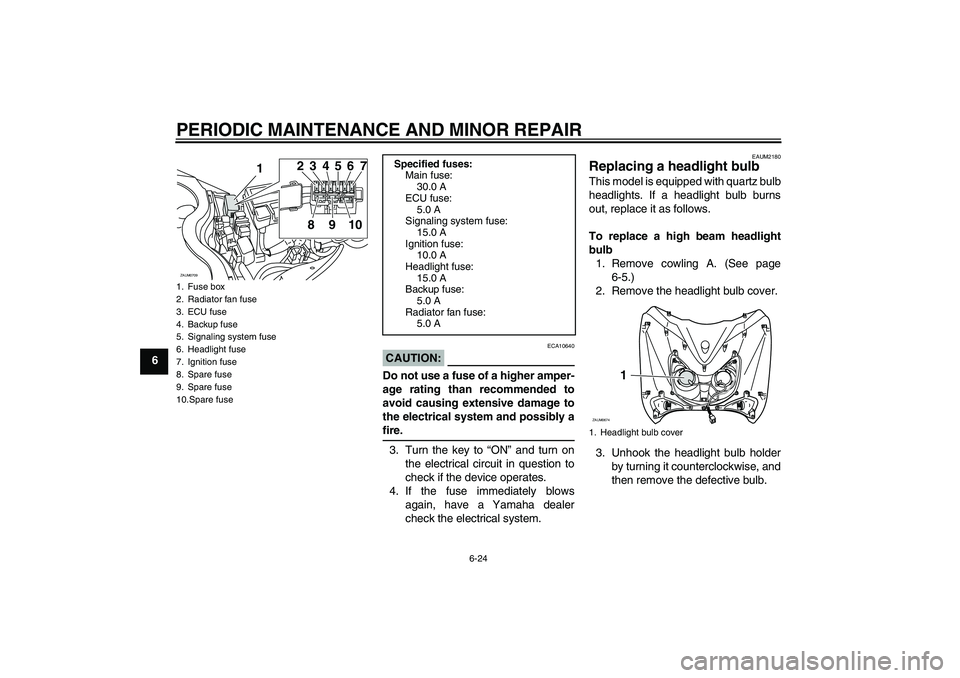
1. Fuse box
2. Radiator fan fuse
3. ECU fuse
4. Backup fuse
5. Signaling system fuse
6. Headlight fuse
7. Ignition fuse
8. Spare fuse
9. Spare fuse
10.Spare fuse
1
ZAUM0709
23
8910456 7
Specified fuses:
Main fuse:
30.0 A
ECU fuse:
5.0 A
Signaling system fuse:
15.0 A
Ignition fuse:
10.0 A
Headlight fuse:
15.0 A
Backup fuse:
5.0 A
Radiator fan fuse:
5.0 A
1. Headlight bulb cover
1
ZAUM0674
U16PE0E0.book Page 24 Tuesday, May 8, 2007 10:26 AM
Page 63 of 80

PERIODIC MAINTENANCE AND MINOR REPAIR
6-25
6
WARNING
EWA10790
Headlight bulbs get very hot. There-
fore, keep flammable products away
from a lit headlight bulb, and do not
touch the bulb until it has cooleddown.
4. Place a new headlight bulb into po-
sition, and then secure it with the
bulb holder by turning it clockwise.CAUTION:
ECA10650
Take care not to damage the follow-
ing parts:
�
Headlight bulb
Do not touch the glass part of
the headlight bulb to keep it free
from oil, otherwise the transpar-
ency of the glass, the luminosity
of the bulb, and the bulb life will
be adversely affected. Thor-
oughly clean off any dirt and fin-
gerprints on the headlight bulb
using a cloth moistened with al-
cohol or thinner.
�
Headlight lens
Do not affix any type of tinted
film or stickers to the headlight
lens.
Do not use a headlight bulb of awattage higher than specified.
5. Install the headlight bulb cover.
6. Install the cowling.
7. Have a Yamaha dealer adjust the
headlight beam if necessary.
To replace a low beam headlight
bulb
1. Remove cowling A. (See page
6-5.)
2. Remove the headlight bulb cover.3. Disconnect the headlight coupler.
4. Unhook the headlight bulb holder,
and then remove the defective
bulb.
1. Headlight bulb holderZAUM0675
1
1. Headlight bulb cover
1. Headlight bulb
2. Headlight coupler
1
ZAUM0677 ZAUM0678
1
2
U16PE0E0.book Page 25 Tuesday, May 8, 2007 10:26 AM
Page 64 of 80

PERIODIC MAINTENANCE AND MINOR REPAIR
6-26
6
WARNING
EWA10790
Headlight bulbs get very hot. There-
fore, keep flammable products away
from a lit headlight bulb, and do not
touch the bulb until it has cooleddown.
5. Place a new headlight bulb into po-
sition, and then secure it with the
bulb holder.CAUTION:
ECA10650
Take care not to damage the follow-
ing parts:�
Headlight bulb
Do not touch the glass part of
the headlight bulb to keep it free
from oil, otherwise the transpar-
ency of the glass, the luminosity
of the bulb, and the bulb life will
be adversely affected. Thor-
oughly clean off any dirt and fin-
gerprints on the headlight bulb
using a cloth moistened with al-
cohol or thinner.
�
Headlight lens
Do not affix any type of tinted
film or stickers to the headlight
lens.
Do not use a headlight bulb of awattage higher than specified.
6. Connect the headlight coupler.
7. Install the headlight bulb cover.
8. Install the cowling.
9. Have a Yamaha dealer adjust the
headlight beam if necessary.
EAUT1260
Replacing a front turn signal
light bulb CAUTION:
ECA10670
It is advisable to have a Yamahadealer perform this job.
1. Place the scooter on the center-
stand.
2. Remove cowling A. (See page
6-5.)
3. Remove the socket (together with
the bulb) by turning it counter-
clockwise.
4. Remove the defective bulb by
pushing it in and turning it counter-
clockwise.
1. Do not touch the glass part of the bulb.
1. Turn signal light bulb socket
1
ZAUM0465
U16PE0E0.book Page 26 Tuesday, May 8, 2007 10:26 AM
Page 65 of 80

PERIODIC MAINTENANCE AND MINOR REPAIR
6-27
6 5. Insert a new bulb into the socket,
push it in, and then turn it clock-
wise until it stops.
6. Install the socket (together with the
bulb) by turning it clockwise.
7. Install the cowling.
EAUM2190
Replacing a tail/brake light
bulb or a rear turn signal light
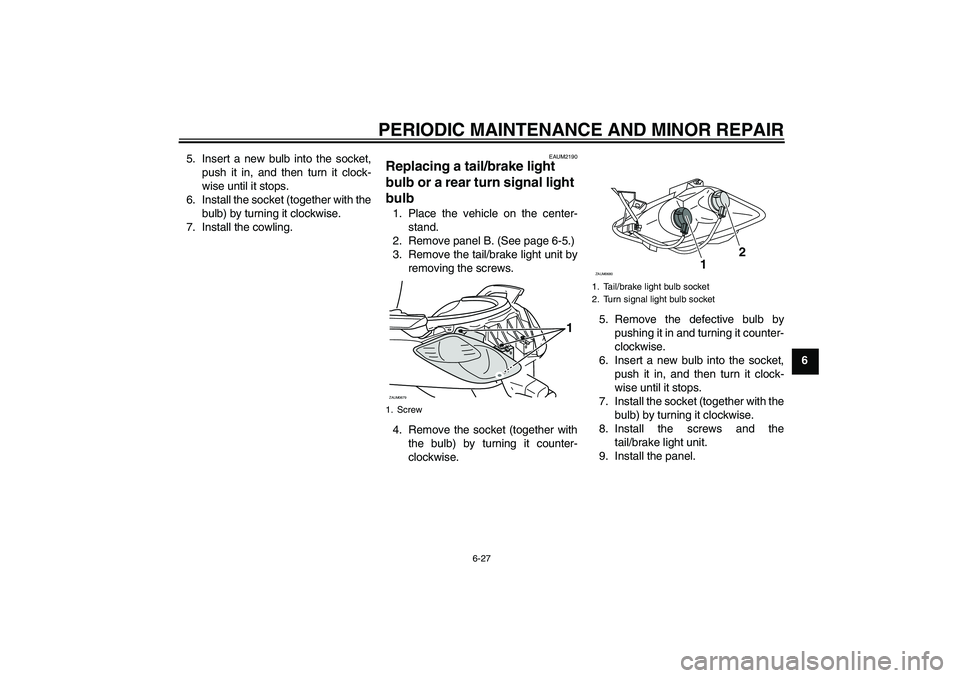
bulb 1. Place the vehicle on the center-
stand.
2. Remove panel B. (See page 6-5.)
3. Remove the tail/brake light unit by
removing the screws.
4. Remove the socket (together with
the bulb) by turning it counter-
clockwise.5. Remove the defective bulb by
pushing it in and turning it counter-
clockwise.
6. Insert a new bulb into the socket,
push it in, and then turn it clock-
wise until it stops.
7. Install the socket (together with the
bulb) by turning it clockwise.
8. Install the screws and the
tail/brake light unit.
9. Install the panel.1. ScrewZAUM0679
1
1. Tail/brake light bulb socket
2. Turn signal light bulb socketZAUM0680
12
U16PE0E0.book Page 27 Tuesday, May 8, 2007 10:26 AM
Page 68 of 80

PERIODIC MAINTENANCE AND MINOR REPAIR
6-30
6Engine overheating
WARNING
EWA10400
�
Do not remove the radiator cap when the engine and radiator are hot. Scalding hot fluid and steam may be
blown out under pressure, which could cause serious injury. Be sure to wait until the engine has cooled.
�
After removing the radiator cap retaining bolt, place a thick rag, like a towel, over the radiator cap, and then
slowly rotate the cap counterclockwise to the detent to allow any residual pressure to escape. When the hissingsound has stopped, press down on the cap while turning it counterclockwise, and then remove the cap.
NOTE:If coolant is not available, tap water can be temporarily used instead, provided that it is changed to the recommended coolantas soon as possible.
Wait until the
engine has cooled.
Check the coolant level in the
reservoir and radiator.
The coolant level
is OK.The coolant level is low.
Check the cooling system
for leakage.
Have a Yamaha dealer checkand repair the cooling system.Add coolant. (See NOTE.)
Start the engine. If the engine overheats again,
have a
Yamaha dealer check
and repair the cooling system.
There is
leakage.
There is
no leakage.
U16PE0E0.book Page 30 Tuesday, May 8, 2007 10:26 AM