Page 44 of 158
4-21
4
WARNING
EWB00400Always adjust the shock absorber assemblies
on the left and right side to the same setting.
Uneven adjustment can cause poor handling
and loss of stability, which could lead to an ac-cident.EBU19180Auxiliary DC jack The auxiliary DC jack is located at the front right
side of the ATV. The auxiliary DC jack can be used
for suitable work lights, radios, etc. The auxiliary
DC jack should only be used when the engine is
running.
1. Set the light switch to “OFF”.
2. Start the engine. (See page 6-1.)
3. Open the auxiliary DC jack cap, and then in-
sert the accessory power plug into the jack.
1. Special wrenchSpring preload setting:
Minimum (soft):
1
Standard:
2
Maximum (hard):
5
U23D60E0.book Page 21 Thursday, March 15, 2007 7:59 PM
Page 45 of 158
4-22
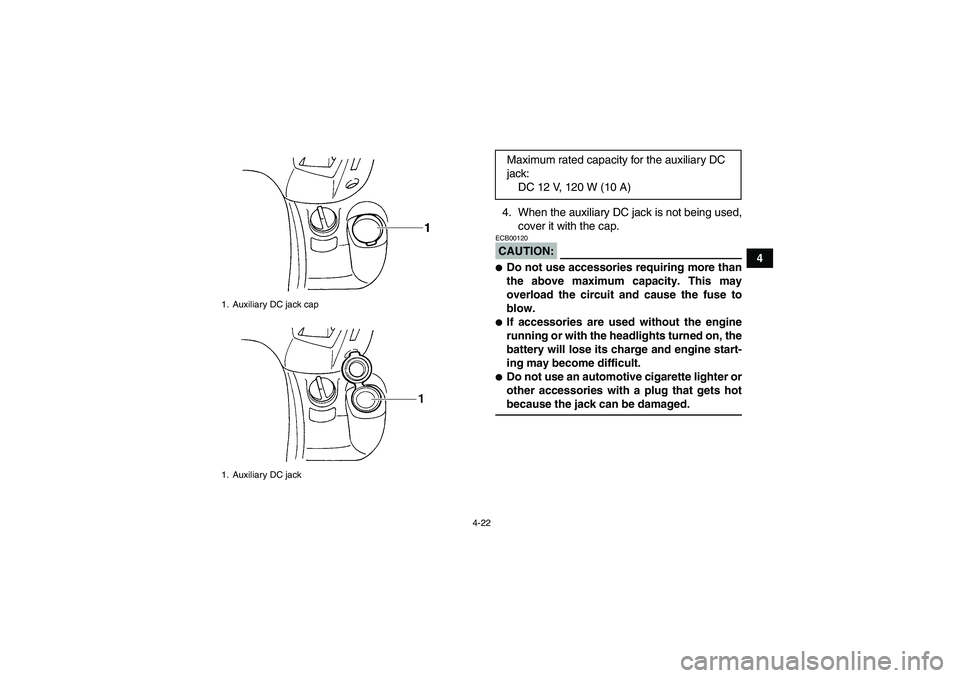
4 4. When the auxiliary DC jack is not being used,
cover it with the cap.
CAUTION:ECB00120�Do not use accessories requiring more than
the above maximum capacity. This may
overload the circuit and cause the fuse to
blow.�If accessories are used without the engine
running or with the headlights turned on, the
battery will lose its charge and engine start-
ing may become difficult.�Do not use an automotive cigarette lighter or
other accessories with a plug that gets hotbecause the jack can be damaged.
1. Auxiliary DC jack cap
1. Auxiliary DC jack
Maximum rated capacity for the auxiliary DC
jack:
DC 12 V, 120 W (10 A)
U23D60E0.book Page 22 Thursday, March 15, 2007 7:59 PM
Page 46 of 158

5-1
5
EBU19200
PRE-OPERATION CHECKS
EBU19221Pre-operation check list Before operating this ATV, be sure to check the items listed in the following table.NOTE:The maintenance of some items in the table has to be performed by a Yamaha dealer. Refer to the periodicmaintenance charts on page 8-3 to determine which service should be performed by a Yamaha dealer.
ITEM ROUTINE PAGE
FuelCheck fuel level in fuel tank, and add recommended fuel if neces-
sary.
Check fuel line for leakage. Correct if necessary.4-15, 5-3
Engine oilCheck oil level in engine, and add recommended oil to specified lev-
el if necessary.
Check ATV for oil leakage. Correct if necessary.5-3, 8-18
Final gear oilCheck ATV for oil leakage. Correct if necessary. 5-3, 8-22
Differential gear oilCheck ATV for oil leakage. Correct if necessary. 5-3, 8-24
CoolantCheck coolant level in reservoir, and add recommended coolant to
specified level if necessary.
Check cooling system for leakage. Correct if necessary.5-3, 8-26
Front brakeCheck operation. If soft or spongy, have Yamaha dealer bleed hy-
draulic system.
Check brake pads for wear, and replace if necessary.
Check brake fluid level in reservoir, and add recommended brake
fluid to specified level if necessary.
Check hydraulic system for leakage. Correct if necessary.5-4, 8-38, 8-39, 8-41
U23D60E0.book Page 1 Thursday, March 15, 2007 7:59 PM
Page 48 of 158

WARNING
EWB00520�Do not overfill the fuel tank. Fuel expands
when it heats up. If the fuel tank is overfilled,")
5-3
5
EBU19540Fuel Make sure that there is sufficient fuel in the tank.
(See page 4-15.)
WARNING
EWB00520�Do not overfill the fuel tank. Fuel expands
when it heats up. If the fuel tank is overfilled,
fuel could spill out due to heat from the en-
gine or the sun.�Be careful not to spill fuel, especially on the
engine or exhaust pipe which can cause a
fire and severe injury. Wipe up any spilled
fuel immediately.�Do not refuel right after the engine has been
running and is still very hot.�Be sure the fuel tank cap is closed securely.EBU19560Engine oil Make sure that the engine oil is at the specified lev-
el. Add oil as necessary. (See page 8-18.)EBU19590Final gear oil Make sure that the final gear oil is at the specified
level. Add oil as necessary. (See page 8-22.)
EBU19600Differential gear oil Make sure that the differential gear oil is at the
specified level. Add oil as necessary. (See page
8-24.)EBU19630Coolant Make sure that the coolant is at the specified level.
Add coolant as necessary. (See page 8-26.)NOTE:The coolant level must be checked on a cold en-
gine since the level varies with engine tempera-ture.
WARNING
EWB00510Wait for the engine and radiator to cool before
removing the radiator cap. You could be
burned by hot fluid and steam blown out under
pressure. Always put a thick rag over the cap
when opening. Allow any remaining pressureto escape before completely removing the cap.
U23D60E0.book Page 3 Thursday, March 15, 2007 7:59 PM
Page 53 of 158

6-1
6
EBU19880
OPERATION
EBU19900Read the Owner’s Manual carefully before riding
the ATV.
WARNING
EWB00630Read the Owner’s Manual carefully to become
familiar with all controls in order to help pre-
vent any loss of control, which could cause an
accident or injury. If there is a control or func-
tion you do not understand, ask your Yamahadealer.EBU20052Starting a cold engine
WARNING
EWB00640Always make sure all control cables work
smoothly before you begin riding in cold
weather. If the control cables are frozen or do
not work smoothly, you could be unable to
control the ATV, which could lead to an acci-dent or collision.
CAUTION:ECB00150See the “Engine break-in” section on page 6-5prior to operating the engine for the first time.
1. Turn the fuel cock to “ON”.
2. Turn the main switch to “ON” and the engine
stop switch to “”.
3. Shift the drive select lever into the neutral or
park position. The corresponding indicator
light should come on. If the indicator light does
not come on, have a Yamaha dealer check
the electrical circuit.NOTE:The engine can be started under the following con-
ditions:�The drive select lever is in the neutral or park po-
sition.�The rear brake lever is applied with the drive se-
lect lever in any position. However, it is recom-
mended to shift into the neutral or park positionbefore starting the engine.
U23D60E0.book Page 1 Thursday, March 15, 2007 7:59 PM
Page 54 of 158
 in reference to the fig-
ure:
Position (1):
Cold engine start with ambient temperature
below 5 °C (40 °F).
Position (2):
Cold engine start with ambient temperature
be")
6-2
64. Use the starter (choke) in reference to the fig-
ure:
Position (1):
Cold engine start with ambient temperature
below 5 °C (40 °F).
Position (2):
Cold engine start with ambient temperature
between 0 °C (30 °F) and 30 °C (90 °F).
Position (3):
Cold engine start with ambient temperature
above 25 °C (80 °F).
Ambient temp./starter (choke) position5. Apply the rear brake lever.
6. Completely close the throttle lever and start
the engine by pushing the start switch.
NOTE:�If the engine fails to start, release the start
switch, then push it again. Pause a few seconds
before the next attempt. Each cranking should
be as short as possible to preserve battery ener-
gy. Do not crank the engine more than 10 sec-
onds on each attempt.�If the battery is discharged, pull the recoil starterto start the engine.
7. If the engine is started with the starter (choke)
in position (1), the starter (choke) should be
returned to position (2) to warm up the engine.
If the engine is started with the starter (choke)
in position (2), keep the starter (choke) in this
position to warm up the engine.CAUTION:ECB00160For maximum engine life, always warm the en-
gine up before starting off. Never acceleratehard when the engine is cold!
1. Fully open
2. Half open
3. Closed
4. Starter (choke)U23D60E0.book Page 2 Thursday, March 15, 2007 7:59 PM
Page 55 of 158
 to
position (3) before riding.
NOTE:The engine is warm when it responds normally tothe throttle with th")
6-3
6 8. Continue warming up the engine until it idles
smoothly, then return the starter (choke) to
position (3) before riding.
NOTE:The engine is warm when it responds normally tothe throttle with the starter (choke) turned off.EBU20291Starting a warm engine Follow the same procedure as for starting a cold
engine, with the exception that the starter (choke)
is not required when the engine is warm. Instead,
start the engine with the throttle slightly open.EBU20440Operating the drive select lever and
driving in reverse CAUTION:ECB00170Before shifting, stop the ATV, otherwise thetransmission may be damaged.
Shifting: Neutral to High-range and High-range
to Low-range
1. Bring the ATV to a complete stop.2. Apply the brake pedal, and then shift by mov-
ing the drive select lever along the shift guide.
NOTE:Make sure that the drive select lever is completelyshifted into position.
3. Release the brake pedal, and then open the
throttle lever gradually.1. Drive select lever
2. L (Low-range)
3. H (High-range)
4. N (Neutral)
5. R (Reverse)
6. P (Park)
U23D60E0.book Page 3 Thursday, March 15, 2007 7:59 PM
Page 57 of 158

6-5
6 4. Check behind for people or obstacles, and
then release the brake pedal.
5. Open the throttle lever gradually and continue
to watch to the rear while backing.
WARNING
EWB00720Improper operation in reverse could make you
hit an obstacle or even a person behind you,
resulting in serious injury. When you shift into
reverse, make sure there are no people or ob-
stacles behind you. When it is safe to proceed,go slowly.EBU20682Engine break-in NOTE:�For ATVs equipped with an odometer or an hour
meter, follow the figures given in km (mi) or the
figures given in hours.�For ATVs not equipped with an odometer orhour meter, follow the figures given in hours.
There is never a more important period in the life of
your engine than the first 320 km (200 mi) or 20
hours of riding. For this reason, you should read
the following material carefully.Since the engine is brand new, do not put an ex-
cessive load on it for the first 320 km (200 mi) or 20
hours. The various parts in the engine wear and
polish themselves to the correct operating clear-
ances. During this period, prolonged full-throttle
operation or any condition that might result in en-
gine overheating must be avoided.
0–160 km (0–100 mi) or 0–10 hours
Avoid prolonged operation above 1/2 throttle. Vary
the speed of the ATV regularly. Do not operate it at
one set throttle position.
160–320 km (100–200 mi) or 10–20 hours
Avoid prolonged operation above 3/4 throttle. Rev
the engine freely, but do not use full throttle at any
time.
320 km (200 mi) or 20 hours and beyond
The ATV can now be operated normally.
CAUTION:ECB00220If any engine trouble should occur during the
engine break-in period, immediately have aYamaha dealer check the ATV.
U23D60E0.book Page 5 Thursday, March 15, 2007 7:59 PM