Page 75 of 102

PERIODIC MAINTENANCE AND MINOR REPAIR
6-28
6
EAU23271
Checking the front fork The condition and operation of the front
fork must be checked as follows at the
intervals specified in the periodic main-
tenance and lubrication chart.
To check the condition
WARNING
EWA10750
Securely support the vehicle so thatthere is no danger of it falling over.
Check the inner tubes for scratches,
damage and excessive oil leakage.
To check the operation
1. Place the vehicle on a level sur-
face and hold it in an upright posi-
tion.
2. While applying the front brake,
push down hard on the handlebars
several times to check if the front
fork compresses and rebounds
smoothly.
CAUTION:
ECA10590
If any damage is found or the front
fork does not operate smoothly,
have a Yamaha dealer check or re-pair it.
EAU23280
Checking the steering Worn or loose steering bearings may
cause danger. Therefore, the operation
of the steering must be checked as fol-
lows at the intervals specified in the pe-
riodic maintenance and lubrication
chart.
1. Place a stand under the engine to
raise the front wheel off the
ground.
WARNING
EWA10750
Securely support the vehicle so thatthere is no danger of it falling over.
2. Hold the lower ends of the front
fork legs and try to move them for-
ward and backward. If any free
play can be felt, have a Yamaha
dealer check or repair the steering.
U3C3E2E0.book Page 28 Friday, July 6, 2007 9:09 AM
Page 76 of 102
PERIODIC MAINTENANCE AND MINOR REPAIR
6-29
6
EAU23290
Checking the wheel bearings The front and rear wheel bearings must
be checked at the intervals specified in
the periodic maintenance and lubrica-
tion chart. If there is play in the wheel
hub or if the wheel does not turn
smoothly, have a Yamaha dealer check
the wheel bearings.
EAU33650
Battery This model is equipped with a sealed-
type (MF) battery, which does not re-
quire any maintenance. There is no
need to check the electrolyte or to add
distilled water.
WARNING
EWA10760
�
Electrolyte is poisonous and
dangerous since it contains sul-
furic acid, which causes severe
burns. Avoid any contact with
skin, eyes or clothing and al-
ways shield your eyes when
1. Positive battery lead (red)
2. Negative battery lead (black)
3. Battery
U3C3E2E0.book Page 29 Friday, July 6, 2007 9:09 AM
Page 80 of 102

PERIODIC MAINTENANCE AND MINOR REPAIR
6-33
64. Turn the key to “ON” and turn on
the electrical circuit in question to
check if the device operates.
5. If the fuse immediately blows
again, have a Yamaha dealer
check the electrical system.
6. Install the battery cover, and then
hook the battery band onto the
holder.
EAU23930
Replacing a headlight bulb This model is equipped with quartz bulb
headlights. If a headlight bulb burns
out, replace it as follows.
1. Disconnect the headlight coupler,
and then remove the bulb cover.
2. Unhook the headlight bulb holder,
and then remove the defective
bulb.
WARNING
EWA10790
Headlight bulbs get very hot. There-
fore, keep flammable products away
from a lit headlight bulb, and do not
touch the bulb until it has cooleddown.
3. Place a new headlight bulb into po-
sition, and then secure it with the
bulb holder.CAUTION:
ECA10650
Take care not to damage the follow-
ing parts:
1. Headlight coupler
2. Headlight bulb cover
1. Headlight bulb holder
U3C3E2E0.book Page 33 Friday, July 6, 2007 9:09 AM
Page 83 of 102

PERIODIC MAINTENANCE AND MINOR REPAIR
6-36
6
EAU27011
Replacing an auxiliary light
bulb This model is equipped with two auxil-
iary lights. If an auxiliary light bulb burns
out, replace it as follows.
1. Remove panel B (if replacing the
left auxiliary light bulb) or panel A
(if replacing the right auxiliary light
bulb). (See page 6-7.)
2. Remove the auxiliary light socket
(together with the bulb) by turning
the socket counterclockwise.
3. Remove the defective bulb by pull-
ing it out.
4. Insert a new bulb into the socket.5. Install the auxiliary light socket (to-
gether with the bulb) by pushing it
in and turning it clockwise.
6. Install the panel.
EAU44790
Front wheel (FZ1-S)
WARNING
EWA14840
For the ABS model, have a Yamahadealer remove and install the wheel.
EAU40060
To remove the front wheel
WARNING
EWA10820
�
It is advisable to have a Yamaha
dealer service the wheel.
�
Securely support the motor-
cycle so that there is no dangerof it falling over.
1. Place the vehicle on the center-
stand.
2. Loosen the front wheel axle pinch
bolt, then the wheel axle and the
brake caliper bolts.
1. Auxiliary light bulb
2. Auxiliary light bulb socket
U3C3E2E0.book Page 36 Friday, July 6, 2007 9:09 AM
Page 85 of 102
PERIODIC MAINTENANCE AND MINOR REPAIR
6-38
6
EAU44800
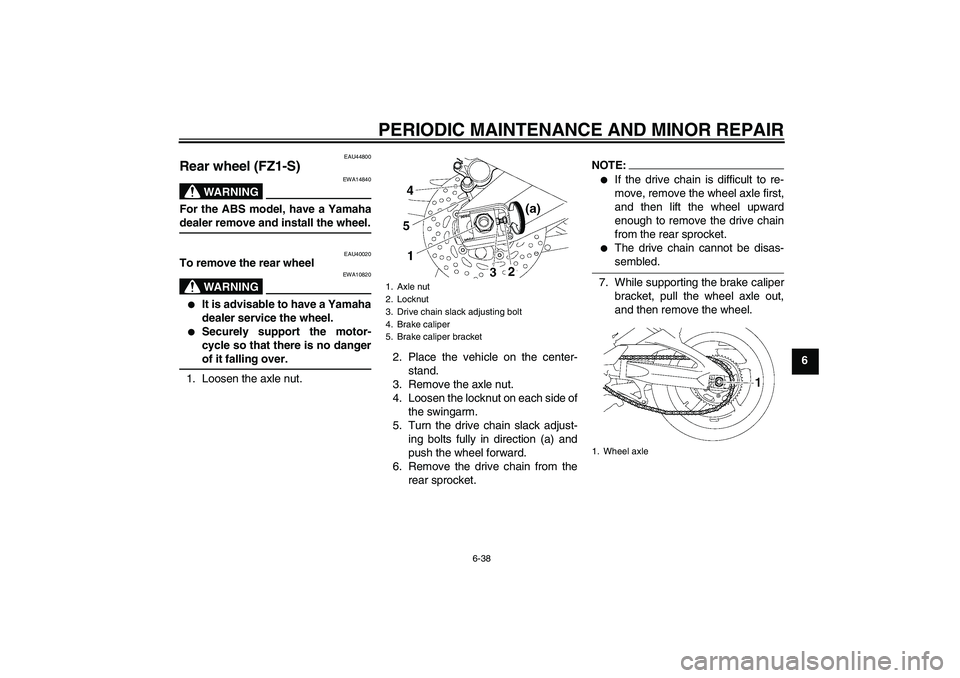
Rear wheel (FZ1-S)
WARNING
EWA14840
For the ABS model, have a Yamahadealer remove and install the wheel.
EAU40020
To remove the rear wheel
WARNING
EWA10820
�
It is advisable to have a Yamaha
dealer service the wheel.
�
Securely support the motor-
cycle so that there is no dangerof it falling over.
1. Loosen the axle nut.2. Place the vehicle on the center-
stand.
3. Remove the axle nut.
4. Loosen the locknut on each side of
the swingarm.
5. Turn the drive chain slack adjust-
ing bolts fully in direction (a) and
push the wheel forward.
6. Remove the drive chain from the
rear sprocket.
NOTE:�
If the drive chain is difficult to re-
move, remove the wheel axle first,
and then lift the wheel upward
enough to remove the drive chain
from the rear sprocket.
�
The drive chain cannot be disas-sembled.
7. While supporting the brake caliper
bracket, pull the wheel axle out,
and then remove the wheel.
1. Axle nut
2. Locknut
3. Drive chain slack adjusting bolt
4. Brake caliper
5. Brake caliper bracket
1. Wheel axle
U3C3E2E0.book Page 38 Friday, July 6, 2007 9:09 AM
Page 87 of 102

PERIODIC MAINTENANCE AND MINOR REPAIR
6-40
6
EAU42500
Troubleshooting charts Starting problems or poor engine performance
WARNING
EWA10840
Keep away open flames and do not smoke while checking or working on the fuel system.
Check the fuel level in
the fuel tank.1. Fuel
There is enough fuel.
There is no fuel.
Check the compression.
Supply fuel.
The engine does not start.
Check the compression.
Operate the electric starter.2. Compression
There is compression.
There is no compression.
Check the ignition.
Have a Yamaha dealer
check the vehicle.
Remove the spark plugs
and check the electrodes.3. Ignition
Wipe off with a dry cloth and correct the
spark plug gaps, or replace the spark plugs.
Have a Yamaha dealer check the vehicle.
The engine does not start.
Have a Yamaha dealer
check the vehicle.
The engine does not start.
Check the battery.
Operate the electric starter.4. Battery
The engine turns over
quickly.
The engine turns over
slowly.
The battery is good.Check the battery lead connections,
and charge the battery if necessary.
DryWet
Operate the electric starter.
U3C3E2E0.book Page 40 Friday, July 6, 2007 9:09 AM
Page 88 of 102

PERIODIC MAINTENANCE AND MINOR REPAIR
6-41
6Engine overheating
WARNING
EWAT1040
�
Do not remove the radiator cap when the engine and radiator are hot. Scalding hot fluid and steam may be
blown out under pressure, which could cause serious injury. Be sure to wait until the engine has cooled.
�
Place a thick rag, like a towel, over the radiator cap, and then slowly rotate the cap counterclockwise to the de-
tent to allow any residual pressure to escape. When the hissing sound has stopped, press down on the capwhile turning it counterclockwise, and then remove the cap.
NOTE:If coolant is not available, tap water can be temporarily used instead, provided that it is changed to the recommended coolantas soon as possible.
Wait until the
engine has cooled.
Check the coolant level in the
reservoir and radiator.
The coolant level
is OK.The coolant level is low.
Check the cooling system
for leakage.
Have a Yamaha dealer checkand repair the cooling system.Add coolant. (See NOTE.)
Start the engine. If the engine overheats again,
have a
Yamaha dealer check
and repair the cooling system.
There is
leakage.
There is
no leakage.
U3C3E2E0.book Page 41 Friday, July 6, 2007 9:09 AM
Page 91 of 102

MOTORCYCLE CARE AND STORAGE
7-3
7 4. To prevent corrosion, it is recom-
mended to apply a corrosion pro-
tection spray on all metal,
including chrome- and nickel-plat-
ed, surfaces.
5. Use spray oil as a universal clean-
er to remove any remaining dirt.
6. Touch up minor paint damage
caused by stones, etc.
7. Wax all painted surfaces.
8. Let the motorcycle dry completely
before storing or covering it.
WARNING
EWA11130
�
Make sure that there is no oil or
wax on the brakes or tires.
�
If necessary, clean the brake
discs and brake linings with a
regular brake disc cleaner or ac-
etone, and wash the tires with
warm water and a mild deter-
gent. Before riding at higher
speeds, test the motorcycle’s
braking performance and cor-nering behavior.
CAUTION:
ECA10800
�
Apply spray oil and wax spar-
ingly and make sure to wipe off
any excess.
�
Never apply oil or wax to any
rubber and plastic parts, but
treat them with a suitable care
product.
�
Avoid using abrasive polishing
compounds as they will wearaway the paint.
NOTE:Consult a Yamaha dealer for advice onwhat products to use.
EAU26180
Storage Short-term
Always store your motorcycle in a cool,
dry place and, if necessary, protect it
against dust with a porous cover.CAUTION:
ECA10810
�
Storing the motorcycle in a
poorly ventilated room or cover-
ing it with a tarp, while it is still
wet, will allow water and humid-
ity to seep in and cause rust.
�
To prevent corrosion, avoid
damp cellars, stables (because
of the presence of ammonia)
and areas where strong chemi-cals are stored.
Long-term
Before storing your motorcycle for sev-
eral months:
1. Follow all the instructions in the
“Care” section of this chapter.
2. Fill up the fuel tank and add fuel
stabilizer (if available) to prevent
the fuel tank from rusting and the
fuel from deteriorating.
U3C3E2E0.book Page 3 Friday, July 6, 2007 9:09 AM
