2008 VOLVO V70 transmission
[x] Cancel search: transmissionPage 3 of 274

3 Contents
03 Your driving environment
Instruments and controls72
Ignition modes80
Seats82
Steering wheel87
Lighting89
Wipers and washers96
Power windows99
Mirrors101
Power moonroof103
HomeLink® Universal
Transceiver (option)105
Starting the engine
109
Transmission112
Brakes115
Hill Descent Control (HDC)117
Electric parking brake119
04 Comfort and driving pleasure
Menus and messages124
Climate system128
Audio system136
Trip computer149
Compass151
Stability system153
Active chassis system-Four C155
Cruise control156
Adaptive Cruise Control-ACC158
Distance Alert165
Collision Warning with Auto-
brake (option)168
Driver Alert System -option
173
Park assist (option)178
Blind Spot Information System
(option)182
Passenger compartment
convenience186
05 During your trip
Driving recommendations
192
Refueling196
Loading202
Cargo area208
Towing a trailer213
Emergency towing216
4 Contents
06 Maintenance and specifications
Volvo maintenance 220
Maintaining your car221
Hood and engine compartment223
Engine oil224
Fluids226
Replacing bulbs228
Wiper blades and washer fluid235
Battery237
Fuses240
Wheels and tires245
Vehicle care265
Label information270
Specifications272
Volvo programs281
07 Index
Index282
ProCarManuals.com
Page 13 of 274

which could result in personal injury. Have the vehicle towed to a trained and qualified Volvo service technician for
repairs.
Automatic transmission:
Before attempting to tow the vehicle, use the following procedure to override the shiftlock system to move the gear
selector to the neutral position:
Switch off the ignition for at least 10 minutes and disconnect the battery
Wait at least one minute.
Insert the remote control into the ignition slot and press the Start button (without depressing brake pedal) to go to
ignition mode II. See page 80
for more information.
Press firmly on the brake pedal.
Move the gear selector from Park ( P) to the Neutral ( N) position. See page 113 for information on manually
overriding the shiftlock system.
19 01 Safety
Safety in the passenger compartment
Front airbags
The front airbag system
The front airbags supplement the three-point seat belts. For these airbags to provide the protection intended, seat belts
must be worn at all times.
The front airbag system includes gas generators surrounded by the airbags, and deceleration sensors that activate the
gas generators, causing the airbags to be inflated with nitrogen gas.
As the movement of the seats' occupants compresses the airbags, some of the gas is expelled at a controlled rate to
provide better cushioning. Both seat belt pretensioners also deploy, minimizing seat belt slack. The entire process,
ProCarManuals.com
Page 47 of 274

Pressing the information button provides certain information about the vehicle with the help of the indicator lights
.
Using the information button
1. Press the information button
.
2. All of the indicator lights
will flash sequentially for approximately 7 seconds to indicate that the PCC is receiving
information from the vehicle. If any of the buttons are pressed during this 7-second period, transmission of
56 02 Locks and alarm
Remote key and key blade
information to the PCC will be interrupted.
NOTE
If none of the indicator lights flash when the information button has been pressed several times from different places
in relation to the vehicle, contact an authorized Volvo service technician.
The indicator lights
provide information according to the illustration below.
Steady green light: the vehicle is correctly locked.
Steady yellow light: the vehicle is not locked.
Steady red light: the alarm has been triggered.
Flashing red lights (Heartbeat sensor): if the two heartbeat sensor lights flash, this indicates that someone may be
inside the vehicle. These lights are only activated if the alarm has been triggered.
Range
The PCC's lock and unlock functions have a range of approximately 60 ft. (20 m) from the vehicle.
NOTE
The approach lighting, panic alarm, and the functions controlled by the information button have a range of
approximately 300 ft (100 m) from the vehicle.
Buildings or other obstacles may interfere with the function of the PCC.
ProCarManuals.com
Page 48 of 274

Outside of the PCC's range
If the PCC is more than approximately 300 ft (100 m) from the vehicle when the information button is pressed, no new
information will be received. The PCC most recently used to lock or unlock the vehicle will show the vehicle's most
recently received status. The indicator lights will not flash when the information button is pressed while the PCC is out
of range.
NOTE
If none of the indicator lights illuminate when the information button is pressed, this may be because the most recent
transmission between the vehicle and the PCC was interrupted or impeded by buildings or other objects.
Heartbeat Sensor
The heartbeat sensor function
is a complement to the vehicle's standard alarm, and indicates at a distance of up to
300 ft (100 m) that someone may be in the vehicle. The heartbeat sensor only functions if the alarm has been triggered.
NOTE
The heartbeat sensor registers a person's heartbeat in the form of vibrations in the vehicle's chassis. For this reason,
the sensor's function may be impaired in areas with high levels of noise or vibrations.
Keyless drive
Vehicles equipped with the optional Personal Car Communicator have the keyless drive function. See page 61
for
detailed information.
57 02 Locks and alarm
Remote key and key blade
Detachable key blade
The key blade can be removed from the remote control. When removed, the key blade can be used as follows:
To lock/unlock the driver's door
To lock/unlock the glove compartment (see page 65)
To enable/disable the private locking function (see page 58)
Unlocking the doors with the detached key blade
Insert the key blade as far as possible in the driver's door lock. Turn the key blade clockwise approximately one -
quarter turn to unlock the driver's door only.
NOTE
After unlocking the driver's door with the key blade, opening the door will trigger the alarm.
To disable the alarm:
Insert the remote key in the ignition slot.
Locking the doors with the detached key blade
1. Lock the rear doors and the front passenger's door by pressing the lock button on each door.
2. Turn the key blade one -quarter turn counter-clockwise to lock the driver's door.
ProCarManuals.com
Page 61 of 274

2 0 0 8
VOLVO V70
70 03 Your driving environment
Instruments and controls 72
Ignition modes80
Seats82
Steering wheel87
Lighting89
Wipers and washers96
Power windows99
Mirrors101
Power moonroof103
HomeLink® Universal Transceiver (option)105
Starting the engine109
Transmission112
Brakes115
Hill Descent Control (HDC)117
Electric parking brake119
71 03 Your driving environment
72 03 Your driving environment
Instruments and controls
Instrument overview
ProCarManuals.com
Page 64 of 274

High beam and turn signal indicators
Function check
All indicator and warning symbols light up in ignition mode II or when the engine is started. When the engine has
started, all the symbols should go out except the parking brake symbol, which only goes out when the brake is
disengaged.
If the engine does not start or if the function check is carried out in ignition mode II , all symbols go out after 5
seconds except the
75 03 Your driving environment
Instruments and controls
symbol for faults in the vehicle's emissions system and the symbol for low oil pressure.
Certain symbols may not have their functions illustrated, depending on the vehicle's equipment.
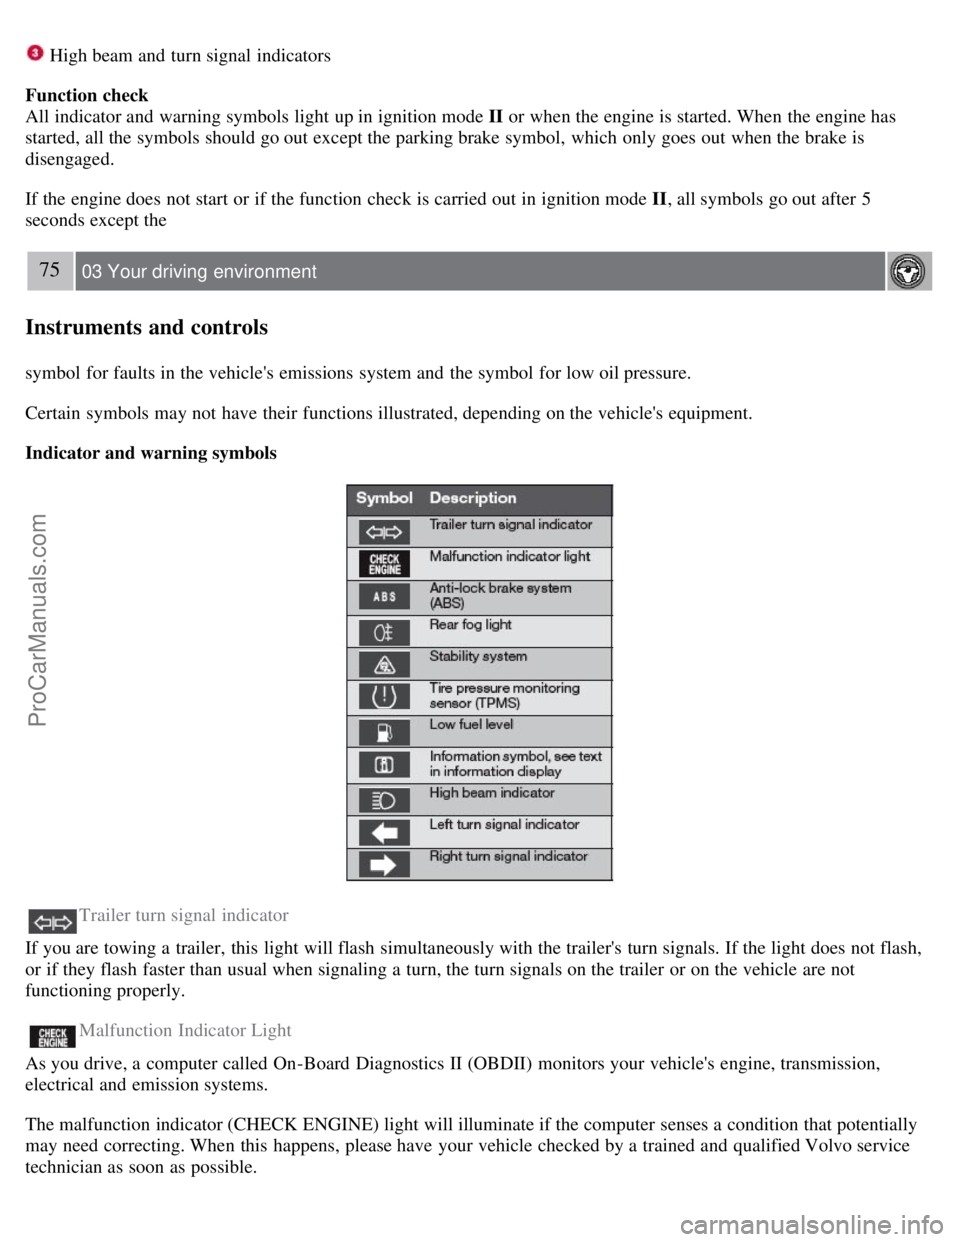
Indicator and warning symbols
Trailer turn signal indicator
If you are towing a trailer, this light will flash simultaneously with the trailer's turn signals. If the light does not flash,
or if they flash faster than usual when signaling a turn, the turn signals on the trailer or on the vehicle are not
functioning properly.
Malfunction Indicator Light
As you drive, a computer called On-Board Diagnostics II (OBDII) monitors your vehicle's engine, transmission,
electrical and emission systems.
The malfunction indicator (CHECK ENGINE) light will illuminate if the computer senses a condition that potentially
may need correcting. When this happens, please have your vehicle checked by a trained and qualified Volvo service
technician as soon as possible.
ProCarManuals.com
Page 75 of 274

The three sections of the rear seat backrest can be folded down in different combinations to make it easier to transport
long objects.
The left (driver's side) section can be folded down separately.
The center section can be folded down separately.
The right (passenger's side) section can be folded down together with the center section.
All three sections can be folded down together.
Release and lower the center head restraint (see page 86) if the center and/or right section of the backrest is to be
lowered. The outboard head restraints fold down automatically.
Pull up the backrest release control on the respective section(s) and fold the section(s) down.
NOTE
It may be necessary to move the front seats forward or put their backrests in a more upright position before folding
down the rear seat backrests.
WARNING
When the backrest(s) are returned to the upright position, check that it is properly locked in place. The red
indicators should not be visible.
Return the outboard head restraints to the upright position.
Long loads should always be securely anchored to help avoid injury in the event of a sudden stop.
Always turn the engine off and apply the parking brake when loading/unloading the vehicle.
Place the transmission in the Park ( P) position to help prevent inadvertent movement of the gear selector.
On hot days, the temperature in the vehicle interior can rise very quickly. Exposure of people to these high
temperatures for even a short period of time can cause heat-related injury or death. Small children are particularly at
risk.
86 03 Your driving environment
Seats
Rear center head restraint
ProCarManuals.com
Page 89 of 274

1. Intermittent wiping
2. Normal (continuous) wiping
Move the lever forward (see the arrow in the illustration) to start the tailgate washer.
Tailgate wiper and reverse gear
If the windshield wipers are on and the transmission is put into reverse gear, the tailgate wiper will go into intermittent
wiping function
1. This function is deactivated when a different gear is selected.
1Consult your Volvo retailer if you would like to have this function deactivated.
NOTE
On vehicles with the optional rain sensor, the tailgate wiper will be activated when reverse is selected, if the rain
sensor is activated and it is raining.
If the tailgate wiper is in the normal (continuous) wiping mode, selecting different gears will not affect its function.
99 03 Your driving environment
Power windows
Power windows
Switch for power child safety locks1 and disengaging rear power window buttons, see page 48
Rear window controls
Front window controls.
ProCarManuals.com