2008 VOLVO S80 tow
[x] Cancel search: towPage 173 of 275

Visual indicator
The audio system's display gives an overview of the vehicle's position in relation to a detected object.
The markers in the display indicate that one or more of the four sensors has detected an object. The greater the number
of markers, the closer the vehicle is to the object.
Display in a vehicle with rear park assist only. Here, an object has been detected by both of the right rear sensors.
Display in a vehicle with both front and rear park assist. The solid marker in this example indicates that an object is
closer than approximately 1 foot (30 cm) to the right front sensor.
Display in a vehicle with both front and rear park assist. Reverse gear is selected and no objects have been detected
in front of or behind the vehicle.
Audible signal
The Park Assist system uses an intermittent tone that pulses faster as you come close to an object, and becomes
constant when you are within approximately 1 ft (30 cm) of an object in front of or behind the vehicle (example 2 in
the illustration). If there are objects within this distance both behind and in front of the vehicle, the tone alternates
between front and rear speakers.
If the volume of another source from the audio system is high, this will be automatically lowered.
The distance monitored behind the vehicle is approximately 5 ft (1.5 m). The audible signal comes from the rear
speakers.
The system must be deactivated when towing a trailer, carrying bicycles in a rear-mounted carrier, etc, which could
trigger the rear park assist system's sensors.
NOTE
Rear park assist is deactivated automatically when towing a trailer if Volvo genuine trailer wiring is used.
Page 176 of 275

The door panel indicator light illuminates on the side of the vehicle where the system has detected another vehicle. If
your vehicle is passed on both sides at the same time, both lights will illuminate.
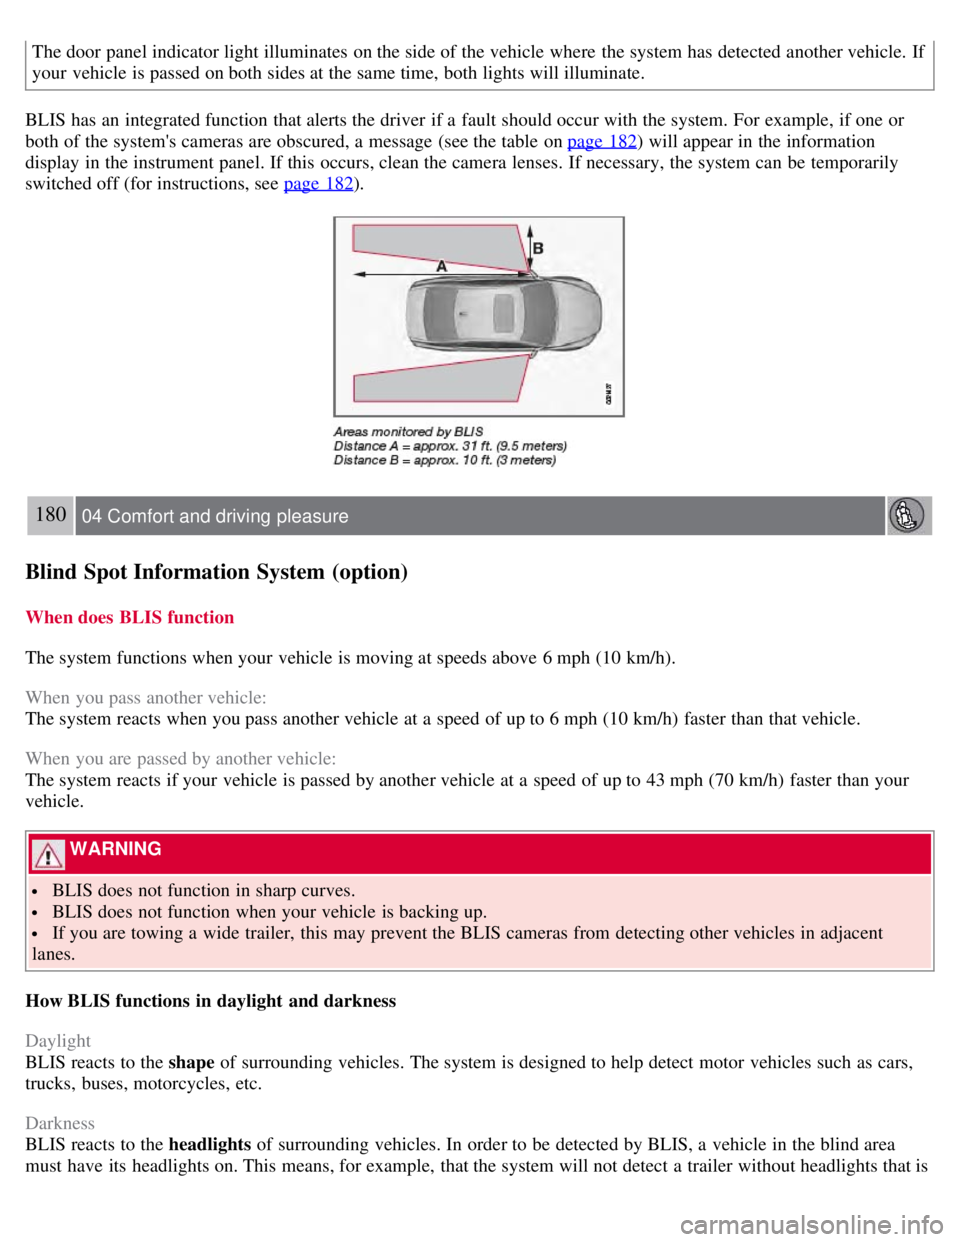
BLIS has an integrated function that alerts the driver if a fault should occur with the system. For example, if one or
both of the system's cameras are obscured, a message (see the table on page 182
) will appear in the information
display in the instrument panel. If this occurs, clean the camera lenses. If necessary, the system can be temporarily
switched off (for instructions, see page 182
).
180 04 Comfort and driving pleasure
Blind Spot Information System (option)
When does BLIS function
The system functions when your vehicle is moving at speeds above 6 mph (10 km/h).
When you pass another vehicle:
The system reacts when you pass another vehicle at a speed of up to 6 mph (10 km/h) faster than that vehicle.
When you are passed by another vehicle:
The system reacts if your vehicle is passed by another vehicle at a speed of up to 43 mph (70 km/h) faster than your
vehicle.
WARNING
BLIS does not function in sharp curves.
BLIS does not function when your vehicle is backing up.
If you are towing a wide trailer, this may prevent the BLIS cameras from detecting other vehicles in adjacent
lanes.
How BLIS functions in daylight and darkness
Daylight
BLIS reacts to the shape of surrounding vehicles. The system is designed to help detect motor vehicles such as cars,
trucks, buses, motorcycles, etc.
Darkness
BLIS reacts to the headlights of surrounding vehicles. In order to be detected by BLIS, a vehicle in the blind area
must have its headlights on. This means, for example, that the system will not detect a trailer without headlights that is
Page 177 of 275

being towed behind a car or truck.
WARNING
BLIS does not react to cyclists or mopeds.
BLIS does not react to vehicles that are standing still.
The function of the BLIS cameras may be affected by intense light, or when driving at night in areas where there
are no external sources of light (e.g., street lights, other vehicles, etc.). In such cases, the system may react as if the
cameras were obscured.
In both of the above mentioned conditions, a message will appear in the information display.
When driving in such conditions, the system's function will be limited or it may be temporarily switched off. See
page 182
for instructions.
When the message is no longer displayed, BLIS will return to normal function.
The BLIS cameras have the same limitation as the human eye. In other words, their "vision is impaired" by
adverse weather conditions such as heavy snowfall, dense fog, etc.
181 04 Comfort and driving pleasure
Blind Spot Information System (option)
Limitations
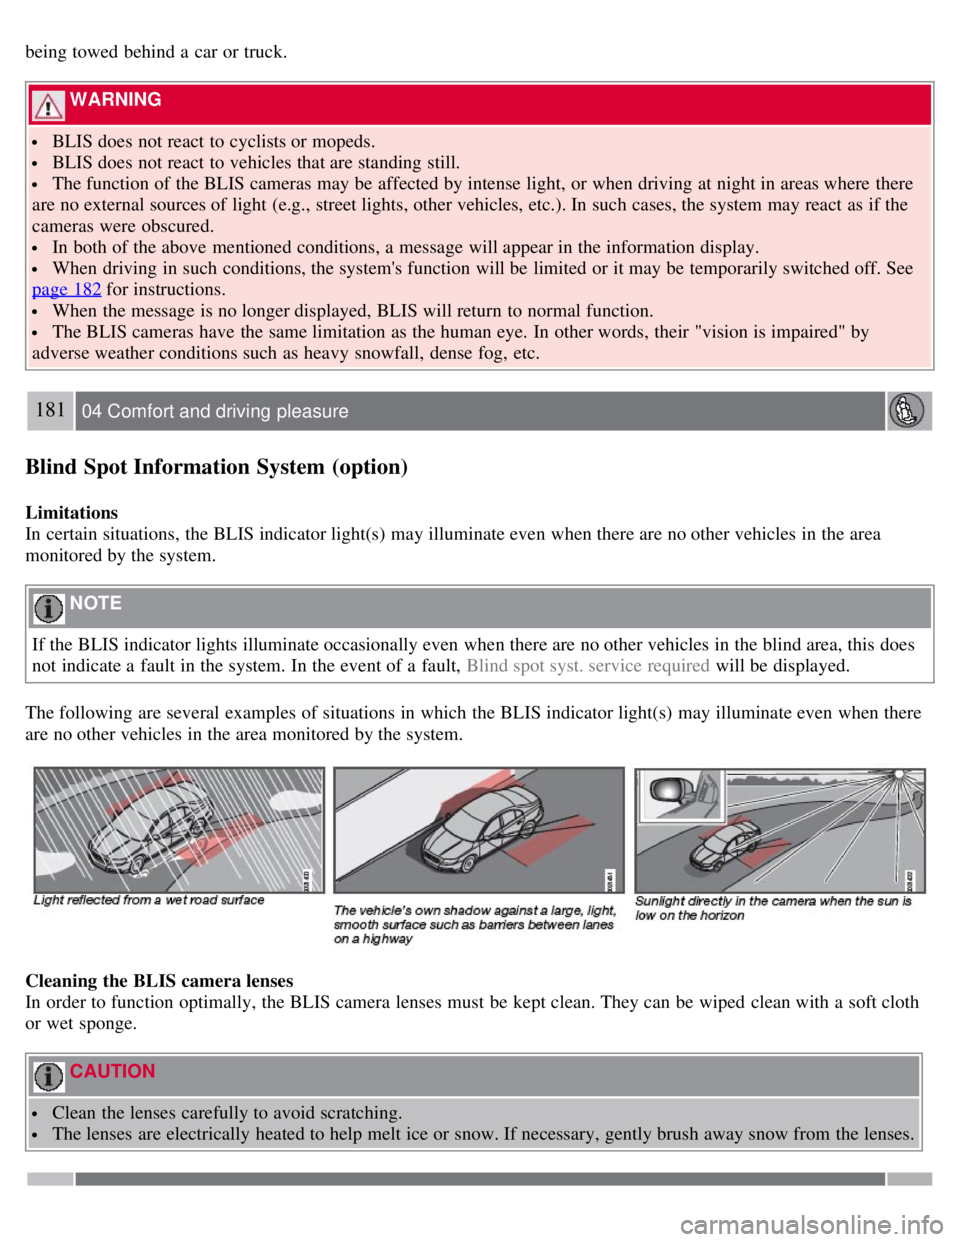
In certain situations, the BLIS indicator light(s) may illuminate even when there are no other vehicles in the area
monitored by the system.
NOTE
If the BLIS indicator lights illuminate occasionally even when there are no other vehicles in the blind area, this does
not indicate a fault in the system. In the event of a fault, Blind spot syst. service required will be displayed.
The following are several examples of situations in which the BLIS indicator light(s) may illuminate even when there
are no other vehicles in the area monitored by the system.
Cleaning the BLIS camera lenses
In order to function optimally, the BLIS camera lenses must be kept clean. They can be wiped clean with a soft cloth
or wet sponge.
CAUTION
Clean the lenses carefully to avoid scratching.
The lenses are electrically heated to help melt ice or snow. If necessary, gently brush away snow from the lenses.
Page 182 of 275

2 0 0 8
VOLVO S80
186 05 During your trip
Driving recommendations 188
Refueling192
Loading198
Towing a trailer201
Emergency towing204
187 05 During your trip
188 05 During your trip
Driving recommendations
General information
Economical driving conserves natural resources
Better driving economy may be obtained by thinking ahead, avoiding rapid starts and stops and adjusting the speed of
your vehicle to immediate traffic conditions.
Observe the following rules:
Bring the engine to normal operating temperature as soon as possible by driving with a light foot on the accelerator
pedal for the first few minutes of operation. A cold engine uses more fuel and is subject to increased wear.
Whenever possible, avoid using the vehicle for driving short distances. This does not allow the engine to reach
normal operating temperature.
Drive carefully and avoid rapid acceleration and hard braking.
Use the transmission's Drive ( D) position as often as possible and avoid using kickdown.
Do not exceed posted speed limits.
Avoid carrying unnecessary items (extra load) in the vehicle.
Maintain correct tire pressure. Check tire pressure regularly (when tires are cold).
Remove snow tires when threat of snow or ice has ended.
Note that roof racks, ski racks, etc, increase air resistance and also fuel consumption.
Page 184 of 275

CAUTION
Engine damage will occur if water is drawn into the air cleaner.
If the vehicle is driven through water deeper than 9 in (25 cm), water may enter the differential and the
transmission. This reduces the oil's lubricating capacity and may shorten the service life of these components.
Do not allow the vehicle to stand in water up to the door sills longer than absolutely necessary. This could result
in electrical malfunctions.
If the engine has been stopped while the vehicle is in water, do not attempt to restart it. Have the vehicle towed
out of the water.
Engine and cooling system
Under special conditions, for example when driving in hilly terrain, extreme heat or with heavy loads, there is a risk
that the engine and cooling system will overheat. Proceed as follows to avoid overheating the engine.
Maintain a low speed when driving with a trailer up long, steep hills.
Do not turn the engine off immediately when stopping after a hard drive.
WARNING
The cooling fan may start or continue to operate (for up to 6 minutes) after the engine has been switched off.
Remove any auxiliary lights from in front of the grille when driving in hot weather conditions.
Do not exceed engine speeds of 4500 rpm if driving with a trailer in hilly terrain. The oil temperature could become
too high.
Conserving electrical current
Keep the following in mind to help minimize battery drain:
When the engine is not running, avoid using ignition mode II . Many electrical systems (the audio system, the
optional navigation system, power windows, etc) will function in ignition modes 0 and I . These modes reduce drain on
the battery.
Please keep in mind that using systems, accessories, etc., that consume a great deal of current when the engine is not
running could result in the battery being completely drained.
The optional 12 volt socket in the trunk provides electrical current even with the ignition switched off, which drains
the battery.
190 05 During your trip
Driving recommendations
Before a long distance trip
It is always worthwhile to have your vehicle checked by a trained and qualified Volvo service technician before
driving long distances. Your retailer will also be able to supply you with bulbs, fuses, spark plugs and wiper blades for
your use in the event that problems occur.
As a minimum, the following items should be checked before any long trip:
Check that engine runs smoothly and that fuel consumption is normal.
Check for fuel, oil, and fluid leakage
Have the transmission oil level checked.
Check condition of drive belts.
Check state of the battery's charge.
Page 187 of 275

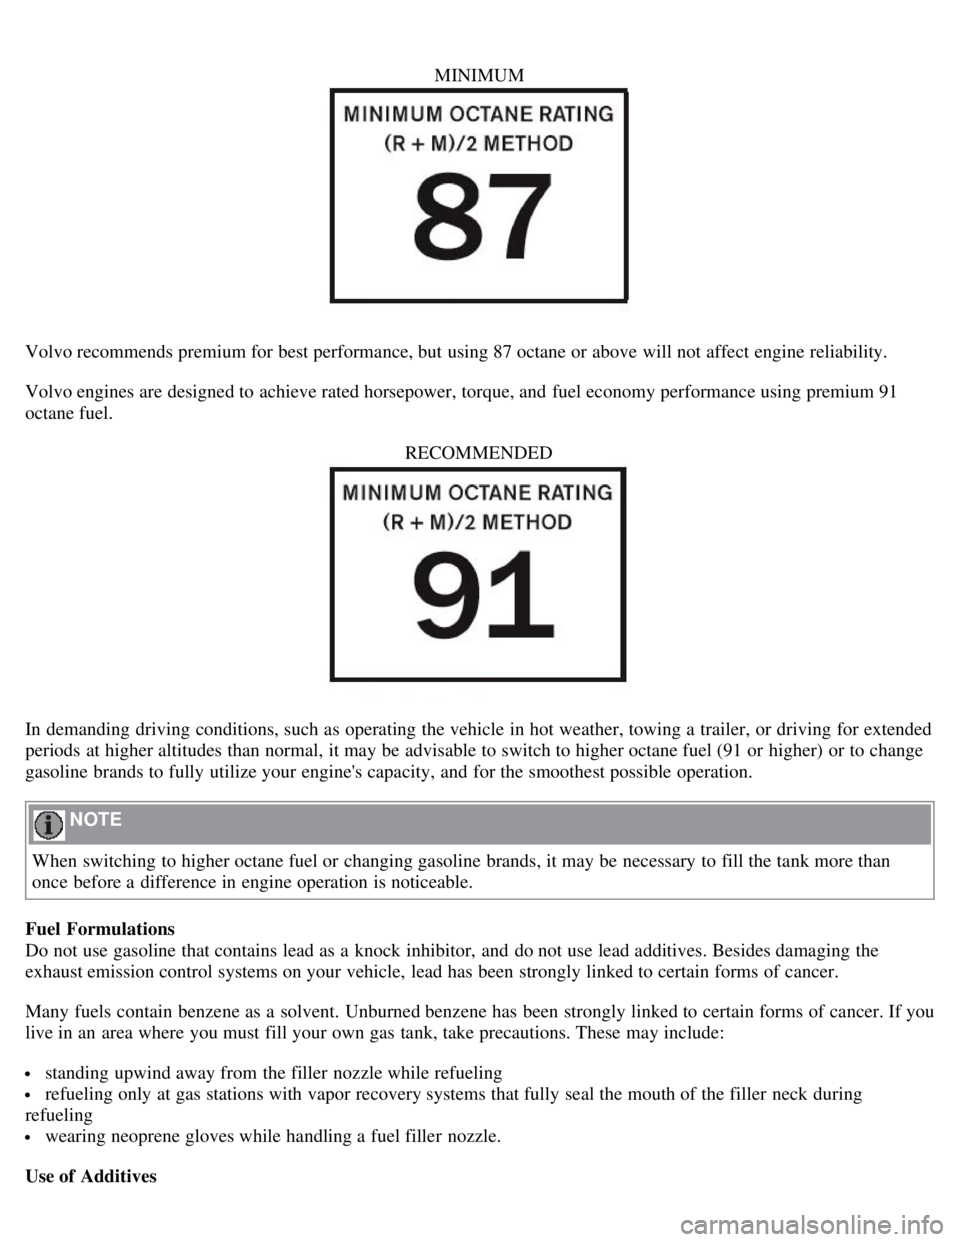
MINIMUM
Volvo recommends premium for best performance, but using 87 octane or above will not affect engine reliability.
Volvo engines are designed to achieve rated horsepower, torque, and fuel economy performance using premium 91
octane fuel.RECOMMENDED
In demanding driving conditions, such as operating the vehicle in hot weather, towing a trailer, or driving for extended
periods at higher altitudes than normal, it may be advisable to switch to higher octane fuel (91 or higher) or to change
gasoline brands to fully utilize your engine's capacity, and for the smoothest possible operation.
NOTE
When switching to higher octane fuel or changing gasoline brands, it may be necessary to fill the tank more than
once before a difference in engine operation is noticeable.
Fuel Formulations
Do not use gasoline that contains lead as a knock inhibitor, and do not use lead additives. Besides damaging the
exhaust emission control systems on your vehicle, lead has been strongly linked to certain forms of cancer.
Many fuels contain benzene as a solvent. Unburned benzene has been strongly linked to certain forms of cancer. If you
live in an area where you must fill your own gas tank, take precautions. These may include:
standing upwind away from the filler nozzle while refueling
refueling only at gas stations with vapor recovery systems that fully seal the mouth of the filler neck during
refueling
wearing neoprene gloves while handling a fuel filler nozzle.
Use of Additives
Page 194 of 275

201 05 During your trip
Towing a trailer
Introduction
Volvo recommends the use of Volvo trailer hitches that are specially designed for the vehicle.
NOTE
See page 270
for the maximum trailer and tongue weights recommended by Volvo.
Observe the legal requirements of the state/province in which the vehicles are
All Volvo models are equipped with energy- absorbing shock-mounted bumpers. Trailer hitch installation should
not interfere with the proper operation of this bumper system.
Trailer towing does not normally present any particular problems, but take into consideration:
Increase tire pressure to recommended full. See the tire inflation tables on pages 240 and 241.
When your vehicle is new, avoid towing heavy trailers during the first 620 miles (1,000 km).
Maximum speed when towing a trailer: 50 mph (80 km/h).
Engine and transmission are subject to increased loads. Therefore, engine coolant temperature should be closely
watched when driving in hot climates or hilly terrain. Use a lower gear and turn off the air conditioner if the
temperature gauge needle enters the red range.
If the automatic transmission begins to overheat, a message will be displayed in the text window.
Avoid overload and other abusive operation.
Hauling a trailer affects handling, durability, and economy.
It is necessary to balance trailer brakes with the towing vehicle brakes to provide a safe stop (check and observe
state/local regulations).
Do not connect the trailer's brake system directly to the vehicle's brake system.
More frequent vehicle maintenance is required.
Remove the ball and drawbar assembly when the hitch is not being used.
Volvo recommends the use of synthetic engine oil when towing a trailer over long distances or in mountainous
areas.
WARNING
Bumper-attached trailer hitches must not be used on Volvos, nor should safety chains be attached to the bumper.
Trailer hitches attaching to the vehicle rear axle must not be used.
Never connect a trailer's hydraulic brake system directly to the vehicle brake system, nor a trailer's lighting system
directly to the vehicle lighting system. Consult your nearest authorized Volvo retailer for correct installation.
When towing a trailer, the trailer's safety wire must be correctly fastened to the hole or hook provided in the
trailer hitch on the vehicle. The safety wire should never be fastened to or wound around the drawbar ball.
202 05 During your trip
Towing a trailer
NOTE
Page 195 of 275

When parking the vehicle with a trailer on a hill, apply the parking brake before putting the gear selector in P.
Always follow the trailer manufacturer's recommendations for wheel chocking.
When starting on a hill, put the gear selector in D before releasing the parking brake. See also page 117 for more
detailed information about starting off on a hill while towing a trailer.
If you use the manual (Geartronic) shift positions while towing a trailer, make sure the gear you select does not
put too much strain on the engine (using too high a gear).
The drawbar assembly/trailer hitch may be rated for trailers heavier than the vehicle is designed to tow. Please
adhere to Volvo's recommended trailer weights.
Avoid driving with a trailer on inclines of more than 15 %.
Trailer cable
An adapter is required if the vehicle's trailer hitch has a 13-pin connector and the trailer has 7 pins. Use an adapter
cable approved by Volvo. Make sure the cable does not drag on the ground.
203 05 During your trip
Towing a trailer
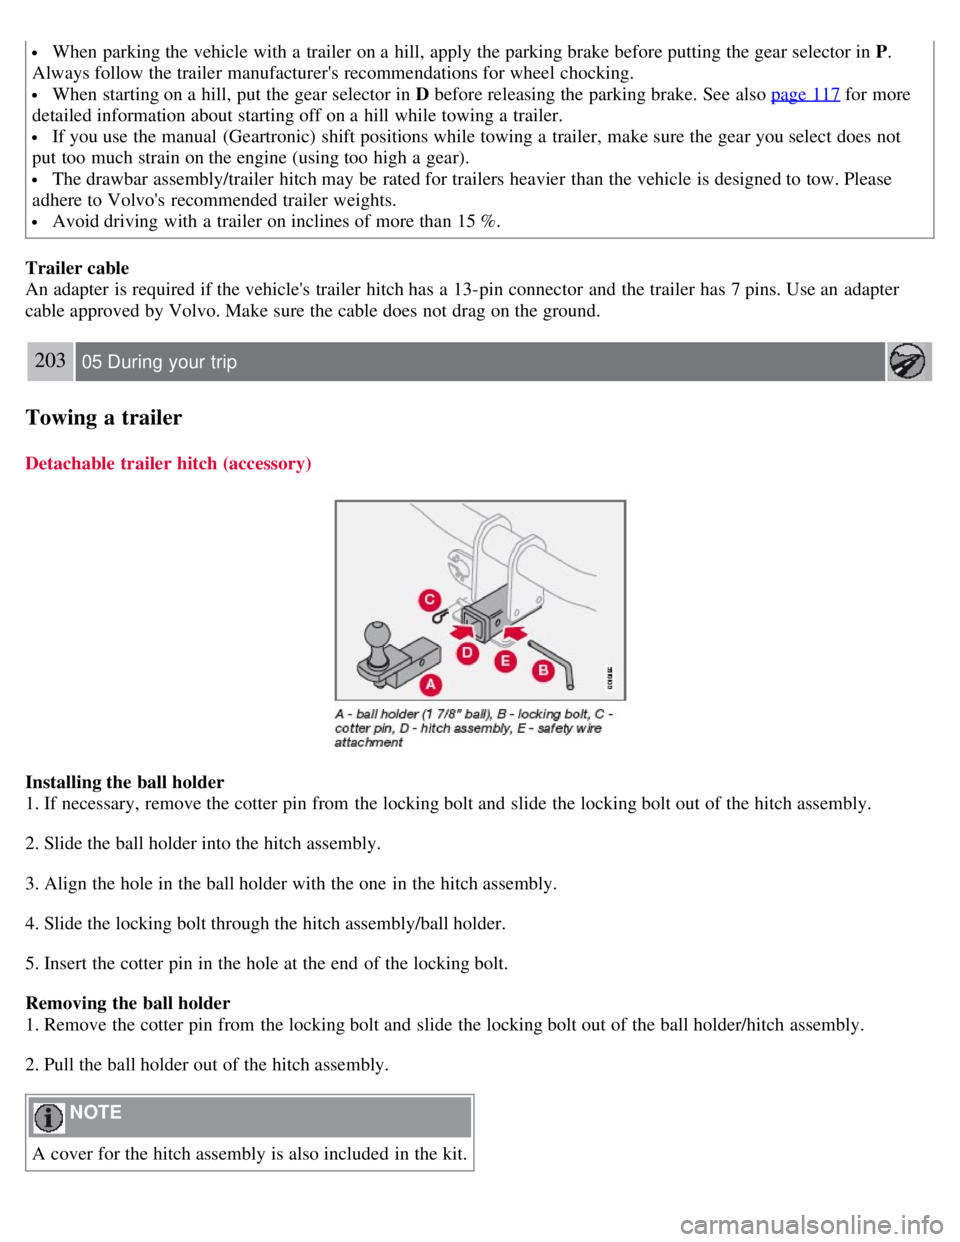
Detachable trailer hitch (accessory)
Installing the ball holder
1. If necessary, remove the cotter pin from the locking bolt and slide the locking bolt out of the hitch assembly.
2. Slide the ball holder into the hitch assembly.
3. Align the hole in the ball holder with the one in the hitch assembly.
4. Slide the locking bolt through the hitch assembly/ball holder.
5. Insert the cotter pin in the hole at the end of the locking bolt.
Removing the ball holder
1. Remove the cotter pin from the locking bolt and slide the locking bolt out of the ball holder/hitch assembly.
2. Pull the ball holder out of the hitch assembly.
NOTE
A cover for the hitch assembly is also included in the kit.