2008 VOLVO S80 display
[x] Cancel search: displayPage 77 of 275
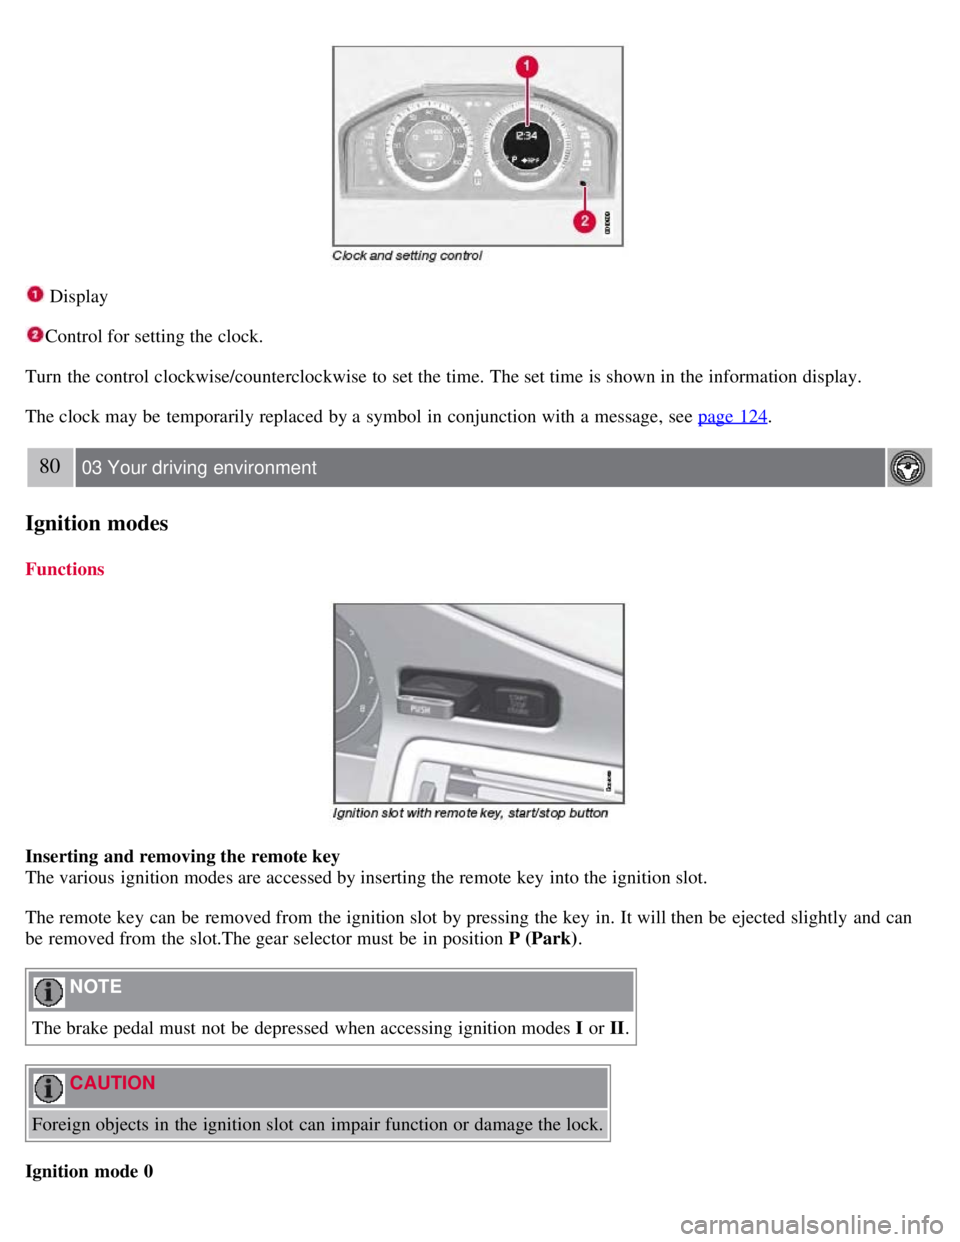
Display
Control for setting the clock.
Turn the control clockwise/counterclockwise to set the time. The set time is shown in the information display.
The clock may be temporarily replaced by a symbol in conjunction with a message, see page 124
.
80 03 Your driving environment
Ignition modes
Functions
Inserting and removing the remote key
The various ignition modes are accessed by inserting the remote key into the ignition slot.
The remote key can be removed from the ignition slot by pressing the key in. It will then be ejected slightly and can
be removed from the slot.The gear selector must be in position P (Park) .
NOTE
The brake pedal must not be depressed when accessing ignition modes I or II.
CAUTION
Foreign objects in the ignition slot can impair function or damage the lock.
Ignition mode 0
Page 86 of 275
Lighting
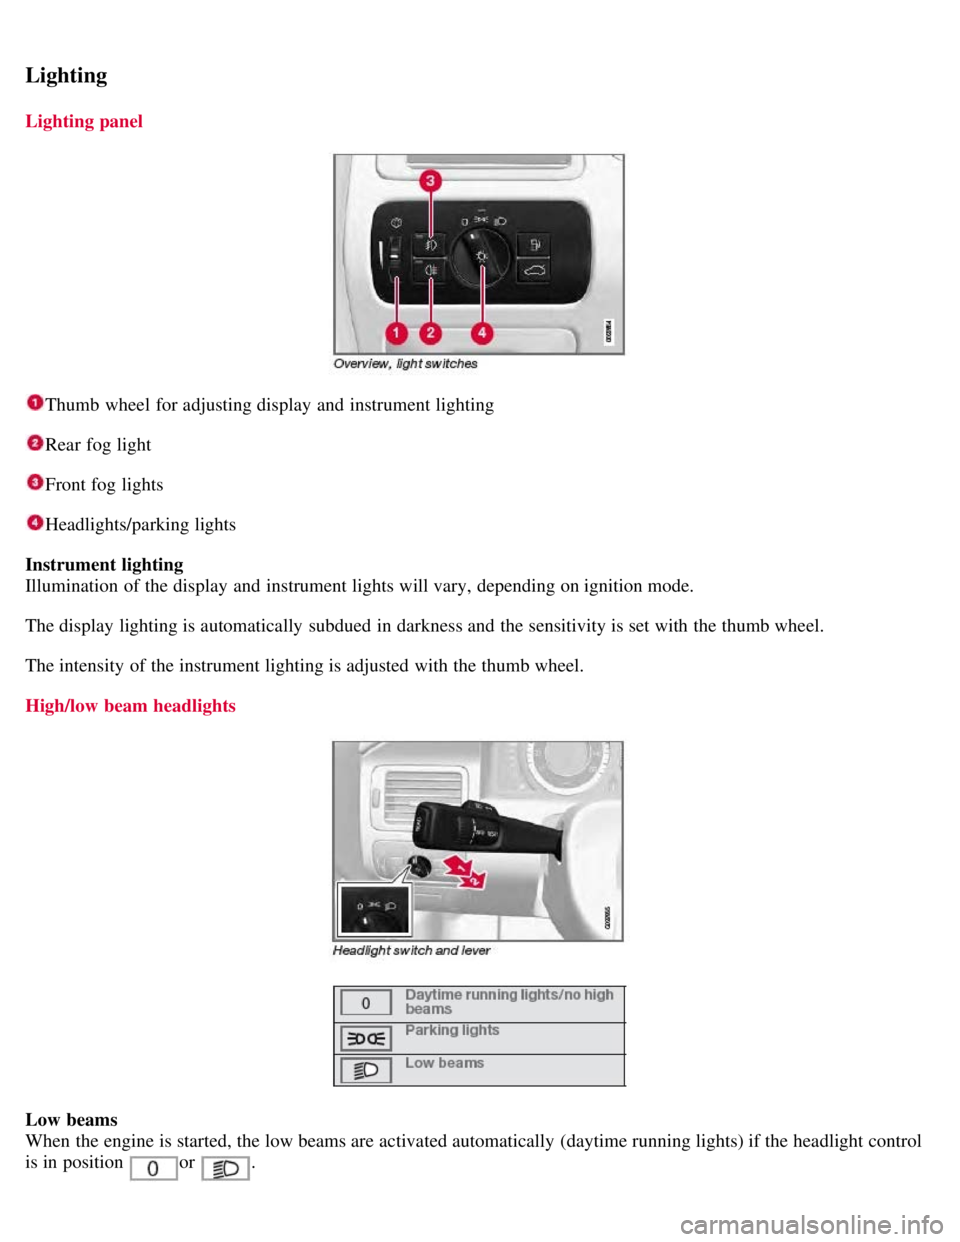
Lighting panel
Thumb wheel for adjusting display and instrument lighting
Rear fog light
Front fog lights
Headlights/parking lights
Instrument lighting
Illumination of the display and instrument lights will vary, depending on ignition mode.
The display lighting is automatically subdued in darkness and the sensitivity is set with the thumb wheel.
The intensity of the instrument lighting is adjusted with the thumb wheel.
High/low beam headlights
Low beams
When the engine is started, the low beams are activated automatically (daytime running lights) if the headlight control
is in position
or .
Page 108 of 275

Do not connect the jumper cable to any part of the fuel system or to any moving parts. Avoid touching hot
manifolds.
Batteries generate hydrogen gas, which is flammable and explosive.
Battery fluid contains sulfuric acid. Do not allow battery fluid to contact eyes, skin, fabrics or painted surfaces. If
contact occurs, flush the affected area immediately with water. Obtain medical help immediately if eyes are affected.
Never expose the battery to open flame or electric spark.
Do not smoke near the battery.
Failure to follow the instructions for jump starting can lead to injury.
110 03 Your driving environment
Transmission
Automatic transmission
Depress the button on the front of the gear selector knob to move the gear selector between the R , N, D, and P
positions.
The gear selector can be moved freely between the Geartronic (manual shifting) and Drive ( D) positions while driving.
Park position (P)
Select the P position when starting or parking.
1The information display (see page 74) shows the gear selector's position or the selected gear by displaying the following: P, R, N, D, 1, 2, 3, 4, 5,
or 6.
Keylock
To remove the remote key from the ignition slot, the gear selector must be in the P position. The remote key is locked
in the slot in all other positions.
Shiftlock
When P has been selected, the transmission is mechanically blocked in this position. The brake pedal must be
depressed before the gear lever can be moved from the P position.
Always apply the parking brake when the vehicle is parked, see page 116
. If the vehicle is equipped with the optional
electric parking brake, press the control to apply the brake, see page 116
.
CAUTION
Page 111 of 275
NOTE
Press the brake pedal hard and maintain pressure on the pedal - do not pump the brakes.
WARNING
If the fluid level is below the MIN mark in the reservoir or if a brake system message is shown in the information
display: DO NOT DRIVE. Have the vehicle towed to a trained and qualified Volvo service technician and have the
brake system inspected.
Power brakes function only when the engine is running
The power brakes utilize vacuum pressure which is only created when the engine is running. Never let the vehicle roll
to a stop with the engine switched off.
If the power brakes are not working, the brake pedal must be pressed approximately five times harder than usual to
make up for the lack of power assistance. This can happen for example when towing your vehicle or if the engine is
switched off when the vehicle is rolling. The brake pedal feels harder than usual.
Water on brake discs and brake pads affects braking
Driving in rain and slush or passing through an automatic car wash can cause water to collect on the brake discs and
pads. This will cause a delay in braking effect when the pedal is depressed. To avoid such a delay when the brakes are
needed, depress the pedal occasionally when driving through rain, slush, etc. This will remove the water from the
brakes. Check that brake application feels normal. This should also be done after washing or starting in very damp or
cold weather.
Severe strain on the brake system
The brakes will be subject to severe strain when driving in mountains or hilly areas, or when towing a trailer. Vehicle
speed is usually slower, which means that the cooling of the brakes is less efficient than when driving on level roads.
To reduce the strain on the brakes, shift into a lower gear and let the engine help with the braking. Do not forget that if
you are towing a trailer, the brakes will be subjected to a greater than normal load.
Anti-lock braking system
The Anti-lock Braking System (ABS) helps to improve vehicle control (stopping and steering) during severe braking
conditions by limiting brake lockup. When the system "senses" impending lockup, braking pressure is automatically
modulated in order to help prevent lockup that could lead to a skid.
The system performs a self -diagnostic test when the engine is started and when the vehicle first reaches a speed of
approximately 12 mph (20 km/h). The brake pedal will pulsate several times and a sound may be audible from the
ABS control module. This is normal.
114 03 Your driving environment
Brakes
Cleaning the brake discs
Coatings of dirt and water on the brake discs may result in delayed brake function. This delay is minimized by
cleaning the brake linings.
Cleaning the brake pads is advisable in wet weather, prior to long-term parking, and after the vehicle has been washed.
Do this by braking gently for a short period while the vehicle is moving.
Emergency Brake Assistance
Page 112 of 275
EBA is designed to provide full brake effect immediately in the event of sudden, hard braking. The system is activated
by the speed with which the brake pedal is depressed.
When the EBA system is activated, the brake pedal will go down and pressure in the brake system immediately
increases to the maximum level. Maintain full pressure on the brake pedal in order to utilize the system completely.
EBA is automatically deactivated when the brake pedal is released.
NOTE
When the EBA system is activated, the brake pedal will go down and pressure in the brake system immediately
increases to the maximum level. You must maintain full pressure on the brake pedal in order to utilize the system
completely. There will be no braking effect if the pedal is released. EBA is automatically deactivated when the brake
pedal is released.
When the vehicle has been parked for some time, the brake pedal may sink more than usual when the engine is
started. This is normal and the pedal will return to its usual position when it is released.
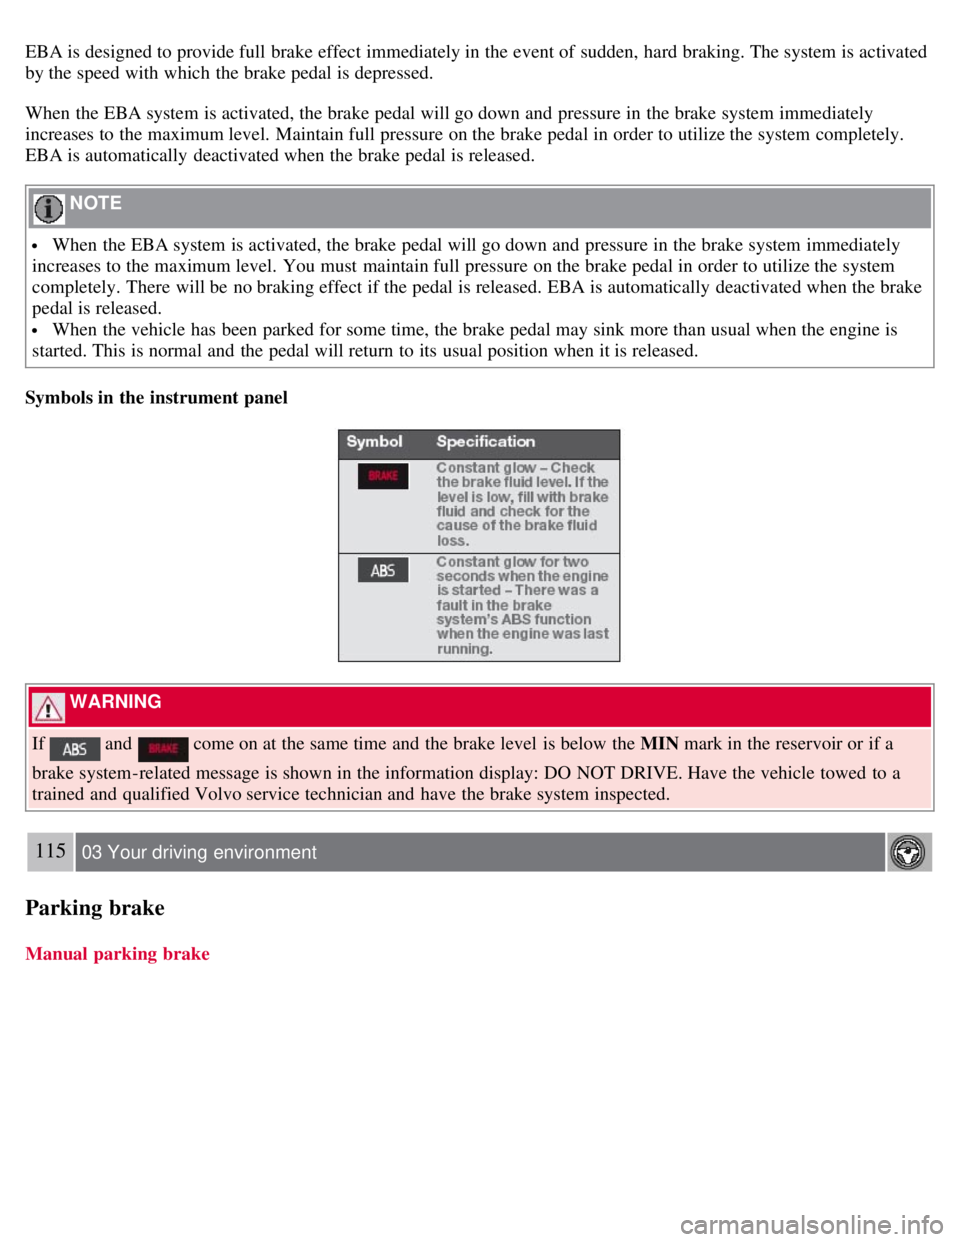
Symbols in the instrument panel
WARNING
If
and come on at the same time and the brake level is below the MIN mark in the reservoir or if a
brake system-related message is shown in the information display: DO NOT DRIVE. Have the vehicle towed to a
trained and qualified Volvo service technician and have the brake system inspected.
115 03 Your driving environment
Parking brake
Manual parking brake
Page 118 of 275
2 0 0 8
VOLVO S80
120 04 Comfort and driving pleasure
Menus and messages 122
Climate system126
Audio system134
Trip computer147
Compass149
Stability system151
Active chassis system-Four C153
Cruise control154
Adaptive Cruise Control-ACC156
Distance Alert163
Collision Warning with Auto-brake (option)166
Driver Alert System -option171
Park assist (option)176
Blind Spot Information System (option)179
Passenger compartment convenience183
121 04 Comfort and driving pleasure
122 04 Comfort and driving pleasure
Menus and messages
Center console
Certain functions are controlled from the center console via the menu system or from the optional keypad in the
steering wheel. Each function is described under its respective section.
The current menu level is shown at the top right of display in the center console.
Page 122 of 275
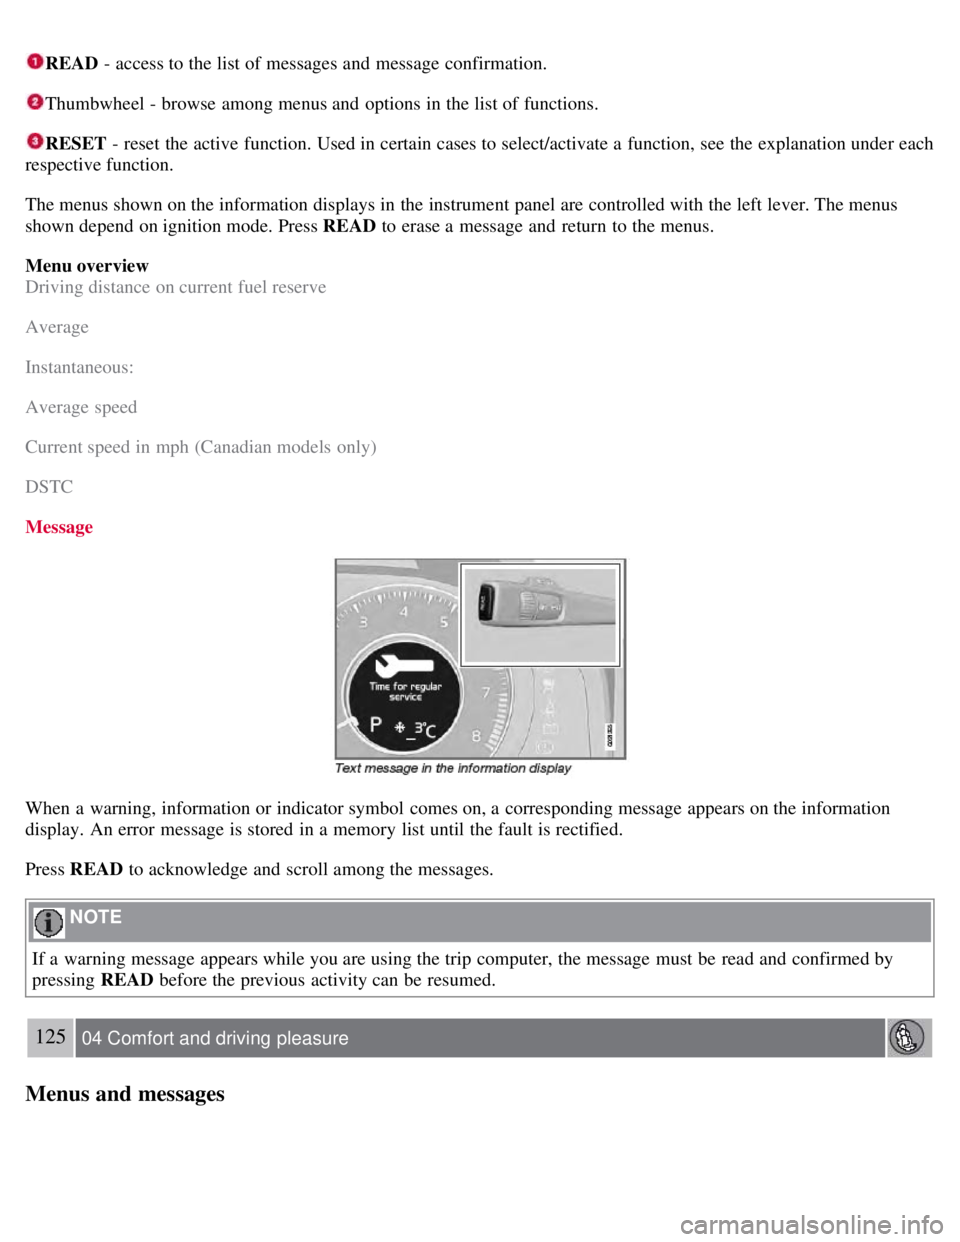
READ - access to the list of messages and message confirmation.
Thumbwheel - browse among menus and options in the list of functions.
RESET - reset the active function. Used in certain cases to select/activate a function, see the explanation under each
respective function.
The menus shown on the information displays in the instrument panel are controlled with the left lever. The menus
shown depend on ignition mode. Press READ to erase a message and return to the menus.
Menu overview
Driving distance on current fuel reserve
Average
Instantaneous:
Average speed
Current speed in mph (Canadian models only)
DSTC
Message
When a warning, information or indicator symbol comes on, a corresponding message appears on the information
display. An error message is stored in a memory list until the fault is rectified.
Press READ to acknowledge and scroll among the messages.
NOTE
If a warning message appears while you are using the trip computer, the message must be read and confirmed by
pressing READ before the previous activity can be resumed.
125 04 Comfort and driving pleasure
Menus and messages
Page 129 of 275

The function automatically regulates cooling, heating, blower speed, recirculation, and air distribution to maintain the
chosen temperature. If you select one or more manual functions, the other functions continue to be controlled
automatically. The air quality sensor is engaged and all manual settings are switched off when AUTO is pressed. The
display shows AUTO CLIMATE.
Blower speed in automatic mode can be set under Climate settings
Automatic blower adjust . Choose between Low,
Normal or High.
NOTE
Selecting the lowest blower speed may increases the risk of fog forming on the windows.
For a description of the menu system, see page 123
.
Temperature control
The temperatures on the driver and passenger sides can be set independently. When the vehicle is started, the most
recent setting is resumed.
NOTE
Heating or cooling cannot be speeded up by selecting a higher/lower temperature than the actual temperature
required.
A/C - ON/OFF
The air conditioning is controlled automatically by the system when the ON light is on. This cools/heats and
dehumidifies the incoming air. When the OFF light is on, the air conditioning is always disengaged. Other functions
are still controlled automatically. When defroster is selected, the air conditioning system is set for maximum blower
speed and dehumidification.
131 04 Comfort and driving pleasure
Climate system
Defroster
This function defrosts/deices the windshield and front side windows. The indicator light in the defroster button lights
when the function is active.
Blower speed increases automatically and the air conditioning will switch on (if not already on and if the passenger
compartment blower is not turned off) to dehumidify the air in the passenger compartment. Air conditioning can be
switched off by pressing the AC button.
Recirculation will not function while defrost is engaged.
The climate system will return to its previous settings when the defroster function is switched off.