Page 2 of 239

In Canada: Volvo Cars of Canada Corp.
National Customer Service
175 Gordon Baker Road
North York, Ontario M2H 2N7
1-800-663-8255
www.volvocanada.com
2007 © Volvo Car Corporation. All rights reserved.
2 Contents
00 Introduction
General information 6
Volvo and the environment7
Important warnings8
01 Safety
Occupant safety 12
Seat belts14
Supplemental Restraint System17
Front airbags18
Occupant Weight Sensor (OWS)21
Side impact protection airbags24
Volvo Inflatable Curtain (VIC)25
Whiplash Protection System27
Crash mode29
Child safety30
Child restraint systems33
Infant seats35
Convertible seats37
Booster cushions40
ISOFIX lower anchors41
Top tether anchors42
Child restraint registration and
recalls43
02 Instruments and controls
Instrument overview
46
Instrument panel49
Indicator and warning symbols51
Symbols - instrument panel53
Information display56
12-volt sockets58
Lighting panel59
Left-side steering wheel lever62
Trip computer63
Cruise control65
Right-side steering wheel lever67
Rain sensor68
Steering wheel adjustment, Hazard
warning flashers69
Parking brake
70
Power windows71
Mirrors73
Power moonroof (option)75
ProCarManuals.com
Page 39 of 239
2 0 0 8
VOLVO S40
44 02 Instruments and controls
Instrument overview 46
Instrument panel49
Indicator and warning symbols51
Symbols - instrument panel53
Information display56
12-volt sockets58
Lighting panel59
Left-side steering wheel lever62
Trip computer63
Cruise control65
Right-side steering wheel lever67
Rain sensor68
Steering wheel adjustment, Hazard warning flashers69
Parking brake70
Power windows71
Mirrors73
Power moonroof (option)75
Personal settings77
HomeLink® Universal Transceiver (option)80
45 02 Instruments and controls
46 02 Instruments and controls
Instrument overview
ProCarManuals.com
Page 41 of 239
21. Seat belt reminder and Occupant Weight Sensor indicator54
22. Rear-view mirror73
23. Display for climate control, personal settings,and audio system77/230
24. Audio system 230
25. Controls for personal settings and audio system77/230
26. Controls for climate system 89/92
27. Gear selector, manual 139 -140
Gear selector, automatic141
28. Hazard warning flashers69
29. Door open handle, and locking button122
30. Glove compartment104/123
31. Parking brake 70
32. 12-volt socket58
33. Not in use
34. Not in use
48 02 Instruments and controls
Instrument overview
Control panel in driver's door
1. Lockout switch for rear windows71
2. Power windows71
3. Door mirror button, driver's side74
4. Door mirror adjustment control74
5. Door mirror button, passenger's side74
49 02 Instruments and controls
Instrument panel
Instrument panel
ProCarManuals.com
Page 43 of 239

14. Indicator and warning symbols
51 02 Instruments and controls
Indicator and warning symbols
Function check
The indicator and warning symbols
1 light up when you turn the ignition key or the optional keyless drive start control
to the driving position (position II) before starting. This shows that the symbols are functioning.
When the engine starts, all symbols go out. If the engine is not started within 5 seconds, all of the symbols
except CHECK ENGINE and will go out. Certain symbols may not have their functions illustrated, depending on the
car's equipment.
The PARK BRAKE symbol will not go out until the parking brake has been released.
1On certain engines, the symbol for low oil pressure is not used. Instead, a text warning is provided in the information display, see also page 206.
Symbols in the center of the instrument panel
Warning symbol
The red warning symbol lights up to indicate a fault that could affect the car's drivability. This symbol illuminates
when the vehicle is traveling at speeds above 5 mph (7 km/h). A text explaining the nature of the fault will also be
shown in the information display. The symbol and accompanying text will remain on until the fault has been corrected.
This symbol may also light up in combination with other indicator or warning symbols.
If the red warning symbol lights up:
1. Stop the car as soon as possible in a suitable location.
2. Read the message in the information display.
3. Follow the instructions provided, or contact a trained and qualified Volvo service technician. Erase the message by
pressing READ (see page 56
).
ProCarManuals.com
Page 46 of 239

1. Turn signal indicator for trailer (certain models)
If you are towing a trailer, this light will flash simultaneously with the turn signals on the trailer. If the light does not
flash when signaling, one of the turn signals on the trailer or on the car are not functioning properly.
2. Parking brake applied
This light is on when the parking brake (hand brake) is applied. The parking brake lever is situated between the front
seats. See page 70
for more information.
NOTE
Canadian models are equipped with the second symbol.
3. SRS system warning light
If this light comes on while the car is being driven, or remains on for longer than approximately 10 seconds after the
car has been started, the SRS system's diagnostic functions have detected a fault in a seat belt lock or pretensioner, a
front airbag, side impact airbag, and/or an inflatable curtain. Have the system(s) inspected by a trained and qualified
Volvo service technician as soon as possible.
4. Oil pressure warning light1
If the light comes on while driving, the car, stop the engine immediately, and check the engine oil level. If the oil level
is normal and the light stays on after restart, have the car towed to the nearest trained and qualified Volvo service
technician. After hard driving, the light may come on occasionally when the engine is idling. This is normal, provided
it goes off when the engine speed is increased.
5. Seat belt reminder
This symbol (and the seat belt reminder light above the rear view mirror) will light up if either front seat occupant has
not buckled his/her seat belt. If the car is not moving, the symbols will go out after approximately 6 seconds.
ProCarManuals.com
Page 52 of 239

NOTE
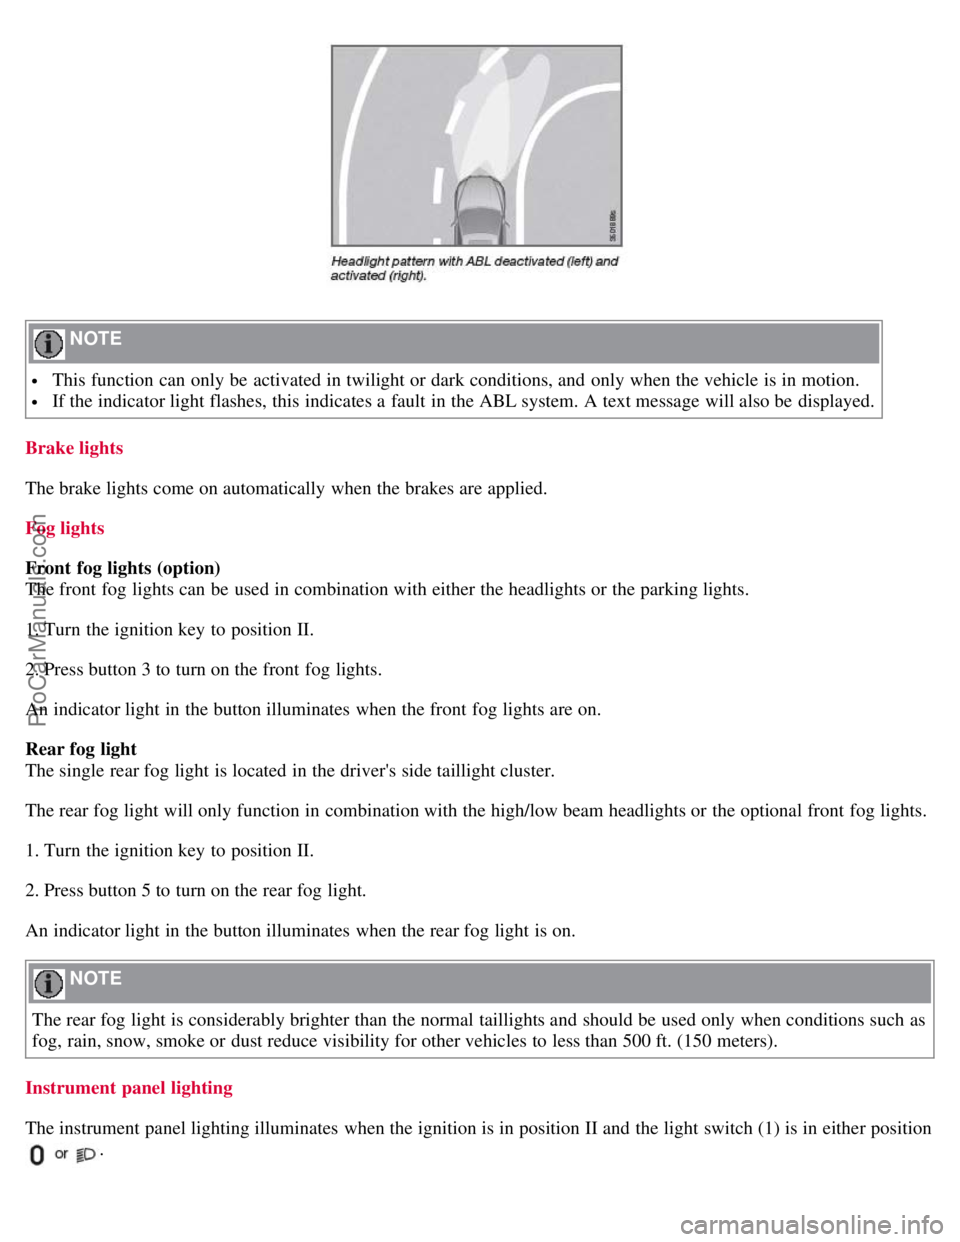
This function can only be activated in twilight or dark conditions, and only when the vehicle is in motion.
If the indicator light flashes, this indicates a fault in the ABL system. A text message will also be displayed.
Brake lights
The brake lights come on automatically when the brakes are applied.
Fog lights
Front fog lights (option)
The front fog lights can be used in combination with either the headlights or the parking lights.
1. Turn the ignition key to position II.
2. Press button 3 to turn on the front fog lights.
An indicator light in the button illuminates when the front fog lights are on.
Rear fog light
The single rear fog light is located in the driver's side taillight cluster.
The rear fog light will only function in combination with the high/low beam headlights or the optional front fog lights.
1. Turn the ignition key to position II.
2. Press button 5 to turn on the rear fog light.
An indicator light in the button illuminates when the rear fog light is on.
NOTE
The rear fog light is considerably brighter than the normal taillights and should be used only when conditions such as
fog, rain, snow, smoke or dust reduce visibility for other vehicles to less than 500 ft. (150 meters).
Instrument panel lighting
The instrument panel lighting illuminates when the ignition is in position II and the light switch (1) is in either position
.
ProCarManuals.com
Page 61 of 239
2. Adjust the steering wheel to a suitable position
3. Press the lever back into place to lock the steering wheel in the new position. If necessary, press the steering wheel
slightly while pressing the lever into the locked position.
Check that the steering wheel is locked in the new position.
WARNING
Never adjust the steering wheel while driving.
Hazard warning flashers
The four-way flasher should be used to indicate that the vehicle has become a traffic hazard. To activate the flashers,
press the triangular button in the center dash. Press the button again to turn off the flashers.
NOTE
Regulations regarding the use of the hazard warning flasher may vary, depending on where you live.
The hazard warning flashers will be activated automatically if an airbag deploys.
70 02 Instruments and controls
Parking brake
Parking brake (hand brake)
ProCarManuals.com
Page 62 of 239

The parking brake lever is located between the front seats.
NOTE
The indicator light will light up even if the parking brake has only been partially applied.
When applying the parking brake
1. Press firmly on the brake pedal.
2. Pull the parking brake lever up firmly to its full extent.
3. Release the brake pedal and ensure that the vehicle is at a standstill.
4. If the vehicle rolls, the parking brake lever must be pulled more firmly.
5. When parking a vehicle always put the gear selector in first gear (for manual transmission) or P (for automatic
transmission).
Parking on a hill
If the vehicle is pointing uphill, turn the front wheels so that they point away from the curb.
If the vehicle is pointing downhill, turn the front wheels so that they point toward the curb.
Releasing the parking brake
1. Press firmly on the brake pedal.
2. Pull the lever up slightly, press the button at the end of the lever and lower the lever completely.
WARNING
Pull up the parking brake lever up firmly to its full extent.
Ashtrays/cigarette lighter
The auxiliary sockets can also be used for cigarette lighters. Ashtrays and lighters are available as accessories. Please
contact your Volvo retailer.
71 02 Instruments and controls
Power windows
Operation
ProCarManuals.com