2008 VOLVO S40 door lock
[x] Cancel search: door lockPage 111 of 239
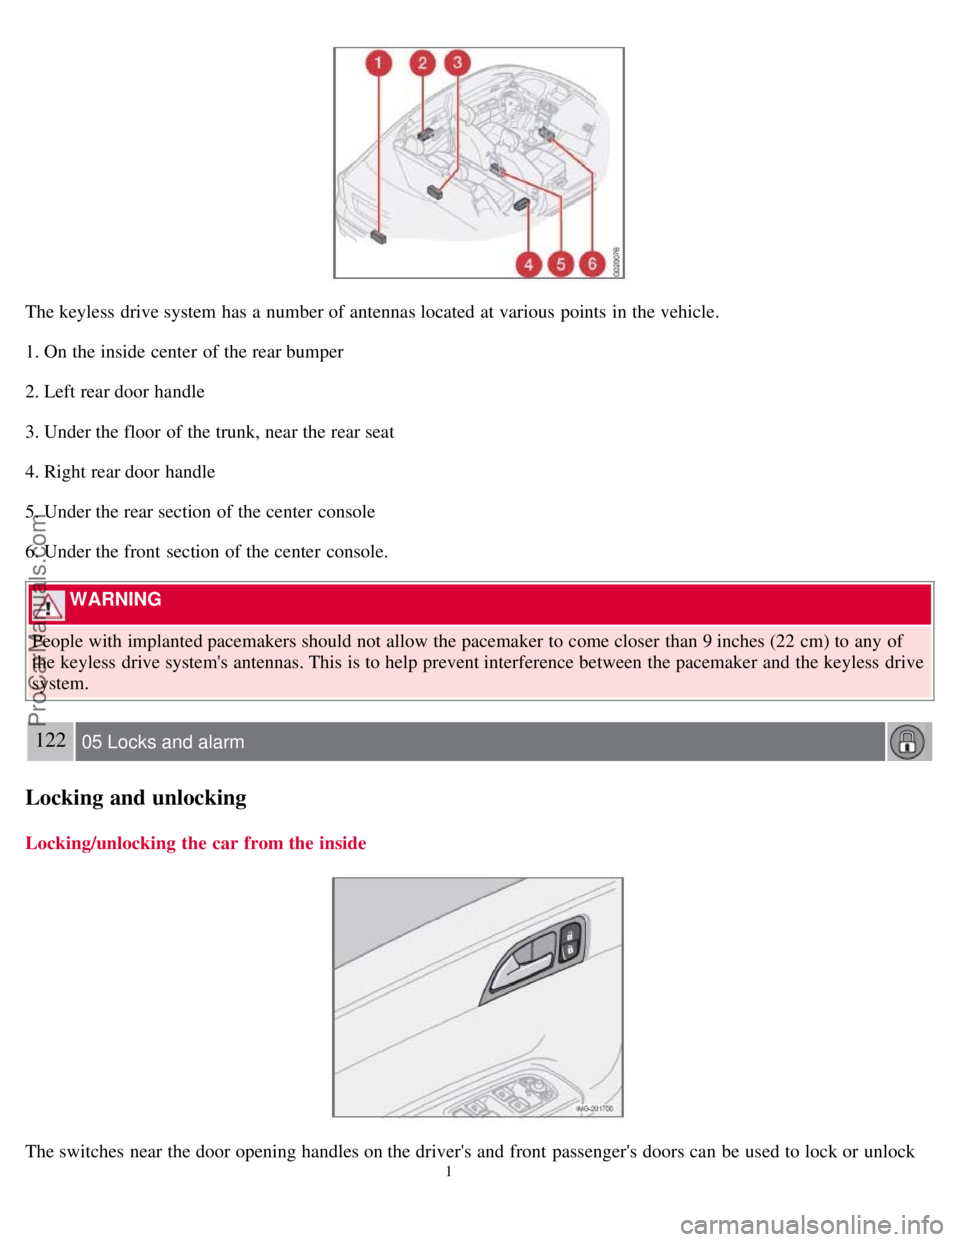
The keyless drive system has a number of antennas located at various points in the vehicle.
1. On the inside center of the rear bumper
2. Left rear door handle
3. Under the floor of the trunk, near the rear seat
4. Right rear door handle
5. Under the rear section of the center console
6. Under the front section of the center console.
WARNING
People with implanted pacemakers should not allow the pacemaker to come closer than 9 inches (22 cm) to any of
the keyless drive system's antennas. This is to help prevent interference between the pacemaker and the keyless drive
system.
122 05 Locks and alarm
Locking and unlocking
Locking/unlocking the car from the inside
The switches near the door opening handles on the driver's and front passenger's doors can be used to lock or unlock
1
ProCarManuals.com
Page 112 of 239
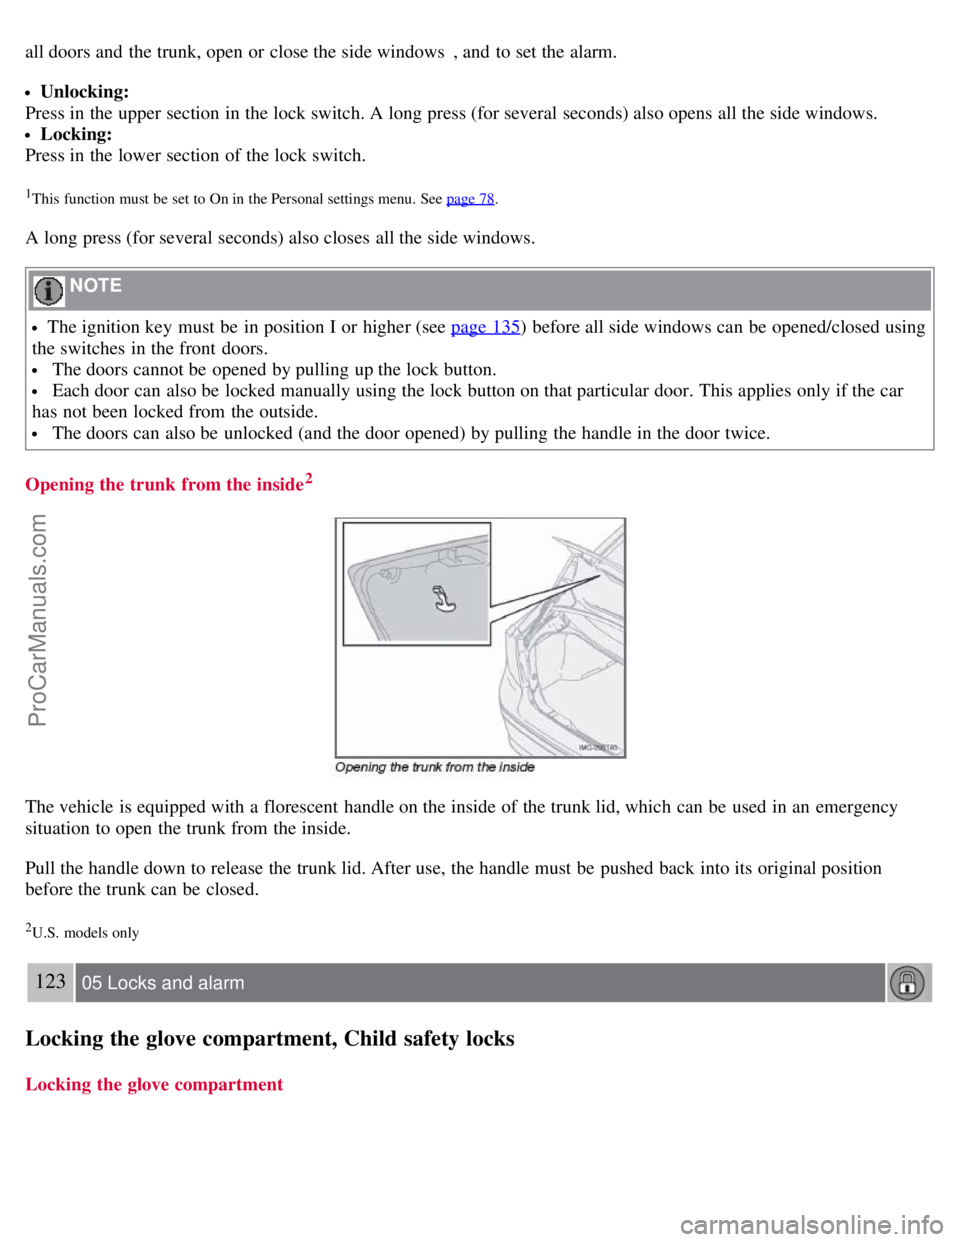
all doors and the trunk, open or close the side windows, and to set the alarm.
Unlocking:
Press in the upper section in the lock switch. A long press (for several seconds) also opens all the side windows.
Locking:
Press in the lower section of the lock switch.
1This function must be set to On in the Personal settings menu. See page 78.
A long press (for several seconds) also closes all the side windows.
NOTE
The ignition key must be in position I or higher (see page 135) before all side windows can be opened/closed using
the switches in the front doors.
The doors cannot be opened by pulling up the lock button.
Each door can also be locked manually using the lock button on that particular door. This applies only if the car
has not been locked from the outside.
The doors can also be unlocked (and the door opened) by pulling the handle in the door twice.
Opening the trunk from the inside
2
The vehicle is equipped with a florescent handle on the inside of the trunk lid, which can be used in an emergency
situation to open the trunk from the inside.
Pull the handle down to release the trunk lid. After use, the handle must be pushed back into its original position
before the trunk can be closed.
2U.S. models only
123 05 Locks and alarm
Locking the glove compartment, Child safety locks
Locking the glove compartment
ProCarManuals.com
Page 113 of 239
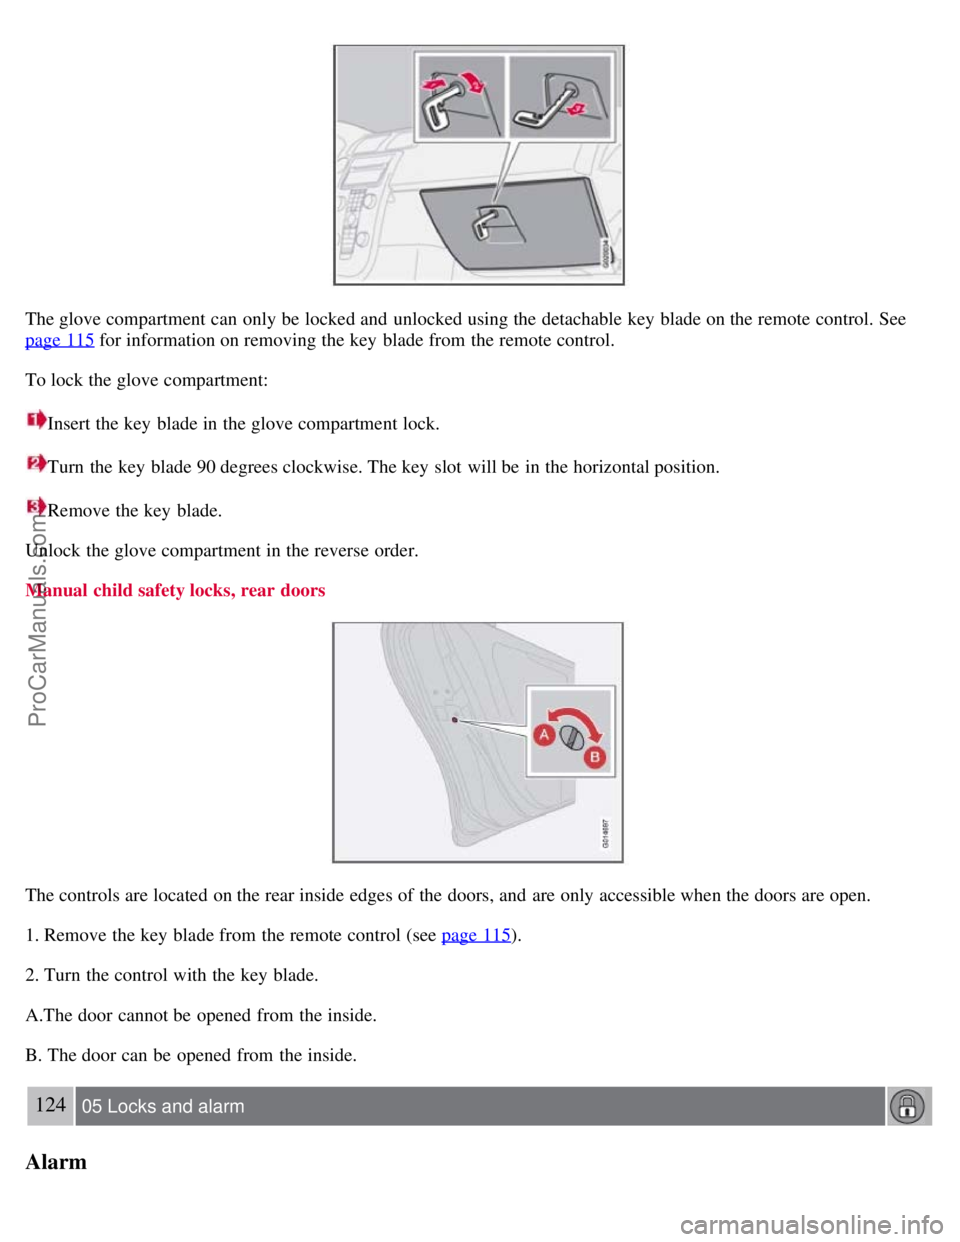
The glove compartment can only be locked and unlocked using the detachable key blade on the remote control. See
page 115
for information on removing the key blade from the remote control.
To lock the glove compartment:
Insert the key blade in the glove compartment lock.
Turn the key blade 90 degrees clockwise. The key slot will be in the horizontal position.
Remove the key blade.
Unlock the glove compartment in the reverse order.
Manual child safety locks, rear doors
The controls are located on the rear inside edges of the doors, and are only accessible when the doors are open.
1. Remove the key blade from the remote control (see page 115
).
2. Turn the control with the key blade.
A.The door cannot be opened from the inside.
B. The door can be opened from the inside.
124 05 Locks and alarm
Alarm
ProCarManuals.com
Page 114 of 239

The alarm system
The alarm is automatically armed whenever the car is locked with the remote control, or if a front lock button is
depressed.
When armed, the alarm continuously monitors a number of points on the car. The following conditions will trigger the
alarm:
The hood is forced open.
The trunk is forced open.
A door is forced open.
The ignition switch is tampered with
An attempt is made to start the car with a non-approved key (a key not coded to the car's ignition).
If there is movement in the passenger compartment (if the car is equipped with the optional movement sensor).
The car is lifted or towed (if the car is equipped with the optional inclination sensor)
The battery is disconnected (while the alarm is armed).
The siren is disconnected when the alarm is disarmed.
The alarm indicator light
The status of the alarm system is indicated by the indicator light on at the top of the dashboard (see illustration):
Indicator light off - the alarm is not armed
The indicator light flashes every two seconds - the alarm is armed
The indicator light flashes rapidly before the ignition is switched on - the alarm has been triggered. The message
"ALARM TRIGGERED, CHECK CAR" will also be displayed.
Fault in the alarm system: If a fault has been detected in the alarm system, a message will be shown in the
information display. Contact a trained and qualified Volvo service technician to have the alarm system inspected and
repaired if necessary.
Arming the alarm
Press the LOCK button on the remote control, or press the central lock button on one of the front doors with the door
open. One long flash of the turn signals will confirm that the alarm is armed.
Disarming the alarm
Press the UNLOCK button on the remote control or insert the key in the ignition
1 to disarm the alarm. Two short
flashes from the car's direction indicators confirm that the alarm has been deactivated and that all doors are unlocked.
ProCarManuals.com
Page 115 of 239

Turning off (stopping) the alarm
If the alarm is sounding, it can be stopped by pressing the UNLOCK button on the remote control or by inserting the
key in the ignition
1On vehicles with the optional keyless drive, press in the start control in the ignition switch.
125 05 Locks and alarm
Alarm
switch. The driver's door must first be unlocked with the key blade.
NOTE
On vehicles equipped with the optional keyless drive, the start control must be removed from the ignition switch
before the key can be inserted. See page 138
for instructions.
Audible/visual alarm signal
An audible alarm signal is given by a battery powered siren. The alarm cycle lasts for 30 seconds.
NOTE
The visual alarm signal is given by flashing all turn signals and turning on the interior lighting for approximately 5
minutes.
Temporarily turning off the accessory alarm sensor(s)
In certain situations it may be desirable to turn off the accessory inclination and movement alarm sensors if, for
example, you drive your vehicle onto a ferry where the rocking of the boat could trigger the alarm or if a pet is left in
the vehicle with the doors locked.
1. From position II or higher, turn the ignition key to 0 and remove it from the ignition switch
1
2. Press the button (1). The LED in the button will remain on for one minute after the key has been removed from the
ignition switch or until the car is locked.
1
ProCarManuals.com
Page 123 of 239

Check Engine Light (malfunction indicator lamp) located on your instrument panel may light. If this occurs, please
return your vehicle to a trained and qualified Volvo service technician for maintenance.
Gasoline containing alcohol and ethers
Some fuel suppliers sell gasoline containing "oxygenates" which are usually alcohols or ethers. In some areas, state or
local laws require that the service pump be marked indicating use of alcohols or ethers. However, there are areas in
which the pumps are unmarked. If you are not sure whether there is alcohol or ethers in the gasoline you buy, check
with the service station operator. To meet seasonal air quality standards, some areas require the use of "oxygenated"
fuel. Volvo allows the use of the following "oxygenated" fuels; however, the octane ratings listed on this page must
still be met.
Alcohol - Ethanol
Fuels containing up to 10% ethanol by volume may be used. Ethanol may also be referred to as Ethyl alcohol, or
"Gasohol".
Ethers - MTBE: Fuels containing up to 15% MTBE may be used.
Fuel Formulations
Do not use gasoline that contains lead as a knock inhibitor, and do not use lead additives. Besides damaging the
exhaust emission control systems on your vehicle, lead has been strongly linked to certain forms of cancer. Many fuels
contain benzene as a solvent. Unburned benzene has been strongly linked to certain forms of cancer. If you live in an
area where you must fill your own gas tank, take precautions.
These may include:
standing upwind away from the filler nozzle while refueling
refueling only at gas stations with vapor recovery systems that fully seal the mouth of the filler neck during
refueling
wearing neoprene gloves while handling a fuel filler nozzle.
WARNING
Carbon monoxide is a poisonous, colorless, and odorless gas. It is present in all exhaust gases. If you ever smell
exhaust fumes inside the vehicle, make sure the passenger compartment is ventilated, and immediately return the
vehicle to a trained and qualified Volvo service technician for correction.
Use of Additives
With the exception of fuel line antifreeze during winter months, do not add solvents, thickeners, or other store -bought
additives to your vehicle's fuel, cooling, or lubricating systems. Overuse may damage your engine, and some of these
additives contain organically volatile chemicals. Do not needlessly expose yourself to these chemicals.
Fuel filler door
Press the button on the light switch panel (see the illustration on page 59
) with the ignition switched off to unlock the
fuel filler door. Please note that the fuel filler door will remain unlocked until the vehicle begins to move forward. An
audible click will be heard when the fuel filler door relocks.
134 06 Starting and driving
Fuel requirements
ProCarManuals.com
Page 124 of 239

If you intend to leave your vehicle while it is being refueled, this feature enables you to lock the doors/trunk while
leaving the fuel filler door unlocked.
You can also keep the vehicle locked if you remain inside it during refueling. The central locking button does not lock
the fuel filler door.
Be sure the fuel filler door is not obstructed and is completely closed after refueling.
Open the fuel filler cap slowly during hot weather.
Refueling
The fuel tank is designed to accommodate possible expansion of the fuel in hot weather. See page 252
for fuel tank
volume. Be aware that the "usable" tank capacity will be somewhat less than the specified maximum. When the fuel
level is low, such factors as ambient temperature, the fuel's "Reid vapor pressure" characteristics, and terrain can affect
the fuel pump's ability to supply the engine with an adequate supply of fuel. Therefore, it is advisable to refuel as soon
as possible when the needle nears the red zone, or when the fuel warning light comes on.
CAUTION
Do not refuel with the engine running1. Turn the ignition off or to position I. If the ignition is on, an incorrect
reading could occur in the fuel gauge
After refueling, close the fuel filler cap by turning it clockwise until it clicks into place.
Avoid overfilling the fuel tank. Do not press the handle on the filler nozzle more than one extra time. Too much
fuel in the tank in hot weather conditions can cause the fuel to overflow. Overfilling could also cause damage to the
emission control systems.
Avoid spilling gasoline during refueling. In addition to causing damage to the environment, gasolines containing
alcohol can cause damage to painted surfaces, which may not be covered under the New Vehicle Limited Warranty.
Do not use gasolines containing methanol (methyl alcohol, wood alcohol). This practice can result in vehicle
performance deterioration and can damage critical parts in the fuel system. Such damage may not be covered under
the New Vehicle Limited Warranty.
1If the fuel filler cap is not closed tightly or if the engine is running when the vehicle is refueled, the Check Engine Light (malfunction indicator
lamp) may indicate a fault. However, your vehicle's performance will not be affected. Use only Volvo original or approved fuel filler caps.
135 06 Starting and driving
Ignition switch/Steering wheel lock
Ignition switch and steering wheel lock
0 - Locked position
Remove the key to lock the steering wheel
1. Never turn the key to position 0 while driving or when the vehicle is
being towed.
NOTE
A ticking sound may be audible if the key is turned to a position between 0 and I. To stop this sound, turn the key to
position II and back to position 0.
ProCarManuals.com
Page 125 of 239

I - Intermediate position2
Certain accessories, radio, etc. on, daytime running lights off.
1Automatic transmission: the gear selector must be in the Park position. The optional keyless drive start control does not need to be removed.
2Please be aware that leaving the key in this positions I or II will increase battery drain.
II - Drive position
The key's position when driving. The vehicle's entire electrical system is activated.
III - Start position
Turn the key to this position and release it immediately. The key returns automatically to the Drive position.
A chime will sound if the key is left in the ignition and the driver's door is opened (does not apply to vehicles with the
optional keyless drive).
Steering wheel lock
When the key is removed from the ignition, the steering wheel locks so that it cannot be turned.
NOTE
The steering wheel lock is activated when the driver's door is opened on vehicles with the optional keyless drive.
Releasing the steering wheel lock
If the front wheels are hard up against a curb, the steering wheel lock may be under too much tension to unlock.
If so, the key will turn in the ignition switch but the car will not start.
At the same time, a message "Steering locked turn wheel" will appear in the information display.
If this happens:
1. Remove the key
3 from the ignition.
2. Turn the steering wheel slightly and hold it to release pressure on the lock mechanism.
3. Reinsert the key and start the vehicle.
The steering should immediately unlock. If not, try again.
NOTE
ProCarManuals.com