2008 VOLVO C70 color
[x] Cancel search: colorPage 69 of 246

Programming the transceiver for the first time (U.S. residents)
1. For first time training, press and hold the two outer HomeLink buttons, releasing only when the HomeLink indicator
light begins to flash after 20 seconds. (Do not perform this step when training the additional HomeLink buttons.)
2. Position the hand -held transmitter 1-3 inches away from the HomeLink surface
74 02 Instruments and controls
HomeLink® Universal Transceiver (option)
(located on your sun visor), keeping the HomeLink indicator light in view.
3. Using both hands, simultaneously press and hold both the desired HomeLink button and hand held transmitter
button. DO NOT release until the HomeLink indicator light flashes slowly and then rapidly. When the indicator light
flashes rapidly, both buttons may be released. (The rapid flashing indicates successful training.)
NOTE
Some garage door openers may require you to replace step 3 with the "cycling" procedure noted in the
"Programming the transceiver for the first time (Canadian residents)" section.
4. Press and hold the trained HomeLink button and observe the indicator light.
If the indicator light is solid/continuous, training is complete and your device should activate when the HomeLink
button is pressed and released.
If the indicator light blinks rapidly for 2 seconds and then turns a solid/continuous light, proceed with the following
training instructions for a rolling code device. A second person may make the following steps quicker and easier.
Please use a ladder or other device. Do not stand on your vehicle to perform the next steps.
5. At the garage door opener receiver (motorhead unit) in the garage, locate the "learn" or "smart" button (usually near
where the hanging antenna wire is attached to the unit). If there is difficulty locating the training button, reference the
garage door opener's manual or contact us toll-free 1-800-355-3515 (Internet: www.HomeLink.com
).
6. Press and release the "learn" or "smart" button (the name and color of the button may vary by manufacturer).
NOTE
Once the button is pressed, there are 30 seconds in which to initiate the next step.
7. Return to the vehicle and firmly press and hold the trained HomeLink button for two seconds and release. Repeat
the "press/hold/release" sequence up to 3 times to complete the training process.
To train additional HomeLink buttons, begin with step two.
Programming the transceiver for the first time (Canadian residents)
1. For first time training, press and hold the two outer HomeLink buttons releasing only when the HomeLink indicator
light begins to flash after 20 seconds. (Do not perform this step when training the additional HomeLink buttons.)
2. Position the hand -held transmitter 1-3 inches (2.5-7.5 cm) away from the HomeLink surface (located on your)
keeping the HomeLink indicator light in view.
3. Using both hands, simultaneously press and hold both the desired HomeLink button and hand held transmitter
button. During programming, your handheld transmitter may automatically stop transmitting. Continue to press and
ProCarManuals.com
Page 70 of 246

hold the desired HomeLink button while you press and re-press ("cycle") your handheld transmitter every two seconds
until the frequency signal has been learned. The indicator light will flash slowly and then rapidly after several seconds
upon successful training. DO NOT release until the HomeLink indicator light flashes slowly and then rapidly. When
the indicator light flashes rapidly, both buttons may be released. (The rapid flashing indicates successful training.)
75 02 Instruments and controls
HomeLink® Universal Transceiver (option)
4. Press and hold the trained HomeLink button and observe the indicator light.
If the indicator light is solid/continuous, training is complete and your device should activate when the HomeLink
button is pressed and released.
If the indicator light blinks rapidly for 2 seconds and then turns a solid/continuous light, proceed with the following
training instructions for a rolling code device. A second person may make the following steps quicker and easier.
Please use a ladder or other device. Do not stand on your vehicle to perform the next steps.
5. At the garage door opener receiver (motorhead unit) in the garage, locate the "learn" or "smart" button (usually near
where the hanging antenna wire is attached to the unit). If there is difficulty locating the training button reference the
garage door opener's manual or contact us.
6. Press and release the "learn" or "smart" button (the name and color of the button may vary by manufacturer).
NOTE
Once the button is pressed, there are 30 seconds in which to initiate the next step.
7. Return to the vehicle and firmly press and hold the trained HomeLink button for two seconds and release. Repeat
the "press/hold/release" sequence up to 3 times to complete the training process.
NOTE
During programming, your hand -held transmitter may automatically stop transmitting. Continue to press and hold
the desired HomeLink button while you press and repress ("cycle") your hand -held transmitter every two seconds
until the frequency signal has been learned. The indicator light will flash slowly and then rapidly after several
seconds upon successful training. If necessary, follow steps 5-7 to complete the training for a rolling code device.
To train additional HomeLink buttons, begin with step two.
Rolling Code Programming
Rolling code garage door openers that are "code-protected" and manufactured after 1996 may be determined by the-
following:
Reference the garage door opener owner's manual for verification.
The handheld transmitter appears to program the HomeLink Universal Transceiver but does not activate the garage
door.
Press and hold the trained HomeLink button. The garage door opener has the rolling code feature if the indicator
light flashes rapidly and then turns solid after 2 seconds.
To train a garage door with the rolling code feature, follow these instructions (the aid of a second person may make the
training quicker and easier):
ProCarManuals.com
Page 71 of 246

1. Locate the training button on the garage door opener motor head unit. Exact location and color of the button may
vary by garage door opener brand. If there is difficulty locating the training button, reference the garage door opener
owner's manual or please visit our Web site at www.homelink.com
.
2. Press the training button on the garage door opener motor head unit (which activates the "training light").
NOTE
Following step 2, there are 30 seconds in which to initiate step 3.
3. Firmly press and release the programmed HomeLink® button. Press and release the HomeLink button a second time
to complete the training process. (Some garage door openers may require
76 02 Instruments and controls
HomeLink® Universal Transceiver (option)
you to do this procedure a third time to complete the training.)
The garage door opener should now recognize the HomeLink Wireless Control System. The remaining two buttons
may now be trained if this has not previously been done. Refer to the Programming portion of this text. The
HomeLink Wireless Control System (once programmed) or the original handheld transmitter may be used to activate
the garage door. In the event that there are still difficulties in programming the HomeLink Wireless Control System,
please visit our Web site, www.homelink.com
.
Reprogramming a Single HomeLink Button
To program a device to HomeLink using a HomeLink button previously trained, follow these steps:
1. Press and hold the desired HomeLink button. Do NOT release until step 4 has been completed.
2. When the indicator light begins to flash slowly ( after 20 seconds), position the handheld transmitter 1 to 3 inches
away from the HomeLink surface.
3. Press and hold the handheld transmitter button. The HomeLink indicator light will flash, first slowly and then
rapidly.
4. When the indicator light begins to flash rapidly, release both buttons.
The previous device has now been erased and the new device can be activated by pushing the HomeLink button that
has just been programmed. This procedure will not affect any other programmed HomeLink.
Erasing Channels
Individual buttons cannot be erased. However, to erase all three programmed buttons:
1. Press and hold the two outside buttons until the indicator light begins to flash (after 20 seconds).
2. Release both buttons.
The HomeLink® Wireless Control System is now in the training (learning) mode and can be programmed at any time
following steps 2 through 4 in the Programming section.
77 02 Instruments and controls
ProCarManuals.com
Page 125 of 246

Fuel Formulations
Do not use gasoline that contains lead as a knock inhibitor, and do not use lead additives. Besides damaging the
exhaust emission control systems on your vehicle, lead has been strongly linked to certain forms of cancer. Many fuels
contain benzene as a solvent. Unburned benzene has been strongly linked to certain forms of cancer. If you live in an
area where you must fill your own gas tank, take precautions.
These may include:
standing upwind away from the filler nozzle while refueling
refueling only at gas stations with vapor recovery systems that fully seal the mouth of the filler neck during
refueling
wearing neoprene gloves while handling a fuel filler nozzle.
WARNING
Carbon monoxide is a poisonous, colorless, and odorless gas. It is present in all exhaust gases. If you ever smell
exhaust fumes inside the vehicle, make sure the passenger compartment is ventilated, and immediately return the
vehicle to a trained and qualified Volvo service technician for correction.
Use of Additives
With the exception of fuel line antifreeze during winter months, do not add solvents, thickeners, or other store -bought
additives to your vehicle's fuel, cooling, or lubricating systems. Overuse may damage your engine, and some of these
additives contain organically volatile chemicals. Do not needlessly expose yourself to these chemicals.
Fuel filler door
Press the button on the light switch panel (see the illustration on page 55
) with the ignition switched off to unlock the
fuel filler door. Please note that the fuel filler door will remain unlocked until the vehicle begins to move forward. An
audible click will be heard when the fuel filler door relocks.
138 06 Starting and driving
Fuel requirements
If you intend to leave your vehicle while it is being refueled, this feature enables you to lock the doors/trunk while
leaving the fuel filler door unlocked.
You can also keep the vehicle locked if you remain inside it during refueling. The central locking button does not lock
the fuel filler door.
Be sure the fuel filler door is not obstructed and is completely closed after refueling.
Open the fuel filler cap slowly during hot weather .
Refueling
The fuel tank is designed to accommodate possible expansion of the fuel in hot weather. See page 256
for fuel tank
volume. Be aware that the "usable" tank capacity will be somewhat less than the specified maximum. When the fuel
level is low, such factors as ambient temperature, the fuel's "Reid vapor pressure" characteristics, and terrain can affect
the fuel pump's ability to supply the engine with an adequate supply of fuel. Therefore, it is advisable to refuel as soon
as possible when the needle nears the red zone, or when the fuel warning light comes on.
ProCarManuals.com
Page 154 of 246
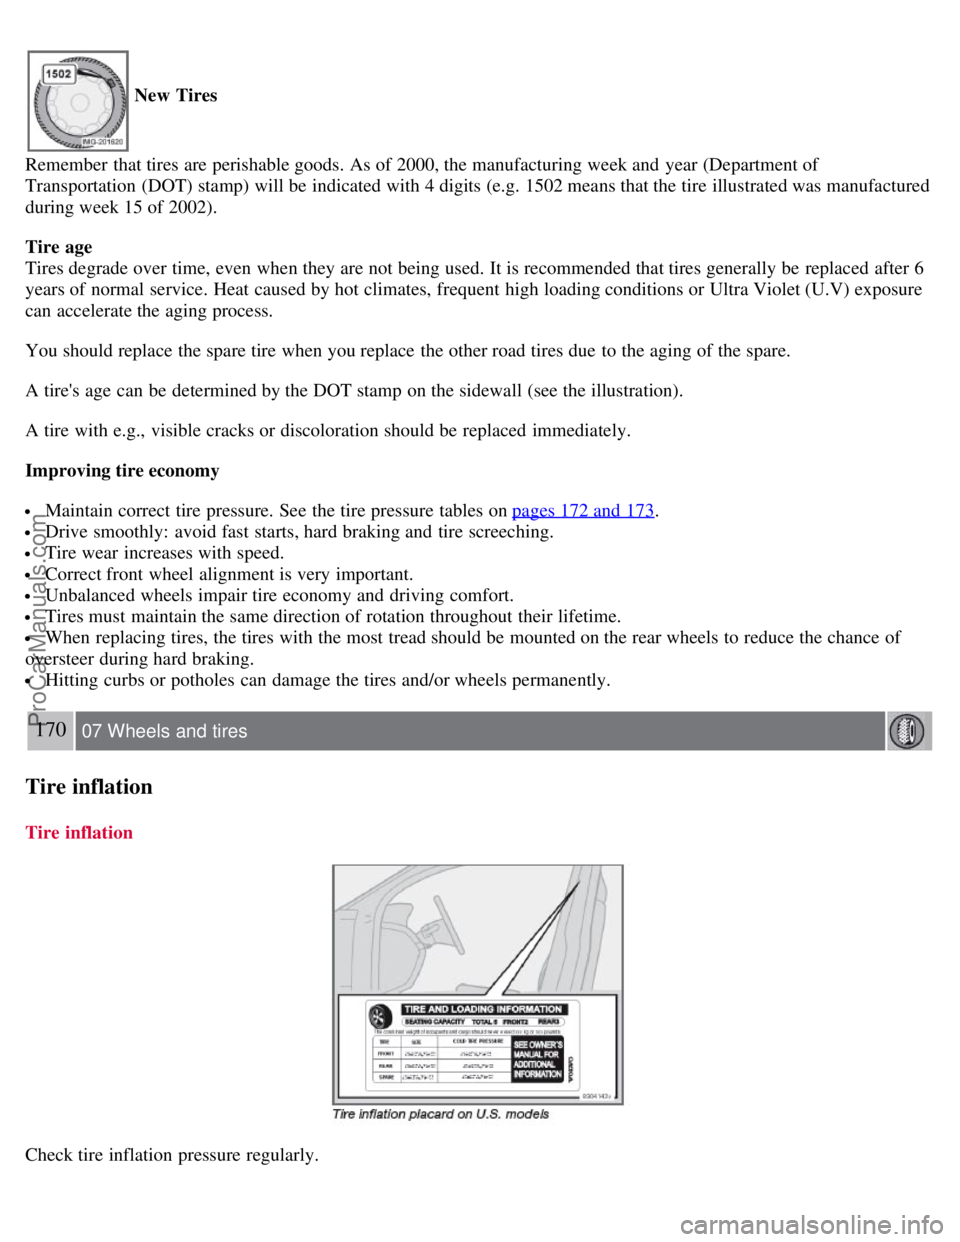
New Tires
Remember that tires are perishable goods. As of 2000, the manufacturing week and year (Department of
Transportation (DOT) stamp) will be indicated with 4 digits (e.g. 1502 means that the tire illustrated was manufactured
during week 15 of 2002).
Tire age
Tires degrade over time, even when they are not being used. It is recommended that tires generally be replaced after 6
years of normal service. Heat caused by hot climates, frequent high loading conditions or Ultra Violet (U.V) exposure
can accelerate the aging process.
You should replace the spare tire when you replace the other road tires due to the aging of the spare.
A tire's age can be determined by the DOT stamp on the sidewall (see the illustration).
A tire with e.g., visible cracks or discoloration should be replaced immediately.
Improving tire economy
Maintain correct tire pressure. See the tire pressure tables on pages 172 and 173.
Drive smoothly: avoid fast starts, hard braking and tire screeching.
Tire wear increases with speed.
Correct front wheel alignment is very important.
Unbalanced wheels impair tire economy and driving comfort.
Tires must maintain the same direction of rotation throughout their lifetime.
When replacing tires, the tires with the most tread should be mounted on the rear wheels to reduce the chance of
oversteer during hard braking.
Hitting curbs or potholes can damage the tires and/or wheels permanently.
170 07 Wheels and tires
Tire inflation
Tire inflation
Check tire inflation pressure regularly.
ProCarManuals.com
Page 177 of 246

NOTE
When washing the car, remember to remove dirt from the drain holes in the doors and sills.
Exterior components
Volvo recommends the use of special cleaning products, available at your Volvo retailer, for cleaning colored plastic,
rubber, or ornamental components such as chromed strips on the exterior of your vehicle. The instructions for using
these products should be followed carefully. Solvents or stain removers should not be used.
CAUTION
Avoid waxing or polishing plastic or rubber components
Polishing chromed strips can wear away or damage the surface
Polishes containing abrasive substances should not be used
CAUTION
During high pressure washing, the spray mouthpiece must never be closer to the vehicle than 13" (30 cm). Do not
spray into the locks.
Dirt, snow, etc., on the headlights can reduce lighting capacity considerably. Clean the headlights regularly, for
example when refueling.
When washing or steam cleaning the engine, avoid spraying water or steam directly on the electrical components
or toward the rear side of the engine.
Chromed wheels : Clean chrome-plated wheels using the same detergents used for the body of the vehicle.
Aggressive wheel-cleaning agents can permanently stain chrome-plated wheels.
197 08 Car care
Washing and cleaning the vehicle
Automatic washing - simple and quick
We do NOT recommend washing your car in an automatic wash during the first six months (because the paint will not
have hardened sufficiently).
An automatic wash is a simple and quick way to clean your car, but it is worth remembering that it may not be as
thorough as when you yourself go over the car with sponge and water.
Keeping the underbody clean is most important, especially in the winter. Some automatic washers do not have
facilities for washing the underbody.
CAUTION
Before driving into an automatic car wash, turn off the optional rain sensor to avoid damaging the windshield
wipers.
Make sure that side view mirrors, auxiliary lamps, etc, are secure, and that any antenna(s) are retracted or removed.
Otherwise there is risk of the machine dislodging them.
WARNING
When the car is driven immediately after being washed, apply the brakes several times in order to remove any
ProCarManuals.com
Page 179 of 246

Volvo also offers a special leather softener that should be applied after the cleaner and protectant. It leaves leather soft
and smooth, and reduces friction between leather and other finishes in the vehicle.
Volvo recommends cleaning, protecting and conditioning your vehicle's leather two to four times a year. Ask your
Volvo retailer about Leather Care Kit 951 0251 and Leather Softener 943 7429.
Cleaning leather upholstery
1. Pour leather cleaner on a damp sponge and squeeze it until the cleaner foams.
2. Apply the foam to the stain by moving the sponge with circular movements.
3. Dampen the stain thoroughly with the sponge. Let the sponge absorb the stain, do not rub.
4. Dry the stain with soft paper towels or a towel, and allow the leather to dry completely.
Protecting leather upholstery
1. Put a small amount of protectant cream on a cloth and apply a thin coating of cream to the upholstery with light
circular movements.
2. Allow the leather to dry for 20 minutes.
This will help the leather resist staining and protect against sunlight's harmful UV rays.
CAUTION
Under no circumstances should gasoline, naphtha or similar cleaning agents be used on the plastic or the leather
since these can cause damage.
Take extra care when removing stains such as ink or lipstick since the coloring can spread.
Use solvents sparingly. Too much solvent can damage the seat padding.
Start from the outside of the stain and work toward the center.
Sharp objects (e.g. pencils or pens in a pocket) or Velcro fasteners on clothing may damage the textile upholstery.
Clothing that is not colorfast, such as new jeans or suede garments, may stain the upholstery.
199 08 Car care
Washing and cleaning the vehicle
Cleaning the seat belts
Clean only with lukewarm water and a mild soap solution.
Cleaning floor mats
The floor mats should be vacuumed or brushed clean regularly, especially during winter when they should be taken out
for drying. Spots on textile mats can be removed with a mild detergent. For best protection in winter, Volvo
recommends the use of Volvo rubber floor mats. Consult your Volvo retailer.
200 08 Car care
Paint touch up
Touching up minor paint damage
ProCarManuals.com
Page 180 of 246

Paint damage requires immediate attention to avoid rusting. Make it a habit to check the finish regularly - when
washing the vehicle for instance. Touch-up if necessary.
Paint repairs require special equipment and skill. Contact a trained and qualified Volvo service technician for any
extensive damage. Minor scratches can be repaired by using Volvo touch-up paint.
Color code
When ordering touch-up paint from your Volvo retailer, make sure you have the right color. Use the paint code
indicated on the model plate (1 in the illustration above).
Minor stone chips and scratches
Material:
Primer - can
Paint - touch-up pen
Brush
Masking tape
NOTE
When touching up the vehicle, it should be clean and dry. The surface temperature should be above 60° F (15° C).
If the stone chip has not penetrated down to the metal and an undamaged layer of paint remains, the touch-up
paint can be applied as soon as the spot has been cleaned.
201 08 Car care
Paint touch up
Deep scratches
ProCarManuals.com