Page 222 of 246

If you have forgotten the access code:
1. Select "SIRIUS ID" in the Sirius settings menu and press ENTER.
2. Press and hold the ENTER button for 2 seconds.
3. The current code will be displayed.
Your Volvo retailer can also provide you with assistance.
SIRIUS ID
This function displays the 12-digit Sirius activation ID.
245 10 Audio
CD player/CD changer (option)
CD function controls
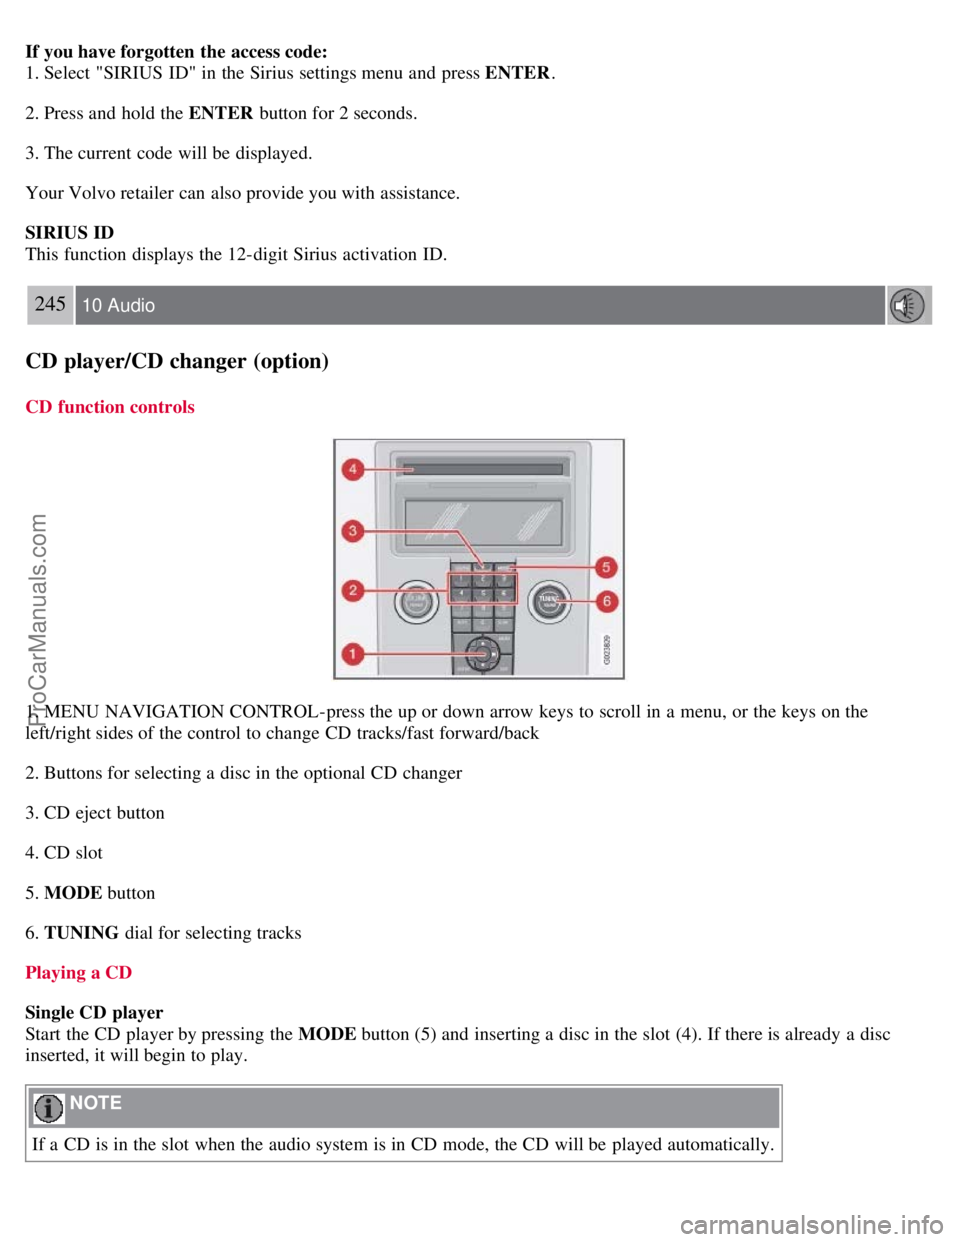
1. MENU NAVIGATION CONTROL-press the up or down arrow keys to scroll in a menu, or the keys on the
left/right sides of the control to change CD tracks/fast forward/back
2. Buttons for selecting a disc in the optional CD changer
3. CD eject button
4. CD slot
5. MODE button
6. TUNING dial for selecting tracks
Playing a CD
Single CD player
Start the CD player by pressing the MODE button (5) and inserting a disc in the slot (4). If there is already a disc
inserted, it will begin to play.
NOTE
If a CD is in the slot when the audio system is in CD mode, the CD will be played automatically.
ProCarManuals.com
Page 223 of 246

CD changer
The CD changer can hold up to six discs.
1. Start the CD changer by pressing the MODE button (5).
2. Select an empty position using the 1-6 buttons or the up/down keys on the MENU NAVIGATION control. The
display shows which positions are empty.
3. Insert a disc into the slot (4).
NOTE
Ensure that INSERT DISC is displayed before inserting a disc.
If a CD position in the changer containing a disc is selected, and the audio system is in CD mode when it is
switched on, the CD will play automatically.
CD eject
Single CD player
Press the eject button (3) to eject the disc.
CD changer
This function makes it possible to eject a single disc, or to eject all of the discs in the changer.
Press the eject button (3) briefly to eject the disc that is currently playing.
246 10 Audio
CD player/CD changer (option)
A longer press (more than two seconds) starts the process of ejecting all of the discs in the changer.
NOTE
The EJECT ALL function can only be used while the vehicle is at a standstill and will be cancelled if the vehicle
begins to move.
For reasons of traffic safety, the ejected CD must be removed within 12 seconds or it will be automatically drawn
back into the slot and the CD player will enter pause mode. Press the CD button to restart the disc.
CD Pause
When the audio system volume is turned off completely, the CD player will pause and will resume playing when the
volume is turned up again.
Audio files
In addition to playing normal music CDs, the CD player/changer can also play discs containing files in mp3 or wma
format.
NOTE
Certain discs that are copy protected cannot be read by the player.
When a disc with audio files is inserted in the player, the player scans the disc's folders before it begins playing the
ProCarManuals.com
Page 224 of 246

files. The length of time that this takes depends on the quality of the disc.
Navigating the disc and playing tracks
If a disc with audio files is in the CD player, press ENTER to display a list of folders on the disc.
Use the up and down arrows in the navigation control (see the illustration on page 234
) to move among the folders on
the disc. Audio files have the
symbol and folders containing these files have the symbol. Press ENTER to play a
selected folder or a file.
When the music file has been played, the player will continue to play the rest of the files in the current folder. When
all of the files in the folder have been played, the player will automatically go to the next folder and play the files in it.
Press the left or right arrow key on the navigation control if the entire name of the current track does not fit in the
display.
Changing tracks
Briefly press the left or right arrow keys on the MENU NAVIGATION control to skip to the previous or next
track/file.
NOTE
The TUNING dial (6) (turn clockwise to go to the next track/file, or counterclockwise to go to the previous
track/file) or the optional steering wheel keypad can also be used for this purpose.
Fast forward/back
Press and hold down the left or right arrows keys in the MENU NAVIGATION control (or the corresponding keys on
the optional steering wheel keypad) to search within a track/file or the whole disc. The search continues for as long as
the buttons are held down.
Random play
This function plays the tracks/files on a CD (or on all of the CDs if the vehicle is equipped with the optional CD
changer) in random order (shuffle).
247 10 Audio
CD player/CD changer (option)
Activating/deactivating the random function-CD player
If a normal CD is being played:
1. Press MENU followed by ENTER .
2. Select Random and press ENTER .
If a CD with audio files is being played:
1. Press MENU followed by ENTER .
2. Select Random and press ENTER .
3. Select Disc or Folder and press ENTER .
Activating/deactivating the random function-CD changer
If a normal CD is being played:
ProCarManuals.com
Page 225 of 246

1. Press MENU followed by ENTER .
2. Select Random and press ENTER .
3. Select Single disc or All discs and press ENTER .
If a CD with audio files is being played:
1. Press MENU followed by ENTER .
2. Select Random and press ENTER .
3. Select Single disc or Folder and press ENTER .
NOTE
CD changer only: you can only select the next random track/file on the current disc.
Press the EXIT button to stop random play.
The random function is automatically deactivated when another disc is selected.
Disc text (CD changer only)
Certain CDs contain information about the disc, such as the titles of the tracks, etc. This information can be shown in
the display by activating the DISC TEXT function.
1. Press MENU . Select the menu for relevant sound source and press ENTER .
2. Select Disc text in the menu and press ENTER .
3. If information is stored on the disc, it will now appear in the display.
To deactivate this function, select DISC TEXT in the menu and press ENTER.
Scan
This function plays the first 10 seconds of each track/file on the CD.
1. Press SCAN .
2. Press EXIT or SCAN to stop the scan function and listen to an entire track/file.
CD eject
Single CD player
Press the eject button (3) to eject the disc.
CD changer
This function makes it possible to eject a single disc, or to eject all of the discs in the changer.
Press the eject button (3) briefly to eject the disc that is currently playing.
A longer press (more than two seconds) starts the process of ejecting all of the discs in the changer.
NOTE
The Eject all function can only be used while the vehicle is at a standstill and will be cancelled if the vehicle
begins to move.
ProCarManuals.com
Page 226 of 246

For reasons of traffic safety, the ejected CD must be removed within 12 seconds or it will be automatically drawn
back into the slot and the CD player will enter pause mode. Press the CD button to restart the disc.
248 10 Audio
CD player/CD changer (option)
Compact disc care
Keep the following in mind when playing/handling compact discs
Do not put tape or labels on the disc itself. They could become stuck in the player.
CDR discs can cause listening problems due to the quality of the disc or recording equipment used.
DualDisc: The audio side of a DualDisc (combined CD/DVD) does not meet CD specifications and may not play in
your audio system.
Keep the discs clean. Wipe them with a soft, clean, lint-free cloth, working from the center outward. If necessary,
dampen the cloth with a neutral soap solution. Dry thoroughly before using.
Never use cleaning spray or antistatic liquid. Use only cleaners specifically made for CDs.
Use discs of the correct size only (3.5" discs should never be used).
Volvo does not recommend the use of plastic outer rings on the disc.
Condensation may occur on discs/optical components of the changer in cold winter weather. The disc can be dried
with a clean, lint-free cloth. Optical components in the CD changer may, however, take up to one hour to dry off.
Never attempt to play a damaged CD.
When not in use, the discs should be stored in their covers. Avoid storing discs in excessive heat, direct sunlight or
in dusty locations.
249 10 Audio
Audio menu
FM1/FM2 menu
1. RADIOTEXT ON/OFF
2. ADVANCED RADIO SETTINGS
3. AUDIO SETTINGS
AM menu
1. 1. AUDIO SETTINGS
CD menu
1. RANDOM
2. AUDIO SETTINGS
CD changer menu
1. RANDOM
2. DISC TEXT ON/OFF
3. AUDIO SETTINGS
AUX menu
ProCarManuals.com
Page 234 of 246
260 11 Specifications
Electrical system
General information
12-volt system with voltage controlled generator. Single wire system in which the chassis and engine block are used as
conductors, grounded on the chassis.
Battery
1Models equipped with the High Performance audio system
2Models equipped with the Premium Sound audio system and/or the Volvo Navigation System
If the battery must be replaced, replace it with one with the same cold start capacity and reserve capacity as the original
(see the decal on the battery).
WARNING
PROPOSITION 65 WARNING!
Battery posts, terminals, and related accessories contain lead and lead compounds, chemicals known to the state of
California to cause cancer and reproductive harm. Wash hands after handling.
261 11 Specifications
Electrical system
Bulbs used in the car
ProCarManuals.com
Page 237 of 246
2 0 0 8
VOLVO C70
264-269 12 Index
12 volt socket 68, 108
A
Accessory installation8
Air conditioning80, 83
Air distribution86
Air vents81
Airbags
disabling the front passenger's airbag21, 22, 23
door mounted inflatable curtain25
front airbag18, 19, 20
side impact24
Alarm system126, 127
turning off alarm sensors127
Anti-lock brakes6
general information147, 148
warning light50
Approach lighting72, 113
Audio system
automatic sound control238
auxiliary connector234
CD care248
CD changer/player245, 246, 247
controls234
equalizer238
menu249
MP3 and WMA files246
radio function239
Sirius satellite radio241, 242, 243
sound settings235
steering wheel keypad235
surround sound235
USB/iPOD connector236
Automatic Locking Retractor32
Automatic sound control238
Automatic transmission144, 145
ProCarManuals.com
Page 241 of 246
Information display message49
Inspection readiness206
Instrument overview44, 45, 46
Instrument panel47
indicator and warning lights50, 51
information symbol49
lighting56
messages53
warning symbol48
Interior lighting100
reading lights100
Introduction1
iPOD connector (audio system)236
ISOFIX lower anchors40
J
Jack
location of183
positioning185
Jacket hanger104
Jump starting154
K
Key blade115
Keyless drive
location of antennas (pacemaker warning)122
Keylock6, 140
L
Label information252, 253
Leather care196
Lighting panel55
Loading the vehicle158
Locking functions113
locking the vehicle from the inside123
valet locking117
Long distance trips134
Long loads109
Lug nuts181
M
Maintenance204
performed by owner205
Malfunction indicator light50
Manual transmission143
Memory function (power seats)92, 93
Mirrors
defroster84
ProCarManuals.com