2008 VOLVO C30 lock
[x] Cancel search: lockPage 165 of 234

Block the wheels standing on the ground, use rigid wooden blocks or large stones.
The jack should be kept well-greased and clean, and should not be damaged.
No objects should be placed between the base of jack and the ground, or between the jack and the attachment bar
on the vehicle.
Installing the wheel
1. Clean the contact surfaces on the wheel and hub.
2. Lift the wheel and place it on the hub.
3. Install the wheel nuts and tighten hand -tight. Using the lug wrench, tighten crosswise until all nuts are snug.
4. Lower the vehicle to the ground and alternately tighten the bolts crosswise to 96 ft. lbs. (130 Nm).
5. Install the wheel cap (where applicable).
184 07 Wheels and tires
Tire Pressure Monitoring System (TPMS)
Introduction
The tire pressure monitoring system uses sensors mounted in the tire valves to check inflation pressure levels. When
the vehicle is moving at a speed of approximately 20 mph (30 km/h) or faster, these sensors transmit inflation pressure
data to a receiver located in the vehicle.
NOTE
USA - FCC ID: KR5S122780002
This device complies with part 15 of the FCC rules. Operation is subject to the following conditions: (1) This device
may not cause harmful interference, and (2) this device must accept any interference received, including interference
that may cause undesired operation.
When low inflation pressure is detected, TPMS will light up the tire pressure warning light (
) (also referred to as a
telltale) in the instrument panel, and will display a message in the text window. The wording of this message is
determined by the degree of inflation pressure loss.
NOTE
If a fault occurs in TPMS, the tire pressure warning light will flash for approximately 1 minute and TIRE PRESS
SYST SERVICE REQUIRED will be displayed.
Each tire, including the spare (if provided), should be checked monthly when cold and inflated to the inflation pressure
recommended by the vehicle manufacturer on the vehicle placard or tire inflation pressure label. (If your vehicle has
tires of a different size than the size indicated on the vehicle placard or tire inflation pressure label, you should
determine the proper tire inflation pressure for those tires.)
As an added safety feature, your vehicle has been equipped with a tire pressure monitoring system (TPMS) that
illuminates a low tire pressure telltale when one or more of your tires is significantly under-inflated. Accordingly,
when the low tire pressure telltale illuminates, you should stop and check your tires as soon as possible, and inflate
them to the proper pressure. Driving on a significantly under-inflated tire causes the tire to overheat and can lead to
Page 169 of 234

NOTE
When washing the car, remember to remove dirt from the drain holes in the doors and sills.
Exterior components
Volvo recommends the use of special cleaning products, available at your Volvo retailer, for cleaning colored plastic,
rubber, or ornamental components such as chromed strips on the exterior of your vehicle. The instructions for using
these products should be followed carefully.Solvents or stain removers should not be used.
CAUTION
Avoid waxing or polishing plastic or rubber components
Polishing chromed strips can wear away or damage the surface
Polishes containing abrasive substances should not be used
189 08 Vehicle care
Washing and cleaning the car
CAUTION
During high pressure washing, the spray mouthpiece must never be closer to the vehicle than 13" (30 cm). Do not
spray into the locks.
Dirt, snow, etc., on the headlights can reduce lighting capacity considerably. Clean the headlights regularly, for
example when refueling.
When washing or steam cleaning the engine, avoid spraying water or steam directly on the electrical components
or toward the rear side of the engine. Special moonroof cautions:
Always close the moonroof and sun shade before washing your vehicle.
Never use abrasive cleaning agents on the moonroof.
Never use wax on the rubber seals around the moonroof.
Automatic washing - simple and quick
We do NOT recommend washing your vehicle in an automatic wash during the first six months (because the paint will
not have hardened sufficiently).
An automatic wash is a simple and quick way to clean your car, but it is worth remembering that it may not be as
thorough as when you yourself go over the vehicle with sponge and water. Keeping the underbody clean is most
important, especially in the winter. Some automatic washers do not have facilities for washing the underbody.
CAUTION
Before driving into an automatic car wash, turn off the optional rain sensor to avoid damaging the windshield
wipers. Make sure that side view mirrors, auxiliary lamps, etc, are secure, and that any antenna(s) are retracted or
removed. Otherwise there is risk of the machine dislodging them.
Chromed wheels : Clean chrome-plated wheels using the same detergents used for the body of the vehicle.
Aggressive wheel-cleaning agents can permanently stain chrome-plated wheels.
WARNING
When the vehicle is driven immediately after being washed, apply the brakes several times in order to remove any
Page 177 of 234

a period of driving is necessary to bring the OBD II system to "ready" for inspection. A half-hour trip of mixed stop-
and -go/highway driving is typically needed to allow OBD II to reach readiness. Your Volvo retailer can provide you
with more information on planning a trip.
Maintain your vehicle in accordance with your vehicle's maintenance schedule.
201 09 Maintenance and servicing
Hood
Opening the hood
To open the hood:
Pull the lever located under the left side of the dash to release the hood lock.
Lift the hood slightly.
Press up the release control located under the front edge of the hood (at the center) up to the right, and lift the hood.
WARNING
Check that the hood locks engage properly when closed.
202 09 Maintenance and servicing
Engine compartment
1. Cooling system expansion tank
Page 189 of 234

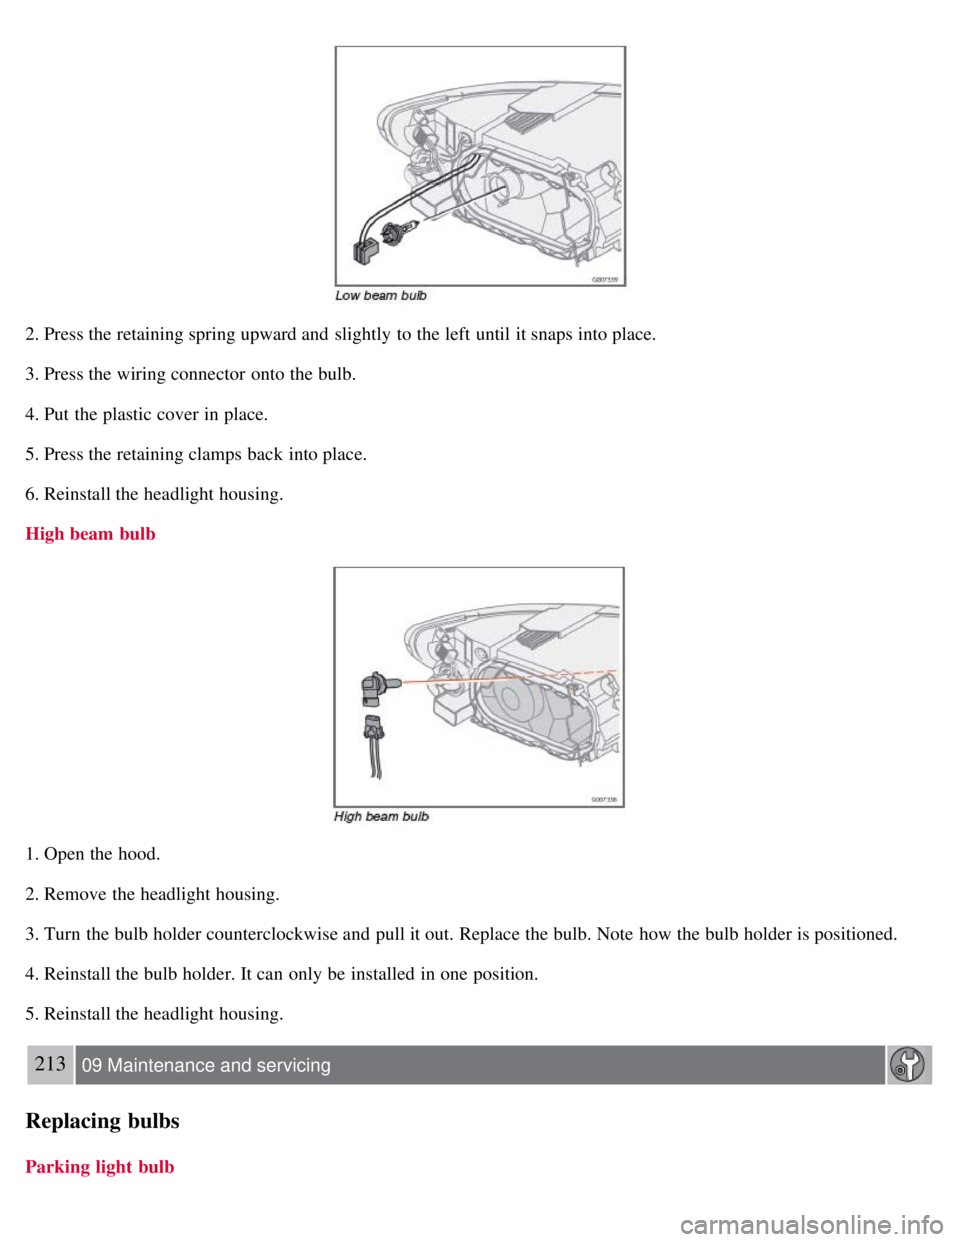
2. Press the retaining spring upward and slightly to the left until it snaps into place.
3. Press the wiring connector onto the bulb.
4. Put the plastic cover in place.
5. Press the retaining clamps back into place.
6. Reinstall the headlight housing.
High beam bulb
1. Open the hood.
2. Remove the headlight housing.
3. Turn the bulb holder counterclockwise and pull it out. Replace the bulb. Note how the bulb holder is positioned.
4. Reinstall the bulb holder. It can only be installed in one position.
5. Reinstall the headlight housing.
213 09 Maintenance and servicing
Replacing bulbs
Parking light bulb
Page 190 of 234

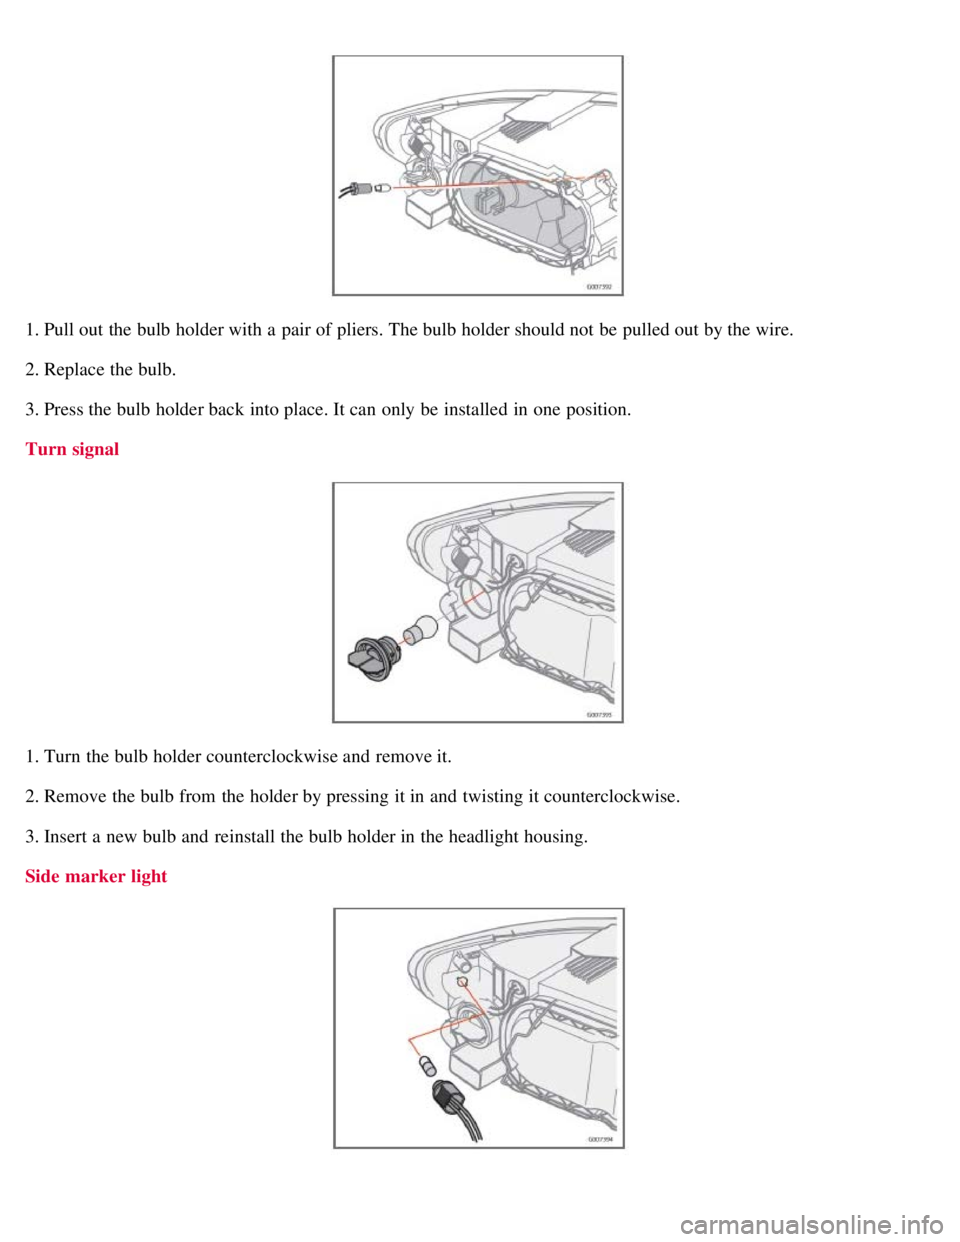
1. Pull out the bulb holder with a pair of pliers. The bulb holder should not be pulled out by the wire.
2. Replace the bulb.
3. Press the bulb holder back into place. It can only be installed in one position.
Turn signal
1. Turn the bulb holder counterclockwise and remove it.
2. Remove the bulb from the holder by pressing it in and twisting it counterclockwise.
3. Insert a new bulb and reinstall the bulb holder in the headlight housing.
Side marker light
Page 191 of 234

1. Turn the bulb holder counterclockwise, pull it out, and replace the bulb.
2. Reinstall the bulb holder. It can only be installed in one position.
214 09 Maintenance and servicing
Replacing bulbs
Front fog light (option)
1. Switch off all lights and turn the key to position 0.
2. Remove the panel around the fog light housing.
3. Unscrew both torx screws in the fog light housing and remove it.
4. Disconnect the connector from the bulb.
5. Turn the bulb counterclockwise and pull it out.
6. Install the new bulb in its seat and turn it clockwise.
7. Reconnect the connector to the bulb.
8. Secure the fog light housing with the screws and press the panel back into place.
215 09 Maintenance and servicing
Replacing bulbs
Removing the tail light bulb holder
Page 197 of 234

Fuses
Fuse box in the passenger compartment
The fuse box in the passenger compartment is located under the glove compartment.
To access the fuses:
1. Remove the upholstery covering the fuse box by first pressing in the center pins in the mounting clips approximately
0.5 in (1 cm) with a small screwdriver and then pulling the pins out.
2. Turn both retaining screws (2) counterclockwise until they release.
3. Fold down the fuse box (3) half way. Pull it toward the seat until it stops. Fold it down completely. The fuse box can
be unhooked completely.
4. Replace the blown fuse.
5. Close the fuse box in reverse order.
6. Pull the center pins fully out of the mounting clips, secure the upholstery with the mounting clips and press the pins
into the mounting clips again. The mounting clips then expand, holding the upholstery in position.
221 09 Maintenance and servicing
Fuses
Fuses in the engine compartment
Page 203 of 234

An auxiliary device, such as an iPOD or a USB flash drive can be connected to the audio system via the connector in
the center console storage compartment.
A sound source must be chosen, depending on the device that has been connected:
1. Use MODE to select iPOD or USB. The text CONNECT DEVICE will be displayed.
2. Connect the device to the connector in the center console storage compartment (see the illustration).
The text LOADING will be displayed while the system indexes the files on the device. This may take a short time.
When indexing has been completed, track information will be displayed, and the desired track can then be selected.
Tracks can be selected in two ways:
Turn the Tuning knob (no. 4 in the illustration on page 228) clockwise or counterclockwise
Use the right or left arrow keys on the navigation control (no. 5 in the illustration on page 233) to select the desired
track. The arrow keys on the steering wheel keypad can also be used in the same way.
NOTE
The system supports playback of files in the most common versions of formats such as mp3, wma, and wav.
However, there may be versions of these formats that the system does not support.
USB flash drive
To simplify the use of a USB flash drive, it is advisable to only store music files on the drive. It will take considerably
longer for the system to index the files on the drive if it contains anything other than compatible music files.
MP3 player
Many mp3 players have a file indexing system that is not supported by the vehicle's audio system. In order to use an
mp3 player, the system must be set to USB Removable device/Mass Storage Device.
iPod
An iPod receives current and its battery is charged through the connecting cord. However, if the iPOD's battery is
completely drained, it should be recharged before the iPOD is connected to the audio system.
NOTE
When an iPOD is used as a sound source, the vehicle's audio system has a menu structure similar to the one in the
iPOD. See the iPOD's manual for detailed information.
For further information, refer to the accessory manual USB/iPOD Music Interface .
Sound settings
Optimal sound reproduction
The audio system is calibrated for optimal sound reproduction through the use of digital signal processing. This
calibration takes into account the speakers, amplifier, cabin
231 10 Audio
Audio functions