Page 267 of 392
– Turn signals
– Parking lights, low beams and high beams
– Taillights
– Brake lights
– License plate lights
Information regarding changing light bulbs, Replacing light bulbs.
WARNING
Disregarding the safety-related checklist may lead to accidents and injuries.
�x Please note and follow the points listed in the checklist.
Page 374 of 392
Replacing headlight bulbs
Fig. 217 In the engine compartment: Covers in the left headlight assembly: A Side marker light, B Low beam headlight, C High beam headlight, D Turn signal and parking light, E Daytime running light.
Fig. 218 In the wheel housing: Removing cover.
�
Page 375 of 392

377
⇒ fig. 217 (A) (B) (C) (D) (E)
Side marker light Low beam High beam Turn signal and parking light
Daytime running lights
3.
Unscrew the fastening screw
⇒ fig. 218 (arrow) with a short screwdriver. To access the screw, turn the wheel in question inward as shown in .
Same as column (A).
4.
Remove the cover from the wheel house lining .
Same as column (A).
5. On the back of the headlight assembly, pull off the rubber cover for the bulb you are replacing.
Turn plastic
cover ⇒ fig. 217 A (E) counterclockwise and remove.
6. Left side of the vehicle: Turn plastic bulb socket counterclockwise (about 1/8 turn) to release it. Right side of the vehicle: Turn plastic bulb socket clockwise (about 1/8 turn) instead.
Turn plastic bulb socket counterclockwise (about 1/8 turn) to release it.
Press plastic tab on back of bulb socket to release it.
Same as column (A). Same as column (A).
7. Pull plastic bulb socket assembly back and out of the headlight assembly.
8. Replace the burned out light bulb with a new bulb of the same type.
9. Reinsert the bulb socket assembly into the headlight assembly.
Page 376 of 392

⇒ fig. 217 (A) (B) (C) (D) (E)
Side marker light Low beam High beam Turn signal and parking light
Daytime running lights
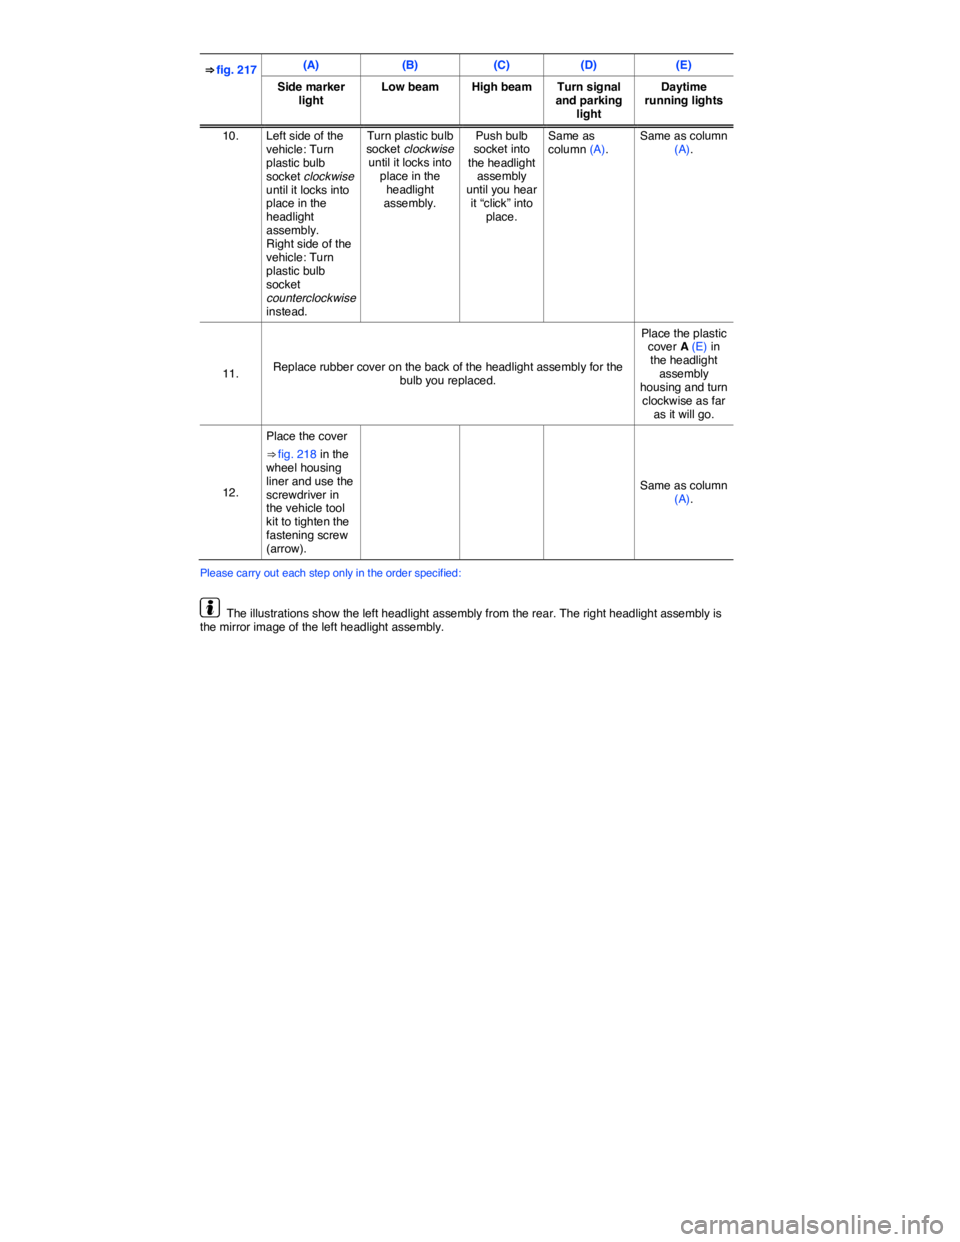
10. Left side of the vehicle: Turn plastic bulb socket clockwise until it locks into place in the headlight assembly. Right side of the vehicle: Turn plastic bulb socket counterclockwise instead.
Turn plastic bulb socket clockwise until it locks into place in the headlight assembly.
Push bulb socket into the headlight assembly until you hear it “click” into place.
Same as column (A). Same as column (A).
11. Replace rubber cover on the back of the headlight assembly for the bulb you replaced.
Place the plastic cover A (E) in the headlight assembly housing and turn clockwise as far as it will go.
12.
Place the cover
⇒ fig. 218 in the wheel housing liner and use the screwdriver in the vehicle tool kit to tighten the fastening screw (arrow).
Same as column (A).
Please carry out each step only in the order specified:
The illustrations show the left headlight assembly from the rear. The right headlight assembly is the mirror image of the left headlight assembly.