2008 VOLKSWAGEN JETTA winter tires
[x] Cancel search: winter tiresPage 6 of 477

Automatic belt retractor 2.1: 19
Automatic car washes 3.2: 17
Automatic mode Climatronic 3 .1: 85
A utomatic switch-off of electrica l compo
nents 3.1: 93
A utoma tic transm iss ion
D irec t shif t gearbox 3.1: 98
Safety interlock for ignition key 3.1 : 94
Se lector lever lock 3.1: 99
Tiptro nic 3.1: 98
Automatic transmission with Tiptronic 3.1:
IOI
Average fuel consum ption 3.1: 9
Average speed 3.1: 9
B
Background lighting 3.1: 521
BAS3.2: 2
Batt ery
Charging 3.2: 50
How often should
I replace my engine
battery? 3.2: 50
I m portant information to kn ow before
disconnect the batt ery 3.2: 49
Repla cin g 3.2: 50
What you must do afte r r eco nnect the bat
tery 3.2: 49
Winter condi tions 3.2: 49, 50
Battery acid level
C hec kin g 3.2: 50
Before d riv in g 2.1: 3
Belt pretensioner
Disposa l 2. 1: 26
Serv ice 2.1: 26
Bonnet 3.2: 36
Booster seats 2.1 : 59
Brake assis t sys tem 3.2: 2
Brake booster 3.2: 2
Brak e flu id
C hangin g 3.2: 48
How of ten s hould the brak e fluid be
changed? 3.2: 47
Warning light 3.1: 11
What is the correc t brake fluid level?. 3.2:
47
What kind of brake fluid should
I u se? 3 .2:
48
Booklet 0.1 General Index ®
Brake pad
Warning message 3.1 :
ll
Brak e pad wear indicator
Warn ing light 3.1: 26
Brak e pads 3.2: 8
Brak e servo 3.2: 8
Brak e system
Warn ing light 3.1: 28
Brake system 3.2: 47
Brakes 3.2: 8
H ow does moisture or road salt aff ec t the
brakes? 3.2: 8
What does it mea n when I fee l a s ligh t vi
bration o n the brake peda l? 3.2: 3
Braking distance 3.2: 8
Br eak-in peri od
Engine 3.2: 7
W hat is the rig h t way to break- in my vehi
cle? 3.2:
7
Breaking in
Brake pads 3.2: 7
Tire s 3.2: 7
Breaking in tires 3.2: 7
Bulb c hange 3.2: 8 1
Bulb defective Warning light 3.1: 24
Bumper Clean ing 3.2: 18
Bumper cover Caut ion w hen parking n ear a parking bar
rier or curb 3.1: 105
B uzzer 3.1: 50, 93
C
Ca libratin g the co mpa ss 3.1 : 18
California Propos ition 65 Wa rning 3.2 : 34 , 49
Car washes 3.2: 17
Cata ly tic converter 3.2:
10
CB radio 3 .2: 29
Ce ll phone 3.2 : 29
Cellu lar phone 3.2: 29
Ce ntral lo cking
I ndiv idua l un locking 3.1 : 34
Ce ntral locking button 3.1: 34
Ce ntral locking syste m 3.1: 34
C han gi ng a bu lb 3.2: 8 1
C hanging a wheel 3.2: 73
Alphabetical inde x 3
Page 14 of 477

Stopping th e engine 3.1: 97
S tora ge area
Ot her stora ge a reas 3.1 : 7l
R oof 3.l : 7 1
S torage compartm ent 3 .1: 69
Fro nt ce n te r armrest 3.1: 70
R ear armrest 3.1: 70
S tor age for the vehicle literature 3.1: 69
Sto ring seat po sit ion s 3.1 :
64
Sto wing luggage in the luggage companm en t
2.1 : 10
S un visor 3.l: 52
S u nro of 3.1: 42
S un sh ade
P owe r roof3.l: 42
Switc h light in g 3.1: 3
Sw itchabl e locking feature
Act iva ting 2.1: 62
Deactivating 2.1: 63
Switc hes
Emerge ncy nasher 3. l: 48
L ig ht switches 3.1 : 46
Powe r ou tsi de m irrors 3.1: 56
Power roof3.l: 42 P owe r w indo ws 3.1: 39
Switc hing off th e e ngin e
W ith
ig n itio n ke y 3 .1: 97
T
Tachometcr3.I: 6
Tank
Fill ing the tank 3.2: 30
F uel ga uge 3. 1: 7
Op ening the fu el fi ller
3.2: 30
Technical modifications 3 .2: 28
T et her anc ho rs 2.1: 65
T et her strap 2.1: 65
Tie-down hooks 3.1 : 78
Ti e-clowns 2. 1: I I
Tire and whee ls 3.2: 5 1
Tire press ure 3.2: 56
Tir e pressure monitor in g syste m 3.1
Warn ing li ght 3.1: 30
Booklet 0 .1 Gen eral Ind ex
Tires
Service life 3.2: 59
Speed Ratin g Le tte rCode 3.2 : 62
Tire manufa cturing date 3.2 : 62
Ti re speci fica tion s 3.2: 62
Trea d depth 3.2: 59
U niform tir e qual it y grading 3.2:
W inter ti res 3.2: 65
T ir e s and wheels
Dim ensio n s 3 .2: 51
New3.2: 6 1
S now chains 3.2: 66
Wh eel b olt s 3 .2: 66
Winter tire s 3.2: 65
Tool s 3.2: 67
Torn or frayed safety belts 2 .1: 1 7
To win g 3 .2:
77
Genera l no te s 3.2: 87
When can your vehicle not be towed? 3.2:
88
To win g eye 3 .2: 86
Trailer t owing
Brak es 3.2 : 11
Dri ving tips 3.2: 13
Operating instr uctio ns 3.2: 12
Sa fety c hain s 3.2: 11, 12
Technica l requ ir eme nts 3.2: 10
Tir e press ure 3 .2: 12
Tow ing t ips 3.2: 13
Trail er lights 3.2: 11
Trailer weigh t 3.2: 12
Trail er turn sig na ls
Wa rnin g light 3.1 : 5 1
Tran sport Canad a 3.2: 90
Tran sport in g long item s 3.1: 62, 69
T read Wear Indicato r (l WI ) 3.2: 59
Tnmk 2. 1: 1
O
Trunk lid 3.1 : 37
Turn sig na l a nd high beam leve r 3.1: 50
Turn sig na ls 3 .1: 50
Wa rnin g ligh t 3 .1: 24, 5 1
u
Unde rb od y se alant 3.2: 22
Un faste ning
Safety belts 2.1 : 24
Unidir ectional tir es 3.2: 51, 73
Uniform tire qua lity g radin g 3.2: 64
Alphab etical ind ex 11
Page 216 of 477
Booklet 3.1 Controls and Equipment
Applies to vehicles: H ighline instrumen t cluster and multi-function steering wheel
Example of using the menus with the mult i- function steering wheel
All menus in the i nstrwnen t cluster can be used following the steps described here.
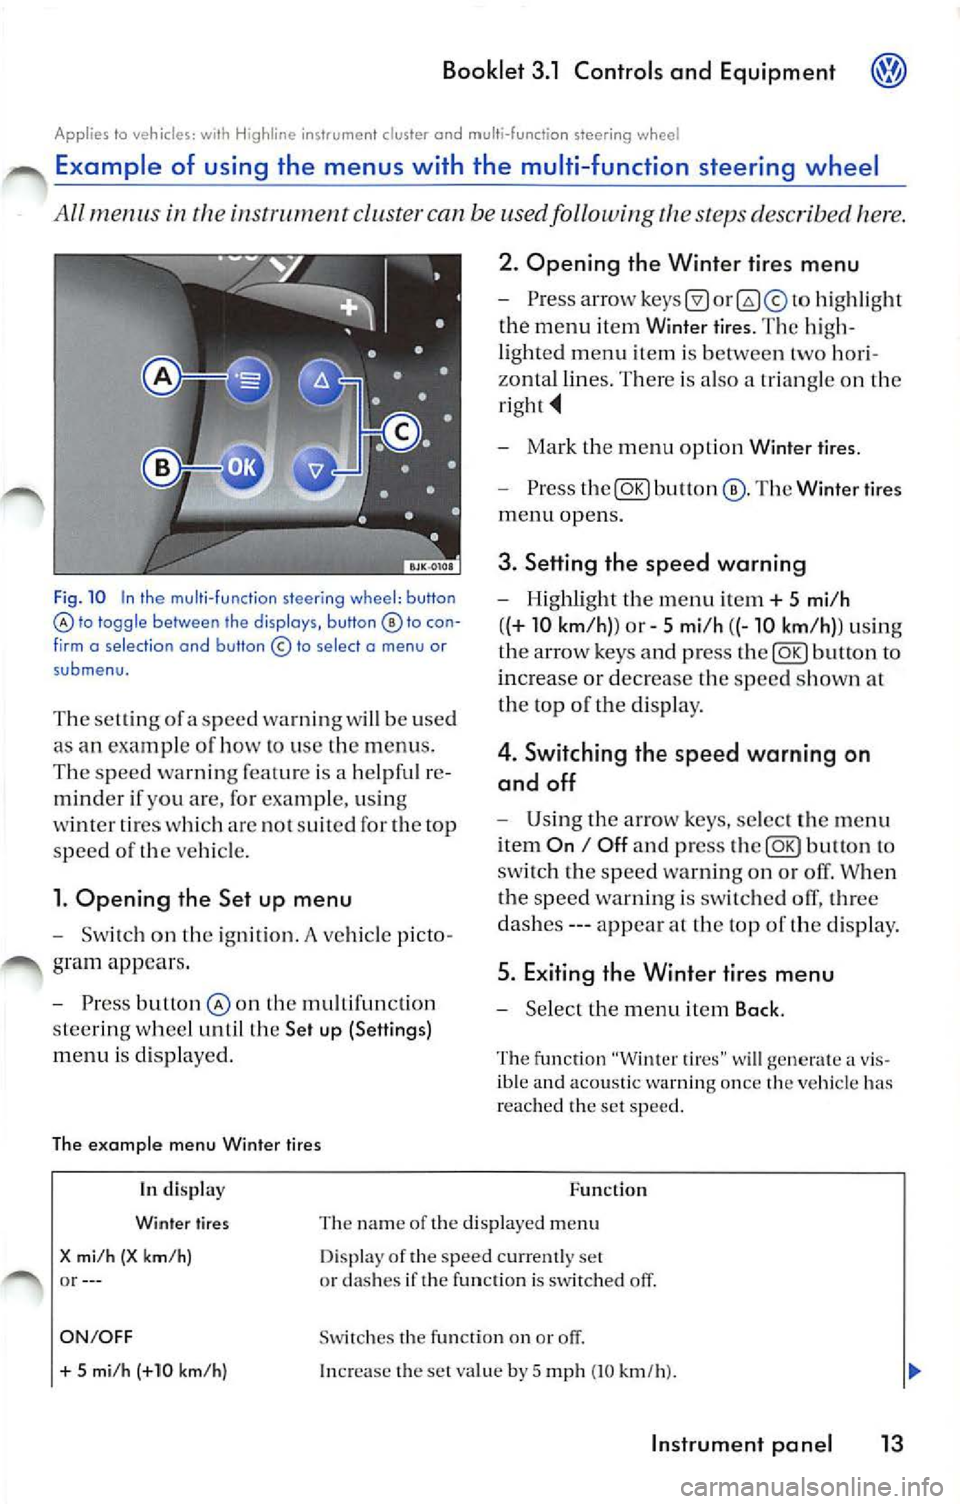
Fig . 10 In the multi -fu nction steering wh eel: button lo toggle between the disp lays, button to con
f irm o se lect ion and button © to select o menu or
submenu.
T he se lling of a speed warning w ill be used
as an exam pie of how lo use the menus .
The speed warn ing feat ure is a helpfu l re
minder if you are, for example, usi ng
wi nter ti res whi ch arc no t suit ed for th e top
s p ee d of
ve hicle.
l. Opening the Set up menu
Switch on the ignition. A ve hicle p icto
gram appea rs .
Press butlon the mult ifunct io n
s tee rin g whee l until the Set up (Settings)
menu is disp layed.
The example menu Winter tires 2. Opening the Winter
tires menu
hig hli ght
the menu item Winier tires. The hig h
li ghted menu item is between two hori
zonta l lines. Th ere is also a trian gle on the
Mark the m enu opt ion Wint er tire s.
Press The Winter tires
menu opens.
3. Setting th e speed warning
Highlight th e menu it em+ 5 mi/h
( (+
10 km /h )) or 5 mi /h ((-10 km /h)) usi ng
th e ar row keys and p ress
butto n to
increa se or decrease the speed s how n at
th e top of t he di sp lay.
4 . Switching the speed warning on
and off
U sing th e arrow keys , select th e menu
i tem
On I Off a nd press to
sw itch the sp ee d wa rnin g on o r off. When
t h e s peed warnin g is swi tched olT, three
da she s --- appea r at the top of the disp lay .
5. Exiting the Winter tires menu
Se lect the m enu item Back .
The fu nction "Winter tires" w ill generate a v is
ible and acoustic warn ing once the ve hicl e has
r eac hed th e set speed .
In di splay
Winter tires
X mi /h (X km/ h) or--- Function
Th e na m e of the displaye d m enu
D isp lay of the speed cur ren tly set
or dashes if the function is switched off.
ON/OFF Swi tc h es the fu nction on or
+ 5 mi /h (+10 km/h ) In crease the set va lue by 5 mp h (10 km/h ).
Instrument pan el 13
Page 217 of 477
Booklet 3.1 Controls and Equipment
Function
In di splay
5 mi /h (-10 km/h)
Bock Dec reases t he se t va lue by 5 mph (10 km /h }.
Th e
Winter tires men u is close d and th e las t d is pla yed menu is
o pene d.
Tips
The m en us s ho wn in t he di spl ay dep end s on th e
veh icle elec tronic s an d th e o ption leve l of your
App lies lo ve hicles: wi th H igh line i nstr u ment cluster
ve hi cle. If you a re not s ure, as k yo ur authori zed
Vo lkswage n dea ler for as sis ta nce.
Example of using the menus with the windshield wiper lever
All menus in the cluste r can be used following the steps described here.
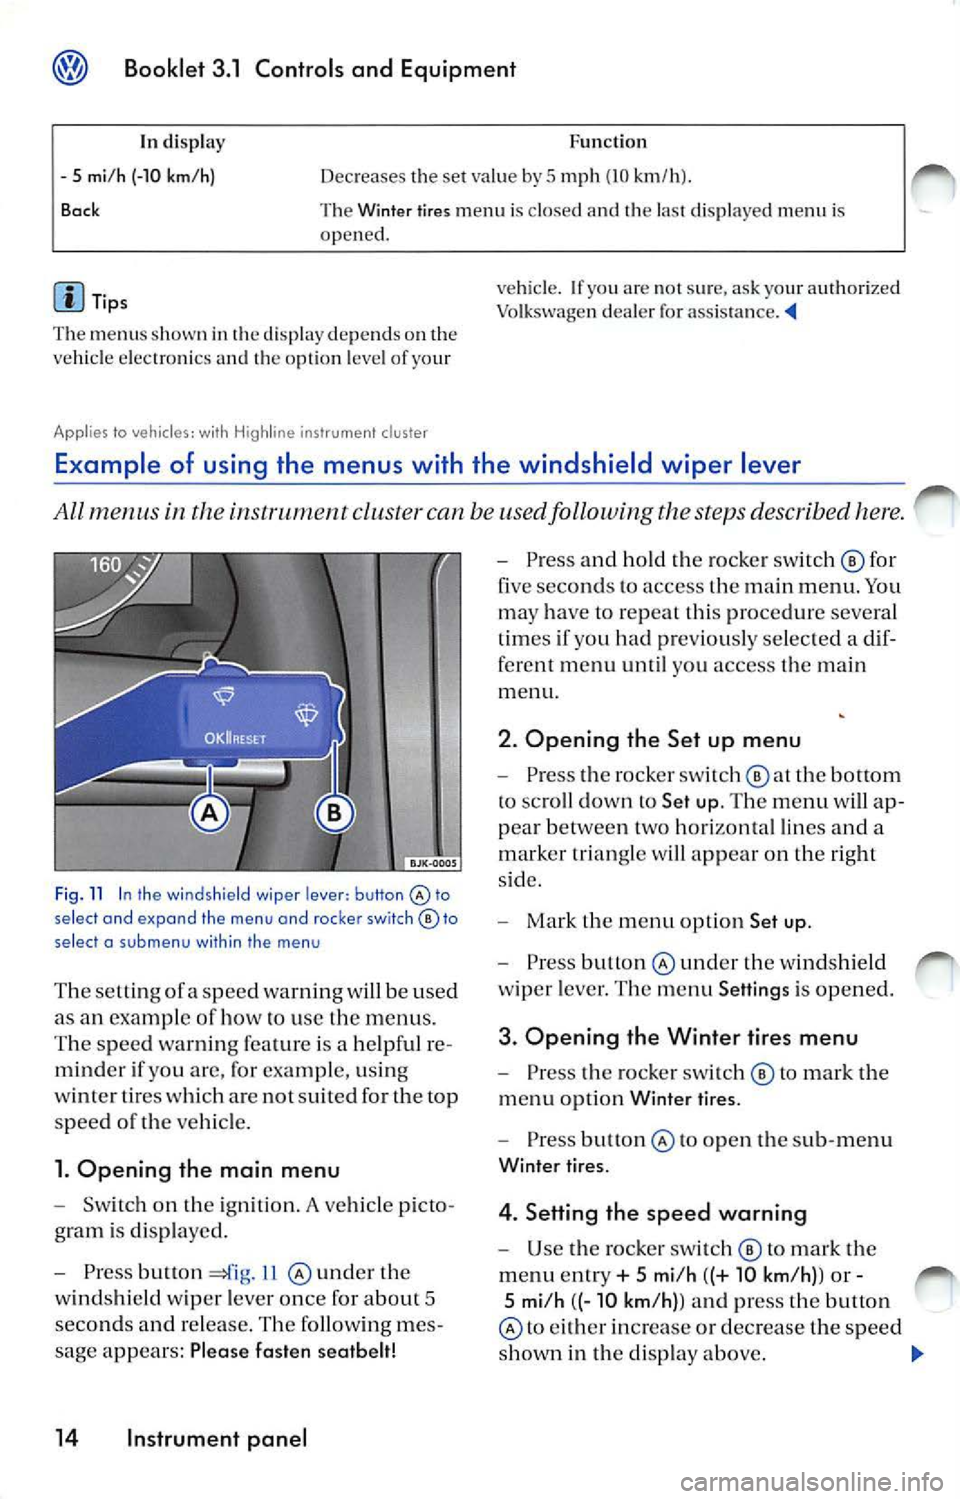
Fig . 11 In the wind shield wiper lever: button select and expand the menu and roc ker switch© to
select a su b m enu with in the men u
The se tting ofa sp eed warnin g will be used
as an examp le of how to use the menu s.
T he s pee d wa rnin g fe atu re is a help ful re
mind er if yo u are, for exa mpl e, u sin g
w int er tires w hich are not suit ed for the top
spee d
the ve hicl e.
1. Opening the main menu
Switch on the ig ni tion. A vehicle p icto
g ram is di spl aye d.
Press button 11 und er th e
w in ds hield wiper leve r o nce for abou t 5
seco nds and re lease . The followin g me s
sage appears: Plea se fasten seatbelt!
14 Instrument panel
Press an d hold the ro cke r sw itch © for
five seco nds to access the m ain men u. Yo u
ma y have to repeat this pro cedur e severa l
t im es if you had pr eviously se lec ted a dif
ferent me nu until you access the main
m enu.
2. Opening the Set up menu
Press the rocker switch the bottom
to sc roll dow n to Set up. The menu will ap
p ea r betwee n two hori zon ta l lin es and a
m arker tr ia n gle w ill app ear on the right
s id e.
Mark the m en u opt io n Set up .
Press under the w indshi eld
w ip er leve r. Th e m enu Setting s is opened.
3. Opening the Winter tires menu
Pr ess the ro cke r swi tc h © to m ark the
m enu opti on Wint er ti res.
Pre ss to o pen th e sub-m enu
Winter tir es.
4. Setting the speed warning
U se the ro cker sw itch © to mark the
m enu ent ry + 5 mi/h ((+ 10 km /h) ) or -
5 mi/h ((- 10 km /h) ) a nd press the button
to eith er in crease or de crease the spe ed
s h ow n in th e di sp lay above.
Page 218 of 477
Booklet 3.1 Controls and Equipment
5. Switching th e spee d warning on
and off
U se the ro cker switc h © to select
m enu point ON I OFF an d pr ess th e
bu tton @
sw itc h th e spe ed warnin g ei
on o r off. Thr ee das hes ---app ear al
t h e top of th e di sp lay if th e sp ee d wa rning
is sw itch ed off.
Th e ex amp le menu Winter tires
6. E xiting the Winter t ires menu
Sc roll dow n to Back and pre ss butt on
The function "Wi nter tire s" w ill gen erate a vis
ib le an d aco ustic wa rning on ce the ve hicle has
r eac hed the set sp eed.
In disp lay
Wi nter tires
X mi /h (X km /h )
or --- Func
tio n
Th e name of th e di sp layed men u
D is pl ay of th e s pee d curr entl y se t
o r clas hes if th e function is sw itc h ed off.
ON/ OFF Swit c h es th e fun ctio n on or off.
+ 5 mi/ h (+1 0 km /h )
- 5 mi/h (-10 km /h )
B ock I
n crease the set va lu e by
5 mph (10 km /h ).
Decreases the set va lue by
5 mp h (10 km /h ).
T he W inter tires m en u is cl osed a nd the las t di spl aye d menu i s
ope ned.
d is p la y depe nds o n th e
ve hicl e e lectro nics and th e op tio n leve l o f yo ur
Vehicle status menu
vehicle. If yo u are not sur e, ask your Vo lkswagen dea le r fo r ass is ta nce . ._
Thi s m enu will disp lay warning or information text s.
Op eni ng the Veh icl e status m enu
Se lec t Vehicle statu s men u and press
b u tto n
14 , fig . 11 @ und er th e
w indshie ld wipe r leve r.
O r
Pr ess but ton 13 , fi g. 10 th e
mul ti-func tion stee rin g w hee l
unt il th e
Veh icl e s tatu s menu i s di sp laye d.
Where applicabl e P
ri ori ty
2 warning s and i nformatio n tex ts w ill
d issa pea r from the disp la yed automatica lly af te r
so me time, but the y w ill be s tored in th e Vehi cle
s ta tu s m enu .
I f th ere are no priorit y
I warnin gs, then the pri
or ity 2 wa rnin gs will appear one af ter th e oth er.
If th ere are no prio rit y
I or priority 2 wa rnin gs
p rese nt, OK or N o en try w ill appea r in th e
d is pl ay . ._
Instrument panel 15
Page 329 of 477
Booklet 3.2 Tips and Advice
Braking power and braking distance
Braking power and braking distance are influenced by driving situations and
road
Worn brake pads will not provide good braking.
The amount of wear and tear on the brake pads
depends to a great extent on the cond itions
und er which the vehicle is opera ted and the way
the vehicle is dr iven. If you do a lot of city
driv ing, drive short distances or have a sporty
driving style, we reco mm end th at you have the
thickness of your brake pad s checked by an au
thor ized Volkswagen dea ler more frequently
than r ecommend ed in the service schedule.
I f you dr ive witJ1 wet brakes , for example after a
dri ving through water,
heavy rainfall or
after washing the vehicle, brakin g power will be
reduced and sto pping distances w ill be longer
because the brake d iscs will be wet or in winter
ma ybe even frozen
the brakes must be dried
with severa l ca reful brake applications.
Brake fluid absorbs water and must be c hanged
every two years. Heavy use of the brakes can
cause vapor lock if the brake fl uid is too old.
Va por lock reduces braking power, increases
stopp ing distances and can even cause total
brake failure.
WARNING
• New tires and new brake pads do not pro
v id e maximum grip, control or braking abilit y.
• To reduce the risk of losing control, a colli
s ion and se rious persona l injuries, drive with
special ca re for the first
350 mil es (560 km).
• New brake pads do not have the best stop
ping power for the first
150 mil es (240 km) and
must be broken in. You can com pensate for
the slightly reduced braking ability by drivin g
w ith care and applying more pressure on the
brak e pedal.
• Never fo llow other vehicle s too close ly or
put yourse lf into other situ ations that might
r equ ire s udden , hard brakin g especially when
th e brake pads have not been broken in.
WARNING
Wet brake s or brak es coa ted ice or road
sa lt react slower and need longer stopping dis
tanc es.
• Carefully apply brakes for a lest.
• Alwa ys dry brake s and clean olT ice coa t
ings and salt coa tings with a few cautiou s
brake app lica tions.
• Always read and hee d all
in "Break ing in tir es and brake pads" on
page 7.
WARNING
Overheated brakes will reduce the vehicle's
s topping power and increase stoppin g di s
tances.
• Always avoid over hea tin g the brakes!
• When driving downhill, the brakes have to
work hard and hea t up quickly .
• Before driving clown a long, steep hill, al
ways red uce spee d and downshift to a lower
gea r. This will let th e ve hicle use engine
braking and reduce the load on the brakes.
• Always c han ge the brake fluid at least
every two years. Hard braking with old brake
fluid may cause a va por lock. Vapor lock re
duces brakin g power, increases s topping dis
tan ces and can even ca use to tal brake failure.
• A damaged front spoiler or new non stan
dard spoile r ca n reduce the airflo w to the
brake s and cause them to overheat.
• Always sec an au thorized Vo lkswage n
dealer or qualil1ed workshop if yo u think th at
you may have damaged the front spoiler.
• Be sure to read and heed all WARNINGS
and the information =-page 27, "Accessories
and part s" before buying accessorie s.
8 Driving and protecting the environment
Page 342 of 477
Locks
Lock cylinders can freeze in winter.
To d e-ic e th e lo ck cylin ders use a sp ecial lo ck
cy lind er de- ice r spra y wit h lubri cating anti ·
corrosive
Cleaning chrome parts
- Cle an chrom e part s wi th a damp cloth.
- Po lish chrome part s with a so ft, dry
cloth .
You can als o u se s pecial chrome cleaner.
C hrome cleaners will help re mov e surfa ce grime
a nd stain s from chrom e surf aces.
Cleaning alloy wheels
Every two weeks
- Was h sa lt and brake du st off alloy
w heel s.
- Use an ac id free dete rgen t to clean the
w hee ls .
Every three months
- Appl y a har d wax compound to the
w hee ls .
Li ght alloy whee ls req uire reg ular car e re mo ve
road sa il a nd brak e by reg ularl y wa shi ng w hee ls, other wise fini sh will du ll and they
wi ll be hard lo clean.
Alwa ys use a n ac id-fr ee dete rge nt for alloy
w heel s.
Do not u se vehicle polis h or oth er abra sive
u cts . I f prot ective coat ing is damag ed , fo r amp le by s tone impact, th e dama ged area
s h ould be re pair ed imm edi ate ly.
Booklet 3.2 Tips and Advice
Note
To pre vent scra tc hin g chrom e surfaces:
• Do not use an abra sive care pro duct on
c hr om e.
• Do
clean or polish chr ome are or dusty or clean or p olish in sand y
o r dusty
WARNING
I mp roper use of power washers ca n ca use rious, invis ible and permanent tire damage
l ead ing to tire failure and lo ss of ve hicle
trol.
• Neve r was h tires with a jet that sprays the
water out in a direct stream eve n from a
tance or for a very short time.
WARNING
Wet brak es or brake s coated wi th ice or road
sa lt react slower and need longer sto pping
tan ces.
• Carefu lly appl y brak es for a
• Always dry brake s and clea n off ice ings and salt coating s with a few cauti ous
brake applications.
• Alw ays read and h eed all WAR NIN GS
8, " Brakin g pow er and braking
Cleaning and protection 21
Page 384 of 477

Maximum Perm issib le Inflatio n Press ure
T his nu mb er is th e g re at est a mount of
pres
s ur e tha t sh oul d ever be put in the tire und er
norma l driv ing cond itio n s.
R ep lac in g tires or rims on vehicles equipp ed
wit h
The air va lve o n all four tires (no t on the spare
ti re) is equip ped with a senso r, w hic h co nsta ntly
m on itors
a ir pr ess ure in side the tire, a nd
the n this Lu If
yo u ar e going to re pl ace the wheel rim s o n yo ur
ve hicl e, make sure the rim s also have these
se nso rs. The se nsor s mu st be co mp atib le w ith
TPM S sys tem o n yo ur vehicle .
I f yo u install rim s. w hich do not have th e se n
sors, o r ha ve sensors w hich are not comp ati ble,
th e TP MS will not wor k pro perl y. In case, theTPM S would n ot b e ab le to m oni tor pr ess ure or wa rn you if is necessa ry.
• Wheneve r you c hange se nso rs, yo u ha ve to
i n sta ll
valves.
•
dri ve the valve ste m cap s se
c ur ely m ou nted. We reco mmen d usi ng fac to ry
i n sta lle d va lve stem caps. As k your auth ori zed
Volkswage n dea le r if yo u los t va lve
caps.
T he in sta llat io n of re pla ceme111 tires
c ord hody plies in the tire si dewa ll m ay ca use
ma lfu nction tir e pre ssure monitorin g
sys te m (TPM S), and i s not recommended (cord
mat eri al informatio n is m olded on
ti re s ide
wa ll).
ch ec k yo ur TPM S indi cator af te r r eone or more tires o n yo ur vehicl e. If t he
TP MS indi cator is on. your TPMS is m alfu nc
ti o nin g. Your
tire m ig ht be incom
patibl e yourTP MS system, or some co mp o
n en t of the TP MS may be dam aged .
WARNING
• Usin g in cor rect or unmatched tires and
I or wheels or improper tire and whee l co mbi
nation s can le ad to loss of con tro l, co llisio n
and serio us perso nal injury.
• Always use tires, rims and whee l bo lts th at
me et th e specification s of ori ginal fa ctory- in
s talled tire s or other combination s th at h av e
b een sp eci fica lly app roved by the vehicle
manufa ctur er.
Booklet 3.2 Tips and Advice
WARN ING (continued)
• Tire s age even if they arc not being use d
and can fail su ddenl y, es peci ally at high
s peeds. Tire s th at are more than 6 yea rs old
can only be use d in an em ergenc y and then
w ith specia l care and at lower speeds.
• Never mount use d tir es on your vehicle if
yo u are not sur e o f th eir "previou s hi story."
Old used tir es ma y ha ve bee n damag ed even
th ou gh th e dam age ca nnot be seen that ca n
l ead to sudd en tir e fa ilur e and lo ss of vehicl e
control.
• All four whe els must be fitted with radi al
tir es of the s am e type, size (ro lling cir cumf er
ence) and th e sa me tread p attern. Dri ving
w ith diff erent tire s reduces ve hicle han dling
a nd can l ead to a loss of control.
• If the spare tire is not th e same a s th e tir es
that are mount ed on the vehicle - for examp le
with winter tir es - only u se the sp are tir e for a
s h ort period of tim e and drive w ith extra care.
Refi t th e no rma l road w hee l as soo n as safe ly
possib le.
• Neve r dri ve
than th e spe ed for wh ic h th e tires on you r ve hicle are
rat ed because tires that arc driven fas te r than
their rated sp eed ca n
sudd enly .
• Overloadin g tir es cause h eat build -up ,
s ud den tire failur e, includin g a blowout and
sudden defl ation and loss of co ntrol.
• Temperat ure grades apply lo tir es that are
properl y inflat ed and not over o r underin
flated .
• For tec hni cal reaso ns it i s not always pos
s ibl e to use whee ls from oth er ve hicles-in
s om e cases not eve n whee ls from the sa me ve
hicle model.
• If you insta ll w hee l trim d iscs on th e ve
hicle whee ls, make sur e that th e air flow to the
brakes is not blo ck ed. R edu ced airflo w to the
brakes can th em to ove rheat , in cre asin g sto p
ping distances and causin g a colli sion .
Checking and Filling 63