2008 VOLKSWAGEN JETTA display
[x] Cancel search: displayPage 287 of 477
Booklet 3.1 Controls and Equipment
Climatronic
Applies to vehicl es : with Climotronic
Controls
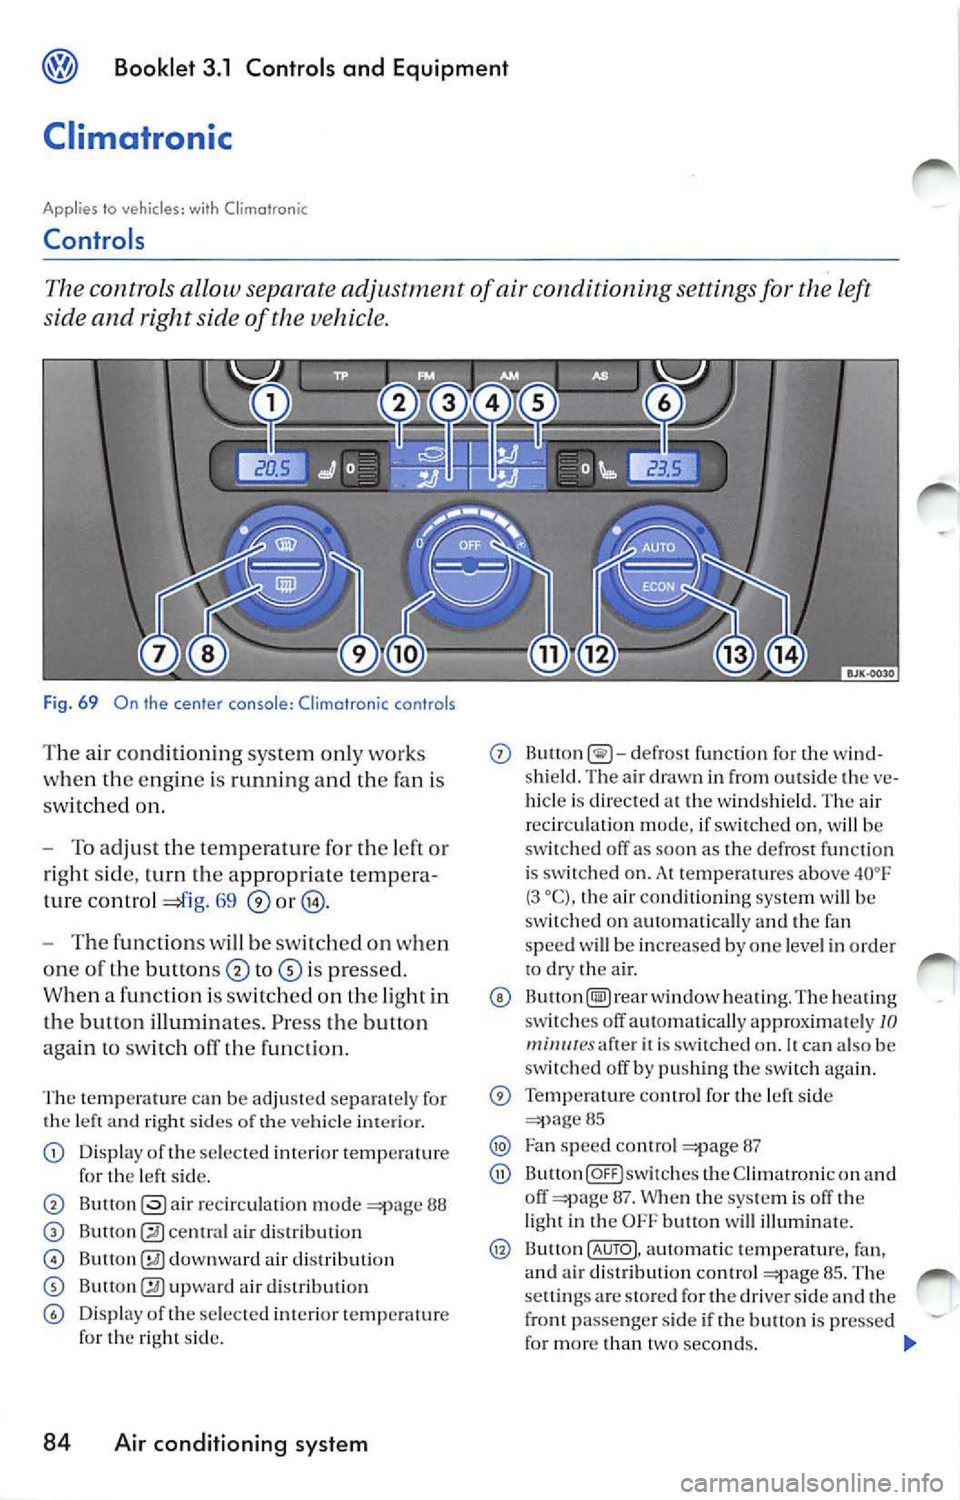
controls a llow sepa rate adjustm ent of conditioning settings for left
side and right side of the vehicle.
Fig. 69 On th e cen te r conso le: Climatran ic co ntrols
The ai r co nd iti on ing syste m only works
w hen the eng in e is ru nnin g and the fan is
sw it ched on.
To adju st th e temperatur e for the left o r
r ight sid e, turn the appropriate tempera
tur e contro l
69
T he functio ns w ill b e switc hed on when
o ne of the button s
is pre sse d.
W hen a function i s switched on th e light in
th e button illuminates. Press the b utto n
again to switch off the fun cti on.
The te mp era tur e ca n be adjusted separ ately for
th e left and right sid es o f the ve hicle in te ri or.
Display of the sele cted interior temp eratur e
for th e le ft side.
r ec ircu la ti on mod e 88
air di strib ution
air dis tribut ion
up war d air d istrib ution
Display of th e se lec te d int erior temperature
for right sid e.
84 Air condit ioning sy stem
defro st function for the w ind
s hi eld. The air dr awn in from outs id e th e ve
h icle i s dire cted at th e winds hield . The air
r ecirc ulation mode, if swi tched on, will be
sw itch ed off as soo n as the defro st fun cti on
i s sw itched on. At temperatures above
(3 the air co nditi oning system will be
sw itc h ed on automatica lly and th e fan
s p eed
w ill be in crease d by one leve l in ord er
to dry the a ir.
The hea ting
switc hes off au tomat ica lly app roxima te ly JO mi11111 esafte r it i s sw itched on. It can a lso be
sw itch ed off by push ing th e sw itch again.
Temperature contro l for the lef t side 85
Fa n sp ee d co ntrol 87
th e C limatro nic on a nd
o ff 87. When th e sys te m i s off t he
li ght in the OFF button w ill illu minate .
Button (AUTO) , automatic te mperature , fa n,
and a ir dis tri bution control 8 5. Th e
se ttin gs are stor ed for the dr iver s ide and the
front passenger side if the butt on is pressed
fo r m ore than t wo sec onds.
Page 305 of 477
Booklet 3.1 Controls and Equipment
Applies to vehicles: with on outomotic transmiss ion
Selector lever positions
The selector lever position s are shown on the display in the instrument cluste r
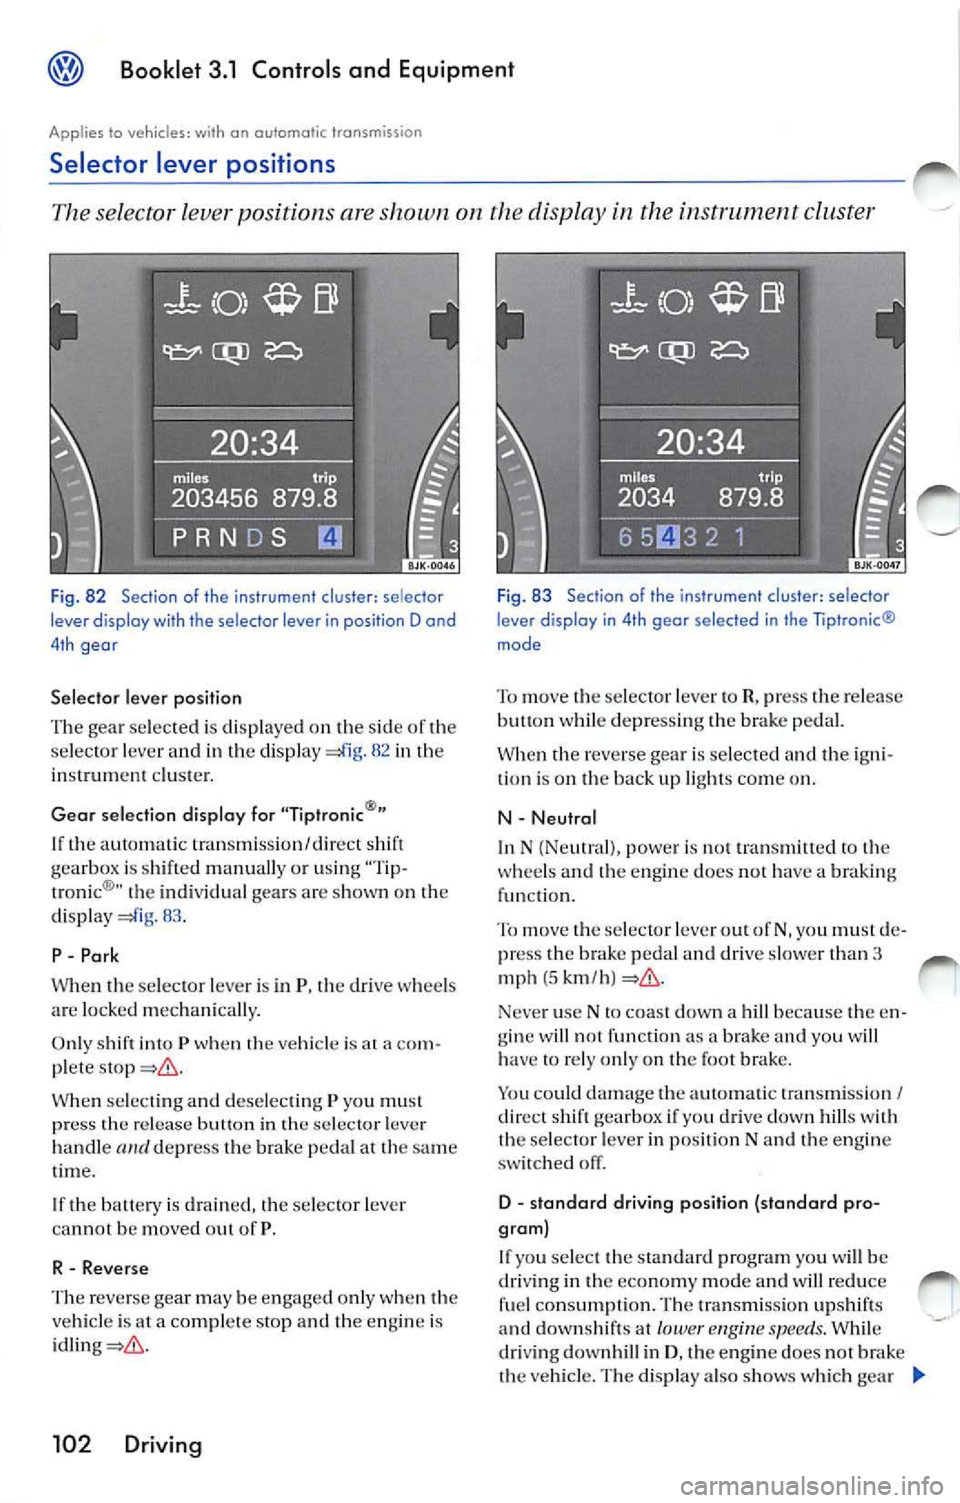
Fig. 82 Section of the instrument cl uster: se lec tor
lever d isplay wi th the selector lever in position D ond
4 th geor
Selector lever position
Th e gea r se lec ted is di splayed on the s ide of the
se lec tor
leve r and in t he d is pl ay in strum ent clu ste r.
Gear selec tion display for "Tiptronic
If th e automat ic tran smi ssion/dire ct shift
gea rbox is shifted m anuall y or u sing
troni c® " the indi vidu al gea rs are sh ow n on the
di splay 83 .
P Pork
When th e selec tor leve r is in P, th e dri ve w hee ls
ar e lo cked mec hani ca lly.
O nl y s hift into
P w hen the v ehicl e is at a plete
se lec tin g a nd deselec tin g P yo u mu st
p ress the re lease button in the selec tor le ve r
h andle
Re verse
T he reve rse gea r ma y be e ngage d onl y when the
ve hicl e is a t a comp le te stop and the engine is
pr ess the release
but to n whil e depr essing th e brak e pe dal.
When the reverse gea r is se lected and the
tio n is on th e back up ligh ts co me on .
N
Neut ral
In
N p owe r is not transmitt ed th e
whee ls and t he e ngine does no t h ave a braking
fun ction .
To move the selec tor leve r ou t of
N , you must pr ess the br ake ped al an d dri ve slowe r th an 3 m ph (5 km /h )
Neve r use N coast dow n a hill bec au se the gin e w ill not function a bra ke and you w ill
h ave to re ly onl y on th e foot brake.
You could dam age the aut om ati c tra nsmi ssio n
I direc t shift gearbox if yo u dri ve clown hills w ith
the sele ctor leve r in po siti on N and the en gin e
s w itch ed off.
D
engin e spee ds. W hil e
dri vin g do wnhill in D , th e en gine d oes not brak e
t h e v ehicle. The di spla y al so sho ws w hich gear
Page 306 of 477
Booklet 3.1 Controls and Equipment
has bee n se lec te d in ad dition to po siti on D 83 .
If po sit io n N h as been selec te d and you wi sh to
se le ct D , yo u mu st pre ss the foot brake if th e ve
hi cle is stat io nary, or travellin g at under 5 km/h
( approx. 3 mph )
S - standard dri ving posit ion {sport program)
If y ou s ele ct t he sport pro gra m yo u will be
dri ving in a sport y mode . A ll forward gear s
shift and down shift automat ically at high er en
g in e s pee ds dep ending on en gin e load , you r in
di vid ual d rivin g sty le and th e ve hicle sp ee d.
W hile dr iv ing downh ill in S, the engin e docs not
the veh icle. Th e displa y al so sh ow s wh ic h
ge ar ha s be en se lec te d in addit io n t o po siti on S .
WARNING
Neve r switch off the engine before the ve hicle
ha s come lo a complete stop. You can lose co n
trol of the vehicl e, crash and be ser iously in
jured.
• The airb ags a nd safe ty bell pretensioners
w ill n ot work when the igniti on i s swi tched off.
• The br ake boo ster do es no t work when the
eng ine i s turn ed off. A lot mor e brak e pedal
pressure will be necessary to stop th e vehicle.
• The power steer ing system does not work
w hen the engine is turn ed off and you will
n eed more force to steer th e ve hicl e.
Applies to vehicles: with on a utoma tic trans missio n
Kick-down function
WARNI NG (continued)
• When the key is removed, th e steer ing
w hee l co lumn will lo ck up and you will not be
able to stee r th e ve hicle.
• Never coast down a slop e w ith th e trans
mi ssio n in Ne utral.
Tips
• If th e selec to r lev er i s un inte nti onal ly mo ved
int o N wh ile dri ving , take your fo ot off t he acc el
era to r p eda l a n d wa it until th e engi ne spee d has
dropp ed to idl e sp ee d before sele c tin g a dri vin g
po sition .
• If th ere is
fa ult in th e sys te m and th e auto
mati c tra nsmi ssion I dir ect shift gearbox is run
n in g in an emergen cy program if all the displays
of the s elector leve r position s for the au tomat ic
tr ansmi ss ion
I di rec t s hi ft g ea rb ox have light
ba ckg ro un d. The a utoma tic tran smi ssio n I di
r ec t shift gearbo x shou ld be c hec ked b y an au
thori zed Vo lkswage n dea ler as soon as
po ssibl e._.
Th e kick -down permits maximum a ccele ration the se lector lev er
is
D, So r
down, th e tran smi ssion p ermi ts a c
c e le ratio n. The tran smi ssio n aut om atica lly
down shift s, de pending on the road spe ed as we ll
a s th e eng ine sp ee d.
Th e tra nsmi ssion
not up sh ift until the en
g in e reac hes the engin e s pee d for th e
g ear sele ct ed .
WARNING
Accelerating on slippe ry road s can cause lo ss
of ve hicle control and serious per sonal injury.
• Be very careful when u sin g th e kick -do wn
especi all y o n sli ppery sur faces. Rapid
accelera tion may ca use w hee l spin and sk id
d in g.
• Use the kick-down fea tur e o nly w hen
and weather conditions permit
Driving 103
Page 313 of 477
Booklet 3.1 Controls and Equipment
Conve nien ce open ing 41
Conven ie n ce operatio n (elec tric
w ind ows) 18
Coo lant
li ght 11
Coo lant leve l
Warn ing 24
Coo lant te mperature
Gauge 6
Warn ing 24
Coo ling the glo ve
69
C ru ise co111rol 107
Wa rnin g light 29
Cup ho ld ers
I n the rear armrest 72
C up holder s in the center co nso le 72
C urrent f uel cons umption 9
D
Day time runnin g lights
Warning lig ht 30
Daytime dri vin g ligh ts 46
Di gita l c loc k 5
Di sp lay 7, 12
D is plays
One-co lo r display 12
Distance trave lled 9
Door re lease hand le 3
Door s
Wa rnin g lig ht 26
Drain the bauery 52
Driving time 9
Driving
an automatic transmi ssion 99
Dust
88
E
See Electron ic D iffe rentia l Lock
EDS
Wa rnin g light 27
E lec tric seal a djustment
See Seat adj ustme nt
Ele ctrical accessories 73
Elec tro-mechanica l power steering syste m
Warning light 29
110 Alphabetical index
Electron ic Diffe re nti al Lock
Wa rnin g lig ht 27
Electronic immobilize r 94
Wa rnin g light 23
Electro nic parking assistance 106
E lectro nic Power Control (EPC)
light 23
E lec tron ic Stabi liza tion Program 28, 91
Wa rnin g lig ht 28
Emergency
48
E m erge ncy wa rning lights
light 24
Engi ne fault
Warning light 23
E ngin e hood
Warning light 26
E ngin e malfun ction
Warn in g light 23
E ngine mana gement
Warn ing lig ht 23
E ngine oil pr essure
Wa rnin g light 11 , 25
Environmental inform ation
Fuel economy 6
Environmental tip
Fue l economy 77
ESP 91
See E lectronic Stabil ization Program
Exhau st warning light
Warning lig ht 22
F
Firs t- aid kit 74
Fog lig ht s 46
Foo t brak e
Wa rning lig ht 30
cen te r a rmr est 70
Fron t passenger
backre st
Folding forward 6 1
F ront seats 60
E le ctri ca l adj ustab le 62
Manua l ad justab le 60
Fuel filler cap Wa rnin g light 29
Fue l g auge
Di splay 7
Fuel level 7
Page 371 of 477
Booklet 3.2 Tips and Advice
The electrolyte level be checked reg ularly in high-mileage vehicles, in hot
cou ntri es and in older batteries.
- Open the engine hood and open the
batt ery cover at the front.
- C heck th e co lor display in the round
w ind ow at the top of the battery.
- If there are air bubb les in the window,
tap the w indow gent ly un til they disp erse .
Th e positio n of th e battery is sh ow n in th e corre
spo ndin g engine compart ment diagram
3.3. Th
e ro und window ("magic eye '') on th e to p of
t h e batt ery chang es color, d epending on the
c harg e le vel and ele ctrolyt e le vel of the ba ttery.
I f th e c olor in the w indow i s co lor less or bri gh t
ye llow . the elec trol yte le vel of the battery is to o
I la ve the ba tte1y ch ec ked by a q ualifi ed
d eal ers hip ..
The col ors g ree n and b la ck ar c use d b y the work
s h op t o diagno se the battery.
Charging and replacing vehicle batteries
All work with the vehicle battery req uir es specia l know ledge.
Have th e batteries checked by auth orized
Vo lkswagen deale r o r qua lified workshop be
t ween regular ma inten an ce i nt erva ls if you of te n
driv e short distance s or i f th e vehicle is not
driven for lo ng peri ods.
I f the bat te ry has discharged and you have prob
l ems starting th e ve hicle, the battery might be
damaged . If thi s happens, we re comme nd you
h ave the ve hicle batte ry c hecked by an autho
ri ze d Vol kswag en dealer
it w ill he erly recha rged o r re pla ced.
C har ging vehicle batteries
T he c har ging of the vehicl e batt eri es s hould be
l ef t to an aut horized Vo lkswage n deale r o r qual
ifi ed workshop, b ecau se your ve hicle is
equipp ed w ith specia l batteri es th at mu st b e
charg ed in a contro lled e nvironm ent.
50 Checking and Filling
Rep lacing a battery
T he batt eries have been specia lly deve lo ped for
th eir lo cat io ns and they have specia l sa fe ty fea
Genui ne Volkswage n batte ries me et th e m aint e
nan ce, and safety sp ecificat io ns
fo r you r ve hicl e.
WARNING
• u se on ly maint en an ce -fr ee or
cycle -free, leak-proof batteries with the same
s pecification s and dimen sions as the ori ginal
e quipm ent batt ery. S pecifi cation s are liste d
on the batt ery hous ing.
• Before sta rtin g
work on th e batteries,
a lways rea d and heed a ll in
"Loca tion of battery" on page 49.
Page 440 of 477
Booklet 3.4 P remi um Sound System
.0, WARNING (conti nued )
• Us e the Sound System only if road , traffic
an d weath er cond itions permit and you will
not be distracted from your driving.
Important information
Operating the Sound System while driving
D rivi ng on today 's road s demands th e full atten
ti o n of the driver.
The w ide range of sophisti cate d eq uipm ent de
tail s of modern car radio s offer not onl y a vas t
so urce of entertainmen t, but also import ant in
form ation reg arding t raffic updates, road condi
t ions, wea ther repo rts. etc.
Bu t re mem ber, you should onl y operate the
ra di o system wit h its num erous fe atures when
th e traffic situ atio n rea lly
in "Con
tro ls" on page 2.
For examp le, c hangin g CDs o r re ading song t i
tl es on a CD case or in th e rad io display when
drivi ng is o ften the ca use of aut o acc idents .
You s hould also set th e vo lume of your radio
sys tem so that yo u ca n h ear s ig n als from other
dr iv ers at a ny tim e.
Convenience radio coding For tec hn ical reason s. the conve nience radio
c oding is not ava ila bl e for all vehicle models.
In the past, it used to be tha t yo u had to manu
a lly recode t he radio wheneve r th e uni t was re
m oved from the ve hicle (for example, if th e unit
was removed to be repaired). or whenever the
veh icle battery was disco nnected (for examp le,
if yo u brou ght yo ur v ehicl e in to t he deale rship
for service a nd it was necessary to dis con nect
t he bauery). In eith er case , the power sup ply to
th e unit was cut off.
T hat has all ch anged w ith the new conven ie n ce
radio cod ing f un cti on: Once t he co de number
ha s bee n ent ered. it
will th en sy nchro nize itse lf
w ith "its" vehicl e!
.0, WARNING (co ntinu ed)
• Always set volume leve ls so that you can
clearly hear horns , si rens and oth er warning
sounds outside the vehicle .
If the power supp ly has been interrupted , the
radio will automa tically c hec k to see if it i s s till in
vehicle after the ignition has been switched
on . If this hap pen, th e radio will be ready for use
af ter just a few seconds.
It is th erefo re no longer necessary to d isengage
th e e lect ronic lock manuall y!
If t11e rad io ha s been in s ra ile d in anot her ve hicl e,
how ever, the electronic lock ha ve to be dis
engaged manually.
If
SAFE ap pea rs i n the disp lay a fter switchin g the
rad io on , it can then only be operated aga in afte r
entering tJ1e co rrect code
=> pa ge 34.
External CD changer1l
You also have the option of installin g a Ge nuine
Vo lkswagen CD Changer. Ask your authoriz ed
Vo lkswagen dealer about thi s optio n.
The CD change r is in stalle d in the front armres t
co mp artment. It is "re mote controlled" by th e
radio unit.
It allow s you ro load up to 6 CDs. See => page 32 for furt her information.
Vo lkswage n dea ler s have a ll the informa tion
conce rning in stallin g th e CD c hange r.
Tip s
• Please note tha t it em s marked with an as
t e ri sk(*) may be standard on ce rtain m odels , op
tional on otJ1 ers or no t ava ilabl e on yo ur model.
Always ch eck with your authorized Volkswage n
deale r to see if the feat ure or item ap plies to your
mod el.
• The radio code numb er and the radio seria l
numb er ca n be found on th e "Radio Card" at the
beg inning of the
Lit erature . ._
I) Availa ble as a fa cto ry install ed opt ion, or your author ized Volkswagen dealer can install the oplional C D
c h anger for you. A lways chec k with yo ur a utho rize d Vol kswage n deale r if th is op tio n i s ava ilab le fo r yo ur
model.
Quick overview 5
Page 442 of 477

Booklet 3.4 Premium Sound System
Radio I CD
Radio
ON /OFF Button
88.3 89.1 94.1
Fig. 3 Radio b uttons
Pr ess the knob fig. 3 to turn the unit
on I
Whatever was playing when the uni! was las!
turned off -radio or CD -will automaticall y
come back on when the unit is turned on again.
The foll owing se lling s will b e saved whenever
yo u tu m off the system:
• Rad io: the frequen cy (ra dio s tat ion or
c h an nel) se ttin g.
• Interna l CD c han ger : the se lected CD track.
W hen you
on the again , th e ra di o or the
CD player w ill co me on depend ing on which on
yo u wer e la st li ste nin g
when you turn ed the
unit off .
The uni! turn s off au!Omati ca lly w hen you re
m ove the key fro m the ign ition lock.
The radio can be turn ed on wh ile th e ignition
key is rem oved b y simpl y pressing the kn ob
88,3
about 1 hour. This procedure can be re p eate d as
o ften as des ired .
WARNING
Dri ver distraction causes accid ents, collision s
and ser ious personal injury!
• Never let yourse lf be distr acted by setting,
a djusting or using the Audio System.
• Use the Audio System only if road, traffic
and weather conditions p ermit and you will
not b e distracted from your driving .
• Alwa ys set vo lum e le vel s so that you can
clearly hear horns, sir ens and other warning
s ounds outside the vehicl e.
Tips
If th e radio does not emit any so un d w hen it is
sw itched on and the word SAFE appears in the
display, then the unit i s electronica lly lock ed u p.
See
page 34.
Radio I CD 7
Page 443 of 477
Booklet 3.4 Pre mium Sound System
Volume Knob
Volume Control
Turn the rotary page 7, fig. 3
to adjust the vo lum e.
Setting Custom Turn-On Volume Level
Press and hold the [SCAN/TUNE) button©
for longer than 2 seconds to enter the set
up mod e. You will hear a signal tone .
Turn the [SCAN/TUNE) button until
SELECT ON VOLUME appears in the dis
pla y.
Use the knob to set the desired turn
on volume.
Press the [SCAN /TUNE) button again for
lon ger than 2 seconds to confirm the set
ting you have just made. You will hear a
s ignal ton e.
Setting the Speed Volume Control
(SVC)
Press and hold down the [SCAN/TUNE)
button for longer than 2 seconds to ent er
th e set up mod e. You wi ll hear a sign al
ton e.
Turn the [SCA N/TUNE) button until SPEED
DEP. VOLUME
appears in the di sp lay.
8 Radio I CD
In the lower part of the display the
words OFF and the number s 1, 2 and 3
appear. By using the station preset buttons
below these words select the volume
l eve l you want. 1 for a minimum volum e
ad justme nt in accordance to spee d.2 for a
m ed ium volume adjustemtn in accor
dance to speed.3 for a maximum volum e
a djustment in accordance to spe ed.
Pre ss the [SCA N/TUNE) b utton again for
longer than 2 seconds to confirm the set
ting you ha ve just mad e. You will h ear a
s ignal tone.
Cu stom Turn-On Volume L evel
The volum e setting when the unit is tu rned on is
the same it was when the unit was turned off
(or ig inal factor y setting). However, yo u can pro-
g ram the unit for your own per sonal turn -on
vo lume level.
Speed Volume Control (SVC)
The Speed Volume Contro l automatica lly ad
justs the vol um e in accordance wit h road sp ee d.
Tips
• If you do not confirm the sellin g yo u ha ve
j u st made , th e unit automati cally return to
th e norma l operat io n m ode af te r about LS sec
onds . Your c usto m turn -on volume will no t b e
s tor ed.
• If
c u sto m turn-on volume th at you stored
is lo ud er than the t urn -off volum e leve l, the unit
wi ll use the turn-off volume th e nex t tim e it is
turn ed on.
• If the audio volume leve l is loud er than the
turn-on vo lume that you stor ed and
unit is
turn ed off, the unit will use the stor ed leve l the
next t im e it is turned on.