2008 VOLKSWAGEN JETTA lock
[x] Cancel search: lockPage 369 of 477
Booklet 3.2 Tips and Advice
Changing the brake fluid
The brake must b e chang ed e very ye ars
We r ecomm end th at yo u have the br ake fl uid
c h a nged by a n au th ori zed Volksw age n dea le r.
S to p! B efo re openin g th e eng in e hoo d, a lways
rea d and hee d all WA RN INGS
34. is jo b No . I w hen work ing in e n gine com
p a rtm ent ".
B rak e fluid absorbs mois tu re. Ove r tim e. it w ill
a bsor b wat er fr om th e air . If
co n1en 1 in
th e brak e fluid is too high, brake co uld co rro de. Too much wa te r in brake fl uid
co nsid erabl y re du ces th e boilin g of brak e fluid. Very heavy use of 1h e bra kes old
b ra ke fluid may ca use va por loc k. Va po r l oc k re
du ces brakin g powe r. in creases s!Opp in g di s
tan ces and can ev en cau se to tal br ake failur e.
Fo r thi s re a so n th e brak e fluid m ust be r epla ced
ev ery
y e ars.
Only use brak e fluid
th e US
standard FM VSS 116 D OT 4. Th e fluid mu st
b e new.
WARNING
Stop! Before working in the engine co mpart
m en t, a lways re ad and heed all
34. Th e eng in e co mpartm en t of motor vehicle is a po tent ially dangerou s area
and can ca use s eriou s per sona l injury.
WARNING
Brake failur e ca n r esult from old o r incorr ec t
brake fluid.
48 Ch ecking and Filling
,0. W ARN ING (c on tinue d)
• U se onl y brake fluid that meets SAE speci
fi ca tion J 1703 and conforms to Federa l Mo tor
Veh icle Safety Sta ndard 116.
• Alwa ys check wit h your a uthor ized Vo lk
s wagen dea le r to make su re that yo u arc usin g
the correc t
fluid.
• The correc t brake fluid is al so listed on the
l abe l o n the brake fluid reservo ir .
WARNING
Brake fluid is poison ous.
• Alway s store brake fluid in the closed or ig
inal contain ers in a safe place.
• To reduce the risk of po iso nin g, ne ver u se
em pty food or beverage co ntain ers that might
mislead someo ne into drinkin g from th em.
• Always keep brak e fluid out of the reac h of
c hildr en.
• Always c hange the brake fluids as required
in the m aint enan ce boo klet. Heavy braking
w ith old brak e fluid m ay cause a va por lock
th at reduces braking power , in crea ses stop
pi ng di sta nce s an d can eve n ca use tota l brake
Note
Llrake fluid ca n d am age t he pa int. Wipe
a n y
b ra ke fluid from th e pa int imm edi ately.
flu id mu st be dr ained and di sp ose d of in
t h e prope r ma nne r observ in g environme ntal
reg ulatio ns.
Page 378 of 477

"Tires and ve hicl e lo ad limit s" for more imporinfor mati on.
Vehicles
ha ve full hub caps have valve ex
tenders ins tead of du st caps. To ch eck tire pr es
s ur e or acid air. you do not n eed to re move the
ex te nd er. 13e s ure to rein sta ll va lve dust caps
ch eck ing or adjust ing tir e pr ess ure.
A lways use an
tir e pr ess ure gaug e w hen
c h eck ing and adju stin g i nfl atio n pr essu res .
C hec k all of the
and b e sure not l o forg et th e
s par e tire. If p ress ure in an y is too high
w hen the tire is "co ld," let o ur of the tir e
s lowly with th e of the tir e ga uge and kee p
c h eck ing th e press ure until you re ac h th e pr es
s ure that is correc t for th e loa d (pa sse nge rs and
l u gg age)
ki nd of dri ving yo u plan t o do .
I f th e pr ess ure in any tire is too low , n ote the dif
f e re n ce between the press ure in the co ld
a nd
th e pr ess ure yo u need and add air yo u
n eed to reac h th e co rrect press ure for the vehicle
load (pa sse nge rs and lu ggage) for th e tire s on
yo ur vehicle as listed o n the on yo ur vehicle a nd
in thi s man ual
th e kind of driv ing y ou p lan
t o do .
Neve r excee d th e maxi mum infl ati on pre ssure
li sted on the tir e sid ewa ll for any reason.
R em emb er th at the ve hicle manufac turer, not
t h e tir e man ufa ctur er, de te rmin es th e co rrec t
t ir e pr ess ure for th e tir es o n yo ur vehicle
I t i s imp ortant
ch ec k th e tir e pr ess ure when
the tires are cold.
Vehicle witho ut
• the re quir ed tire pressure from the tir e
pressu re lab el on the ope n edge of th e dri ver's
door .
• Place the a ir press ure gauge on the dust cap s
- th ere is no need
re m ove them.
• The tir e press ures s ho uld onl y be checked
tire s cold. The sli ghtl y pres
s ur es ofwann tires no t b e reduced.
•
th e tire press ure to the load you are
ca rrying.
Vehicle with
• the req uir ed tir e pr ess ure from the tir e
pressure label o n th e ope n edge of the dr ive r's
do or.
Booklet 3.2 Tips and Advice
• Turn th e va lve s tem cap counter-clockw ise to
r emove it from the tire valve.
•
th e ai r press ure on the valv e.
• The tir e pressures sh o uld onl y be ch ecke d
w hen th e tir es are cold. T he slig htly rai sed pres
s ur es of
tires not be redu ced.
• Adju st th e tir e pr ess ure to the load you are
carry ing.
• Reins tall the valv e ste m cap on the valve.
When should I ch eck the tire pressure?
Th e co rrec t tir e pr ess ure is especia lly import ant
a t hi gh speeds . Th e pre ssur e s ho uld th erefo re be
c h ecked at leas t once a month and alwa ys befo re
s ta rt in g a jo urn ey. D o not forget to ch eck the tire
pr ess ure on th e spare whee l
When shou ld
I adjust the tire press ures?
Ad just th e tire press ure to the loa d you are car
ry ing. After changin g
wheel or repl acing
w hee ls yo u have tu adj ust th e tir e press ures on
a ll whee ls. In ad ditio n on ve hicles wit h TPMS,
yo u sh oul d s pecify new tire pressures
=boo klet
WARNING
In co rrec t tire press ure ca n result in sudd en
ti re failur e Jo ss of co ntrol, collision , seriou s
perso nal injur y an d eve n dea th .
•
tire s to the re co mm end ed and
co rrec t tir e pre ssure before drivin g off.
• Driving with und erinfl atcd tires bend
m or e, le ttin g th em get too hot res ulting in
tr ead separatio n, s udd en tir e fai lure ti re
fa ilur e and Jo ss of control.
• Excess ive sp ee d and /or ove rload ing ca n
ca use hea t build -u p, su dden tire failure in
cludin g a bl owo ut an d su dden deflati on and
Jo ss o f co ntrol.
• If th e tire pr essure is to o low or too high,
th e tir es will wear prema turely and the ve hicl e
wi ll not handl e we ll.
Not e
Dr iv in g w ith out valve s te m caps ca n cau se
applicab le Tire pressure monitoring system)
Checking and Filling 57
Page 389 of 477
Booklet 3.2 Tips and Advice
WA RNING (continued)
• Always pro perl y s ecur e th e ve hicle ja ck
a nd t ool kit in th e lu ggage co mpartm ent.
L o ose item s in th e vehicle ca n fly a round th e
in sid e o f th e ve hicle during hard brakin g or in
a c rash cau sing seriou s pers onal injur y.
Changing a wheel
Applies lo vehicles: with spare wheel
Getting started
WARNING (contin ued)
• Before y ou rai se yo ur ve hicl e the jac k,
al ways re ad and h eed all
Pa rk vehicle in a safe place befo re changing a whee l.
-If yo u have a flat tir e or pun ctur e, park
t h e ve hicle as fa r away from th e flow of
t ra ffi c as poss ible o n a firm , eve n surf ace.
- Turn o ff the engine. Turn o n the emer
ge ncy flas her.
- Apply the park ing brake firm ly and en
gage a gear or
pu 1 1h e se lecto r in P.
- A ll passe nge rs mus t leave the ve hicle.
Th ey sh o uld wait in a safe place (for ex
a mpl e behin d a g ua rd rail or other safe ty
ba rrier) .
- Block the w hee l o pp osite t he w hee l
b ein g cha nged wit h a su itabl e objec t. .
- If yo u are tow ing a tra iler, u nh itch it
fr om your ve hicle .
- Remove the spare w hee l and the ve hicle
t oo ls from t he lu ggage com part ment.
WARNING
C han gin g a w hee l, es pecia lly on the s ide the
ro ad , can b e da ngero us. To hel p re du ce th e
ri sk of seriou s perso nal inju ry:
• Alw ays sto p th e vehicl e as soon as
is safe
t o do so and mo ve the ve hicle a safe distan ce
68 What do I do now?
WA RNING (cont inu ed)
off th e ro ad wher e it i s safe lo c hang e th e
wh eel.
• Turn on th e emerge ncy flas her a nd set up
an other warnin g dev ice a bo ut 27 ya rds (25
m eters) behin d th e ve hicl e to wa rn ap
pro achin g traffi c.
• Always make sure th at th e gro und i s leve l
a nd
if n ecessary use a s turdy boar d
und er th e jac k.
• When one w heel is lif ted
th e g round
puttin g th e se lector leve r in P will not pre vent
s udd en ve hicl e mo vement .
• Always appl y th e parkin g brak e
and
e ngage the se lec tor lever in P to help prev ent
the vehicl e from m oving s udd enl y a nd s lip
p in g o ff th e ja ck.
• Always block the whee l oppos ite th e w hee l
be in g cha nged with b oth fo ld in g ch ocks or
s imil ar obj ec ts .
• If you arc towin g a tra iler, a lways unhit ch it
fr om yo ur vehicl e before star tin g to c hange
th e w hee l.
• Alwa ys use a ja ck th at ha s bee n approve d
b y th e m anufa ctur er for your vehicle .
• Neve r u se oth er j ac ks, ev en if th ey have
b ee n ap pro ve d for u se on oth er Vo lkswag en
Page 391 of 477
Booklet 3.2 Tips and Advice
Applies lo vehicles: wi th spore whee l
Removing the spare wheel
The spar e wheel is located und ern eath the floor covering in the luggag e compart
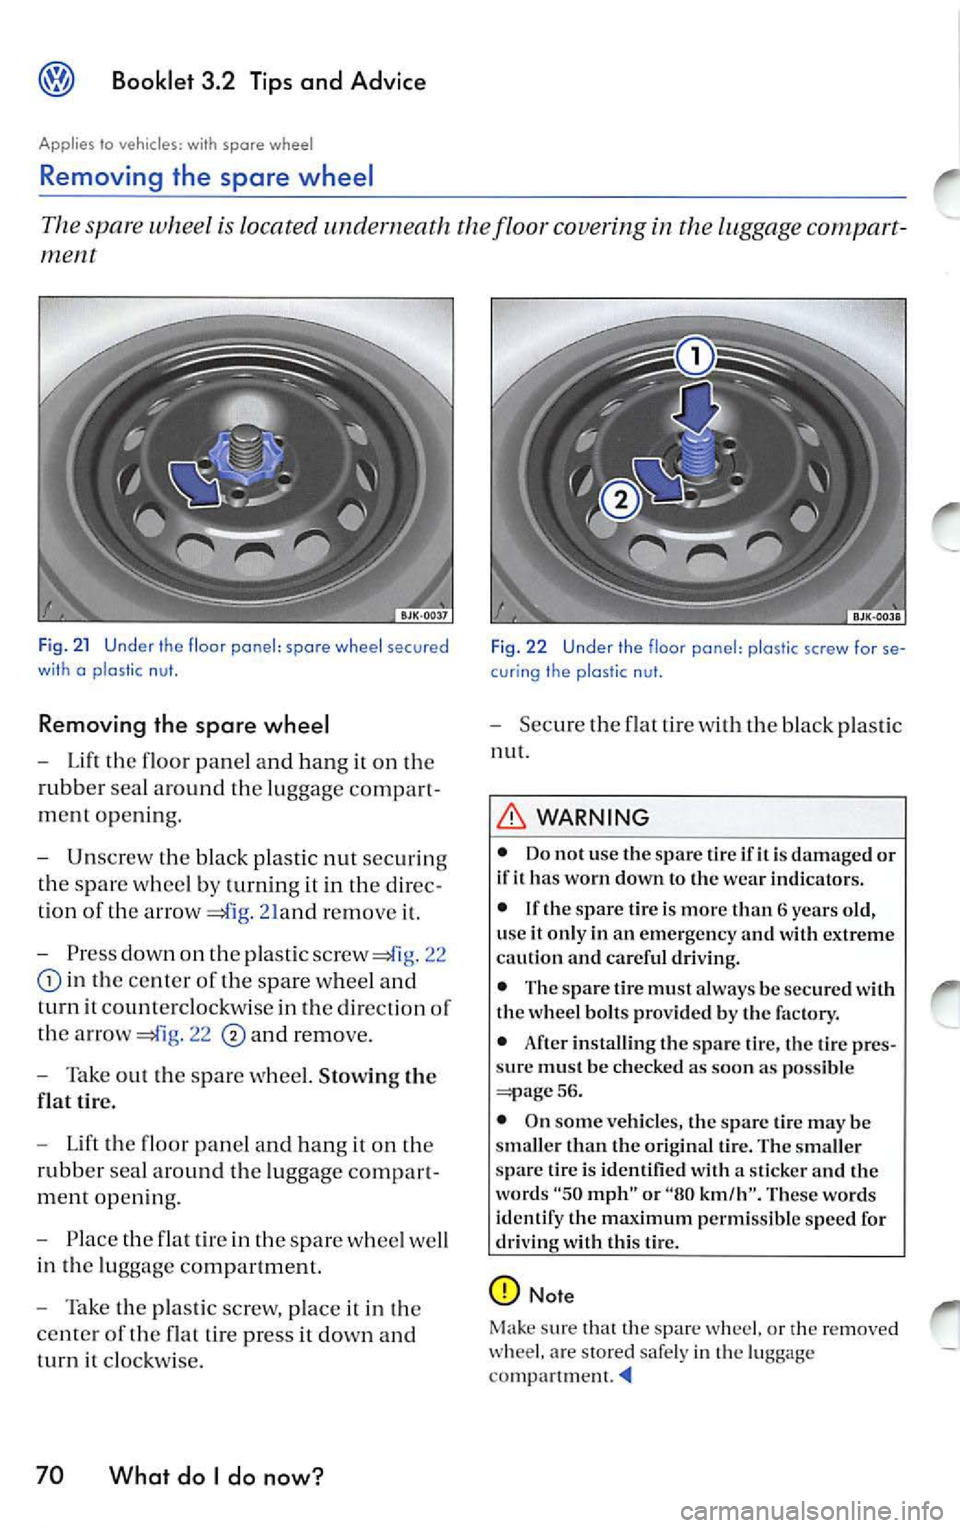
Fig. 21 Under th e floor ponel: spore wheel secured
wi th o p las tic nut.
Removing the spare wheel
-Lift floor panel and hang on
rubb er sea l aro und the luggage compart
ment openin g.
- Unscrew the black plastic nut securin g
th e s par e whee l by turning it in
direc
tion of th e arrow
21and remo ve
-Press dow n on pla stic screw 22
in the ce nter of the spare wheel and
turn it co unt erclo ckw ise in th e direction of
the arro w
22 and remove.
- Tak e out the s pare whee l. Stowing the
flat tir e.
- Lift the fl oor pan el a nd h ang i t on the
rubb er sea l around the luggage compart
m en t open ing.
- Pla ce the flat tir e in the spar e whee l we ll
in the lu ggage co mpartment.
- Take the pla stic scr ew, place it in the
c ente r of th e flat tire pre ss
dow n and
t urn
clockw ise.
70 What do I do now?
Fi g. 2 2 Under th e floor pone!: plo stic screw for se
cur ing the plostic n ut.
- Secu re the flat tire w ith bla ck pl astic
nut.
WARNING
• Do not use the spar e tir e ifit i s damaged or
if it ha s worn down to the wear indicators.
• If th e s pare lire i s more than 6 years old,
u se
it only in an em ergen cy and with extreme
cau tion and careful dri vin g.
• The spare tire mu st alwa ys be se cur ed w ith
the wheel bolt s provided b y the factory.
• After installin g the spare tire, the tire pr es
s ur e must be c hecked as soon as p ossible
56.
• On some ve hicles, the spare tire ma y be
sma ller th an th e original tire. The smaller
spar e tir e is identified with a sticker and th e
word s
"50 mph" or "80 km/h". These words
identify the max imum permissible sp ee d for
driving with this tire.
Not e
Mak e sure that the spare w heel. or
re mo ved ar e stored safe ly i n luggag e
Page 392 of 477
Booklet 3.2 Tips and Advice
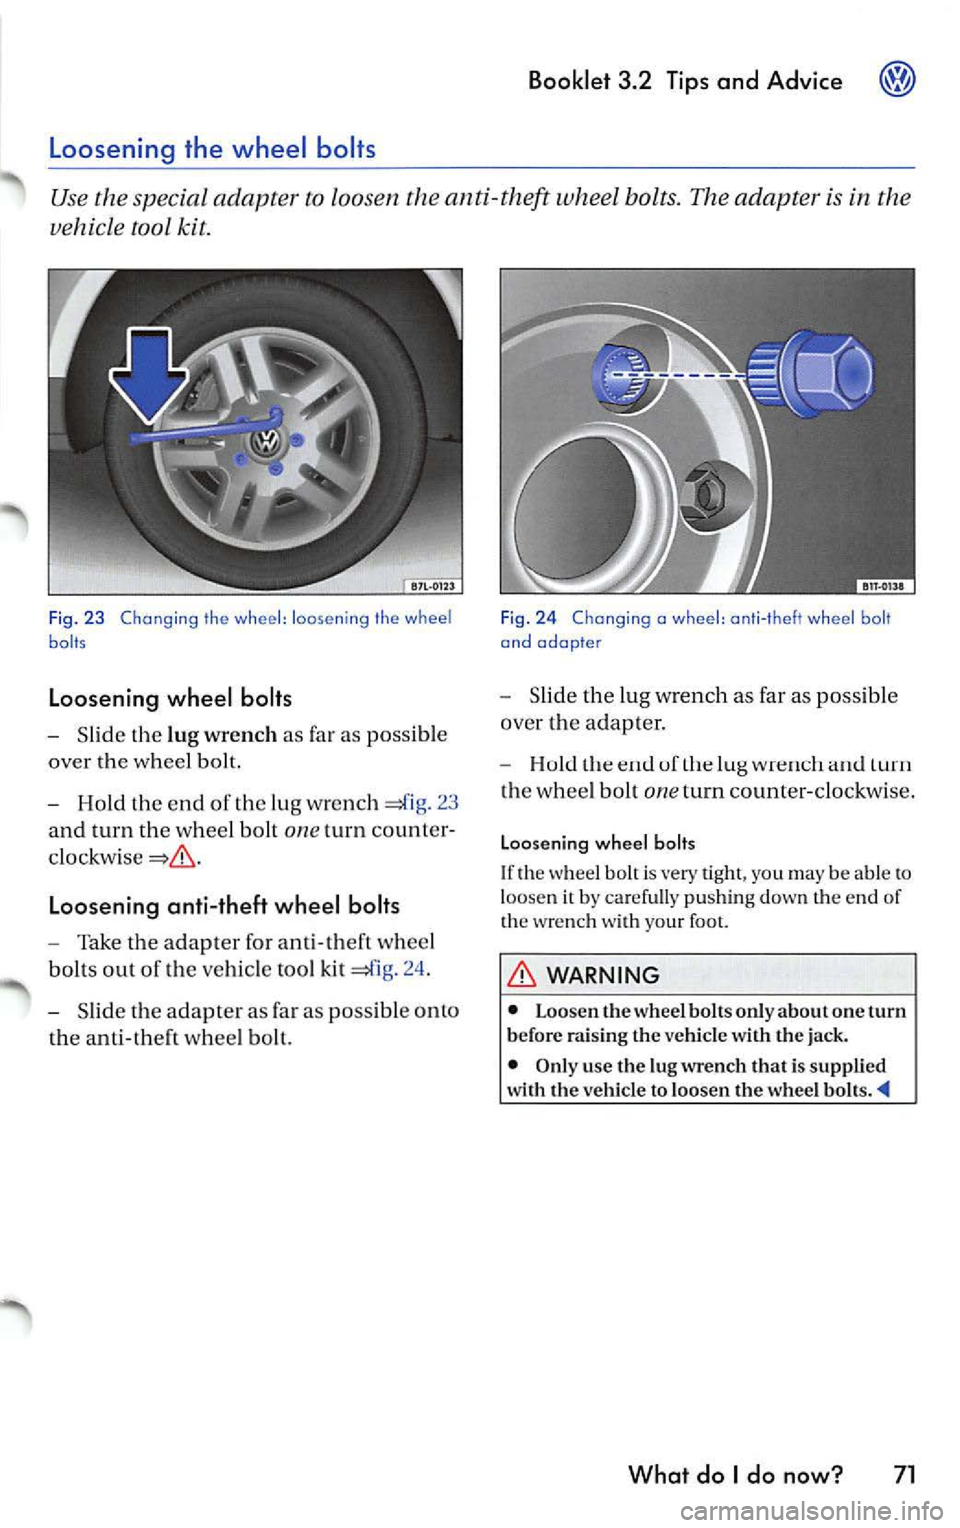
Slid e th e lu g wrench as far as possib le
over the whee l bolt.
Hold the end of the lug wre n ch 23
and turn the whee l bolt
one turn count er
Loosening anti-theft wheel bolts
Take the adapter for ant i- th eft w hee l
bol ts out of the ve hicle tool kit =£lg. 24 .
Slid e the adap ter as far as pos sib le o nto
th e a nti -theft w hee l b olt.
Fig . 2 4 Chang ing a wheel : ant i- t h eft whe el b olt
and adopte r
Slid e the lug w rench as far as possib le
ove r the adapter.
uf turn
th e whee l bolt one turn counter-clockwi se.
Loosen ing wheel bolts
If th e w hee l b olt is very tigh t, yo u may be able t o loose n it by carefu lly pu shin g down the end of
th e wre nch with your foo t.
WARNING
• Loo sen th e whee l bolt s onl y about one turn
b efor e rai sing th e vehicle w ith the jack.
• Only use the lu g wrench that is suppli ed
w ith th e ve hicl e to loosen the wheel
What do I do now? 71
Page 394 of 477
WARNING {continu ed)
• Never let anyone place any part of their
body underneath the vehicle when support ed
by the jack.
• Never support your vehicl e on cinder
blocks, bricks or other obje cts . These may not
Changing a wheel
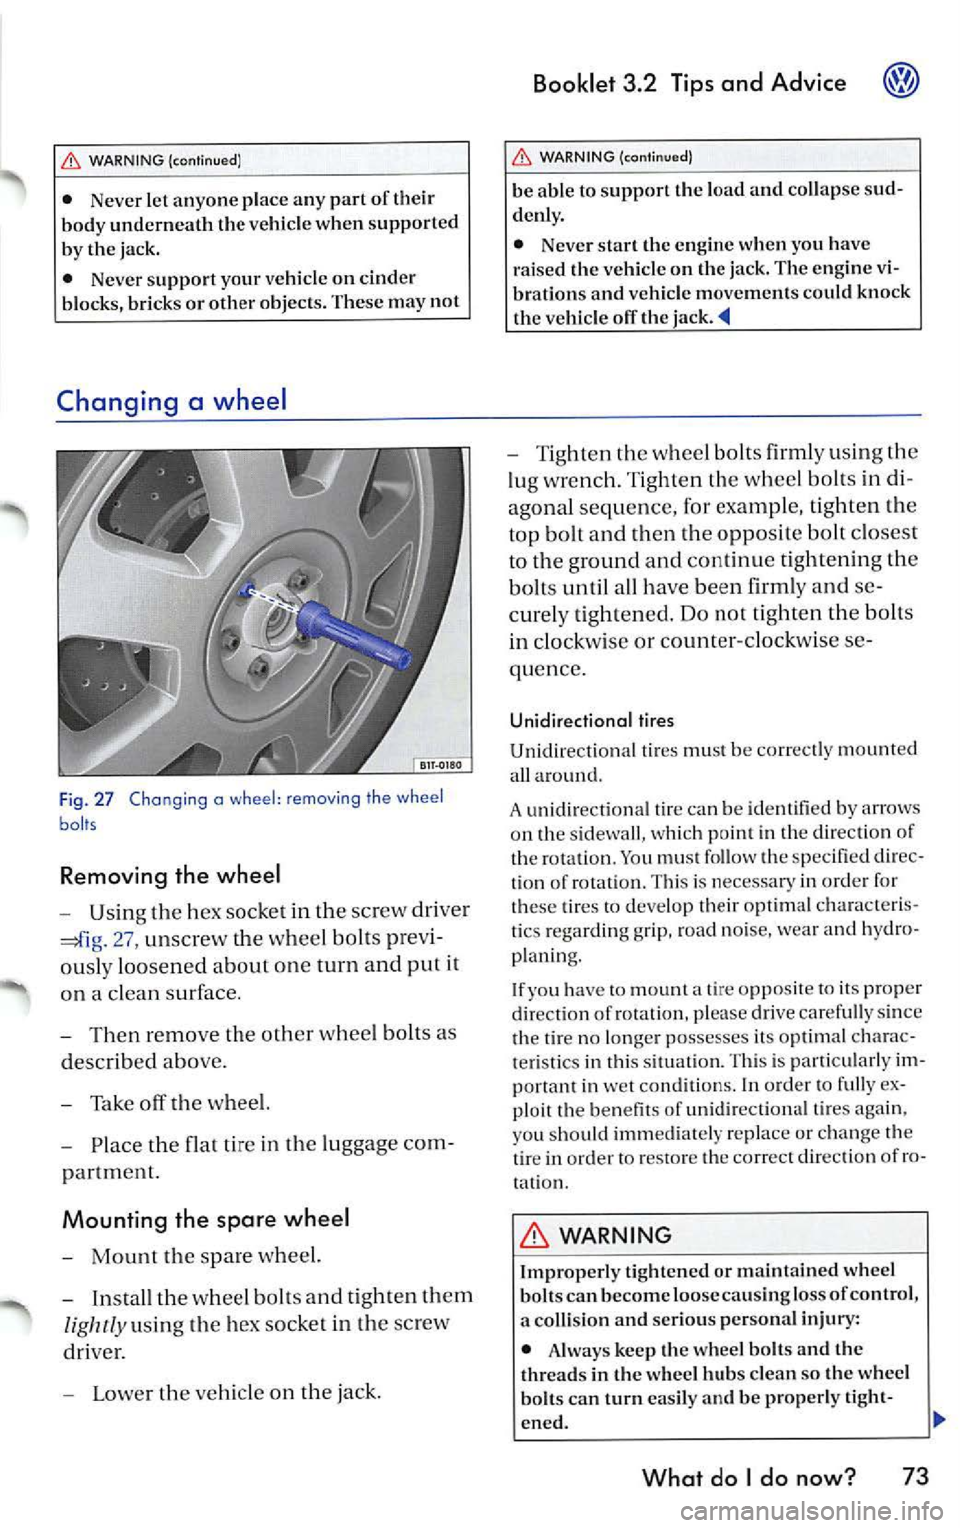
F ig . 27 Chang ing a wheel : removing the wheel
baits
Removing the wheel
-Usin g the h ex socket in th e sc rew dri ver
27, un screw t he w heel bo lts pre vi
o usly loo sen ed about on e turn and put it
o n a cl ean su rface .
- Then re mo ve the oth er whee l bolt s as
d esc ribed abo ve.
- Tak e off th e w he el.
- Place the flat ti re in the lu gg ag e co m-
p artmen t.
Mounting the spare wheel
-Mount the sp a re wh eel.
- Insta ll th e w hee l bolt s and tight en th em
lig htly u sin g th e hex so cke t in th e sc rew
dri ver.
- L ower th e ve hicle on the jack .
Booklet 3.2 Tips and Advice
WARNING {cont inu ed )
be able to support the load and collap se sud
denl y.
• Nev er start the engine when you have
raised the vehicl e on the jack. The engine vi
bration s and v ehicle movements could knock
the v ehicl e off the
- T ig ht en the wheel bolts firml y using the
lu g w re n ch. Ti gh te n th e whee l b olts in di
a gonal s equ ence , for e xampl e, tig h te n th e
top bolt and then th e oppo sit e bolt clo se st
to th e ground and continu e tight enin g the
bolt s until all have bee n firml y and se
c ur ely tight en ed. Do not tight en th e bolts
in clock wise or c ounter-cl oc kw ise se
quen ce.
Unidirectional tires
Unidir ectional tir es mu st be co rrec tly m ount ed
a ll arou nd.
A un idir ection al tir e ca n b e id en tified b y arrows
o n th e s idewa ll, w hi ch p oin t in the di rec tion of
t h e ro tation . Yo u mu st fo llow the speci fied dir ec
ti on of ro ta ti on. Thi s is necessary in orde r for
the se tires to deve lop t heir optim al cha racte ris
ti cs regar ding grip, road noise, wea r and hydro
p la ni ng .
I f y ou have
to moun t a tire opp osite to i ts pro per
dir ection of rot atio n. p lease drive caref ull y sin ce
th e tir e no lo nge r poss esses its o ptimal chara c
t e ri stic s in thi s s itu atio n. Thi s is parti cul arl y im
po rta nt in we t con ditions. In orde r to f ully ex
pl oi t th e benefi ts of unidir ectio nal tire s ag ain ,
yo u sh ou ld imm edi ate ly re place or change the
tir e in or der to resto re th e co rrect d irec tion of ro
t a ti on .
WARNING
Improp erl y tight en ed or maintain ed wheel
b olt s can b ecome loose cau sin g lo ss of control ,
a colli sio n and seriou s per son al inju ry:
• Alw ay s keep th e wheel bolt s and th e
thread s in the wh eel hub s clean so the whee l
bolt s can turn easily and be p roperl y tight-
en ed .
What do I do now? 73
Page 396 of 477
Booklet 3.2 Tips and Advice
or th e centra l locking malfunctions, th e doors can be locked o r
unlocked manually.
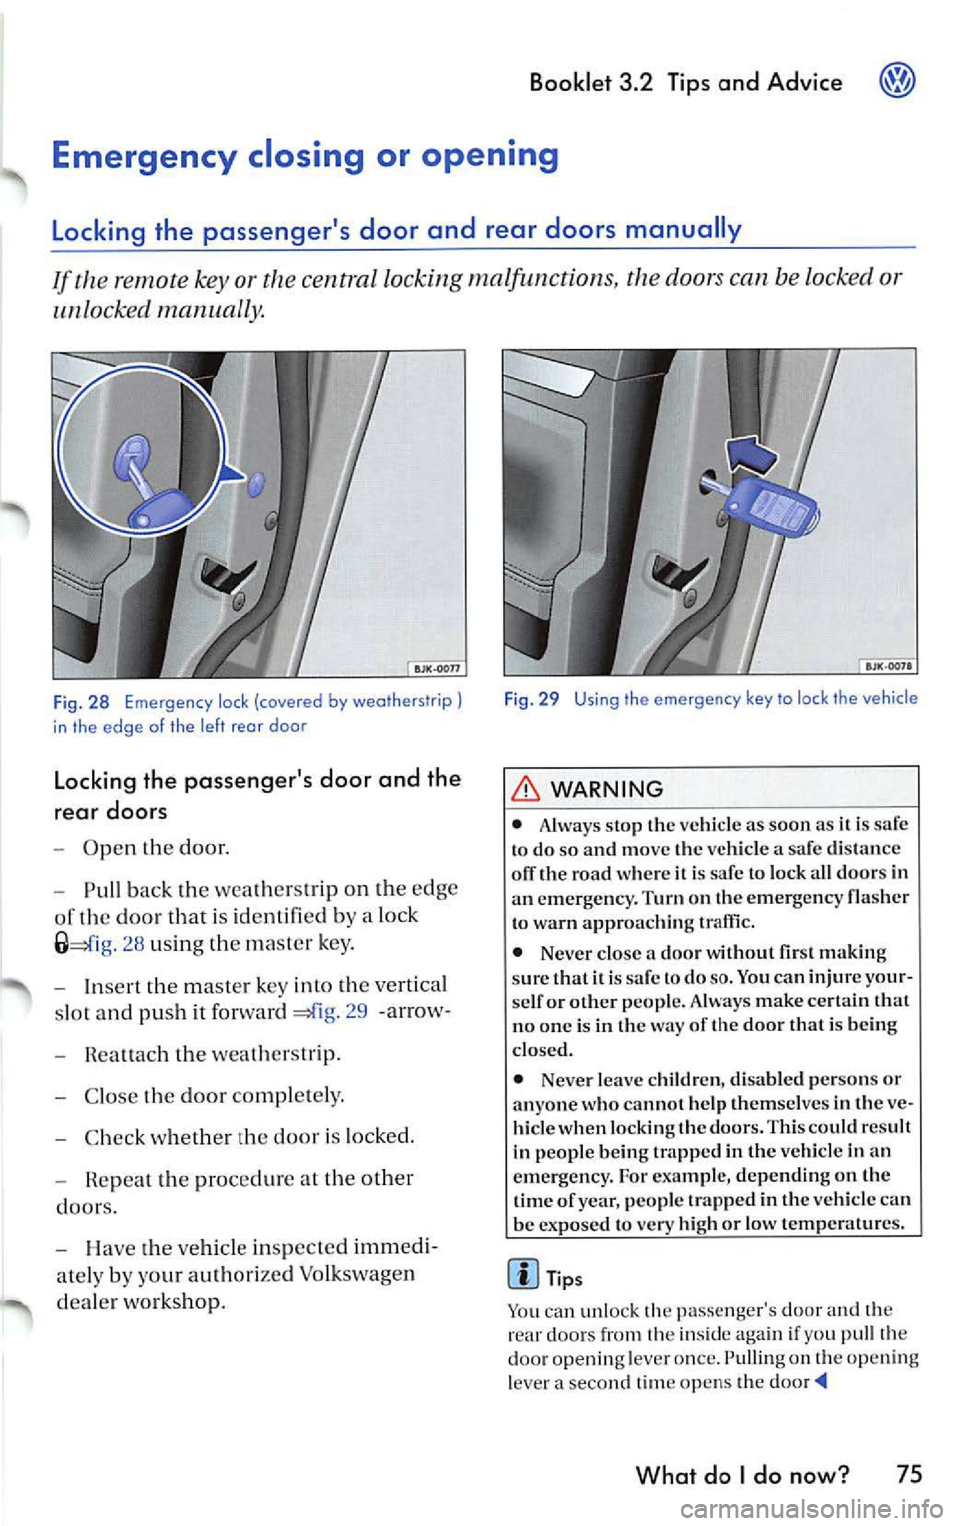
Fig. 28 Emergen cy lock (covered by weatherstrip)
in the edge o f the left rea r doo r
Locking the passenger's door and the
rear doors
Open the door.
Pull back the wea thers trip on th e edg e
of the door th a t is id en tifi ed by a lock
2 8 us ing th e ma ster key .
Inse rt the m aster key into th e ve rtical
s lot and pus h it forward
29 -arrow-
Rea ttach t he weat hers trip.
C lose the door comp le te ly.
C hec k w hethe r the door is lock ed.
Repea t the proced ure at the other
doors.
H ave the ve hicle in sp ec ted immedi
ate ly by your auth orize d Vo lkswage n
d ea le r wo rks ho p.
Fig . 29 Using the emergency key to lock the vehicle
WARNING
• Always sto p the vehicl e as soo n as it is to do so and move the ve hicle a sa fe d is tance
olT the road w here it is sa fe to lock a ll doors in
a n eme rge ncy. Turn on the emerge ncy fla sher
t o warn a pproac hing traffic.
• Never close a door wit hout first makin g
s u re th at it is sa fe to do
so. You ca n injure your
se lf or other people. Always make certain that
n o o ne is in t he way of the door that is bein g
clo sed.
• Neve r leave c hildren, di sabled perso ns or
anyo ne who cannot help th em se lves in th e ve
hicle when lock ing th e doors. This could r esult
in p eople being trapp ed in th e vehicle in an
e mergenc y. For example, depending on the
tim e of year, peop le trapped in the vehicl e ca n
be expo sed to very high or low temperat ures.
Tips
Yo u can unlock the passenger's door and th e
rear doo rs from th e insid e aga in if you pu ll the
door opening leve r o nce. Pulling on th e openi ng
l ever a secon d time op en s th e
What do I do now? 75
Page 398 of 477

WARNING (continued )
hide. The doors can be lock ed using the re
mote control key or the powe r lock button.
Th is co uld res ult in peop le bein g trapped in
th e ve hicl e.
•
build -up in th e passenger com part
ment an d lu ggage compartmen t o f a parked
Fuses
Changing a fu se
Fig. 32 Dosh panel, le fl: cover of fuse box A
Fuse bo x A locat ed in th e side of the
da sh pan el on th e driver' s side
In se rt a suit abl e obj ect (e .g. a sc rew
dr iver) into th e
32 and car efull y
pry the cove r oil
Fu se box B in the engine compartment
Open the en gin e hood .
Press the release tabs 33 (arrow s)
to re lease the fuse box cove r.
R e mo ve the cover .
To re mount the cover, place it ove r th e
fu se box
press the sid e tab s in the op
po sit e direct ion until they latch sec ure ly.
Bookl et 3.2 Tip s and Advice
WARNING (continu ed)
vehicle can re sult in tem peratur es in the ve
hicle that arc much higher than the out sid e
tem peratu res, p arti cularl y in su mmer. Tem
p era tures ca n quickl y reac h levels that can
cause unco nscio usne ss and death, particu
l ar ly to sma ll childre n. _.
Fig . 33 In the engine compa rtment: caver of fuse
box B
The indiv idu al el ec trica l ci rcu its are prot ecte d
b y fu se s. We reco mm end y ou sev eral spar e
fu ses at all tim es. T hese are availab le from a u
th ori ze d Vo lk sw agen dea le rs.
A ut omob ile te chnol ogy chan ges co ntinuously.
Your a uthori ze d Volkswage n deal er h as the mo st
curr ent t echn ica l in format io n for your Vo lk
sw agen.
I f yo u ar e
sur e w hich fu se to use or to ch an ge ,
co ntact your authori zed Vol kswage n Se rv ice
viso r.
Co lar cod ing o f fu ses
C olor
rating
li ght
5
brow n t 7.5
reel I 10
What do I do now? 77