2008 VOLKSWAGEN GOLF lock
[x] Cancel search: lockPage 178 of 444
and Equipm ent
Instrument
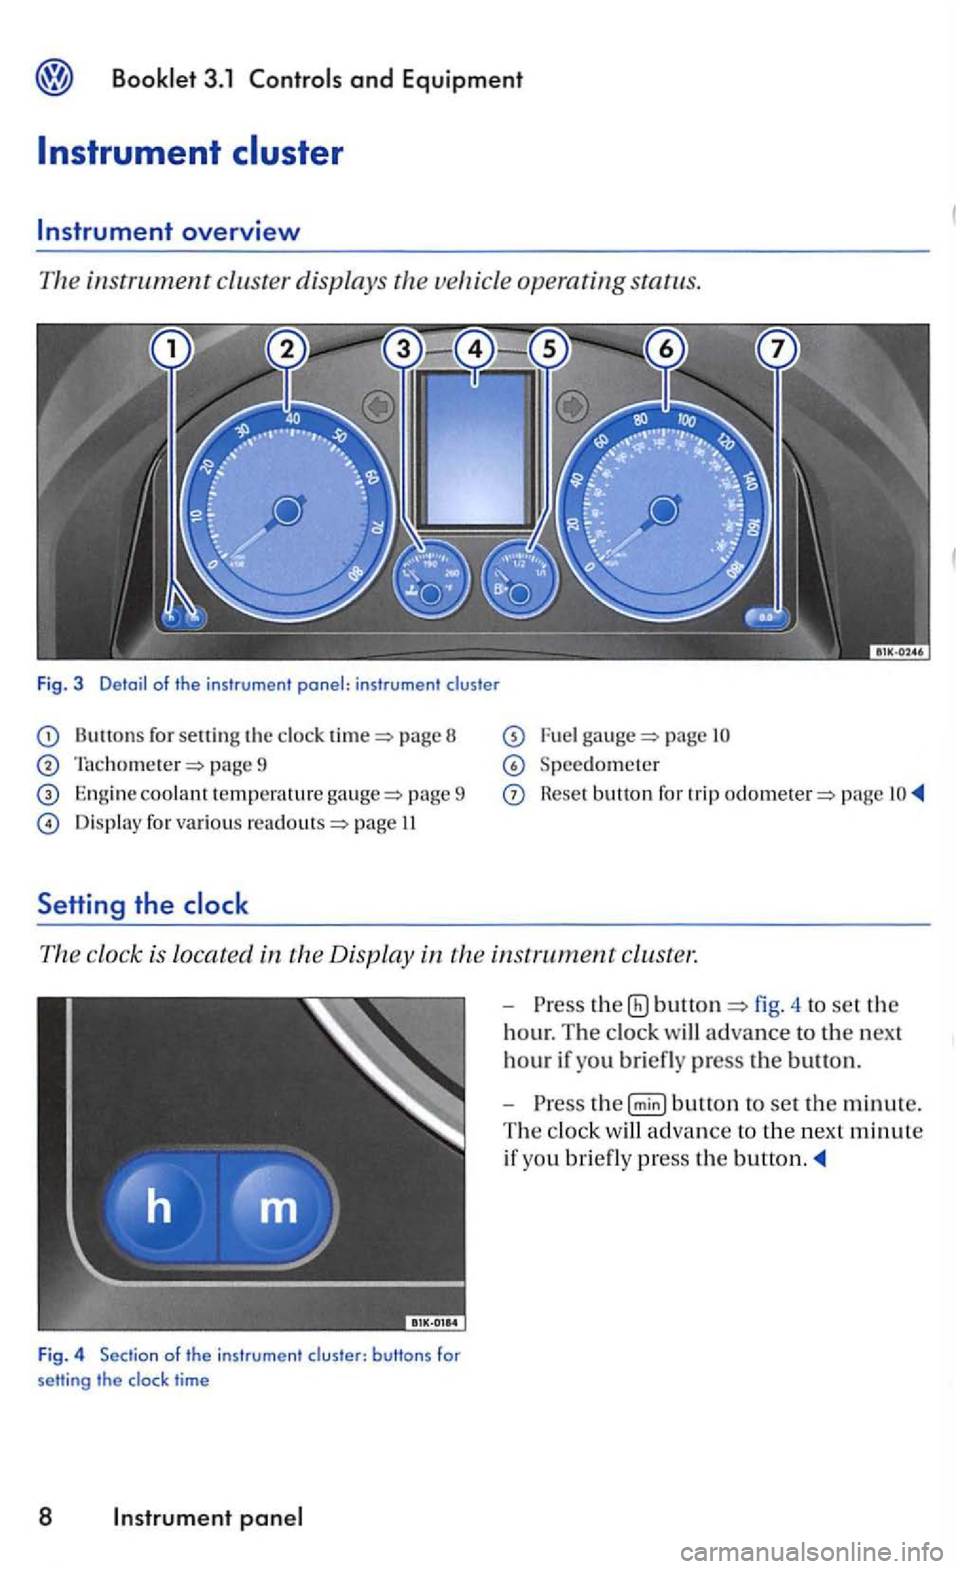
for sett in g the page 8
page 9
Engine coolant te mpera tu re pa ge 9
Display for various page II
Setti ng the
page
Speedometer
Reset button for trip page
The clock is locat ed in the Display in
time
8 Instr um ent
-the fig. 4 to set the
hour. The clock will advance to the next
hour if you briefl y press the button.
-
Page 181 of 444
Informational or malfunction messages are identified by a warning light or
symbo l and, depending on the
kind of instrument cluster in your vehicle , with a
matching text in the display.
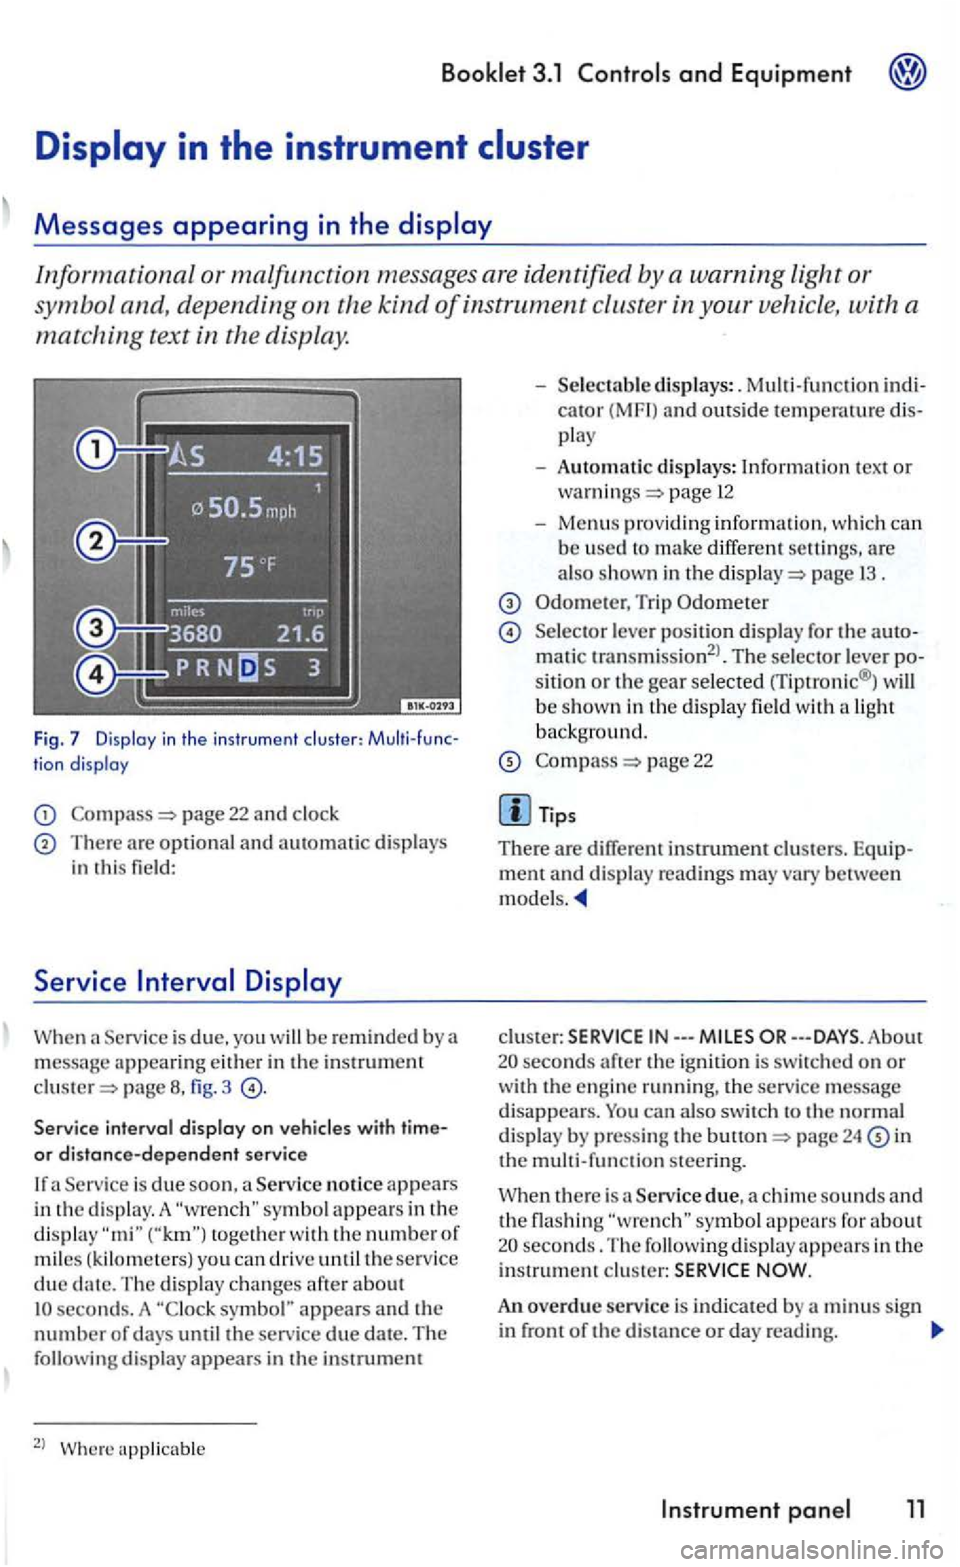
Fig. 7 Display in the in str umen t clu ste r: tion display
page 22 and clock
There are optional and automatic displays in this field:
Serv ice
page fig. 3
Service interval display on
Service is due soon , a Service notice appears
i n the d is play. A togeth e r with the numbe r of miles ( kilom ete rs) you can driv e until the service due seconds. A symbol" appears and the number of days until the service due date. The following display appear s in the instrumem
2
l
cator (MF I) and outside temperawre play
- Automatic displays: Information tex t or page 12
-Menus providing informatio n, w hich can b e used to make differ ent are also shown in the page 1 3 .
Trip Odometer
Selecto r lever positio n di splay for the matic transmission2
l. The selector lever sitio n or the gear selected rriptronic® ) will
b e show n in th e display field wit h a light backg round.
page 22
m ent and disp lay rea dings may vary between models.
clus te r: IN---
24 in the m ult i-function steering.
Service due, a chime sounds and the flashing seconds. The following display appears in the i nstrument c lu ster:
An overdue service is indicated by a m inus sign in front of the di sta nce or day reading.
Instrument 11
Page 187 of 444
Convenience
Door open
ATA confirm
Conv. mode
Mirrors
adjust
Fa cto ry setti ng
Back
Booklet 3.1 and Equipment
Function
The ve hicle locks doors w he n the veh icle is m ov ing and unl ocks the doors w hen the key is remo ved from the ig n ition lock.
The activation of the q ui red.
Co nve
nience operation of the po wer windows: determines if the drive rs doo r window , windows or no window s ho ul d be ope ned when th e ve hicle is unlocke d. This function can only be activa te d
via the drive r's door.
The front passenger sid e mirror be adjusted automatically
of these fu nctio ns to the ori gin al factory ring s.
men u.
The menus shown in the dis p lay de pends on th e
ve hicle electron ics and the option s
Lights & Vision menu
Vario us se ttings can be made for vehicle Lighting
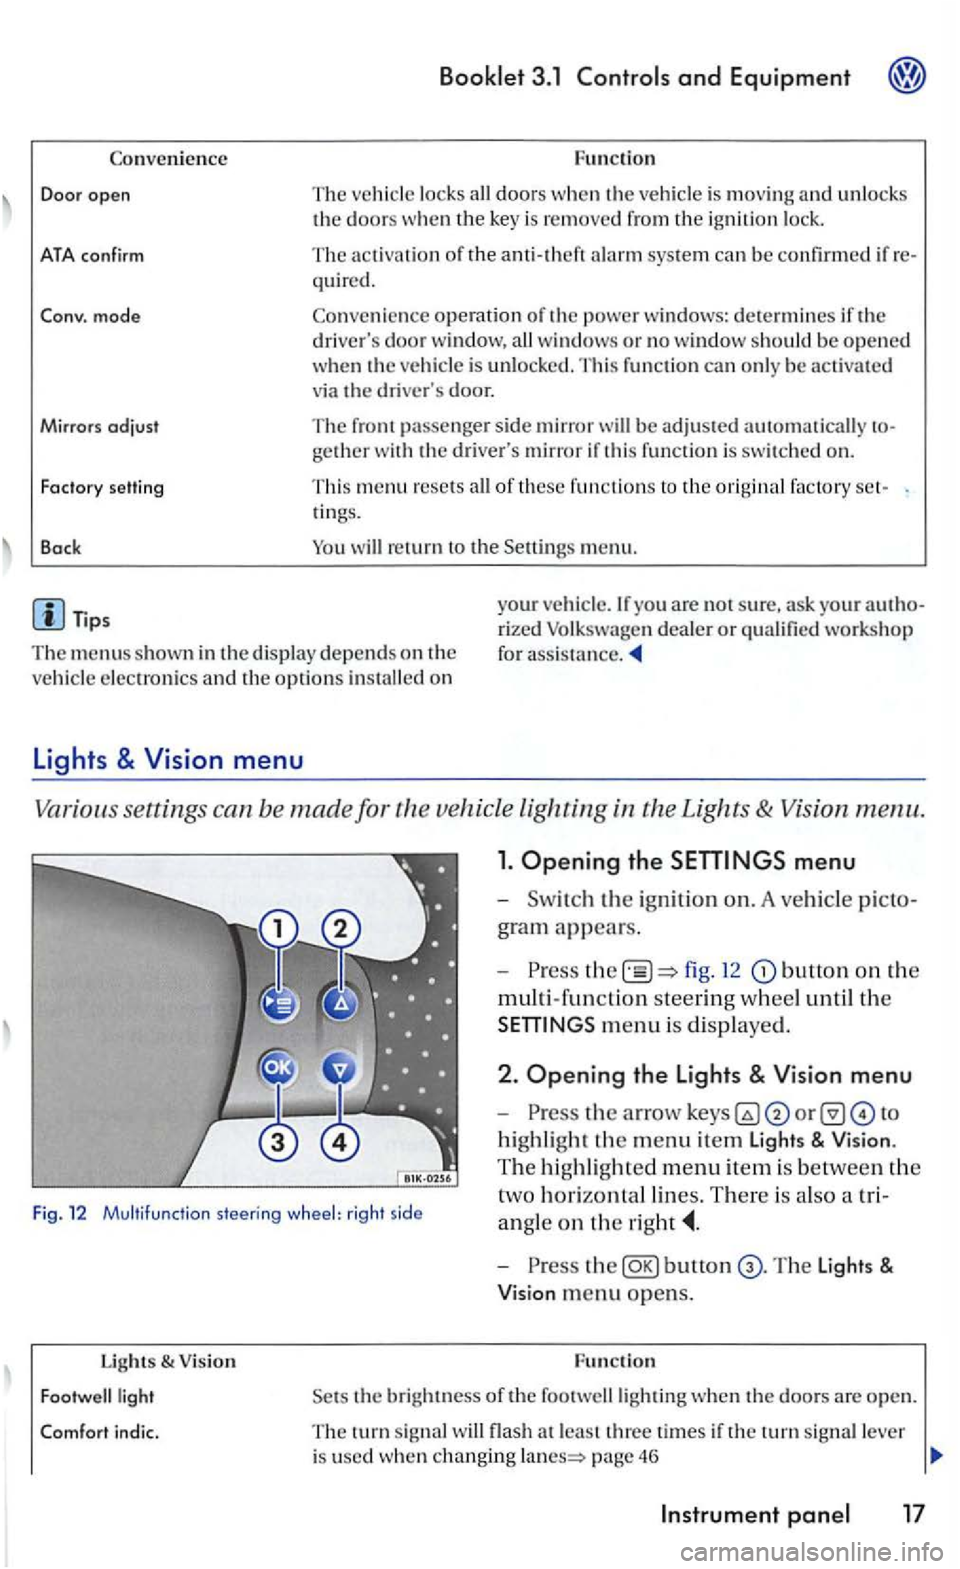
1. Opening the
fig. 12 button on the
multi-fun ction steering w hee l until th e
m enu is dis played .
Fig. 12 Multifu nctio n steering wheel: rig ht side
2 . Opening the Lights & Vision menu
-
highli ght the m enu item Light s & Vision .
T he hi ghli gh te d m e
nu item is be tween the
t
wo h orizontal lin es. There is als o a tri
a n gle
on the
Lights & V ision
bunon
the bright ness of the footwelllighting when th e doo rs a re open.
T he turn sig nal flash a t le ast thre e time s if the tu rn sig nal lever
i s used whe n changing page 46
Page 195 of 444
Applies to vehicles' with
and drive 1:
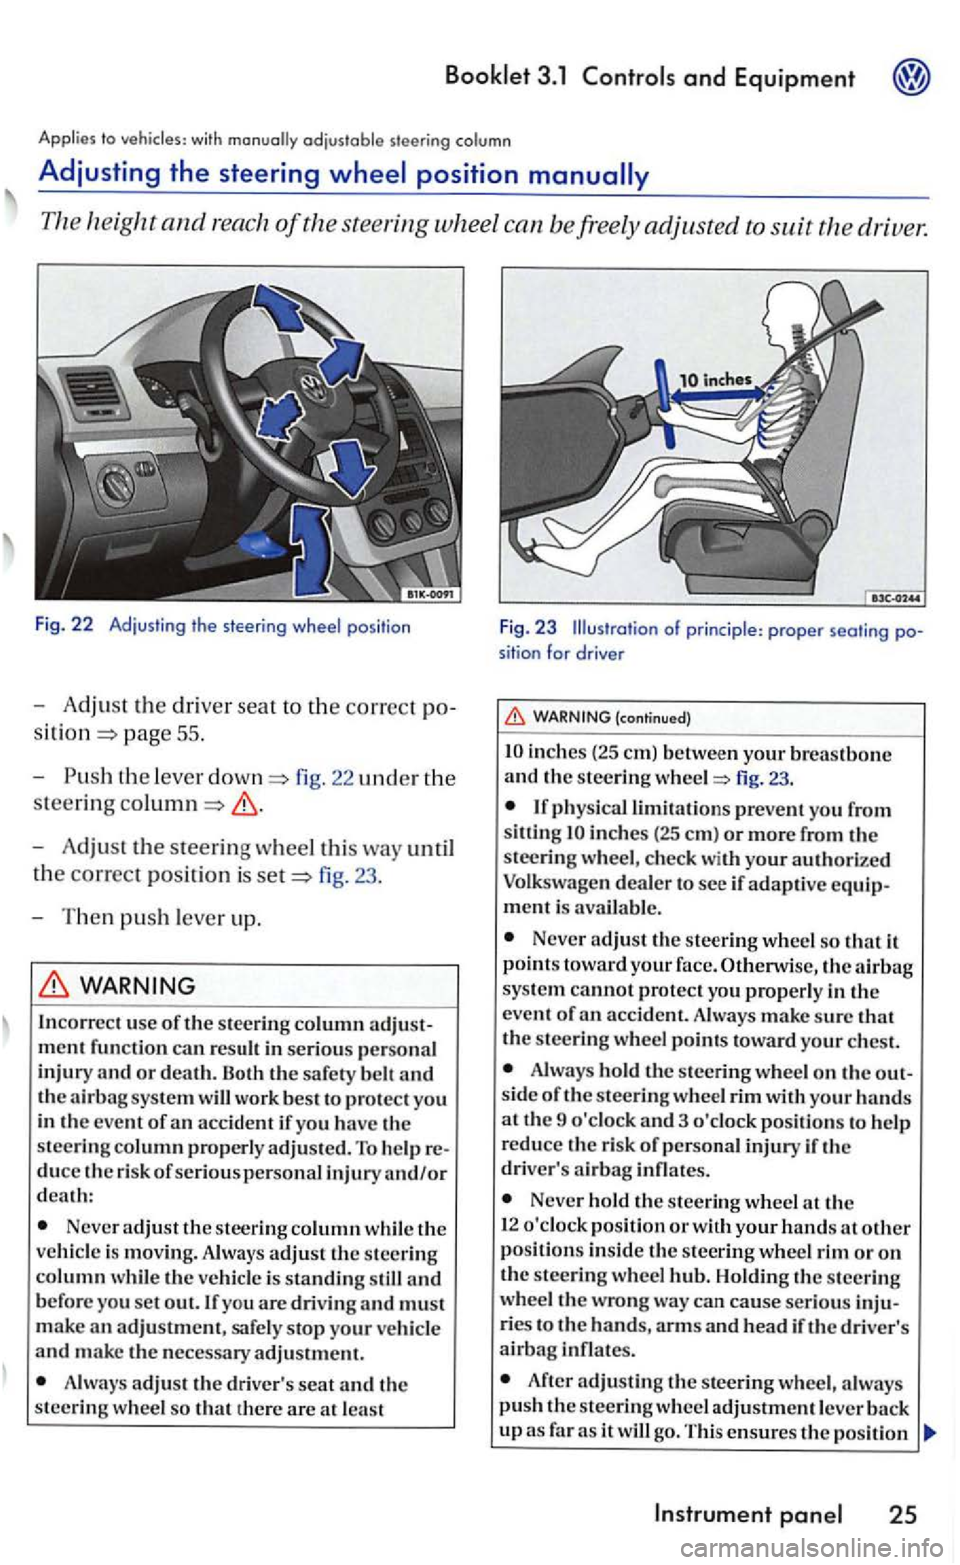
Fig. 22 Adjust in g t he s tee ring wheel pos itio n
-Adjust the dri ver seat to the correct po
pag e 55 .
- Push
the leve r fig. 22 uncl er the
steering
-Adjust the steering wheel this way until
t h e
correct posit ion is fig. 23 .
- T hen
push lever up.
WARNING
In correc t use of the stee ring column
Neve r adjust the steer ing column while th e
ve hicl e is movin g. Always adjust th e steering column w hil e th e veh icle is standing still and b efore you set out. If you are drivin g and must
m ake an adjustment, safe ly stop your ve hicl e and make the necessary adjustment.
A lways adjus t th e driv er's seat and th e
steering w hee l so that th ere are at lea st
F ig. 23 Illustration of princi ple : proper seati ng position for drive r
(continued)
inch es (2 5 em) betwe en your breastbone and th e s teering fig. 23.
inches (25 em ) or more from the
steeri ng w heel, c hec k with your authori ze d
Volkswagen deale r to see if adaptive equipment is avai la ble .
Never adjust the steering wheel so that it
p oin ts toward your face. Otherwise, the sys te m cannot protect yo u properly in the
e ve nt of
Alwa ys hold the s teering wheel o n the out
s id e of the s teering whee l rim with your hands at th e 9 o'clock and 3 o 'clock pos itions to help
r educe th e risk of p ersonal injury if th e
driver' s
Never hold the stee rin g wheel th e
1 2 o'clock pos ition or w ith your hands at other position s in side th e s teering wheel rim or on the steerin g wheel Holdin g th e s teerin g
wheel the wrong wa y ca n cause serious inju
ries t o the hands, arm s and hea d if the driver's airbag infl ates.
After adjusting the stee rin g wheel, a lwa ys push the s teerin g wh eel adjustment leve r
Instrument
Page 197 of 444
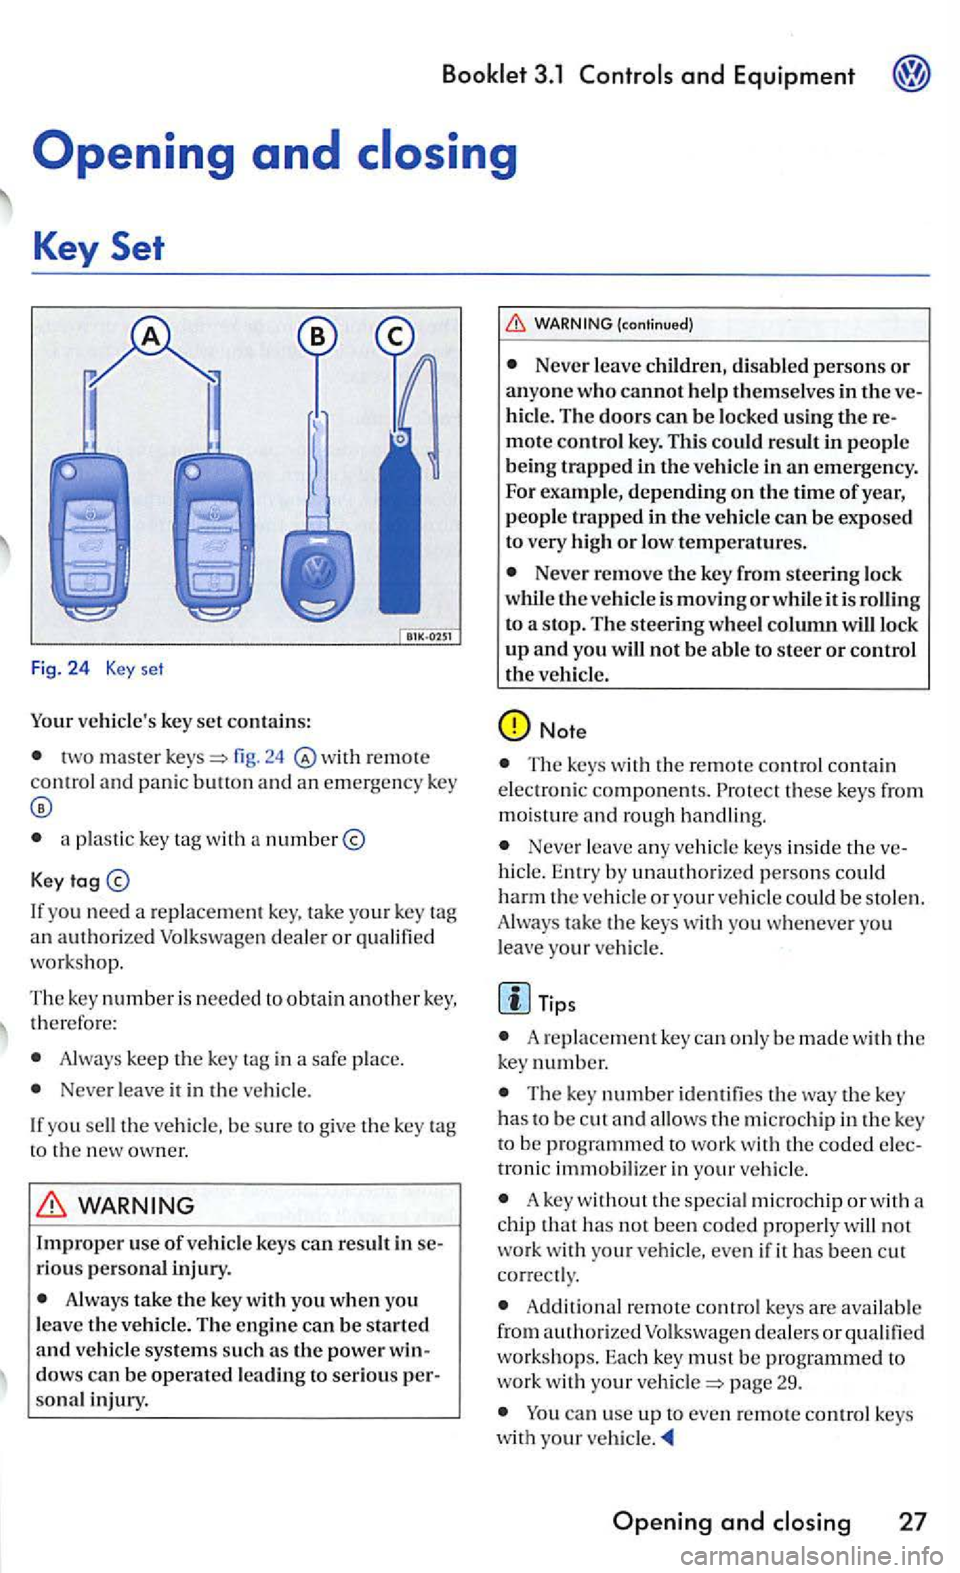
Your vehicle's key set contains:
two master r e mot e control and panic butt on and an emergency key
a plastic key with a number@
Key
If yo u n eed a replace ment ke y. tak e your key
work shop.
The key numbe r i s needed to obtain another key, th erefo re:
Always keep the key tag in a safe place.
Ne ver leave it in the ve hicle.
I f
you sell the ve hicl e. be sure to giv e the key
sonal injury.
(continued)
Neve r leave ch ildren, disabled persons or anyone who cannot help themselves in the hicl e. The doors can be lock ed using
or low tempera tures.
Never remove the key from steering lock
w hil e the vehicle is moving or while it is rolling
to a stop. The steering wheel column will lock up and you will not be able to steer or control the veh icle.
Note
Th e keys with the remote control contai n
e lec troni c component s. these ke ys from
m oisture and rough handling.
Never leave any ve hicl e keys insid e th e hicl e. Entry by unauthorize d pe rso ns co uld harm the vehicl e or your vehicl e cou ld be stol en .
Alway s take the keys with you whe neve r you
l eav e your ve hicl e.
Tips
A re pla cement key ca n only be made w ith ke y number.
The key number identifie s the key has to be c ut and allo ws micro chip in the key
troni c immobilizer in your vehicle .
A key without the special microchip or with a
c hip that has not bee n coded properl y will not work wi th you r vehicle, even if it has been c ut
co rrect ly .
A dd ition al remote contro l keys are availab le
from authori zed Volk swage n dealers or to work with your pag e 29.
ca n use up to even remote co ntrol keys
w ith your
Opening and
Page 198 of 444
3.1
key
Locking and
remote control key can lock and unlo ck the vehicle from a distance.
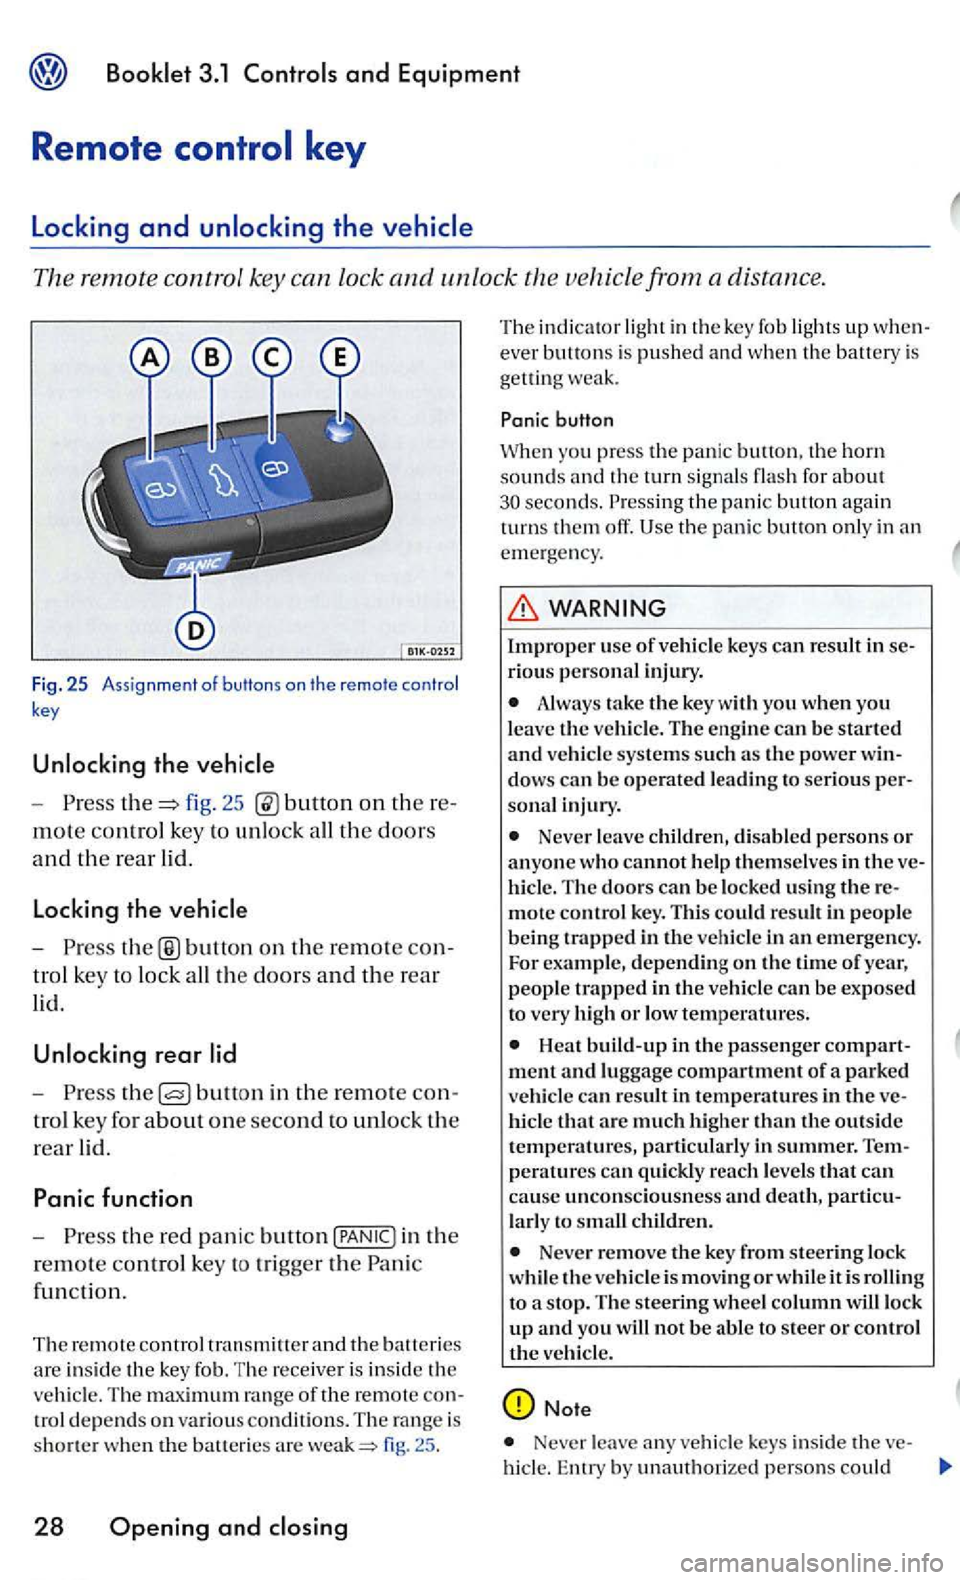
Fig. 25 Ass ignment of butt ons on the remote control
key
- P res s fig. 25 on th ere
mote control key to unl ock all th e doors
and th e rear lid.
Locking the
-button on the rem ote con
t ro l key to lock all the doors and the rear
lid.
rear
-Press bullo n in the re mote con
tro l key for a
bout one second to unlock the
rear lid.
Panic function
-Press the red pani c button in the
r
emote co ntrol key to tri gge r the Pan ic
fun cti
on.
Th e remote control
fig. 25 .
28 Opening and
T he ind ica tor lig ht in th e key fob ligh ts up w hen
ever bu tto ns is pushed a nd when th e batt ery is
get ting weak.
button
Whe n you press the panic the horn sounds the turn signal s flas h for about the pani c button again
turn s them off.
WARNING
Improper us e of vehicle keys can result in serio us perso nal inj ury .
Always take the key with yo u when you leave the ve hicle. The engine can be started and vehicle systems su ch as th e power win
dow s can be operated l ead ing to seri o us person al in ju ry.
Never leave childr en, disabl ed p erson s or anyone who cannot help them selves in t he ve
hi cle . The doors can be locked using the re
mote control key. T his co uld result in peo pl e
being trapped in th e vehicl e in an emergency.
For example, depending on the time of year, people trapped i n th e vehicl e can be exposed
t o very high or low tem peratures.
hicl e that arc much high er than the outside temperatures, particularly in summer. T empe ra tures can quickly reac h levels that can
cause uncon scio usnes s and death, partic u
l a rl y to sm all children.
Neve r remove the key from steering lock
whi le th e vehicle is mov in g or whil e it is t o a s top. The s teering wheel column wiU lock up and you will not be a bl e to steer or control the veh icle.
Note
Never leave any veh icle keys inside the ve-
hicl e. En try by unauth orized persons could
Page 199 of 444
Booklet 3.1
harm the
U sing the wron g batteries can damage the
remot e con trol key. Rep lace used batteries with
new ones of the same
Tips
page o r by your authorized dealer o r bul!on once to unlock just the drivers 's page the button a second time to unl ock a lithe doors and the rear lid.
When yo u unlock your with therem ote control, you have seconds to open a door or the rear lid. lfyou do the will
Resetting the remote control key
automatically re lock itself. This safety re lock feature prevents you from leaving your un
locked.
it may have to be synchronized again page 29.
the r emote controlmay not work and have to be reset page29.
Use the remote control only if yo u intend to
use one of the fun ctio ns. terrain and cond iti on s may pressing the remote may un
lo ck the
Th e operation of the remote control key can b e temporarily disrupted by interference from transminers in the vic inity of the that work in the same frequency range (e.g. radio equipment, cellular phone).
The remote key has to be reset if it does not lock or unlock the vehicle.
Resetting the remote control ke y
-Unlock the driver's door m anually by
inserting the em erg ency key in the door
Tips
The remote control ke y will have to be reset if you press the several times outside it s
effective range and the
Opening and closing 29
Page 200 of 444
and Equipment
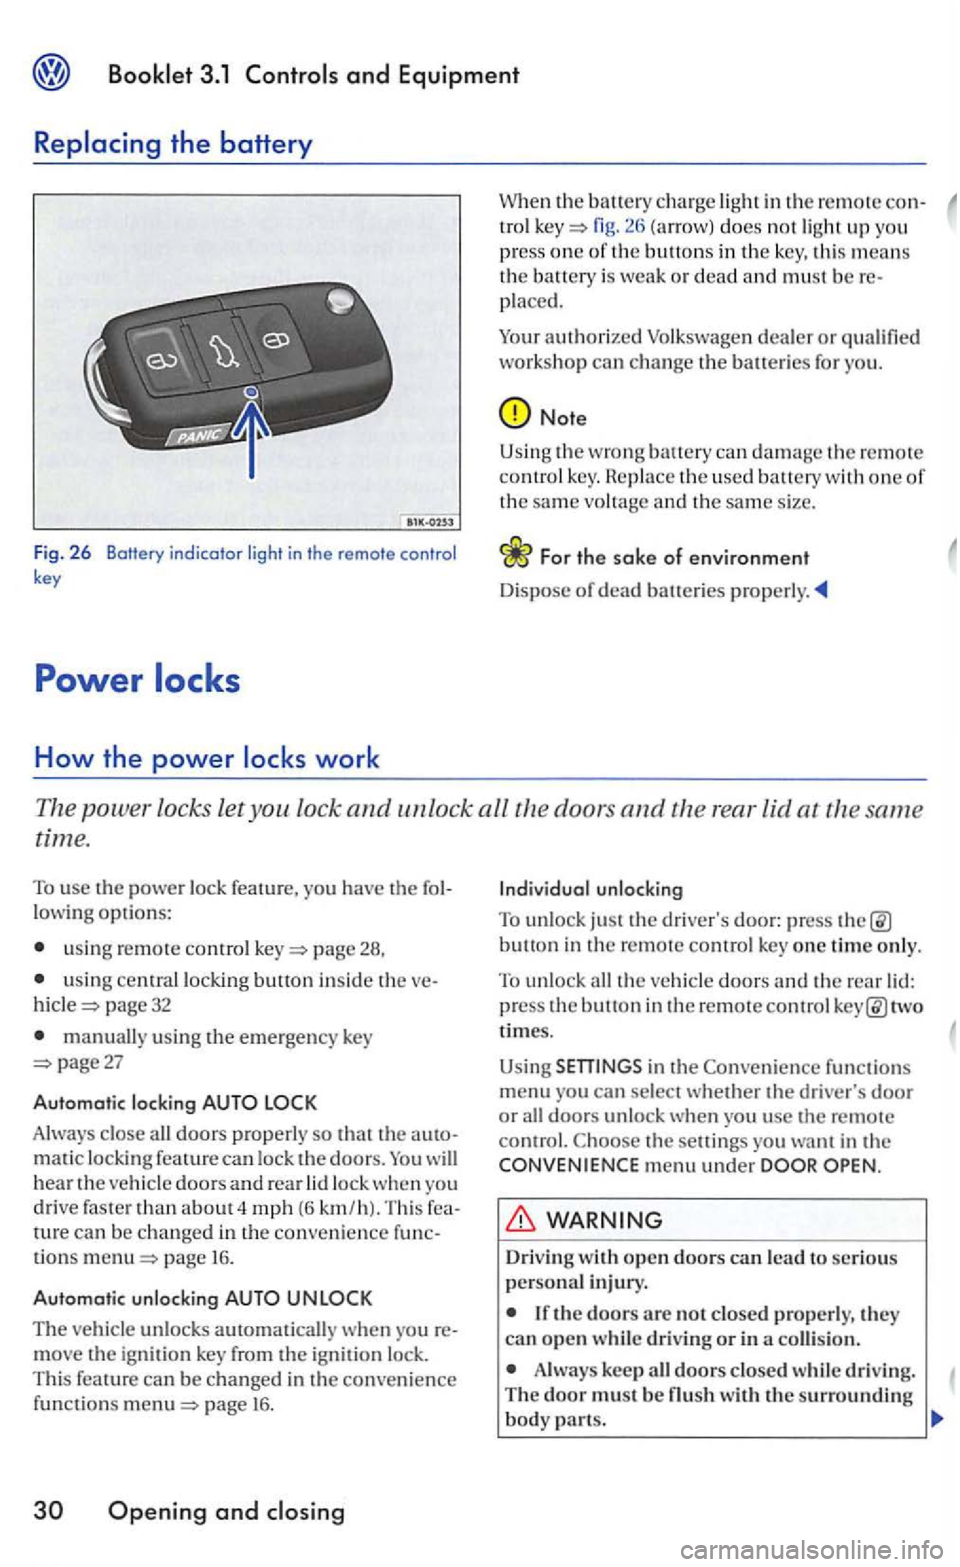
Fig. 2 6 Botfery indicator light in the remote control key
How the power
in the remote con-tro l fig. does not ligh t up you
press one of th e buttons in the key, this means the battery is weak or dead and must be placed.
Your
authorized
Note
Using the wrong can damage t h e remote co ntrol key. th e used battery with one of the same vo ltage and th e same size.
Th e power locks let you lock and unlock all the doors and the rear lid at the same
time.
To use the power lock feature, you have the
usin g remote control page 28,
u sing central locking button inside the page 32
manually using the emergency key page27
Automatic locking
Always close all doors properly so that the matic locking feature can lock the doors. will hear the vehicle doors an d rear lock when yo u
drive faster than about 4 mph (6 km /h). Thi s can be changed in the convenience tions page 16.
Automatic unlocking
The vehicle unlocks automatically w hen yo u move the ignit ion key from the ignition lock.
This feature can be changed in the convenience funct io ns page 16 .
Openin g and
button in the remote control key one time only.
To unlock all the veh icle doors and the rear two
times.
Using
functions menu you can sel ect whether the driver's door or all doors unlock when you usc the remote control. the setti ngs you want in the menu under
Driv ing
Always keep all doors closed whil e driving. The door must be