Page 365 of 444
WARNING
Alwa ys sto p the as soon as it is safe
to do so and move th e a safe di stance off the road where it is sa fe to lock doors in an em erge ncy. Turn on the em erg ency to warn approaching traffic.
Neve r a door without making sure that it is s afe to do so. ca n injure self or other people. Always make certain that no one is in the way of the door that is be ing
3.2 Tips and Adv ic e
(continue d)
Never le ave childr en, di sa ble d person s or
anyo ne w ho cannot he lp themselves in the
in peo pl e bein g trapped in the in em erge ncy. For example, depending o n th e time of year, people trapp ed in the can be ex posed to very high or low temperatures.
Tips
ca n unlock the passenger's door a nd the rear doors from the inside again if yo u the door openin g leve r once .
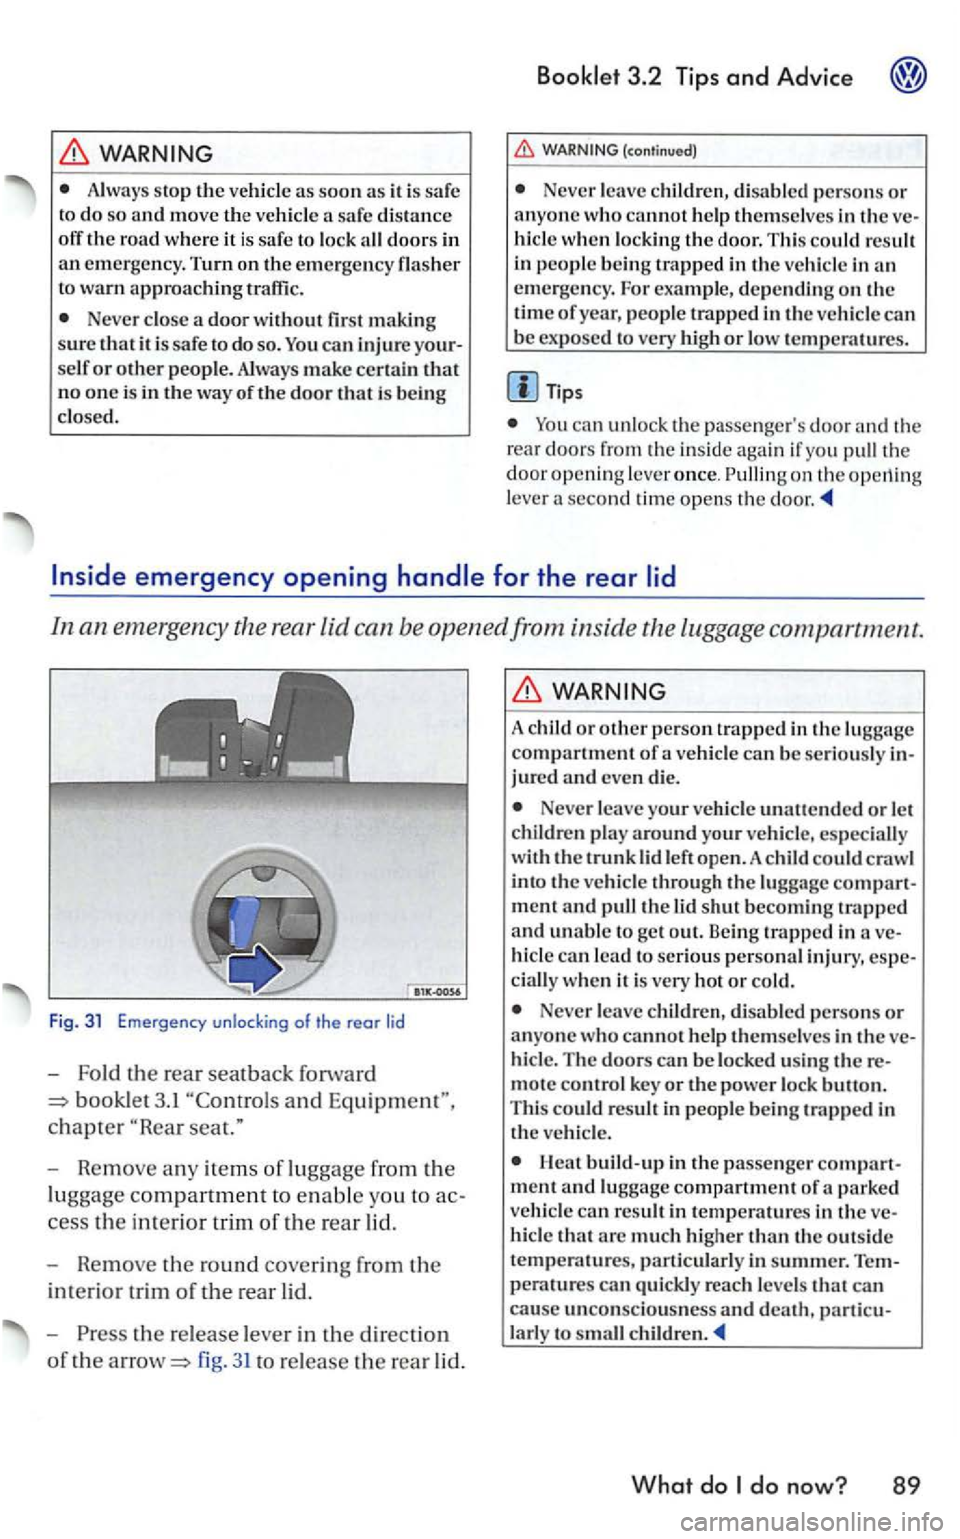
rea r lid can be opened from inside the luggag e compartment.
__ _ ,
Fig. 31 Emergency unlocking of t he rear lid
-Fold the rea r seat back forward
booklet 3.1
the release lever in the direction
of the fig. 31 to re lease the rear lid .
WARNING
A chi ld or oth er p erson trapped in the lu ggage compartment of a can be se riously jure d and eve n die .
Neve r leave your unatt ended or let
childr en play around your especia lly
wit h th e trunk lid le ft open.A child could cra wl
int o th e through the lugga ge ment and
wh en it is very hot or cold .
Neve r leave childr en, disabled persons or
a n yone T he doors ca n b e lock ed usi ng mote contro l key or the powe r lock butto n .
T his could res ult in peop le bei ng trapped in
th e
ment and lugg age compartment of a parked vehicle can resu lt in tempe ratures in the that arc mud1 higher than th e outs ide
t emperatur es , particu larly in summer. peratures can quickl y reac h levels that can cause unconscio usn ess and d eath, larly to c hildr en .
What do do now? 89
Page 366 of 444
left side of the instrument panel and behind fu se box covers in
the engine
compa rtment.
Fig. 32
- Turn off the igni tion and the con
cerning component.
-
Insert the flat blade of a screwdri ver
into
the openin g of th e fuse box cove r
32.
-
the respeclive fuse.
-
the fuse tables to find out the loca-
tion of the blown page 92.
- If
the fuse is blown (the m etal strip is
melted) , replace it w ith a new fuse of the
same amp ra tin g (sa m e co lo r and sam e
marking).
Fuse bo x Bin the engine compartment
-Turn off the ign ition an d the con
cerning component.
-th e eng in e hood.
fig . 33 .
- Remove
the cover.
-To remount the cover, place it ove r the
fuse box and press th e lock buttons back
ward aga inst the directio n of the arrow
until
they latch securely .
Th e indi vidual electric a l c ir cuit s are pro tected by fuses. recommend you carry severa l spare
f uses at
clear 2 5
Page 373 of 444
(continued)
swagen dealer or a qualified workshop. rious personal injury m ay resu lt from erl y perfo rmed work.
Booklet 3.2 Tips and Advice
Note
Do not touch glass bulb with bare hands.
A bulb can on ly be rep laced by a bulb of the same type. The model identification is either on the bulb base or on the bulb
turn
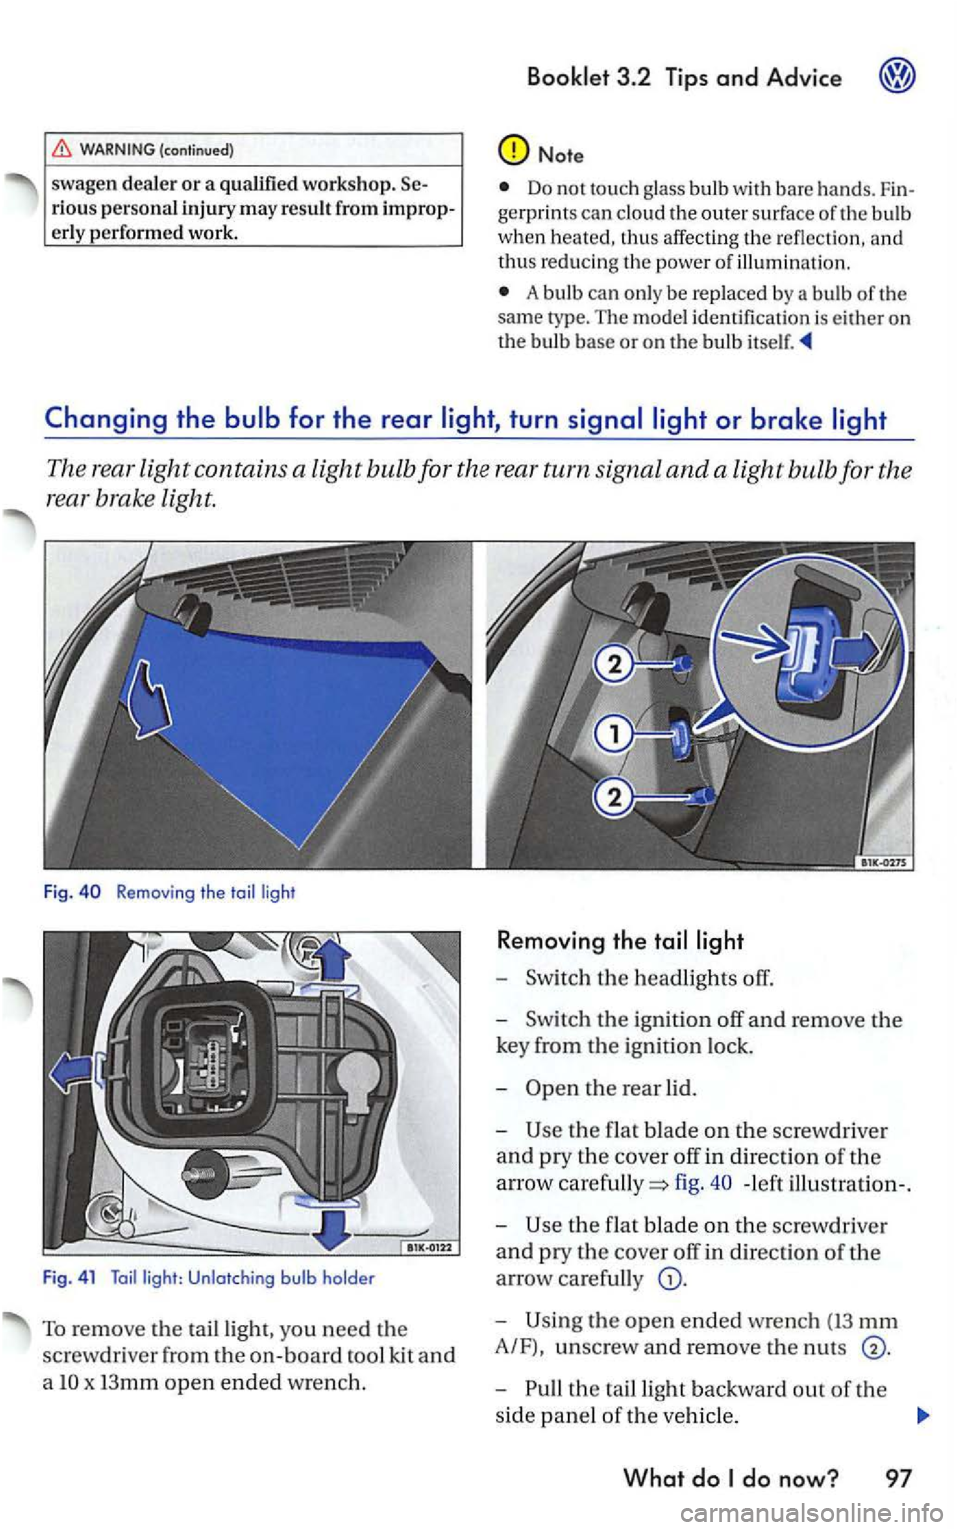
The rear light contains a light bulb fo r the rear turn signal and a light bulb for the
rea r brake light.
Fig . Removing the toi l ligh t
F ig . 4 1
Toil light: Unlotching bulb holde r
To remov e the tailligh t, yo u need the
screwdr iver from th e
on-board tool kit and
a
x I3mm open ended wrench.
R e moving the
-the headlights off.
-the ign ition off and remove the
key from the ignition lock.
-
the flat blade on th e screw driver
and pry the cover off in direction of th e
arrow
fig. - left illu stration-.
-
the f lat b lade on the sc rewdri ver
and pry the cover off in direction of the
arrow carefully
the open ended wrench (13 mm
A/F), unscrew and remo ve the nut s
the ta illight backward out of the
side panel
of th e veh icle .
What do
Page 375 of 444
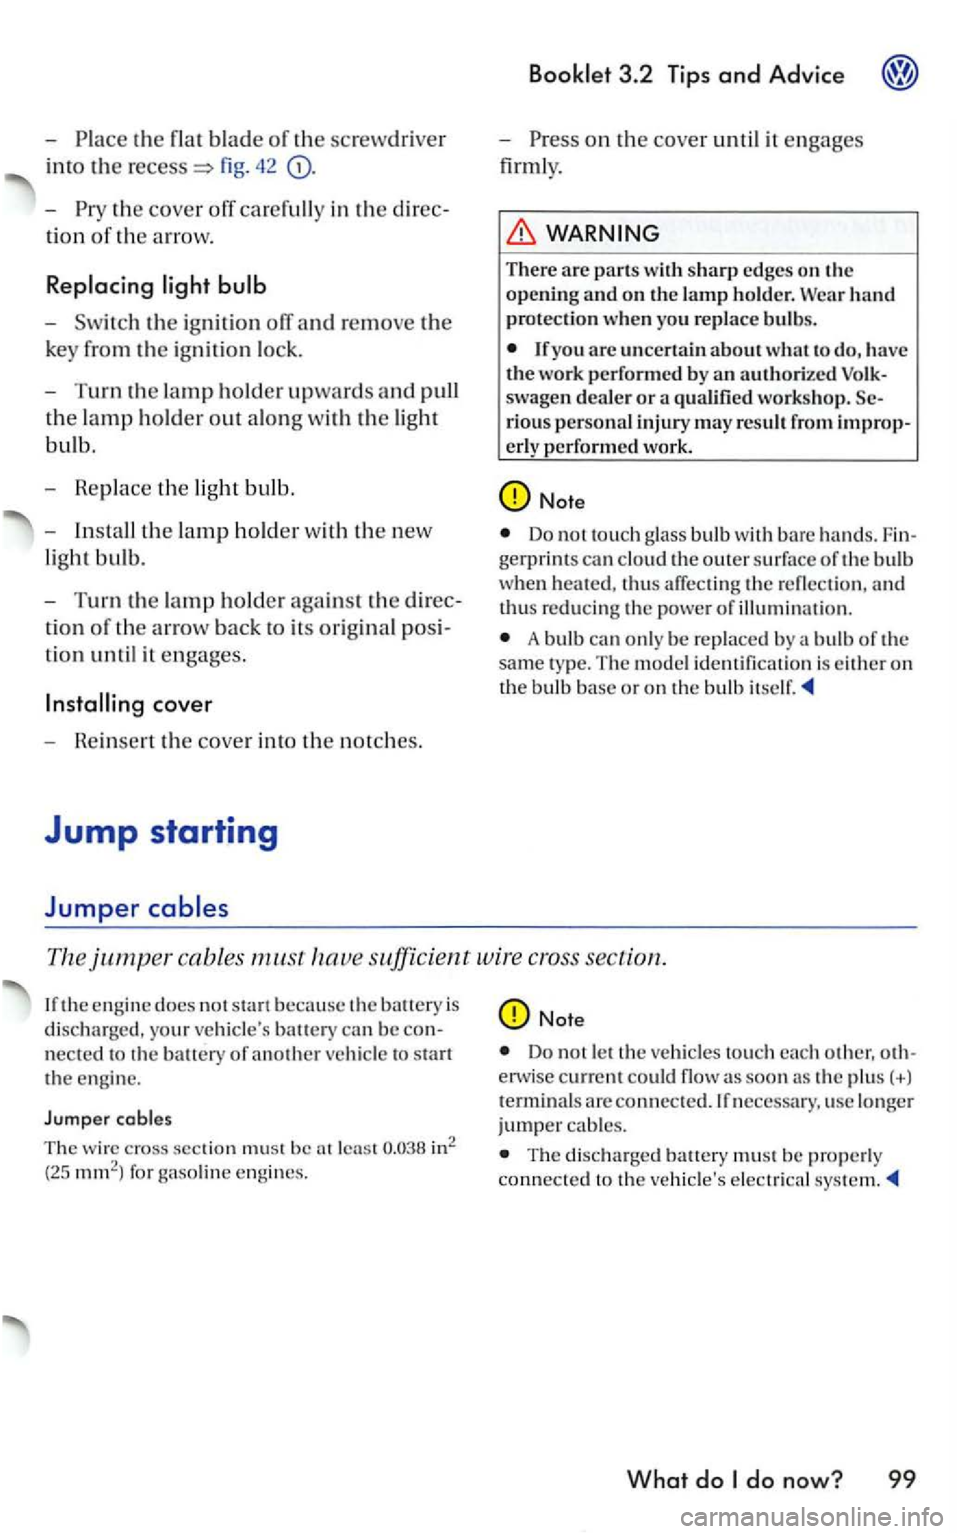
-Place the flat blade of th e screwdri ver
into the fig. 42
the cover off care full y in the dir ec
tio n of the a rrow.
Replacing
th e ig nit ion off and remove th e
key fr
om the ig nitio n lock.
- T
urn the lamp holder upwards and pull
the lamp holder out alo ng w ith the lig ht
bulb.
- Rep l
ace th e light bulb.
- Install
the lamp h o lder w ith the new
light bulb.
-
Turn t h e lamp hold er against the direc
tio n of th e a rrow back to its o rigina l posi
tion until it e n gages.
Booklet 3.2 Tips and Advice
-Press on the cove r until it engages
firmly.
There are parts with sharp ed ges on the opening and on the lamp holder. h and protection when yo u replace bulbs .
authorized Volk
s w age n dealer or a qu alifi ed workshop. rious person al injury may
Do not touch glass bulb with hands. Fingerprints can cloud the outer s u rface of the bulb
w hen heated. thus affect ing th e reflection, th us reducing the power of illumin at io n .
A bulb can o nly be rep laced by a bulb of the sam e type. The model identificat io n i s ei ther on the bulb base or on the bulb
cables must h ave sufficient wire cross section.
the engine does not is
disch arged, your vehicle's can be connected the batt ery of another vehicle to start the engine.
Jumpe r cables
T he wi re cross section mu st be in2
(25 1111112
) fo r g asoli ne e ngines.
Do no t let the ve hicles each other, o therwise current could flow as soon as th e plus(+) terminals areconnected.lf necessary.use longer jumpe r cables.
T he discharged battery must be p roperly connected to th e ve hicle's
What do
Page 378 of 444
the right front bumper: removing the cover
Take the towing the lug wrench and
the screwdriver out of the vehicl e tool kit in
the luggage page
the towing eye
- Remove the Ph ilips head screw
- Reach into the opening -small arrows
with your finger and pull th e cover forward
to remove i l.
the towing eye in direction of the
arrow as far as it will go into the threaded
46. the lu g wrench to
tighte n the towing eye.
-
the cover and the sc rew in a safe
p l
ace in the ve hicl e.
-
When towin g operations a re complete,
unsc rew the towing eye clockw ise and in
s ta
ll the cover.
-
He turn the to wi ng the lu g w re n ch
a
nd the screwdrive r t o the to ol kit.
Follow directions for
Page 379 of 444
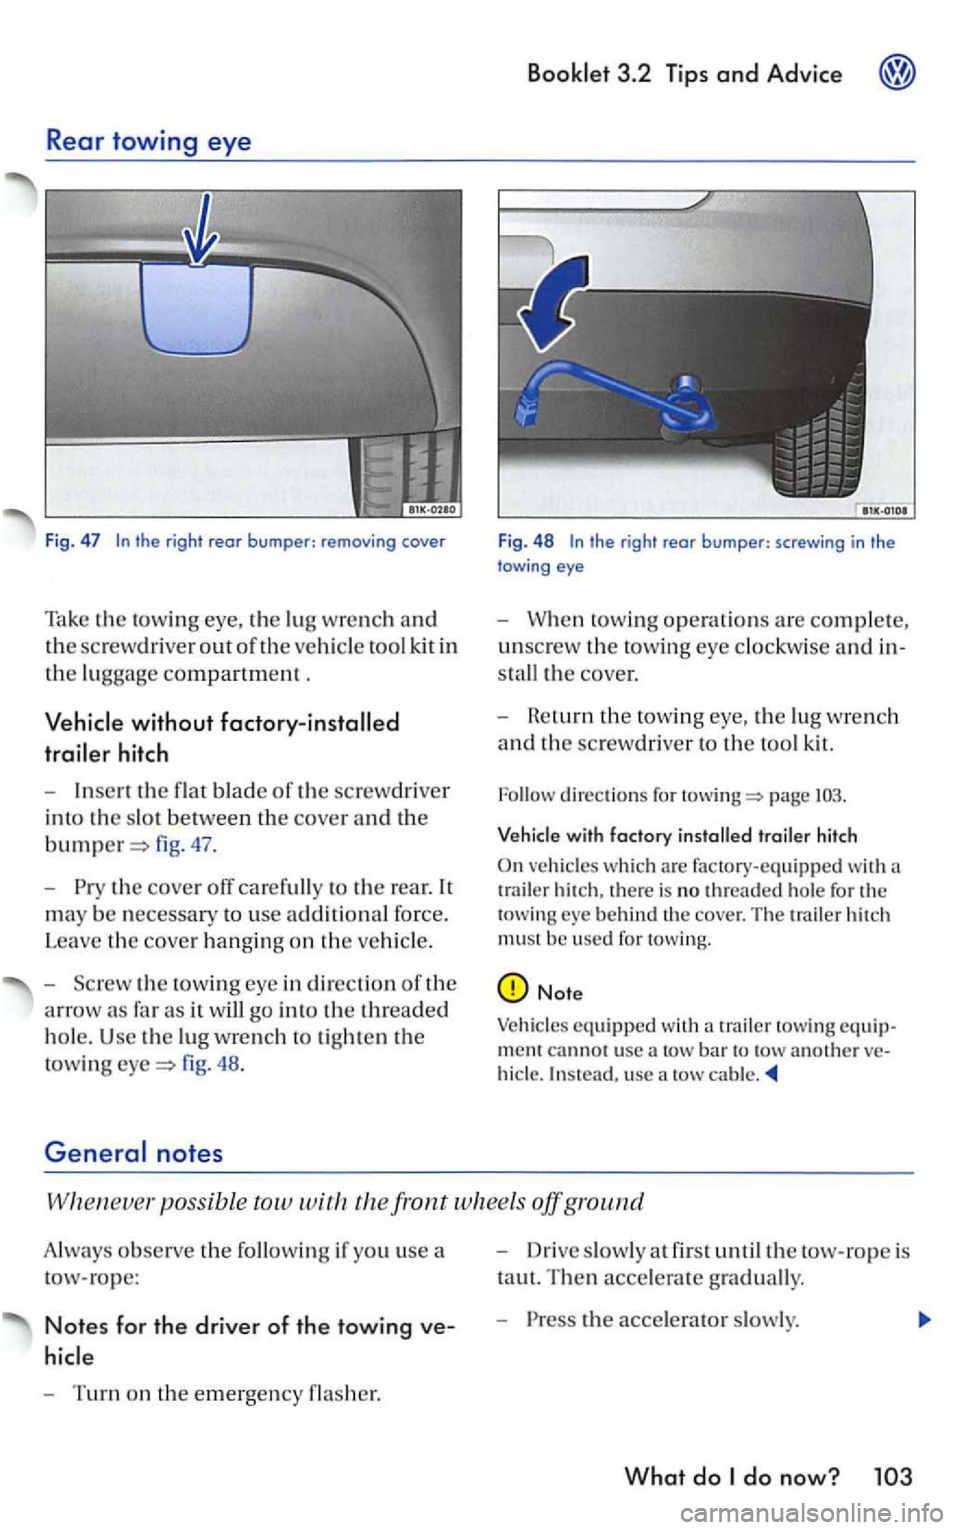
Rear towing eye
Fig. 47
without
hitch
-Inse rt the flat blade of the screw driver
i n to
the slo t between th e cover and the
fig . 47 .
-
th e cove r off carefully to the re ar. It
m
ay be necessar y to use addi t ional force.
Lea
ve the cove r hanging on the veh icle.
- Scr
ew the tow ing eye in di rectio n of th e
arrow as fa r as it will go into the threa ded
hole. Use the lu g wrench tigh te n the
to wing fig . 48 .
3.2 T ip s and Advice
Fig. 48 the right rear bumper: screwing in the eye
-towing operations are comple te,
unsc rew the towing eye clockwise and in
s ta
ll t h e cover.
-
He turn t h e tow ing eye , the lug wre nch
and th e screwdriver to the too l kit.
page
trailer hi tch
On veh icles whic h are fac tory-equipped wit h a
t rai ler hitch . there is no threaded hole for th e
to w in g behind th e cover. The trailer hitc h
must be use d for towing.
Note
Vehicle s equi pped with a trailer towing cannot use a tow bar to usc a
possib le tow the front w hee ls off g round
Always observe the followi ng if yo u use a
tow-rope :
Notes for the driver of the towing ve
-Turn on the emergency
- Drive slowly at fir s t until the tow-rope is
t a u
t. Th en accelerate gradually.
-the acce lerator s lowly.
What do
Page 384 of 444
light 5
See Anti-lock brake
should want to add an acces-sor y to my ve hicl e?
Add ress of
Add ress of Transport
Afte r c hanging a w heel 87
Alloy
wheels
fe el a slight v i
b ration on the brake pedal? 4
Ant i-t h
eft alarm system
Linking your trailer
Anti-theft wheel bolts 84
A uto Safety Hotline
Automatic car wash 22
B
3
Batt ery
56
low often should replace m y engin e
battery? 56
Important informatio n t o know befo re
d isconnect the battery 55
Hcplac ing
56 yo u must do after reconnect the battery 55
is the correct brake nuidleve l?. 53
Brake syste m 53
light 2
B rak
es low docs mois ture or road salt affect the brakes? 13
does it mean when feel a slight vibra tion o n the brake pedal? 4
Br
aking distance 13
Break-in period
Engin e 12
is the right way to break-in my vehicle? 12
Br e
aking in
B r
ake pads 12
Ti r
es 12
Break ing in
tires 12
Bulb ch
ange 93
Bulb fa
ilure 93
65 39 , 55
22
ra di o 33
phone 33
phone 33
a bulb 93
a w heel 86
brake pads
fuel cap 36
engine oil leve l 44
26
Page 385 of 444
Allo y w heels 26
Auto m
atic car w as h 22
Bumper 23
27
seat cove rs 29
Engine
compartment 27 Exterior 22
Fabric
trim 29
Instrument panel 28
Leat her 29
Outside mirrors 25 part s 28
belt s th e ve hicl e 22
25
tri m 28
and protection 2 1
scat covers
29
numbe r
For anti -
theft wheel bolt s
pressure 6 1
47
L eve l 49
L
oss 49
light 48
temperature
in structions 48
Tr
ailer t o w in g 48 light 48
recorders 34
D
Da ta Link for agnosti c II
D etermin in g correct load limit 71
D ifferentia l lock 6
D rive
econom ically 19
D rive
economi cally and he lp protec t th e environment 19
D
riving o u ts id e of the or Precautions
3 .2 Tips and Advice
light 5
Elec tron ic di
fferential lock 6
Electroni c
Control 9
Electronic
Stabili zat ion
How it work s 6
Em erge ncy
Lockin g drive r's door 88
Opening leve r for the rear lid 89
Unlo ckin g
driver's door 88
Emergen cy clos ing 88
E m erg
ency locking doors 88
E m erge ncy op
ening 88
E m erge ncy
unlocking of rear lid 89
E ngin e
Break-in 12
E ngine
compartment
27
Pr eca utions yo u s ho ul d tak e when working inside th e engine compartment 39
I add pl ain water to the engin e
c o ol
ant?
losses
light 4 1
E n gin e m a
nagem ent 9
E n gin e oil 42
Adding 45 Additi ves 46
leve l 44 43
Dip stick 44
How do I k now how much oil my engine is consuming? 43
c h an ge 46
Specificati on s 42
S pecificat i
ons gasolin e engine 42 kind of engine oil should put in my
ve hicle? 42