Page 329 of 621
319
2008 TUNDRA from Apr. ’08 Prod. (OM 34477U)
Z18013
OPERATING THE “”, “”, “”
AND “
” SWITCHES/BUTTONS
“
” switch/button: Push this switch/but-
ton to pause the disc or to cancel the
pause and return to normal playing.
“
” switch/button: This switch/button
stops a screen when the DVD player is
operated.
“
” and “” switches/buttons: Push
and hold the “
” or “” switch/button
to fast forward or reverse. When you re-
lease the switch/button, the DVD player
will resume playing.
Push the “
” switch/button while paus-
ing, the DVD video plays the slow −motion
video replay.
Z17409
Page 332 of 621
322
2008 TUNDRA from Apr. ’08 Prod. (OM 34477U)
Z17414
Each time you push the “Sub Title” switch,
another language stored on the disc is se-
lected.
To turn off the subtitles, push the “Hide
Buttons” switch.
Push the “Back” switch to return to the
previous screen.
The selected subtitle language will appear
on the screen.Z17415
CHANGING AUDIO LANGUAGE
Push the “Audio” switch on the screen
and then the changing audio language
screen will appear. You can also display
the screen by pushing the “AUDIO” button
on the controller.
Page 333 of 621
323
2008 TUNDRA from Apr. ’08 Prod. (OM 34477U)
Z17416
Each time you push the “Audio” switch,
another language stored on the disc is se-
lected.
To turn off the audio language screen,
push the “Hide Buttons” switch.
Push the “Back” switch to return to the
previous screen.
The selected audio language will appear
on the screen.Z17417
CHANGING ANGLE SCREEN
Push the “Angle” switch on the screen,
and then the changing angle screen will
appear. You can also display the screen
by pushing the “ANGLE” button on the
controller.
Page 334 of 621
324
2008 TUNDRA from Apr. ’08 Prod. (OM 34477U)
Z17413
The angle can be selected for discs that
are multi−angle compatible when the “
”
mark appears on the screen. Each time
you push the “Angle” switch, the angle
changes. The angle number which you
can select will appear on the screen.
To turn off the screen, push the “Hide
Buttons” switch.
Push the “Back” switch to return to the
previous screen.Z17419
CHANGING THE INITIAL SETTING
Push the “Set Up” switch on the screen,
and then the initial setting screen will ap-
pear. You can also display the screen by
pushing the “SET UP” button on the con-
troller. You can change the initial setting.
After the setting is done, the player plays
from the beginning of the chapter or the
track.
Page 365 of 621
355
2008 TUNDRA from Apr. ’08 Prod. (OM 34477U)
1. “AUDIO/CONTROL” knob
Turning the “AUDIO/CONTROL” knob dis-
plays the menu items, names, numbers,
etc. to be selected. To select an item,
push the “AUDIO/CONTROL” knob. Due to
safety concerns, the “AUDIO/CONTROL”
knob does not function while the vehicle
is in motion.
2. Display
Displays such items as the reception lev-
el, a party’s name and phone number. See
“DISPLAY” described on the following
page for further details about the display.
3. “TEXT” button
When the party’s name or phone number
is too long to be displayed, pushing and
holding the “TEXT” button displays the re-
maining characters.
4. Preset buttons
Pushing the preset button displays the
registered speed dial numbers.
�
Audio unit
XS18014
Page 386 of 621

376
2008 TUNDRA from Apr. ’08 Prod. (OM 34477U)
If the cellular phone is not registered, this
system cannot be used. See page 356 for
registering a cellular phone. Make sure
that “BT” is displayed and get the cellular
phone ready to use.
There are 3 way to make a phone call
with this system.
�Speed dial
A phone call can be made with a preset
button in which a phone number is regis-
tered. See page 372 for setting the preset
buttons.
�Dial by Name
The system dials the numbers correspond-
ing to the spoken names registered in the
system.
�Dial by Number
The system dials to the spoken numbers.
To make a phone call
Push the off −hook switch to turn the
hands −free system on. To speed dial
1. Push the preset button where the de- sired number is set. The name or tele-
phone number is displayed.
2. Push the off −hook switch to dial.
To dial by Name 1. Push the talk switch and say “Dial by name”.
“Dial by name. Please push the talk
switch and say the stored name, or say
list names.” is heard and “Dial by Name”
is displayed.
2. Push the talk switch and say “XXXX”, or turn the “AUDIO/CONTROL” knob
until the phone name that you want to
dial is displayed and push the knob. When using a voice command:
“XXXX Push the off
−hook switch to dial.
Otherwise, push the talk switch and say
dial, or go back.” is heard. After that, do
the one of the following:
�Push the off −hook switch.
�Push the talk switch and say “Dial”.
�Turn the “AUDIO/CONTROL” knob until
“Dial” is displayed and push the knob.
When using the knob:
It calls the number.
The system may not function in the follow-
ing cases:
�If there is no number registered in the
preset button.
�If the system does not recognize the
voice command.
—Making a phone call
Page 432 of 621

422
2008 TUNDRA from Apr. ’08 Prod. (OM 34477U)
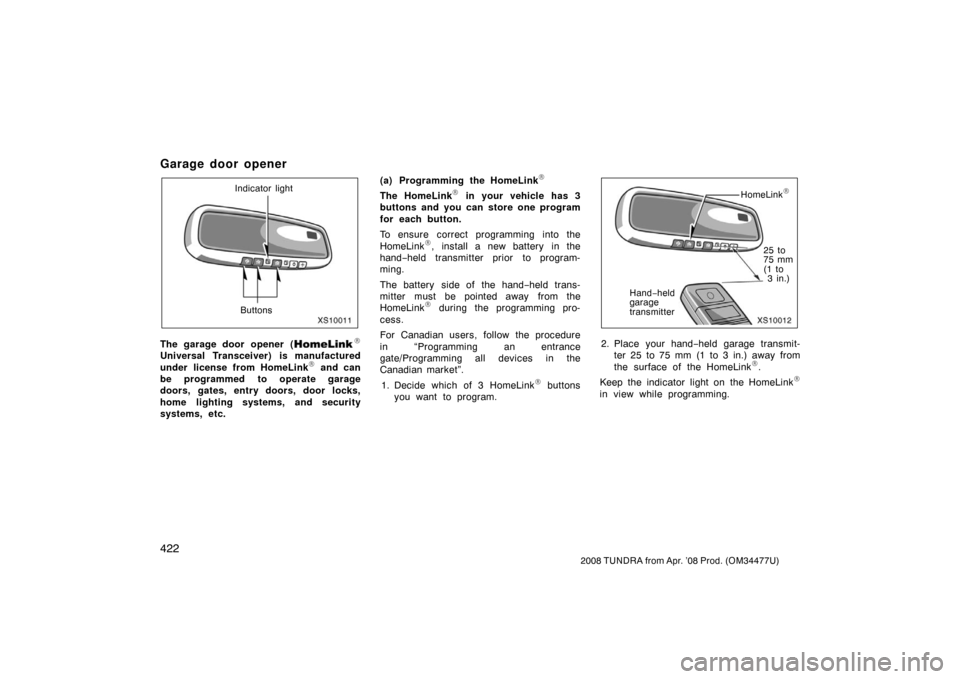
Garage door opener
XS10011
Indicator light
Buttons
The garage door opener (\b
Universal Transceiver) is manufactured
under license from HomeLink\b and can
be programmed to operate garage
doors, gates, entry doors, door locks,
home lighting systems, and security
systems, etc. (a) Programming the HomeLink
\b
The HomeLink\b in your vehicle has 3
buttons and you can store one program
for each button.
To ensure correct programming into the
HomeLink
\b, install a new battery in the
hand− held transmitter prior to program-
ming.
The battery side of the hand −held trans-
mitter must be pointed away from the
HomeLink
\b during the programming pro-
cess.
For Canadian users, follow the procedure
in “Programming an entrance
gate/Programming all devices in the
Canadian market”.
1. Decide which of 3 HomeLink
\b buttons
you want to program.
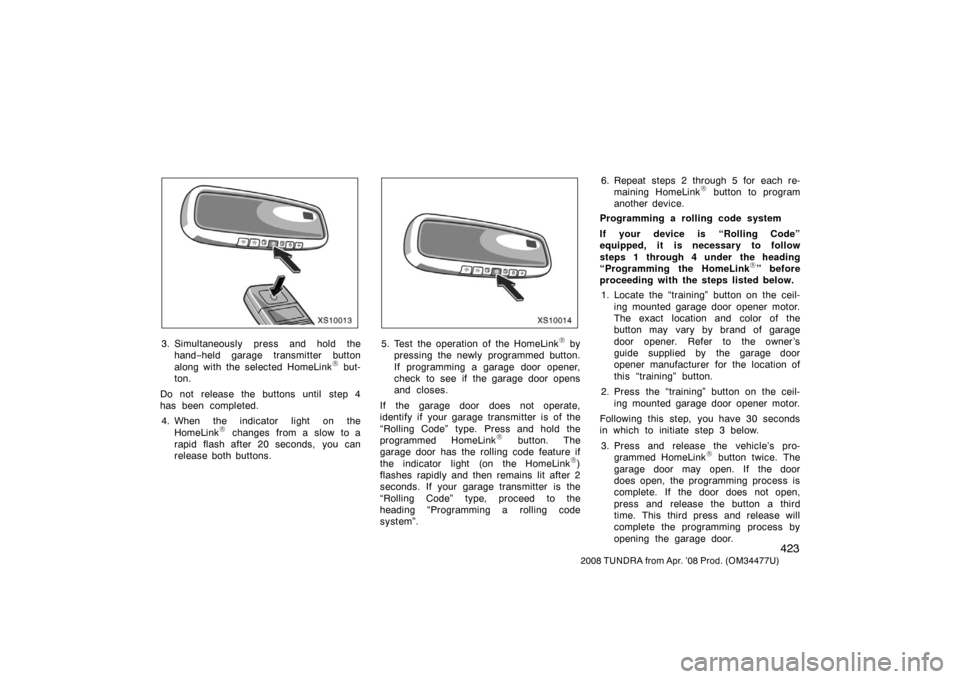
XS10012
HomeLink\b
25 to
75 mm
(1 to 3 in.)
Hand −held
garage
transmitter
2. Place your hand −held garage transmit-
ter 25 to 75 mm (1 to 3 in.) away from
the surface of the HomeLink
\b.
Keep the indicator light on the HomeLink
\b
in view while programming.
Page 433 of 621

423
2008 TUNDRA from Apr. ’08 Prod. (OM 34477U)
XS10013
3. Simultaneously press and hold the
hand− held garage transmitter button
along with the selected HomeLink
\b but-
ton.
Do not release the buttons until step 4
has been completed. 4. When the indicator light on the HomeLink
\b changes from a slow to a
rapid flash after 20 seconds, you can
release both buttons.
XS10014
5. Test the operation of the HomeLink\b by
pressing the newly programmed button.
If programming a garage door opener,
check to see if the garage door opens
and closes.
If the garage door does not operate,
identify if your garage transmitter is of the
“Rolling Code” type. Press and hold the
programmed HomeLink
\b button. The
garage door has the rolling code feature if
the indicator light (on the HomeLink
\b)
flashes rapidly and then remains lit after 2
seconds. If your garage transmitter is the
“Rolling Code” type, proceed to the
heading “Programming a rolling code
system”. 6. Repeat steps 2 through 5 for each re-
maining HomeLink
\b button to program
another device.
Programming a rolling code system
If your device is “Rolling Code”
equipped, it is necessary to follow
steps 1 through 4 under the heading
“Programming the HomeLink
\b” before
proceeding with the steps listed below.
1. Locate the “training” button on the ceil- ing mounted garage door opener motor.
The exact location and color of the
button may vary by brand of garage
door opener. Refer to the owner ’s
guide supplied by the garage door
opener manufacturer for the location of
this “training” button.
2. Press the “training” button on the ceil- ing mounted garage door opener motor.
Following this step, you have 30 seconds
in which to initiate step 3 below.
3. Press and release the vehicle’s pro- grammed HomeLink
\b button twice. The
garage door may open. If the door
does open, the programming process is
complete. If the door does not open,
press and release the button a third
time. This third press and release will
complete the programming process by
opening the garage door.