Page 489 of 572
08 SIENNA_U (L/O 0801)
481
2008 SIENNA from Aug. ’08 Prod. (OM45455U)
To remove the tools, turn the knob
counterclockwise and remove the
cover.To remove the jack, turn the jack joint
by hand until the jack becomes free.To store the jack, turn the jack joint
until the jack base fits securely with
the vehicle body.
This prevents the jack from flying for-
ward during a collision or sudden
stop.
Page 491 of 572

483
2008 SIENNA from Aug. ’08 Prod. (OM45455U)
2. Block the wheel diagonally op-posite the flat tire to keep the
vehicle from rolling when it is
jacked up.
When blocking the w")
08 SIENNA_U (L/O 0801)
483
2008 SIENNA from Aug. ’08 Prod. (OM45455U)
2. Block the wheel diagonally op-posite the flat tire to keep the
vehicle from rolling when it is
jacked up.
When blocking the wheel, place a
wheel block in front of one of the front
wheels or behind one of the rear
wheels.3. Remove the wheel ornament.
Pry off the wheel ornament, using the
beveled end of the wheel nut wrench
as shown.
CAUTION
Do not try to pull off the orna-
ment by hand. Take due care in
handling the ornament to avoid
unexpected personal injury.
4. Loosen all the wheel nuts.
Always loosen the wheel nuts before
raising the vehicle.
Turn the wheel nuts counterclockwise
to loosen. To get maximum leverage,
fit the wrench to the nut so that the
handle is on the right side, as shown
above. Grab the wrench near the end
of the handle and pull up on the han-
dle. Be careful that the wrench does
not slip off the nut.
Do not remove the nuts yet—just un-
screw them about one −half turn.
—Blocking the wheel —Removing wheel ornament
(steel wheels)
—Loosening wheel nuts
Page 493 of 572
08 SIENNA_U (L/O 0801)
485
2008 SIENNA from Aug. ’08 Prod. (OM45455U)
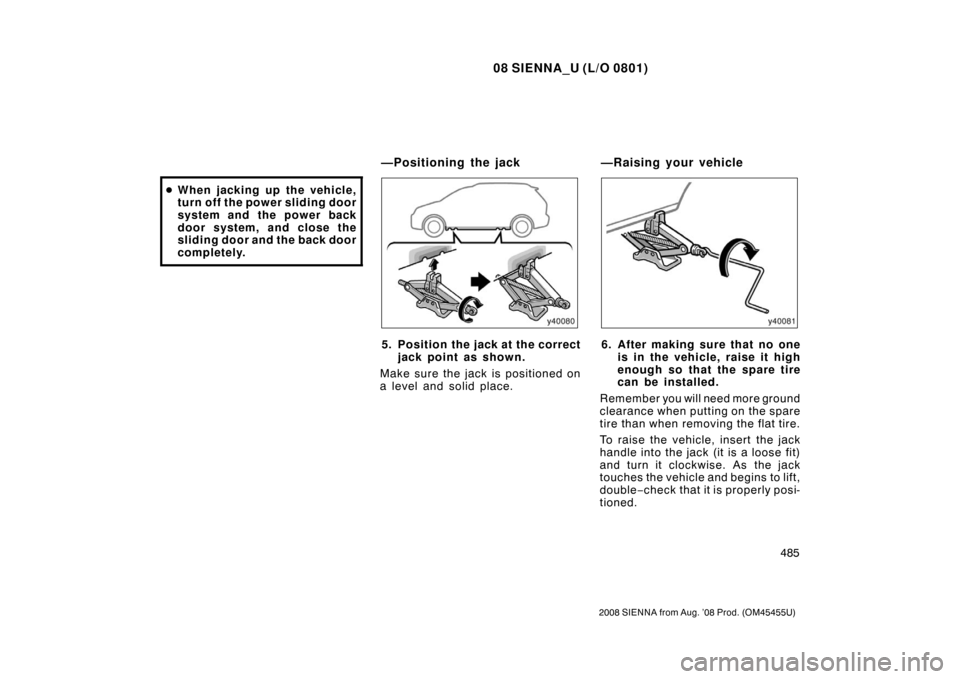
�When jacking up the vehicle,
t u rn of f th e po w er sl i d i n g do o r
system and the power back
door system, and close the
sliding door and the back door
completely.
5. Position the jack at the correct
jack point as shown.
Make sure the jack is positioned on
a level and solid place.6. After making sure that no one is in the vehicle, raise it high
enough so that the spare tire
can be installed.
Remember you will need more ground
clearance when putting on the spare
tire than when removing the flat tire.
To raise the vehicl e, insert the jack
handle into the jack (it is a loose fit)
and turn it clockwise. As the jack
touches the vehicle and begins to lift,
double −check that it is properly posi-
tioned.
—Positioning the jack —Raising your vehicle
Page 495 of 572

487
2008 SIENNA from Aug. ’08 Prod. (OM45455U)
8. Reinstall all the wheel nuts fin-ger tight.
Reinstall the wheel nuts (tapered end
inward) and tighten them as much as
you can")
08 SIENNA_U (L/O 0801)
487
2008 SIENNA from Aug. ’08 Prod. (OM45455U)
8. Reinstall all the wheel nuts fin-ger tight.
Reinstall the wheel nuts (tapered end
inward) and tighten them as much as
you can by hand. Press back on the
tire and see if you can tighten them
more.
CAUTION
Never use oil or grease on the
bolts or nuts. Doing so may lead
to overtightening the nuts and
damaging the bolts. The nuts
may loosen and the wheels may
fall off, which could cause a seri-
ous accident. If there is oil or
grease on any bolt or nut, clean
it.
9. Lower the vehicle completely and tighten the wheel nuts.
Turn the jack handle counterclock-
wise to lower the vehicle.
Use only the wheel nut wrench to
tighten the nuts. Do not use other
tools or any additional leverage other
than your hands, such as a hammer,
pipe or your foot. Make sure the
wrench is securely engaged over the
nut.
Tighten each nut a little at a time in
the order shown. Repeat the process
until all the nuts are tight.
—Reinstalling wheel nuts —Lowering your vehicle
Page 531 of 572

523
2008 SIENNA from Aug. ’08 Prod. (OM45455U)
Clean all dirt from the outside of the res-
ervoir tank and look at the fluid level. If
the fluid is cold, the level should be i")
08 SIENNA_U (L/O 0801)
523
2008 SIENNA from Aug. ’08 Prod. (OM45455U)
Clean all dirt from the outside of the res-
ervoir tank and look at the fluid level. If
the fluid is cold, the level should be in the
“COLD” range. Similarly, if it is hot, the
fluid level should be in the “HOT” range.
If the level is at the low side of either
range, add automatic transmission fluid
DEXRON�II or III to bring the level within
the range.
To remove the reservoir cap, turn it coun-
terclockwise and lift up. To reinstall it,
turn it clockwise. After replacing the reser-
voir cap, visually check the steering box
case, vane pump and hose connections
for leaks or damage.
CAUTION
The reservoir tank may be hot so be
careful not to burn yourself.
NOTICE
Avoid overfilling, or the power steer-
ing could be damaged.
Keep your tire inflation pressures
at the proper level.
The recommended cold tire inflation
pressures, tire sizes and the com-
bined weight of occupants and cargo
(vehicle capacity weight) are de-
scribed on page 549 and 553. They
are also on the tire and loading infor-
mation label.
You should check the tire inflation
pressure every two weeks, or at least
once a month. And do not forget the
spare!
Checking tire inflation
pressure
Page 550 of 572
08 SIENNA_U (L/O 0801)
542
2008 SIENNA from Aug. ’08 Prod. (OM45455U)
1. Open the hood. Press the bulb baseslightly and turn the bulb base coun-
terclockwise to the front of the ve-
hicle as shown.2. Unplug the connector while depress-ing the lock release.
If the connector is tight, wiggle it.3. Plug in a new bulb into the connec- tor and install it into the mounting
hole.
Aiming is not necessary after replacing
the bulb. When aiming adjustment is nec-
essary, contact your Toyota dealer.
—Headlights
Page:
< prev 1-8 9-16 17-24

481
2008 SIENNA from Aug. ’08 Prod. (OM45455U)
To remove the tools, turn the knob
counterclockwise and remove the
cover.To remove the jack, turn the jack joint
by hand until t")

542
2008 SIENNA from Aug. ’08 Prod. (OM45455U)
1. Open the hood. Press the bulb baseslightly and turn the bulb base coun-
terclockwise to the front of the ve-
hicle as shown.2")