Page 136 of 226
OTHER FUNCTIONS
154
2. Touch “Change”.
3. Input the current code.
Each time you touch �, an inputted digit is de-
leted.
4. Input a new code.
5. Touch “Yes”.
�Phone Book Lock
When you set the phone book lock, you
can have the following functions locked.
�Display of the phone book screen and
transferring, registering, editing, deleting
the phone book data.
�Display of speed dial screen, registering,
deleting the speed dial and speed dialing.
�Display of the other party’s name for calls
being received or made.
�Display of dialed numbers screen and
received calls screen, deleting dialed
numbers and received numbers.
�Display of phone information screen.
�Changing the security code.
When you set this function, the speed dial
screen is not displayed while you are driving.
Page 153 of 226

Finish
AUDIO/VIDEO SYSTEM
171
8“AUDIO” button
Push this button to display the audio
control screen. For details, see page
172.
9“SEEK/TRACK” button
Push either side of this button to seek up
or down for a station, or to access a de-
sired track, file or chapter. For details,
see pages 177, 188, 192,196 and 199.
10“PWR·VOL” knob
Push this knob to turn the audio system
on and off, and turn it to adjust the volu-
me. For details, see page 172.
Using your audio/video
system —
— Some basics
This section describes some of the basic fea-
tures of your audio system. Some information
may not pertain to your system.
Your audio system works when the engine
switch is set at ACC or ON.
NOTICE
To prevent the battery from being dis-
charged, do not leave the audio system
on longer than necessary when the en-
gine is not running.
CAUTION
For vehicles sold in U.S.A. and Canada:
�Part 15 of the FCC Rules
FCC Warning:
Changes or modifications in con-
struction not expressly approved by
the party responsible for compliance
could void the user’s authority to op-
erate the equipment. Radio frequen-
cy exposure. This device is approved
for Mobile Application only and, to
comply with applicable FCC radio fre-
quency exposure regulations, must
be used with a distance of at least 7.9
in. (20 cm) between the antenna and
the body of any person at all time dur-
ing use.
Page 157 of 226
 Selecting screen size (with rear seat
entertainment system)
The video screen can be changed from nor-
mal mode to wide mode.
1. Push the “AUDIO” button.
2. Touch")
Finish
AUDIO/VIDEO SYSTEM
175
(d) Selecting screen size (with rear seat
entertainment system)
The video screen can be changed from nor-
mal mode to wide mode.
1. Push the “AUDIO” button.
2. Touch “WIDE”.
“NORMAL”:Displays a 3 � 4 screen, with
either side in black.
“WIDE 1”:Widens the 3 � 4 screen hori-
zontally to fill the screen.
“WIDE 2”:Widens the 3 � 4 screen verti-
cally and horizontally, in the
same ratio, to fill the screen.
When you touch
, the previous screen
returns.
(e) Your CD changer
When you insert a disc, touch “LOAD” and
gently push the disc in with the label side up.
This CD changer can store up to four discs.
The changer will play from track 1 through to
the end of the disc. Then it will play from track
1 of the next disc.
The changer is intended for use with 12 cm
(4.7 in.) discs only.
NOTICE
�Do not stack up two discs for inser-
tion, or it will cause damage to the
changer. Insert only one disc into
slot at a time.
�Never try to disassemble or oil any
part of the changer. Do not insert
anything other than a disc into the s-
lot.
Page 159 of 226
 Presetting a station
1. Tune in the desired station.
2. Touch one of the touch screen buttons
(1 — 6) you want and hold it until a beep is
heard. This sets the sta")
Finish
AUDIO/VIDEO SYSTEM
177
(b) Presetting a station
1. Tune in the desired station.
2. Touch one of the touch screen buttons
(1 — 6) you want and hold it until a beep is
heard. This sets the station to the touch
screen button and the frequency appears
on the touch screen button.
Each radio mode (AM, FM1 or FM2) can store
up to 6 stations. To change the preset station
to a different one, follow the same procedure.
The preset station memory is cancelled when
the power source is interrupted by battery dis-
connection or a blown fuse.(c) Selecting a station
Tune in the desired station using one of the
following methods.
Preset tuning: Touch the touch screen but-
ton (1 — 6) for the station you want. The
touch screen button is highlighted and the
station frequency appears on the screen.
Seek tuning: Push the “SEEK/TRACK” but-
ton on either side. The radio will begin seek-
ing up or down for a station of the nearest fre-
quency and will stop on reception. Each time
you push the button, the stations will be
searched automatically one after another.
To scan all the frequencies: Touch “SCAN”
on the screen or push the “SCAN” button
briefly. “SCAN” appears on the screen. The
radio will find the next station and stay there
for a few seconds, and then scan again. To
select a station, touch “SCAN” or push the
“SCAN” button again.
To scan the preset stations: Touch
“SCAN” on the screen or push the “SCAN”
button for longer than a second. “P. SCAN”
appears on the screen. The radio will tune in
the next preset station, stay there for a few se-
conds, and then move to the next preset sta-
tion. To select a station, touch “SCAN” or
push the “SCAN” button again.(d) Radio Data System
Your audio system is equipped with Radio
Data Systems (RDS). RDS mode provides
you to receive text messages from radio sta-
tions that utilize RDS transmitters.
When RDS is on, the radio can
— only select stations of a particular program
type,
— display messages from radio stations,
— search for a stronger signal station.
RDS features are available for the use only on
FM stations which broadcast RDS informa-
tion.
Page 160 of 226
Finish
AUDIO/VIDEO SYSTEM
178
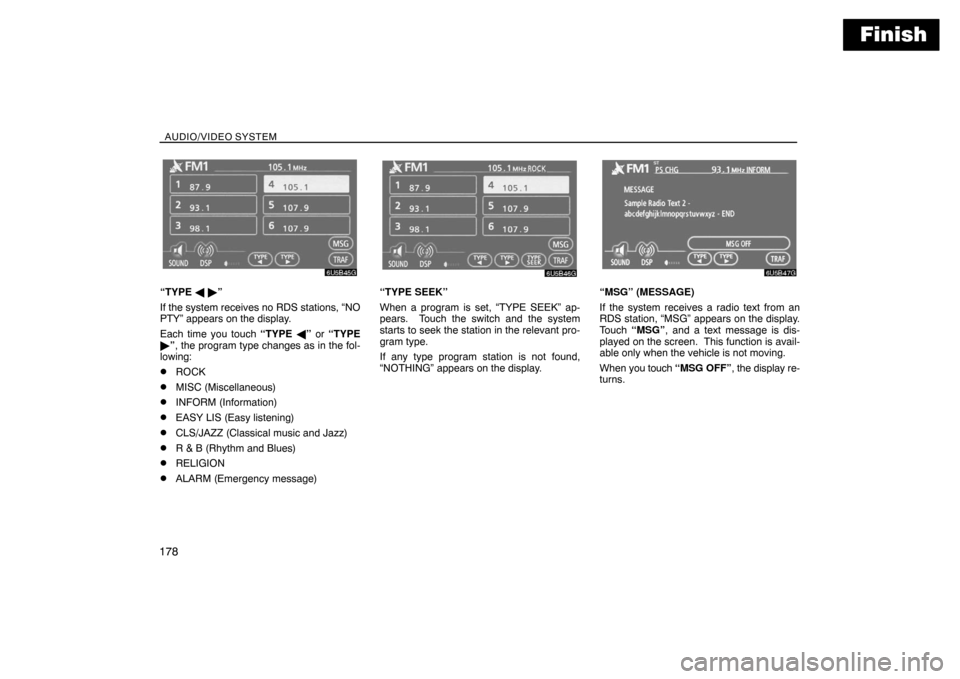
“TYPE � �”
If the system receives no RDS stations, “NO
PTY” appears on the display.
Each time you touch “TYPE �” or “TYPE
�”, the program type changes as in the fol-
lowing:
�ROCK
�MISC (Miscellaneous)
�INFORM (Information)
�EASY LIS (Easy listening)
�CLS/JAZZ (Classical music and Jazz)
�R & B (Rhythm and Blues)
�RELIGION
�ALARM (Emergency message)
“TYPE SEEK”
When a program is set, “TYPE SEEK” ap-
pears. Touch the switch and the system
starts to seek the station in the relevant pro-
gram type.
If any type program station is not found,
“NOTHING” appears on the display.“MSG” (MESSAGE)
If the system receives a radio text from an
RDS station, “MSG” appears on the display.
Touch “MSG”, and a text message is dis-
played on the screen. This function is avail-
able only when the vehicle is not moving.
When you touch “MSG OFF”, the display re-
turns.
Page 163 of 226
 and hold it until a beep is
heard.
This sets the channel t")
Finish
AUDIO/VIDEO SYSTEM
181 �
Presetting a channel
1. Tune in the desired channel.
2. Touch one of the channel selector but-
tons (1 — 6) and hold it until a beep is
heard.
This sets the channel to the touch screen but-
ton and the name and number of the channel
appears on the touch screen button.
Each touch screen button can store three
SAT channels. To change the preset channel
to a different one, follow the same procedure.
The preset channel memory is cancelled
when the power source is interrupted by bat-
tery disconnection or a blown fuse.
�Selecting a channel
Tune in the desired channel using one of the
following methods.
Preset tuning: Touch the channel selector
button (1 — 6) for the channel you want. The
button (1 — 6) is highlighted and channel
number appears on the display.
To select channel within the current cate-
gory: Push the “
” or “” button of
“SEEK·TRACK”. The radio will step up or
down the channel within the current channel
category. Touch “TYPE SEEK”. The radio
will step up the channel within the current
channel category.
To scan the currently selected channel
category: Touch “TYPE SCAN” or push the
“SCAN” button briefly. “SCAN” appears on
the display. The radio will find the next chan-
nel in the same channel category, stay there
for a few seconds, and then scan again. To
select a channel, touch “TYPE SCAN” or
push the “SCAN” button a second time.
To scan the preset channels: Push the
“SCAN” button and hold it until you hear a
beep. “P.SCAN” appears on the display. The
radio will find the next preset channel, stay
there for a few seconds, and then move to the
next preset channel. To select a channel,
push the “SCAN” button a second time.
Page 165 of 226

Finish
AUDIO/VIDEO SYSTEM
183 �
If the satellite radio tuner malfunctions
When problems occur with the XM� tuner, a message will appear on the display. Referring to the table below to identify the problem, take the
suggested corrective action.
ANTENNA
The XM� antenna is not connected. Check whether the XM� antenna cable is attached securely.
A short circuit occurs in the antenna or the surrounding antenna cable. See a Toyota certified dealer for assistance.
UPDATING
You have not subscribed to the XM� satellite radio. The radio is being updated with the latest encryption code.
Contact the XM� satellite radio for subscription information. When a contract is canceled, you can choose the
“CH000” and all free−to−air channels.
The premium channel you selected is not authorized. Wait for about 2 seconds until the radio returns to the pre-
vious channel or “CH001”. If it does not change automatically, select another channel. If you want to listen to the
premium channel, contact the XM� satellite radio.
NO SIGNALThe XM� signal is too weak at the current location. Wait until your vehicle reaches a location with a stronger signal.
LOADINGThe unit is acquiring audio or program information. Wait until the unit has received the information.
OFF AIRThe channel you selected is not broadcasting any programming. Select another channel.
−−−−−There is no song/program title or artist name/feature associated with the channel at that time. No action needed.
−−−The channel you selected is no longer available. Wait for about 2 seconds until the radio returns to the previous
channel or “CH001”. If it does not change automatically, select another channel.
The XM� Listener Care Center is also available on the phone, please call (800) 967−2346 during the following hours:
Monday — Saturday: 6 a.m. — 2 a.m. Sunday: 8 a.m. — 8 p.m. Eastern Time
Page 169 of 226
Finish
AUDIO/VIDEO SYSTEM
187
The numbers of the trays where the disc is not
set are dimmed.
(c) Playing a disc
Push the “DISC·AUX” button if the discs
are already loaded in the changer.
“CD CHANGER” appears on the screen.
The discs set in the changer are played con-
tinuously, starting with the last disc you in-
serted. The disc number of the disc currently
being played, the track number and the time
from the beginning of the program appear on
the screen.
When play of one disc ends, the first track of
the following disc starts. When play of the fi-
nal disc ends, play of the first disc starts
again.
The changer will skip any empty disc trays.Vehicles with rear entertainment system —
If the DVD player is turned on, push the
“DISC·AUX” button again to switch to the CD
changer.
If the rear seat entertainment system is on,
pushing the “DISC·AUX” button switches the
sound of the front audio system and that of the
rear seat entertainment system.

 Playing a disc
Push the “DISC·AUX” button if the discs
are already loaded in the changer.
“CD CH")