Page 146 of 440
146 2-2. Instrument cluster
Switch the displayDisplay items can be switched
by pressing the “DISP” button.
The display will return to the out-
side temperature display when
the “DISP” button is pressed and
held.
●Outside temperature
● Cruising range
● Average fuel consumption after refueling
Displays the outside air temperature.
The temperature range that can be displayed is from
-40 F (-40 C) to 122 F (50 C).
Displays the estimated maximum distance that
can be driven with the quantity of fuel remaining.
• This distance is computed based on your average
fuel consumption. As a result, the actual distance
that can be driven may differ from that displayed.
• When only a small amount of fuel is added to the tank, the display may not be updated.
Displays the average fuel consumption since the
vehicles was last refueled.
Page 147 of 440
147
2-2. Instrument cluster
2
When driving
●
Driving distance
● Average vehicle speed
● Cruise information off
● Zoom display of odometer and trip meter
● Energy monitor
● Eco drive level Displays the driving dist
ance since the hybrid sys-
tem was started.
Displays the average vehicle speed since the
hybrid system was started.
Displays the odometer and trip meters only.
Displays the odometer and one of the trip meters
simultaneously.
Displays the operating condi tion of the hybrid sys-
tem. ( P. 27)
Displays the eco drive level and the average fuel
consumption since the hybrid system was started.
Page 148 of 440
148 2-2. Instrument cluster
NOTICE
■The multi-information disp lay at low temperatures
Allow the interior of the vehicle to warm up before using the liquid crystal
information display. At extremely low temperatures, the information display
monitor may respond slowly, and display changes may be delayed.
Page 174 of 440

174
3-1. Using the air conditioning system and defogger
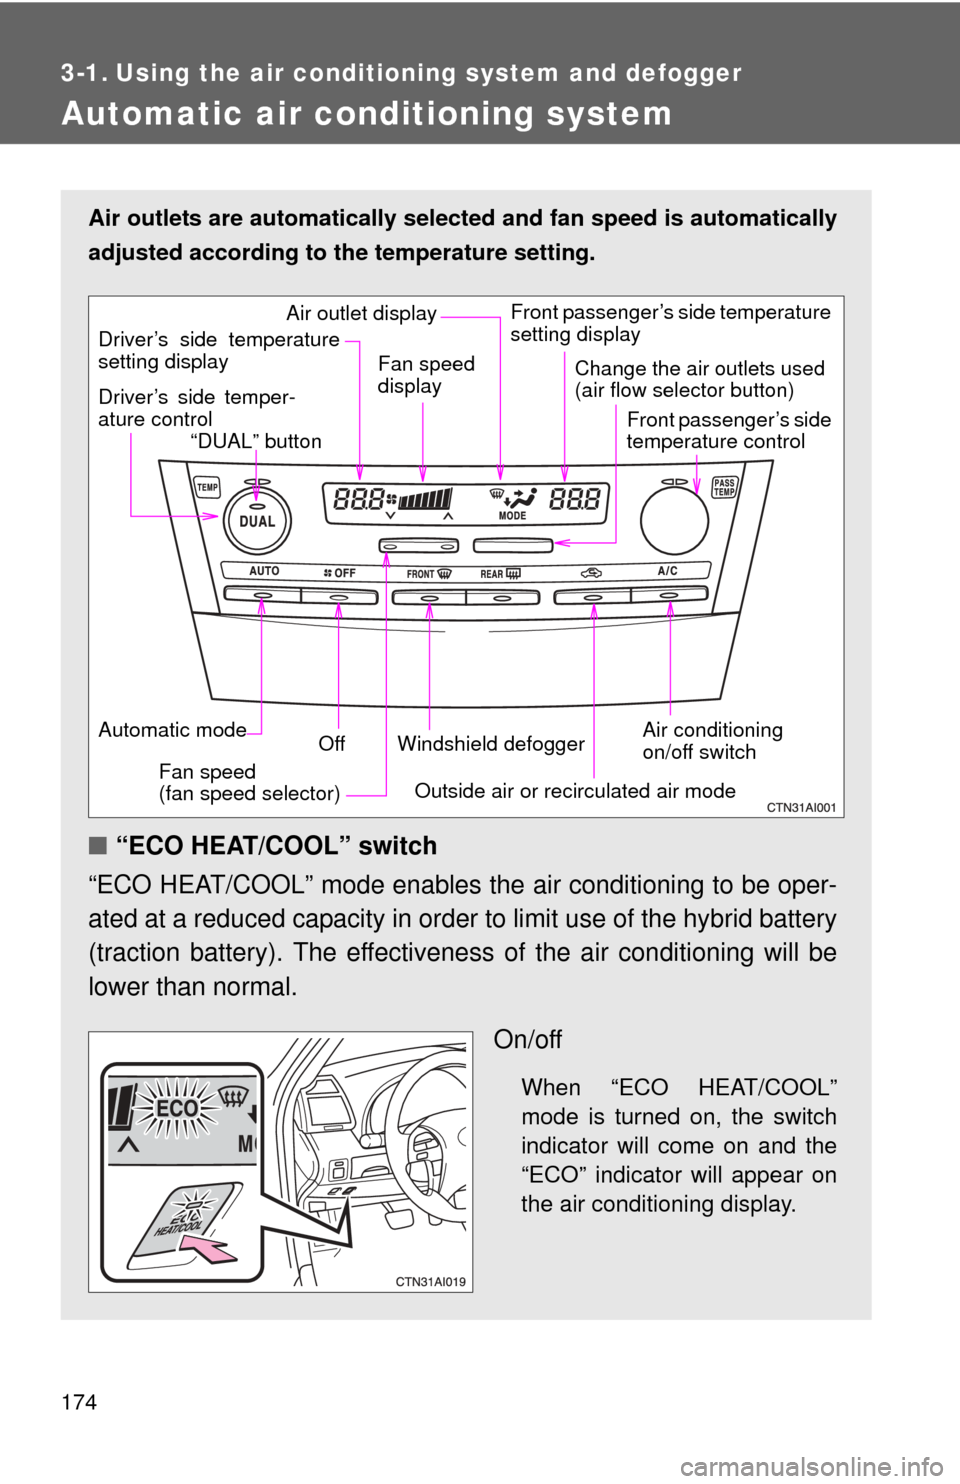
Automatic air conditioning system
Air outlets are automatically selected and fan speed is automatically
adjusted according to the temperature setting.
■ “ECO HEAT/COOL” switch
“ECO HEAT/COOL” mode enables the air conditioning to be oper-
ated at a reduced capacity in order to limit use of the hybrid battery
(traction battery). The effectivene ss of the air conditioning will be
lower than normal.
On/off
When “ECO HEAT/COOL”
mode is turned on, the switch
indicator will come on and the
“ECO” indicator will appear on
the air conditioning display.
Air conditioning
on/off switch
Front passenger’s side temperature
setting display
Driver’s side temper-
ature control “DUAL” button
Automatic mode Off
Driver’s side temperature
setting display
Fan speed
(fan speed selector) Outside air or recirculated air mode
Fan speed
display
Change the air outlets used
(air flow selector button)
Front passenger’s side
temperature control
Windshield defogger
Air outlet display
Page 176 of 440
176 3-1. Using the air conditioning system and defogger
■Adjusting the fan speed
Press “ ” (increase) or “ ” (decrease) on the fan speed selector.
The fan speed is shown on the display. (7 levels)
Press to turn the fan off.
■ Changing the air outlets
Press the air flow selector button.
The air outlets switch each time the button is pressed. The air flow
shown on the display indicates the following.
Air flows to the upper body.
Air flows to the upper body and
feet.
Air flows to the feet.
Page 186 of 440
186
3-2. Using the audio system
Using the radio
Setting station presets (excluding XM® Satellite Radio)
Search for desired stations by turning the dial or press-
ing “
” or “ ” on .
Press and hold the button (from to ) the station
is to be set to, until you hear a beep.
Scanning radio stations (excluding XM® Satellite Radio)
■ Scanning the preset radio stations
Press and hold the “SCAN” button until you hear a beep.
Preset stations will be played for 5 seconds each.
When the desired station is r eached, press the “SCAN” button
once again.
Vol um e
Scanning for
receivable stations
(“SCAN” button) Station selector
Seeking the frequency Adjusting the frequency
(AM, FM mode) or channel
(SAT mode)
AMSAT/FM
mode buttonsPower
Displaying radio text mes-
sages (“TEXT” button)
Changing the channel
STEP1
STEP2
STEP1
STEP2
Page 187 of 440
187
3-2. Using the audio system
3
Interior features
■
Scanning all radio stations within range
Press
the “SCAN” button.
All stations with reception will be played for 5 seconds each.
When the desired station is re ached, press the “SCAN” button
once again.
XM® Satellite Radio (if equipped)
■ Receiving XM
® Satellite Radio
Press and hold until SAT shows in the display.
The display changes as follows each time is pressed.
AM SAT1 SAT2 SAT3
Turn to select the desired channel from all categories
or press or on to select the desired channel in the
current category.
■ Setting XM
® Satellite Radio channel presets
Select the desired channel. Press the button (from
to )
the channel is to be set to until you hear a beep.
■ Changing the channel category
Press or on .
STEP1
STEP2
STEP1
STEP2
Page 188 of 440
188 3-2. Using the audio system
■Scanning XM® Satellite Radio channels
● Scanning channels in the current category
Press the “SCAN” button.
When the desired channel is reached, press the “SCAN”button again.
● Scanning preset channels
Press and hold the “SCAN” button until you hear a beep.
When the desired channel is reached, press the “SCAN”button again.
■ Displaying text information
Press the “TEXT” button.
The display will show up to 10 characters.
The display changes as follows each time the button is pressed.
●CH NAME
● TITLE (SONG/PROGRAM TITLE)
● NAME (ARTIST NAME/FEATURE)
● CH NUMBER
STEP1
STEP2
STEP1
STEP2