Page 27 of 146

BASIC FUNCTIONS
41
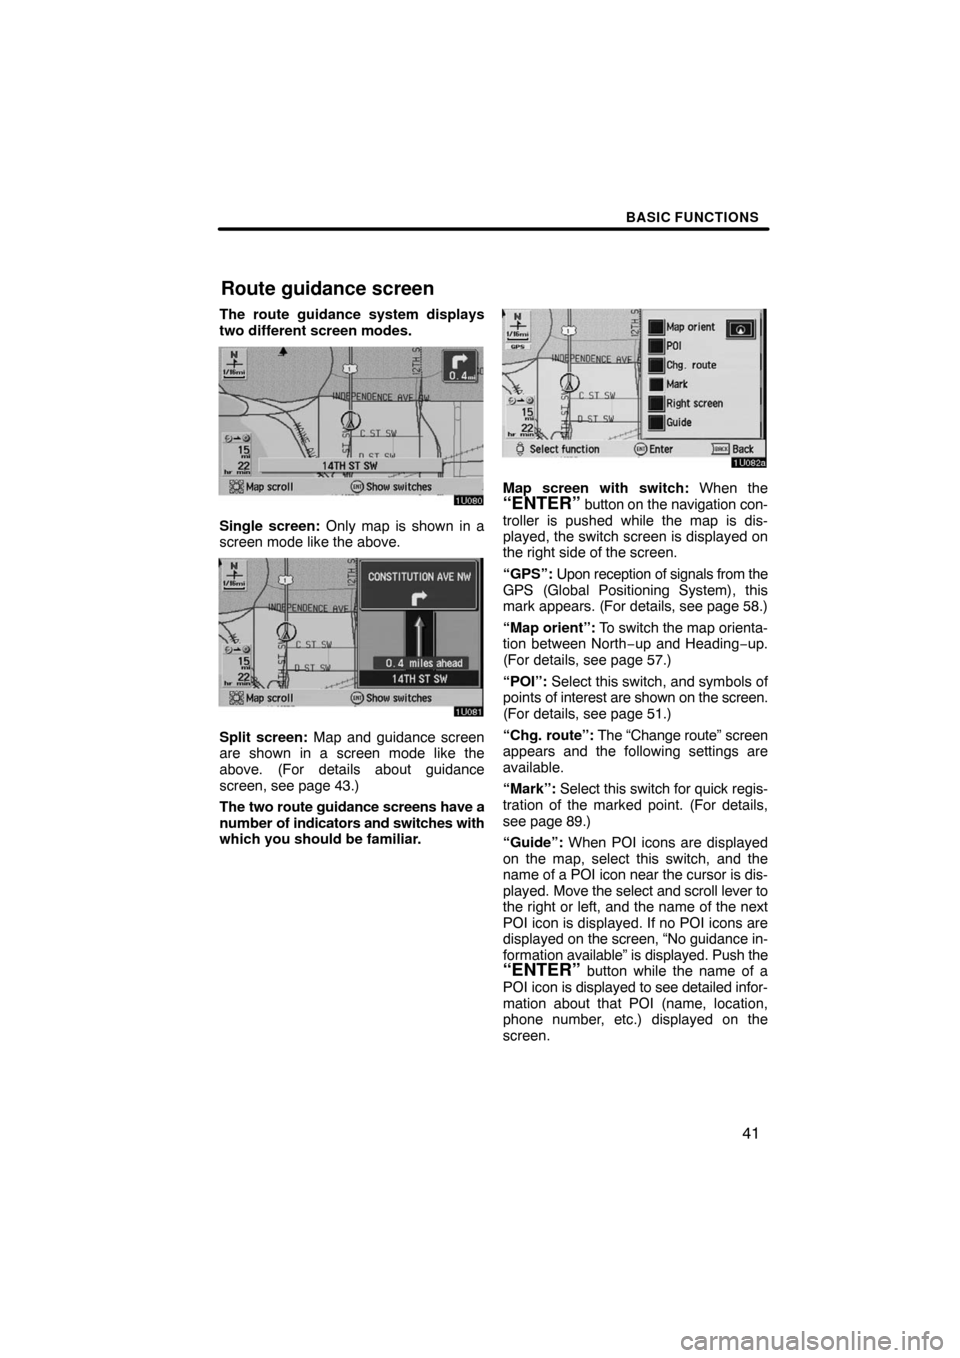
The route guidance system displays
two different screen modes.
Single screen: Only map is shown in a
screen mode like the above.
Split screen: Map and guidance screen
are shown in a screen mode like the
above. (For details about guidance
screen, see page 43.)
The two route guidance screens have a
number of indicators and switches with
which you should be familiar.
Map screen with switch: When the“ENTER” button on the navigation con-
troller is pushed while the map is dis-
played, the switch screen is displayed on
the right side of the screen.
“GPS”: Upon reception of signals from the
GPS (Global Positioning System), this
mark appears. (For details, see page 58.)
“Map orient”: To switch the map orienta-
tion between North−up and Heading−up.
(For details, see page 57.)
“POI”: Select this switch, and symbols of
points of interest are shown on the screen.
(For details, see page 51.)
“Chg. route”: The “Change route” screen
appears and the following settings are
available.
“Mark”: Select this switch for quick regis-
tration of the marked point. (For details,
see page 89.)
“Guide”: When POI icons are displayed
on the map, select this switch, and the
name of a POI icon near the cursor is dis-
played. Move the select and scroll lever to
the right or left, and the name of the next
POI icon is displayed. If no POI icons are
displayed on the screen, “No guidance in-
formation available” is displayed. Push the
“ENTER” button while the name of a
POI icon is displayed to see detailed infor-
mation about that POI (name, location,
phone number, etc.) displayed on the
screen.
Route guidance screen
Page 37 of 146

BASIC FUNCTIONS
51
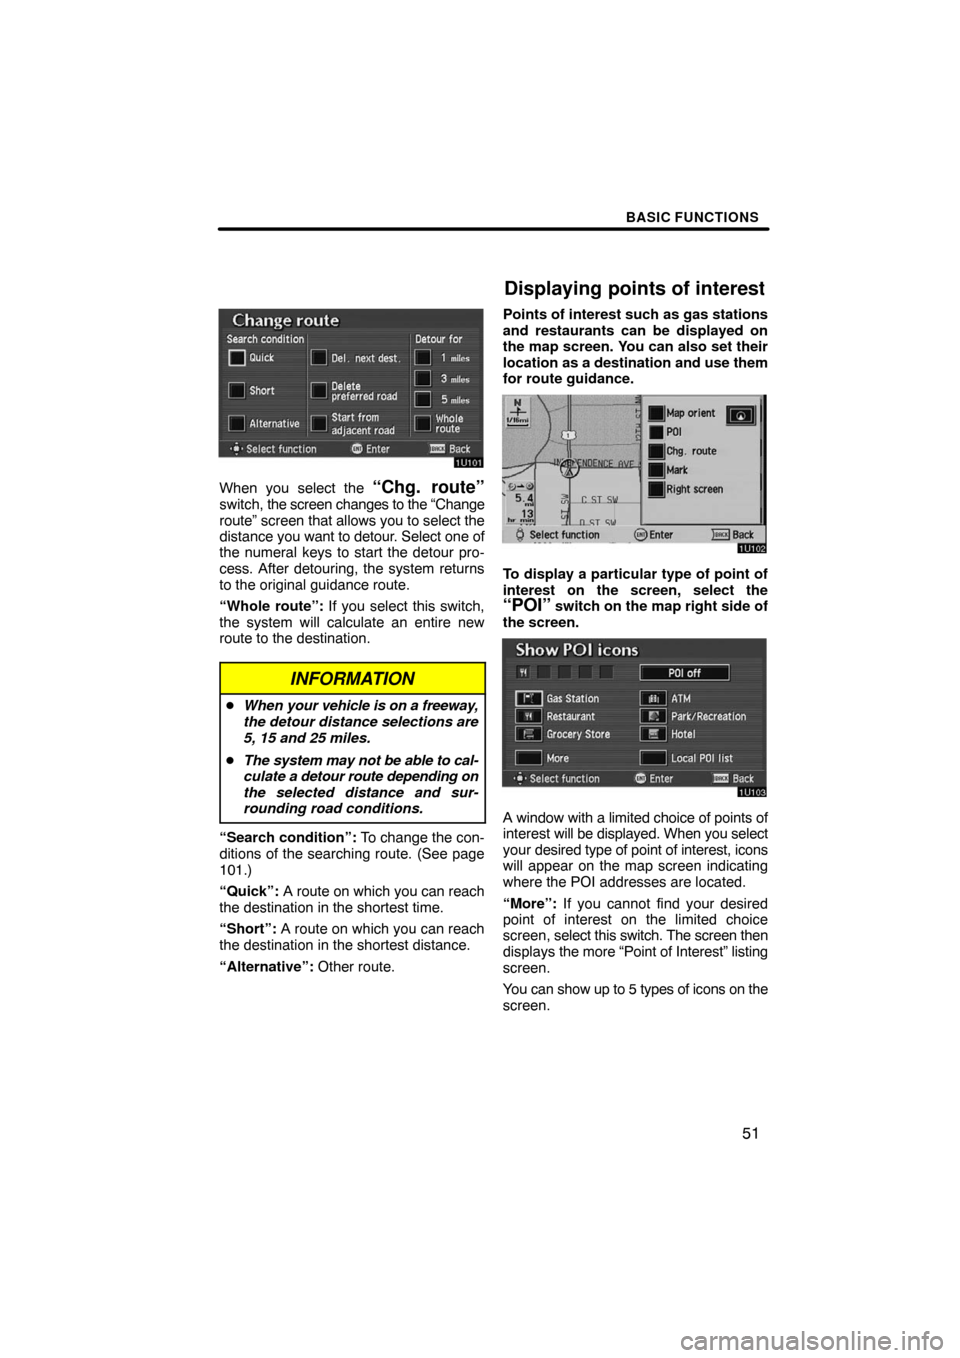
When you select the “Chg. route”switch, the screen changes to the “Change
route” screen that allows you to select the
distance you want to detour. Select one of
the numeral keys to start the detour pro-
cess. After detouring, the system returns
to the original guidance route.
“Whole route”: If you select this switch,
the system will calculate an entire new
route to the destination.
INFORMATION
�When your vehicle is on a freeway,
the detour distance selections are
5, 15 and 25 miles.
�The system may not be able to cal-
culate a detour route depending on
the selected distance and sur-
rounding road conditions.
“Search condition”: To change the con-
ditions of the searching route. (See page
101.)
“Quick”: A route on which you can reach
the destination in the shortest time.
“Short”: A route on which you can reach
the destination in the shortest distance.
“Alternative”: Other route.Points of interest such as gas stations
and restaurants can be displayed on
the map screen. You can also set their
location as a destination and use them
for route guidance.
To display a particular type of point of
interest on the screen, select the
“POI” switch on the map right side of
the screen.
A window with a limited choice of points of
interest will be displayed. When you select
your desired type of point of interest, icons
will appear on the map screen indicating
where the POI addresses are located.
“More”: If you cannot find your desired
point of interest on the limited choice
screen, select this switch. The screen then
displays the more “Point of Interest” listing
screen.
You can show up to 5 types of icons on the
screen.
Displaying points of interest
Page 38 of 146

BASIC FUNCTIONS
52
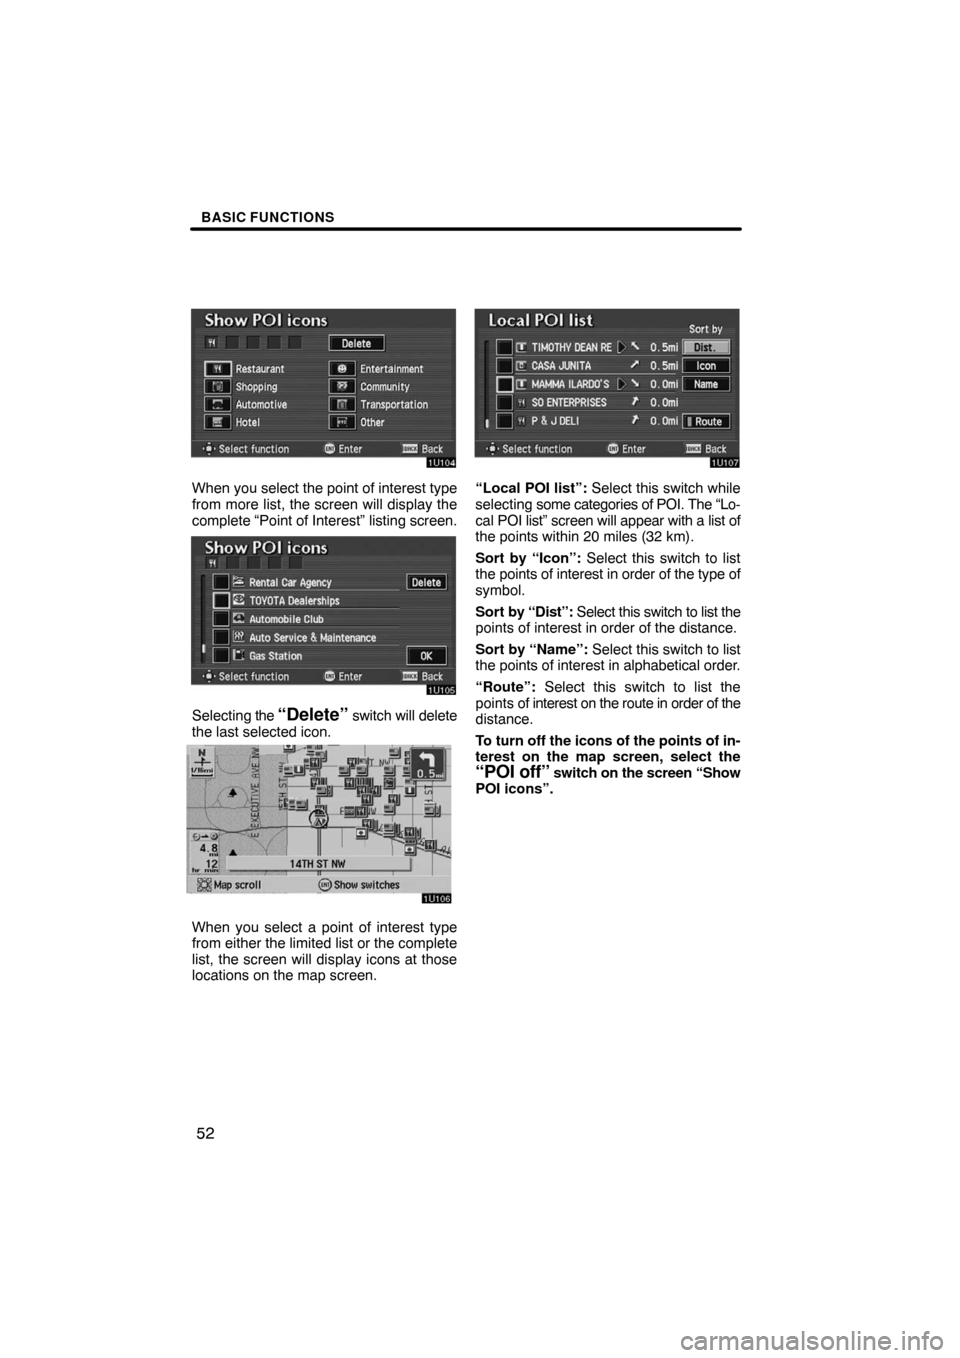
When you select the point of interest type
from more list, the screen will display the
complete “Point of Interest” listing screen.
Selecting the “Delete” switch will delete
the last selected icon.
When you select a point of interest type
from either the limited list or the complete
list, the screen will display icons at those
locations on the map screen.
“Local POI list”: Select this switch while
selecting some categories of POI. The “Lo-
cal POI list” screen will appear with a list of
the points within 20 miles (32 km).
Sort by “Icon”: Select this switch to list
the points of interest in order of the type of
symbol.
Sort by “Dist”: Select this switch to list the
points of interest in order of the distance.
Sort by “Name”: Select this switch to list
the points of interest in alphabetical order.
“Route”: Select this switch to list the
points of interest on the route in order of the
distance.
To turn off the icons of the points of in-
terest on the map screen, select the
“POI off” switch on the screen “Show
POI icons”.
Page 39 of 146
BASIC FUNCTIONS
53
Setting a POI as a destination
You can select one of the points of in-
terest icons on the map screen as a
destination and use it for a route guid-
ance.
1. Select the icon of the point of inter-
est that you want to set as a destination.
Operate the select and scroll lever to move
the cursor
to your desired POI icon.
Then the icon “POI” is centered in the
screen and it overlaps with the cursor
.
2. Push the
“ENTER” button on the
navigation controller, and then the
switch menu appears.
3. Select the “Guide” switch.
The name of the point of interest is dis-
played at the top of the screen. You can se-
lect the other POI icon on the displayed
map.
When you push the
“ENTER” button on
the navigation controller, the information
such as the name and address, etc. are
displayed.
4. If you set the point of interest as a
destination, select the
“Enter ”switch. If not, push the “BACK” but-
ton on the navigation controller, then
the previous screen returns.
Page 56 of 146

BASIC FUNCTIONS
70
END USER NOTICE
PLEASE READ THIS NOTICE
CAREFULLY BEFORE USING
THIS NAVIGATION SYSTEM
The Point Of Interest Data
(“POI” Data) in the navigation
system is in part provided by
infoUSA Inc. (“infoUSA”). By
using the POI Data, you accept
and agree to all terms and con-
ditions set forth below.
1. OWNERSHIP
All rights, title and interest to the
infoUSA POI Data shall be re-
tained by infoUSA.
2. LIMITATIONS ON USE
Except to the extent explicitly
permitted by mandatory laws, you
may not extract or reutilize any
portion of the contents of the
POI Data, nor reproduce, copy,
modify, adapt, translate, disas-
semble, decompile, or reverse
engineer any portion of the POI
Data.3. TRANSFER
You may not transfer the POI
Data to third parties, except to-
gether with the system for which
it was created, provided that you
do not retain any copy of the
POI Data.
4. DISCLAIMER OF WARRANTY
EXCEPT AS STATED HEREIN,
INFOUSA MAKES NO EXPRESS
OR IMPLIED WARRANTIES, IN-
CLUDING, WITHOUT LIMITA-
TION, ANY EXPRESS OR IM-
PLIED WARRANTY OF FITNESS
FOR A PARTICULAR PURPOSE
OR WARRANTY OF MERCHANT-
ABILITY.
5. LIMITATION OF LIABILITY
EITHER INFOUSA OR SUPPLI-
ER OF POI DATA SHALL NOT
BE LIABLE FOR ANY INDIRECT,
CONSEQUENTIAL OR INCIDEN-
TAL DAMAGES MADE OR AL-
LEGED IN CONNECTION WITH
YOUR USE OF THE POI DATA.
Page 70 of 146
ADVANCED FUNCTIONS
84
You can register and keep your own
marked points of interest list (like res-
taurants, sports facilities, etc.) and use
the marked points to input a destina-
tion.
Push the “MENU” button on the navi-
gation controller.(a) Registering marked points
1. Select the “Marked points”switch.
2. Select the “Register” switch of
the “Marked points”.
Marked points
Page 89 of 146
ADVANCED FUNCTIONS
103
To display the next destination
To preview the route to the
next destination
To preview the route to the
next destination fast
To stop previewing
To preview the route to the
previous departure position
To preview the route to the
previous departure position
To display the previous de-
parture position
3. Select the “Edit” switch. The “Edit
route preview” screen appears.
“To next POI”: To preview the next POI
“To next
”: To preview the next destina-
tion
If the points of interest you selected are on
the route, they are displayed on the
screen.
“Select POI”: To select the POI icon
“Delete”: To delete the POI icon
4. Select your desired category of
point of interest.
5. Select your desired icon from the
list and select the “OK” switch.
Page 127 of 146
APPENDIX
141
POI* display on the map
Command
Action
Automobile ClubDisplays icon.Triple A
Auto Service & MaintenanceDisplays icon.Auto Service
Gas StationDisplays icon.Gas
LEXUS DealershipDisplays icon.LEXUS Dealer
Parking GarageDisplays icon.
Parking LotDisplays icon.
TOYOTA DealershipDisplays icon.TOYOTA Dealer
AT MDisplays icon.
BankDisplays icon.
City HallDisplays icon.
Civic CenterDisplays icon.Community Center
Convention CenterDisplays icon.Exhibition Center
Court HouseDisplays icon.
Higher Education
Displays icon.University
College
HospitalDisplays icon.
LibraryDisplays icon.
*: Point of Interest