Page 144 of 496
132
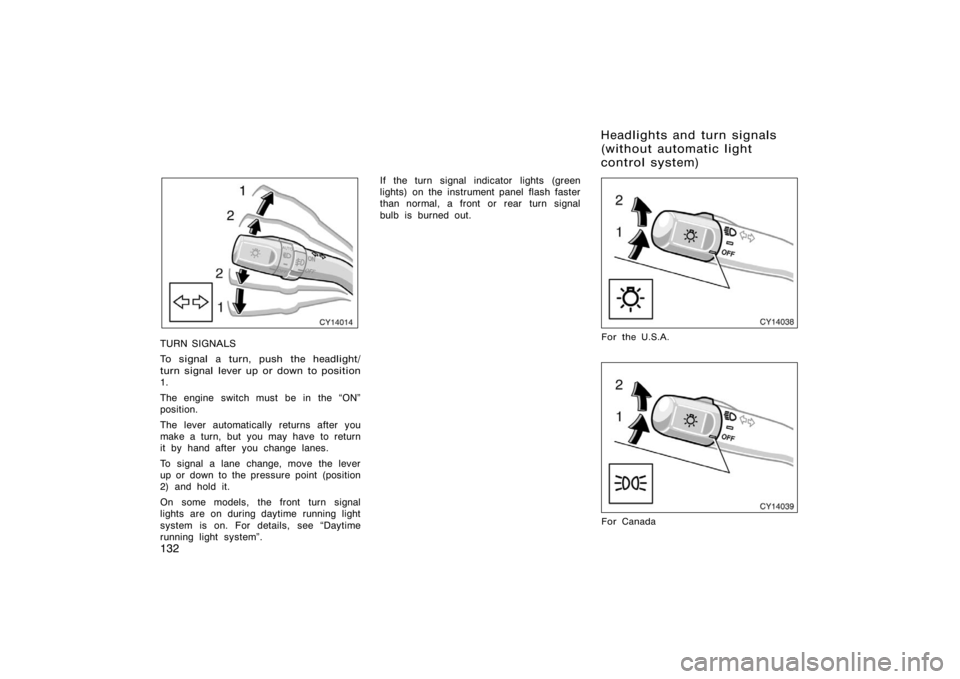
CY14014
TURN SIGNALS
To signal a turn, push the headlight/
turn signal lever up or down to position
1.
The engine switch must be in the �ON"
position.
The lever automatically returns after you
make a turn, but you may have to return
it by hand after you change lanes.
To signal a lane change, move the lever
up or down to the pressure point (position
2) and hold it.
On some models, the front turn signal
lights are on during daytime running light
system is on. For details, see �Daytime
running light system".If the turn signal indicator lights (green
lights) on the instrument panel flash faster
than normal, a front or rear turn signal
bulb is burned out.
CY14038
For the U.S.A.
CY14039
For Canada
Headlights and turn signals
(without automatic light
control system)
Page 146 of 496
. Pull the lever to-
ward you (position 2) for low beams.
The headlight high beam indic")
134
CY14016
High−Low beams�For high beams, turn
the headlights on and push the lever away
from you (position 1). Pull the lever to-
ward you (position 2) for low beams.
The headlight high beam indicator light
(blue light) on the instrument panel will
tell you that the high beams are on.
Flashing the high beam headlights
(position 3)�Pull the lever all the way
back. The high beam headlights turn off
when you release the lever.
You can flash the high beam headlights
with the knob turned to �OFF".
CY14017
TURN SIGNALS
To signal a turn, push the headlight/
turn signal lever up or down to position
1.
The engine switch must be in the �ON"
position.
The lever automatically returns after you
make a turn, but you may have to return
it by hand after you change lanes.
To signal a lane change, move the lever
up or down to the pressure point (position
2) and hold it.
On some models, the front turn signal
lights are on during daytime running light
system is on. For details, see �Daytime
running light system". If the turn signal indicator lights (green
lights) on the instrument panel flash faster
than normal, a front or rear turn signal
bulb is burned out.
Page 445 of 496
433
CHECKING AND REPLACING FUSES
Parts (if replacement is necessary):
�Fuse with same amperage rating as
original
ADDING WASHER FLUID
Parts:
�Water
�Washer fluid containing antifreeze (for
winter use)
Tools:
�Funnel
REPLACING LIGHT BULBS
Parts:
�Bulb with same number and wattage
rating as original (See charts in
�Replacing light bulbs" on page 454 in
Section 7−3.)
Tools:
�Screwdriver
Page 461 of 496
449
DO−IT−YOURSELF MAINTENANCE
Electrical components
Checking battery condition450
. . . . . . . . . . . . . . . . . . . . . . . . . . . . . . . . . .
Battery recharging precautions 451
. . . . . . . . . . . . . . . . . . . . . . . . . . . . . . .
Checking and replacing fuses 452
. . . . . . . . . . . . . . . . . . . . . . . . . . . . . . . .
Adding washer fluid 453
. . . . . . . . . . . . . . . . . . . . . . . . . . . . . . . . . . . . \
. . . . .
Replacing light bulbs 454
. . . . . . . . . . . . . . . . . . . . . . . . . . . . . . . . . . . . \
. . . .
SECTION 7− 3
Page 466 of 496

454
The following illustrations show how to
gain access to the bulbs. When replacing
a bulb, make sure the engine switch and
light switch are off. Use bulbs with the
wattage ratings given in the table.
The stop/tail and rear side marker lights
consist of a number of LEDs. If any of
the LEDs burn out, take your vehicle to
your Toyota dealer to have the light re-
placed.
CAUTION
�To prevent burning yourself, do not
replace the light bulbs while they
are hot.
�Halogen bulbs have pressurized gas
inside and require special handling.
They can burst or shatter if
scratched or dropped. Hold a bulb
only by its plastic or metal case.
Do not touch the glass part of a
bulb with bare hands.
NOTICE
Only use a bulb of the listed type.
The inside of the lens of exterior lights
such as headlights may temporarily fog up
when the lens becomes wet in the rain or
in a car wash. This is not a problem
because the fogging is caused by the
temperature difference between the outside
and inside of the lens, just like the
windshield fogs up in the rain. However, if
there is a large drop of water on the
inside of the lens, or if there is water
pooled inside the light, contact your
Toyota dealer.
Replacing light bulbs�
Page 467 of 496
455
A: HB3 halogen bulbs
B: H11 halogen bulbs
C: HB4 halogen bulbs
D: Wedge base bulbs (amber)
E: Single end bulbs
F: Wedge base bulbs (clear)
G: Double end bulbs
9005
Ty p e
WBulb No.Light bulbs
Headlights (high beam)
Headlights (low beam)
Front fog lights
Parking and front side marker lights
Front turn signal lights
Rear turn signal lights
Back−up lights
License plate lights
High mounted stoplight
Interior light
Personal lights
Vanity lights
Door courtesy lights
Glove box light
Luggage compartment light
Running board lights �
9006 168
�
�
�
�
921
�
�
� �
921
168
1156NA 60
55
51
5
27
21
18 5
18 8
5
3
3.8
1.2 8
3.8 A
B
C
D E
D F
F
F
G F
G
F
F
G F
Page 468 of 496
456
CY73039
High beam
(inside)
Low beam
(outside)
1. Turn the bulb base counterclockwiseto the front of the vehicle as shown.
CY73004
2. Unplug the connector while depress-ing the lock release.
If the connector is tight, wiggle it.
CY73040
3. Install a new bulb and connector into the mounting hole and turn
them clockwise to the front of the
vehicle.
Aiming is not necessary after replacing
the bulb. When aiming adjustment is nec-
essary, contact your Toyota dealer.
�Headlights
Page 469 of 496
457
CY73041
1. Turn the bulb base counterclockwiseto the front of the vehicle as shown.
CY73009
2. Unplug the connector while depress-ing the lock release.
If the connector is tight, wiggle it.
CY73042
3. Install a new bulb and connector into the mounting hole and turn
them clockwise to the front of the
vehicle.
�Front fog lights


E: Single end bulbs
F: Wedge base bulbs (clear)
G: Double end bulbs
9005
Ty p e
WBulb No.Light bulbs
H")

Low beam
(outside)
1. Turn the bulb base counterclockwiseto the front of the vehicle as shown.
CY73004
2. Unplug the connector while depress-ing the lock release.
If the")
