Page 143 of 496

131
Position 2 or 3 with the headlights on�
The lights automatically turn off after 30
seconds when all the side doors and back
door are closed with the engine switch in
the �ACC" or �LOCK" position.
If the �LOCK" switch of the wireless re-
mote control transmitter is pushed twice
simultaneously, the lights automatically
turn off immediately.
The time before the headlights turn off
can be changed. For details, contact your
Toyota dealer.
If the driver ’s door is kept open, the lights
automatically turn off after 30 minutes.
To turn them on again, turn the engine
switch to the �ON" position or actuate the
headlight switch.
If you are going to park for over one
week, make sure the headlight switch is
off.
NOTICE
To prevent the battery from being dis-
charged, do not leave the lights on
for a long period when the engine is
not running.
Daytime running light (DRL) system (all
models sold in Canada and some mod-
els sold in U.S.A.)
The Daytime Running Light (DRL) system
can make it easier for others to see the
front of your vehicle during the day. The
DRL system can be helpful in many differ-
ent driving conditions, but they can be
especially helpful in the short periods after
dawn and before sunset.
The DRL system will make your front turn
signal lights come on when:
�The engine is running.
�The knob is in the �OFF" position,
position 1 or position 3 with the tail
lights on.
�The parking brake is released.
To turn off the DRL system, twist the knob
to position 2 or position 3 with the head-
lights on, or turn the engine switch switch
off.
This DRL system can be disabled. For
details, contact your Toyota dealer.
CY14013
High−Low beams� For high beams, turn
the headlights on and push the lever away
from you (position 1). Pull the lever to-
ward you (position 2) for low beams.
The headlight high beam indicator light
(blue light) on the instrument panel will
tell you that the high beams are on.
Flashing the high beam headlights
(position 3)�Pull the lever all the way
back. The high beam headlights turn off
when you release the lever.
You can flash the high beam headlights
with the knob turned to �OFF".
Page 146 of 496
. Pull the lever to-
ward you (position 2) for low beams.
The headlight high beam indic")
134
CY14016
High−Low beams�For high beams, turn
the headlights on and push the lever away
from you (position 1). Pull the lever to-
ward you (position 2) for low beams.
The headlight high beam indicator light
(blue light) on the instrument panel will
tell you that the high beams are on.
Flashing the high beam headlights
(position 3)�Pull the lever all the way
back. The high beam headlights turn off
when you release the lever.
You can flash the high beam headlights
with the knob turned to �OFF".
CY14017
TURN SIGNALS
To signal a turn, push the headlight/
turn signal lever up or down to position
1.
The engine switch must be in the �ON"
position.
The lever automatically returns after you
make a turn, but you may have to return
it by hand after you change lanes.
To signal a lane change, move the lever
up or down to the pressure point (position
2) and hold it.
On some models, the front turn signal
lights are on during daytime running light
system is on. For details, see �Daytime
running light system". If the turn signal indicator lights (green
lights) on the instrument panel flash faster
than normal, a front or rear turn signal
bulb is burned out.
Page 265 of 496
253
Z17485
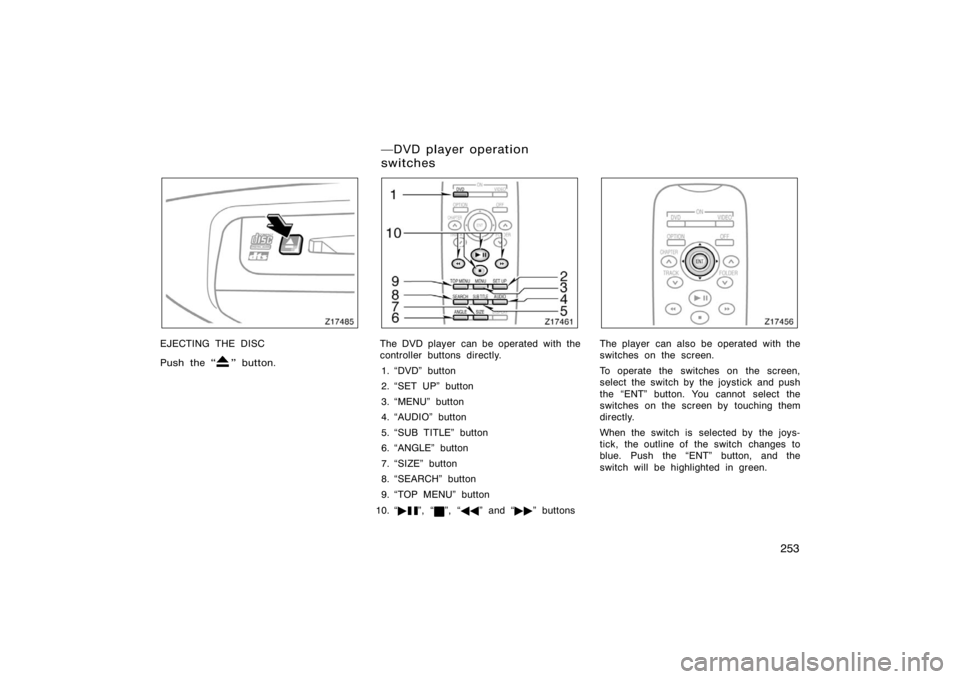
EJECTING THE DISC
Push the �
" button.
Z17461
The DVD player can be operated with the
controller buttons directly.1. �DVD" button
2. �SET UP" button
3. �MENU" button
4. �AUDIO" button
5. �SUB TITLE" button
6. �ANGLE" button
7. �SIZE" button
8. �SEARCH" button
9. �TOP MENU" button
10. � �
", �", ��� " and ��� " buttons
Z17456
The player can also be operated with the
switches on the screen.
To operate the switches on the screen,
select the switch by the joystick and push
the �ENT" button. You cannot select the
switches on the screen by touching them
directly.
When the switch is selected by the joys-
tick, the outline of the switch changes to
blue. Push the �ENT" button, and the
switch will be highlighted in green.
�DVD player operation
switches
Page 463 of 496
 first and rei")
451
NOTICE
�Be sure the engine and all accesso-
ries are off before performing main-
tenance.
� When checking the battery, remove
the ground cable from the negative
terminal (�−" mark) first and rein-
stall it last.
� Be careful not to cause a short cir-
cuit with tools.
� Take care no solution gets into the
battery when washing it.
If the battery is disconnected or run
down, the power window, power back win-
dow and moon roof may not operate auto-
matically, the jam protection function will
not function correctly, and the back door
will not open after you reconnect, replace
or recharge the battery. In any of these
cases, you should normalize the power
window, power back window, back door
and moon roof. To normalize them, see
�Power windows" on page 27, �Power back
window" on page 30, �Back door" on page
32 and �Electric moon roof" on page 39
in Section 1−2.
CY73015
Ty p e A
Ty p e B Green
Blue Dark
White Red Clear or light
yellow
CHECKING BY INDICATOR
Check the battery condition by the indi-
cator color.
Indicator color
ConditionTy p e ATy p e B
GreenBlueGood
DarkWhite
Charging necessary.
Have battery
checked by your
Toyota dealer.
Clear orlight
yellow
Red
Have battery
checked by your
Toyota dealer.
During recharging, the battery is pro-
ducing hydrogen gas.
Therefore, before recharging:
1. If recharging with the battery installed on the vehicle, be sure to disconnect
the ground cable.
2. Be sure the power switch on the re- charger is off when connecting the
charger cables to the battery and when
disconnecting them.
CAUTION
�Always charge the battery in an un-
confined area. Do not charge the
battery in a garage or closed room
where there is not sufficient ventila-
tion.
�Only do a slow charge (5 A or
less). Charging at a quicker rate is
dangerous. The battery may ex-
plode, causing personal injuries.
NOTICE
Never recharge the battery while the
engine is running. Also, be sure all
accessories are turned off.
�Checking battery condition Battery recharging precautions