Page 250 of 496

Radio
Turn the knob clockwise to step up the
frequency. Turn the knob counterclockwise
to step down the frequency.
XM
� Satellite Radio∗�
Turn the �TUNE·FIL")
238
TUNE·FILE (Tuning and File up/down)
Radio
Turn the knob clockwise to step up the
frequency. Turn the knob counterclockwise
to step down the frequency.
XM
� Satellite Radio∗�
Turn the �TUNE·FILE" knob clockwise to
step up the channel. Turn the knob coun-
terclockwise to step down the channel.
∗: Use of satellite radio r equires XM�
tuner and service. Contact your Toyota
dealer for details.
MP3/WMA player
Turn the knob clockwise to file up. Turn
the knob counterclockwise to file down.
TYPE
XM
� Satellite Radio∗�
When you push the �� " or ��" side of
the �TYPE" button while receiving a XM
�
channel, the current channel category ap-
pears on the display.
When the channel category appears, push
either � �" or � �" side of the �TYPE" but-
ton to switch to the next or previous cate-
gory.
∗: Use of satellite radio r equires XM�
tuner and service. Contact your Toyota
dealer for details.
CY17029
Some parts of the audio system can be
adjusted using the switches on the steer-
ing wheel.
Details of the specific switches, controls,
and features are described below.
1. Volume control switches
2. � ��" switch
3. �MODE" switch 1. Volume control switches
Push the �+" side to increase the volume.
The volume continues to increase while
the switch is being pushed.
Push the �−" side to decrease the volume.
The volume continues to decrease while
the switch is being pushed. 2. � � � " switch
Radio
This switch has the following features�
To select a preset station:
Quickly push and release the � �" or � �"
side of the switch. Do this again to select
the next preset station.
To seek a station:
Push and hold the � �" or � �" side of the
switch until you hear a beep. Do this
again to find the next station. If you push
the switch on either side during the seek
mode, seeking will be cancelled.
To step up or down the frequency, push
and hold the switch even after you hear
a beep. When you release the switch, the
radio will begin seeking up or down for a
station. Do this again to find the next
station.
Audio remote controls
(steering switches)
Page 251 of 496

239
XM� Satellite Radio∗�
To select a preset channel, push the � �"
or � �" side of the switch. Repeat until a
desired channel is found.
∗: Use of satellite radio r equires XM�
tuner and service. Contact your Toyota
dealer for details.
Compact disc player
Use this switch to skip up or down to a
different track in either direction.
Quickly push and release the � �" or � �"
side of the switch until the track you want
to listen to is set. If you want to return
to the beginning of the current track, push
the � �" side of the switch once, quickly.
Vehicles with rear seat entertainment sys-
tem�
While the DVD player is in operation, the
chapter or track can be changed by push-
ing the � �" or � �" side of the switch.
With compact disc changer only�
Push and hold the � �" or � �" side of the
switch until the disc you want to listen to
is set. MP3/WMA player
Use this switch to select a desired file or
disc.
To select a desired file:
Quickly push and release the �
�" or � �"
side of the switch until the file you want
to listen to is set. If you want to return
to the beginning of the current file, push
the � �" side of the switch once, quickly.
To select a desired disc:
Push and hold the � �" or � �" side of the
switch until the disc you want to listen to
is set.
Vehicles with rear seat entertainment sys-
tem�
While the DVD player is in operation, the
chapter or track can be changed by push-
ing the � �" or � �" side of the switch.
3. �MODE" switch
Push the �MODE" switch to select an au-
dio mode. Each push changes the mode
sequentially if the desired mode is ready
to use.
To turn the audio system on, push the
�MODE" switch.
To turn the audio system off, push and
hold the �MODE" switch until the system
turns off.CY17076
An AUX adapter is installed in the rear
console box.
By inserting a mini plug into the AUX
adapter, you can listen to music from a
portable audio device through the vehicle’s
speaker system.
To use the AUX adapter, switch to the
AUX mode (external device mode) by
pressing the �DISC·AUX" button. When the
AUX adapter is in use, �AUX" will appear
on the display. To adjust the volume, turn
the �PWR·VOL" knob.
When using a portable audio device con-
nected to the power outlet, noise may
occur during playback. If this happens,
use the power source of the portable au-
dio device.
A U X ad ap t er
Page 316 of 496
304
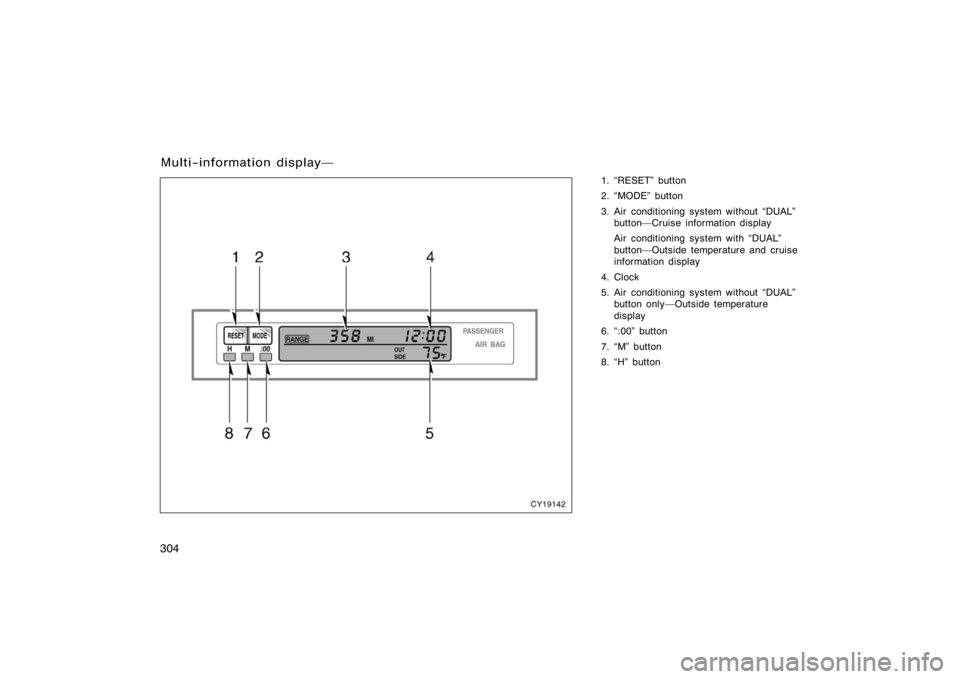
1. �RESET" button
2. �MODE" button
3. Air conditioning system without �DUAL"button�Cruise information display
Air conditioning system with �DUAL"
button�Outside temperature and cruise
information display
4. Clock
5. Air conditioning system without �DUAL" button only�Outside temperature
display
6. �:00" button
7. �M" button
8. �H" button
Multi−information display�
CY19142
Page 317 of 496

305
Operate the multi−information display
with the engine switch on.
When the engine switch is turned to �ON",
the last previously used mode displayed
just before the engine switch is turned off
will appear.
If the electrical power source has been
disconnected from the multi−information
display, the display will automatically be
set to the initial mode.
CAUTION
Do not adjust the display while the
vehicle is moving. Be sure to adjust
the display only when the vehicle is
stopped.
CY19001
To reset the hour: Push the �H" button.
To reset the minutes: Push the �M" button.
If quick adjustment to a full hour is de-
sired, push the �:00" button.
For example, if the �:00" button is de-
pressed when the time is between
1:01�1:29, the time will change to 1:00.
If the time is between 1:30�1:59, the
time will change to 2:00.
The engine switch must be in the �ACC"
or �ON" position.
If the electrical power source has been
disconnected from the clock, the time dis-
play will automatically be set to 1:00 (one
o’clock).
CY19082
The displayed temperature ranges from
−30�C (−22 �F) up to 50 �C (122 �F).
The engine switch must be in the �ON"
position.
If an abnormality exists in the connection
of the outside air temperature sensor,
�−− �C" (�−− �F") will appear on the display.
If �−− �C" (�−− �F") appears on the display,
contact your Toyota dealer.
There may be a case that �−− �C" (�−− �F")
appears momentarily when the engine
switch is quickly turned to �ON". It is
normal if it goes out soon.
�Before using the
multi−information display �Clock
�Outside temperature display
(air conditioning system
without �DUAL" button)
Page 319 of 496

The distance the vehicle can travel with
the remaining fuel is calculated and
displayed based on the quantity of re-
maining fuel and past fuel consumpti")
307
2. Driving range(�RANGE MI" or �RANGE km")
The distance the vehicle can travel with
the remaining fuel is calculated and
displayed based on the quantity of re-
maining fuel and past fuel consumption.
The driving range display indicates the
approximate distance that you can drive
until the fuel gauge reaches �E". It is
different from the actual distance traveled.
The displayed value is updated about ev-
ery 10 seconds.
Every time you refuel the vehicle, the cal-
culation is reset. However, when only a
small amount of fuel is added to the tank,
the display may not be reset.
The actual driving range varies with driv-
ing habits and road conditions. If fuel con-
sumption is good, the driving range will be
longer than indicated. If fuel consumption
is poor, the driving range will be shorter
than indicated.
If the low fuel level warning light comes
on, refuel the vehicle even if the display
indicates that the vehicle can be driven
further. 3. Average fuel consumption
(�AVG. MPG" or �AVG. L/100 km")
Average fuel consumption is calculated
and displayed based on total driving
distance and total fuel consumption
with the engine running.
The displayed value is updated about ev-
ery 10 seconds.
To reset the calculation, push the
�RESET" button about 1 second.
4. Average vehicle speed (�AVG. MPH" or �AVG. km/h")
Average vehicle speed is calculated and
displayed based on total driving dis-
tance and total driving time with the
engine running.
The displayed value is updated about ev-
ery 10 seconds.
To reset the calculation, push the
�RESET" button about 1 second.
CY19138
The direction is indicated on the inside
rear view mirror.
If the engine switch was turned off with
the system on, the system will automati-
cally turn back on when the engine switch
is turned on.
Push the �
" switch to turn the compass
system on and off.
Compass