Page 47 of 496

35
CY12054
The system sounds alarm and flashes
lights when forcible entry is detected.
The alarm is triggered if any of the
doors or hood is forcibly unlocked or
opened or the battery terminal is dis-
connected and then reconnected when
the vehicle is locked.
CY12074
SETTING THE SYSTEM1. Turn the engine switch to the �LOCK" position and remove the key.
The indicator light will start flashing when
the key is removed from the engine
switch. (See �Engine immobilizer system"
on page 14 in this Section for details.)
2. Have all passengers get out of the vehicle.
3. Close and lock all the side doors, back door and hood.
The indicator light will remain on when all
the side doors, back door and hood are
closed and locked. The system will automatically be set after
30 seconds. When the system is set, the
indicator light will start flashing again.
4. After making sure the indicator light starts flashing, you may leave the ve-
hicle.
Never leave anyone in the vehicle when
you set the system, because unlocking
from the inside will activate the system.
CANCELING THE SYSTEM
The system will cancel under the any of
the following conditions:�Any of the side doors, back door or
hood is opened.
�Any of the side doors or the back door
is unlocked.
�The key is inserted into the engine
switch.
�The battery terminal is reconnected.
Theft deterrent system
Page 48 of 496

36
WHEN THE SYSTEM IS SET
Activating the system
The system will sound the alarm under
the following conditions:
�If any of the side doors is unlocked or
opened without the key or wireless re-
mote control transmitter, or if the back
door or hood is forcibly opened.
�If the battery terminal is disconnected
and then reconnected.
�If the ignition is hotwired.
The indicator light will come on when the
system is activated.
If the alarm has been activated and the
key is not in the engine switch, all the
side doors and back door will re−lock au-
tomatically.
After one minute, the alarm will automati-
cally stop and the indicator light will starts
flashing again.
Reactivating the alarm
Once set, the system automatically resets
the alarm after the alarm stops.
The alarm will activate again under the
same circumstances described in
�Activating the system". Stopping the alarm
The alarm will be stopped by the following
these ways:
�Unlock any of the side doors or the
back door with the key or wireless re-
mote control transmitter.
�Turn the engine switch from the
�LOCK" to �ON" position.
These ways cancel the system at the
same time.
If the battery becomes discharged due
to the vehicle being unused for a long
time, etc., when the battery is recharged
or replaced, the system will give the
alarm. If this happens, immediately unlock
any of the side doors or the back door
with the key or the wireless remote con-
trol transmitter, and the alarm will stop. TESTING THE SYSTEM
1. Open all the windows.
2. Set the system as described above. The side doors and back door should
be locked with the key or wireless re-
mote control transmitter. Be sure to
wait until the indicator light goes off or
starts flashing.
3. Unlock any side door from the inside. The system should activate the alarm.
4. Stop the alarm as described above.
5. Repeat this operation for the other doors and hood. When testing the
hood, also check that the system is
activated when the battery terminal is
disconnected and then reconnected.
If the system does not work properly,
have it checked by your Toyota dealer.
Page 49 of 496
37
CY12081
This indicates that the fuel filler door
is on the left side of your vehicle.
CY12055
1. To open the fuel filler door, pull thelever.
When refueling, turn off the engine.
CAUTION
�Do not smoke, cause sparks or al-
low open flames when refueling.
The fumes are flammable.
�When opening the cap, do not re-
move the cap quickly. In hot weath-
er, fuel under pressure could cause
injury by spraying out of the filler
neck if the cap is suddenly re-
moved.
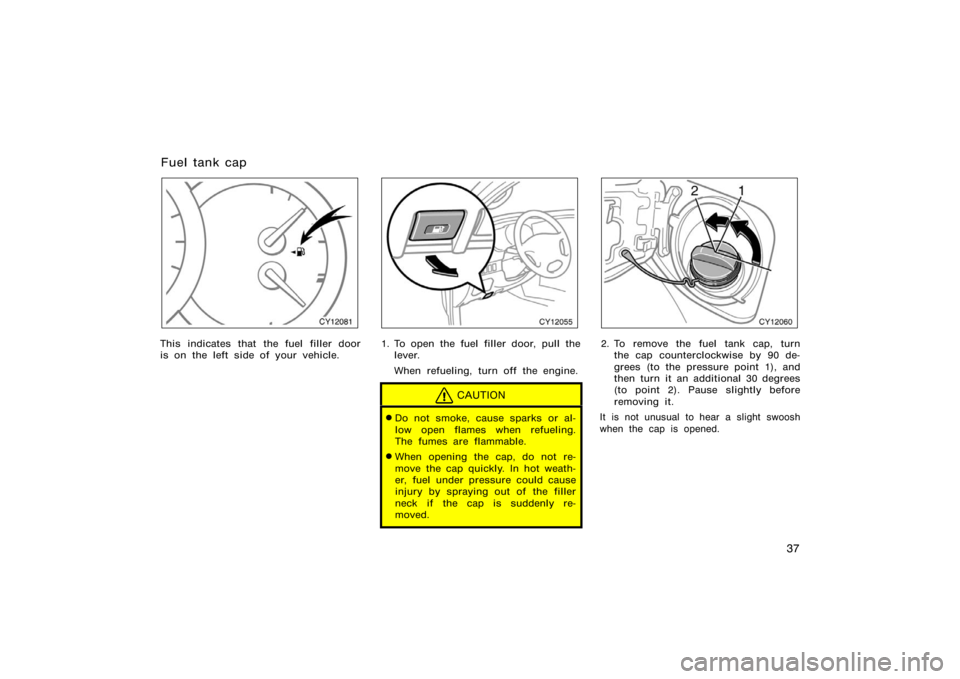
CY12060
2. To remove the fuel tank cap, turnthe cap counterclockwise by 90 de-
grees (to the pressure point 1), and
then turn it an additional 30 degrees
(to point 2). Pause slightly before
removing it.
It is not unusual to hear a slight swoosh
when the cap is opened.
Fuel tank cap
Page 50 of 496
38
CY12056
3. The removed cap can be stored onthe back side of the fuel filler door.
Position the cap so that the hooks point
to the left and right or up and down, and
set it in the receptacle on the back side
of the door.
When installing the cap, turn the cap
clockwise until you hear a click. When
you hear the click, the cap is fully
closed.
If the cap is not installed securely, the
malfunction indicator lamp comes on.
Make sure the cap is tightened securely.
The indicator lamp goes off after driving
several times. If the indicator lamp does
not go off, contact your Toyota dealer as
soon as possible.
CAUTION
�Make sure the cap is installed se-
curely to prevent fuel spillage in
the event of an accident.
�Use only a genuine Toyota fuel tank
cap for replacement. It is designed
to regulate fuel tank pressure.
NOTICE
To prevent damage to the cap, apply
force only in the turning direction to
the cap. Do not pull or pry it.
Page 55 of 496

43
Front passenger seat
CAUTION
The SRS front passenger airbag also
deploys with considerable force, and
can cause death or serious injury es-
pecially if the front passenger is very
close to the airbag. The front passen-
ger seat should be as far from the
airbag as possible with the seatback
adjusted, so the front passenger sits
upright.
Front seats
CAUTION
The SRS side airbags are installed in
the driver and front passenger seats.
Observe the following precautions.
�Do not lean against the front door
when the vehicle is in use, since
the side airbag inflates with consid-
erable speed and force. Otherwise,
you may be killed or seriously in-
jured.
�Do not use seat accessories which
cover the area where the side air-
bags inflate. Such accessories may
prevent the side airbags from acti-
vating correctly, causing death or
serious injury.
�Do not modify or replace the seats
or upholstery of the seats with side
airbags. Such change may prevent
the side airbag system from activat-
ing correctly, disable the system or
cause the side airbags to inflate ac-
cidentally, resulting in death or seri-
ous injury.
CAUTION
�Do not adjust the seat while the
vehicle is moving as the seat may
unexpectedly move and cause the
driver to lose control of the vehicle.
�Be careful that the seat does not
hit a passenger or luggage.
�After adjusting the seat position, re-
lease the lever and try sliding the
seat forward and backward to make
sure it is locked in position.
�After adjusting the seatback, push
your body back against the seat to
make sure the seat is locked in
position.
�Do not put objects under the seats.
Otherwise, the objects may interfere
with the seat−lock mechanism or
unexpectedly push up the seat posi-
tion adjusting lever and the seat
may suddenly move, causing the
driver to lose control of the vehicle.
�Seat adjustment precautions
Page 61 of 496

49
To make only slight changes to an already
memorized position, the easiest way is to
first activate the memorized position, then
make the desired changes and perform
step 2 above.
CY13301
RECALLING THE MEMORIZED POSITION
When you push button �1" or �2", a
beep will sound and the driving posi-
tion will be automatically adjusted to
the position recorded for that button.
The memorized position can be recalled
under the following conditions:
�The engine switch is in the �ON" posi-
tion and the selector lever is in the �P"
position.
�The engine switch is turned to the
�LOCK" position or the key is not in
the engine switch, and less than 30
seconds have passed since opening
the driver ’s door.To stop the operation, push any driving
position memory button.
To reactivate the system, push the button
�1" or �2" again.
If the vehicle’s battery is disconnected,
the memory will be erased and the posi-
tions will have to be set again.
CAUTION
�Do not start the vehicle while the
adjustments are being made.
�Take care not to select the wrong
button, or the seat could strike the
rear passenger or hit your body
against the steering wheel. If this
happens, you can stop the move-
ment by pressing another driving
position memory switch.
Page 116 of 496

104
CY13043
Move seat
fully back
�A forward−facing child restraint sys-
tem should be allowed to be
installed on the front passenger
seat only when it is unavoidable.
Always move the seat as far back
as possible even if the front pas-
senger occupant classification indi-
cator light indicates �OFF", because
the front passenger airbag could in-
flate with considerable speed and
force. Otherwise, the child may be
killed or seriously injured.
�Do not allow the child to lean his/
her head or any part of his/her
body against the door or the area
of the seat, front or rear pillar or
roof side rail from which the side
airbags or curtain shield airbags
deploy even if the child is seated in
the child restraint system. It is dan-
gerous if the side airbag and/or
curtain shield airbag inflate, and the
impact could cause death or seri-
ous injury to the child.
CY13044
�Do not install a child restraint sys-
tem on the second (or third) seat if
it interferes with the lock mecha-
nism of the front (or second) seats.
Otherwise, the child or front (or
second) seat occupant(s) may be
killed or seriously injured in case
of sudden braking or a collision.
�If the driver’s seat position does
not allow sufficient space for safe
installation, install the child re-
straint system on the rear right
seat.
Page 142 of 496

130
CY14036
For the U.S.A.
CY14037
For Canada
HEADLIGHTS
To turn on the following lights: Twist
the headlight/turn signal lever knob.
Position 1�Parking, tail, license plate,
side marker and instrument panel lights
For Canada�The tail light indicator (green
light) on the instrument panel will tell you
that the tail lights are on.
Position 2�Headlights and all of the
above
For the U.S.A.�The headlight low beam
indicator light (green light) on the instru-
ment panel will tell you that the low
beams are on.
Position 3 (�AUTO")�Headlights and/or all
of the lights in position 1
They automatically turn on or off depend-
ing on the darkness of the surroundings.
Manually twist the knob to the position 2
to turn on the headlights if they are need-
ed immediately when entering a dark tun-
nel, parking structure, etc.
CY14031
The automatic light control sensor is on
the top of the driver’s side instrument
panel.
Do not place anything on the instrument
panel, and/or do not affix anything on the
windshield to block this sensor.
The operating condition or sensitivity can
be changed. For details, contact your
Toyota dealer.
Automatic light cut off system
Position 1 or position 3 with the tail
lights on�
The lights automatically turn off when the
driver ’s door is opened with the engine
switch in the �ACC" or �LOCK" position.
Headlights and turn signals
(with automatic light control
system)