2008 SUZUKI SX4 remove seats
[x] Cancel search: remove seatsPage 33 of 278
2-20
BEFORE DRIVING
80J21-03E
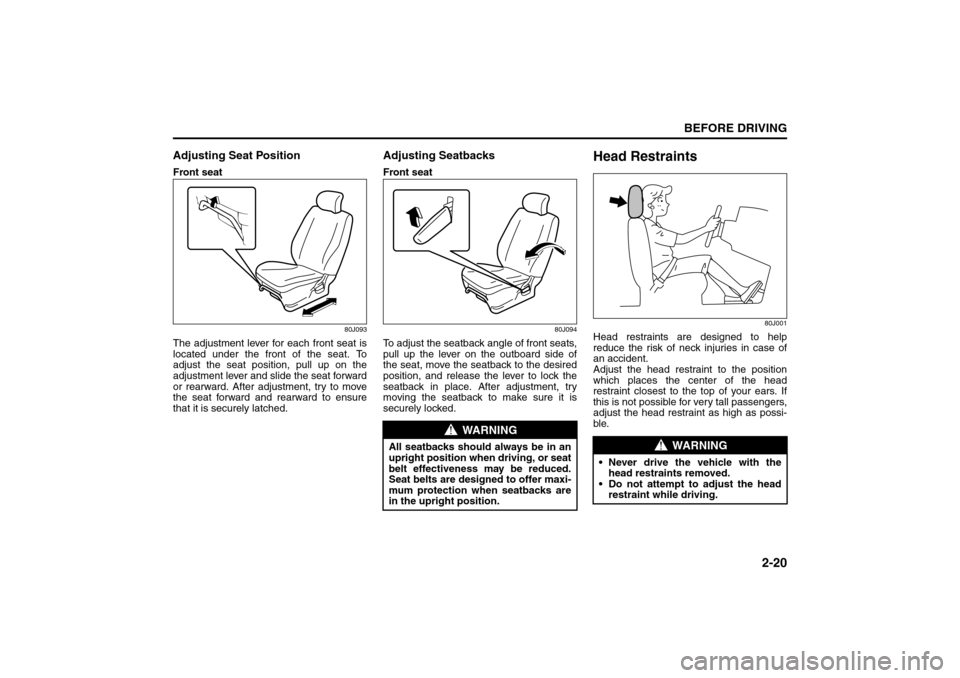
Adjusting Seat PositionFront seat
80J093
The adjustment lever for each front seat is
located under the front of the seat. To
adjust the seat position, pull up on the
adjustment lever and slide the seat forward
or rearward. After adjustment, try to move
the seat forward and rearward to ensure
that it is securely latched.
Adjusting SeatbacksFront seat
80J094
To adjust the seatback angle of front seats,
pull up the lever on the outboard side of
the seat, move the seatback to the desired
position, and release the lever to lock the
seatback in place. After adjustment, try
moving the seatback to make sure it is
securely locked.
Head Restraints
80J001
Head restraints are designed to help
reduce the risk of neck injuries in case of
an accident.
Adjust the head restraint to the position
which places the center of the head
restraint closest to the top of your ears. If
this is not possible for very tall passengers,
adjust the head restraint as high as possi-
ble.
WARNING
All seatbacks should always be in an
upright position when driving, or seat
belt effectiveness may be reduced.
Seat belts are designed to offer maxi-
mum protection when seatbacks are
in the upright position.
WARNING
Never drive the vehicle with the
head restraints removed.
Do not attempt to adjust the head
restraint while driving.
Seat Belts and Child Restraint Systems: 3
Page 47 of 278
2-34
BEFORE DRIVING
80J21-03E
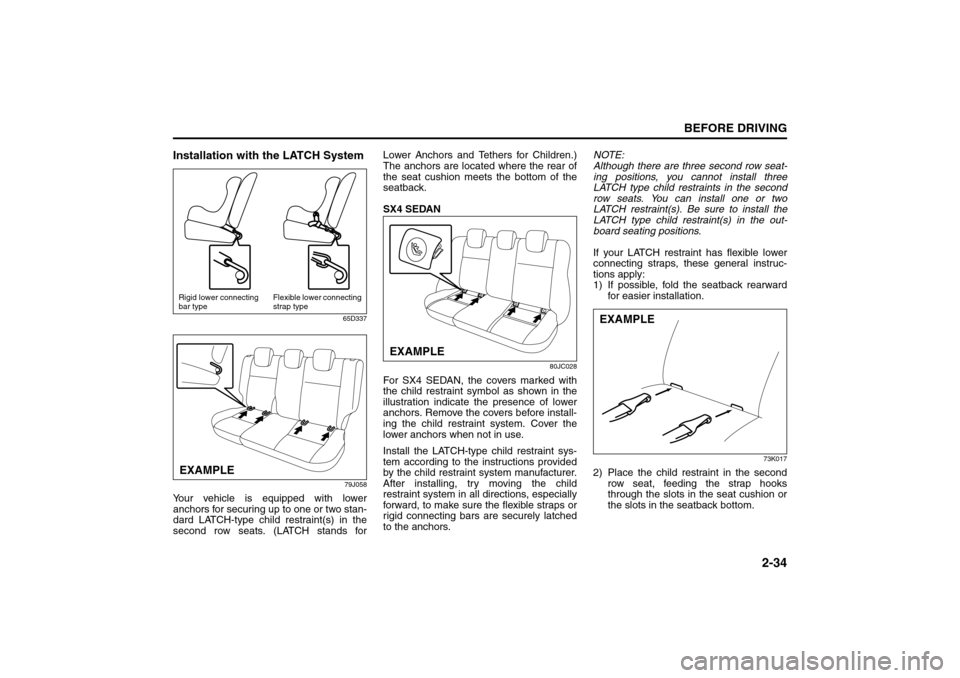
Installation with the LATCH System
65D337
79J058
Your vehicle is equipped with lower
anchors for securing up to one or two stan-
dard LATCH-type child restraint(s) in the
second row seats. (LATCH stands forLower Anchors and Tethers for Children.)
The anchors are located where the rear of
the seat cushion meets the bottom of the
seatback.
SX4 SEDAN
80JC028
For SX4 SEDAN, the covers marked with
the child restraint symbol as shown in the
illustration indicate the presence of lower
anchors. Remove the covers before install-
ing the child restraint system. Cover the
lower anchors when not in use.
Install the LATCH-type child restraint sys-
tem according to the instructions provided
by the child restraint system manufacturer.
After installing, try moving the child
restraint system in all directions, especially
forward, to make sure the flexible straps or
rigid connecting bars are securely latched
to the anchors.NOTE:
Although there are three second row seat-
ing positions, you cannot install three
LATCH type child restraints in the second
row seats. You can install one or two
LATCH restraint(s). Be sure to install the
LATCH type child restraint(s) in the out-
board seating positions.
If your LATCH restraint has flexible lower
connecting straps, these general instruc-
tions apply:
1) If possible, fold the seatback rearward
for easier installation.
73K017
2) Place the child restraint in the second
row seat, feeding the strap hooks
through the slots in the seat cushion or
the slots in the seatback bottom.
Rigid lower connecting
bar typeFlexible lower connecting
strap typeEXAMPLE
EXAMPLE
EXAMPLE
Seat Belts and Child Restraint Systems: 3
Page 51 of 278
2-38
BEFORE DRIVING
80J21-03E
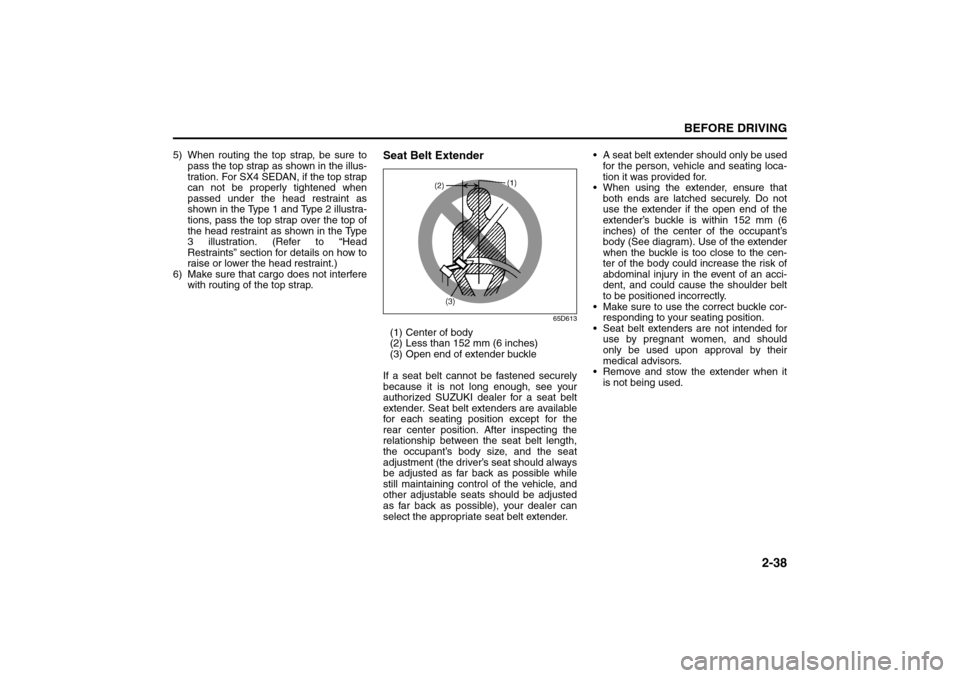
5) When routing the top strap, be sure to
pass the top strap as shown in the illus-
tration. For SX4 SEDAN, if the top strap
can not be properly tightened when
passed under the head restraint as
shown in the Type 1 and Type 2 illustra-
tions, pass the top strap over the top of
the head restraint as shown in the Type
3 illustration. (Refer to “Head
Restraints” section for details on how to
raise or lower the head restraint.)
6) Make sure that cargo does not interfere
with routing of the top strap.
Seat Belt Extender
65D613
(1) Center of body
(2) Less than 152 mm (6 inches)
(3) Open end of extender buckle
If a seat belt cannot be fastened securely
because it is not long enough, see your
authorized SUZUKI dealer for a seat belt
extender. Seat belt extenders are available
for each seating position except for the
rear center position. After inspecting the
relationship between the seat belt length,
the occupant’s body size, and the seat
adjustment (the driver’s seat should always
be adjusted as far back as possible while
still maintaining control of the vehicle, and
other adjustable seats should be adjusted
as far back as possible), your dealer can
select the appropriate seat belt extender. A seat belt extender should only be used
for the person, vehicle and seating loca-
tion it was provided for.
When using the extender, ensure that
both ends are latched securely. Do not
use the extender if the open end of the
extender’s buckle is within 152 mm (6
inches) of the center of the occupant’s
body (See diagram). Use of the extender
when the buckle is too close to the cen-
ter of the body could increase the risk of
abdominal injury in the event of an acci-
dent, and could cause the shoulder belt
to be positioned incorrectly.
Make sure to use the correct buckle cor-
responding to your seating position.
Seat belt extenders are not intended for
use by pregnant women, and should
only be used upon approval by their
medical advisors.
Remove and stow the extender when it
is not being used.
Supplemental Restraint System (advanced air bags):
3, 9, 12
Page 141 of 278
5-4
OTHER CONTROLS AND EQUIPMENT
80J21-03E
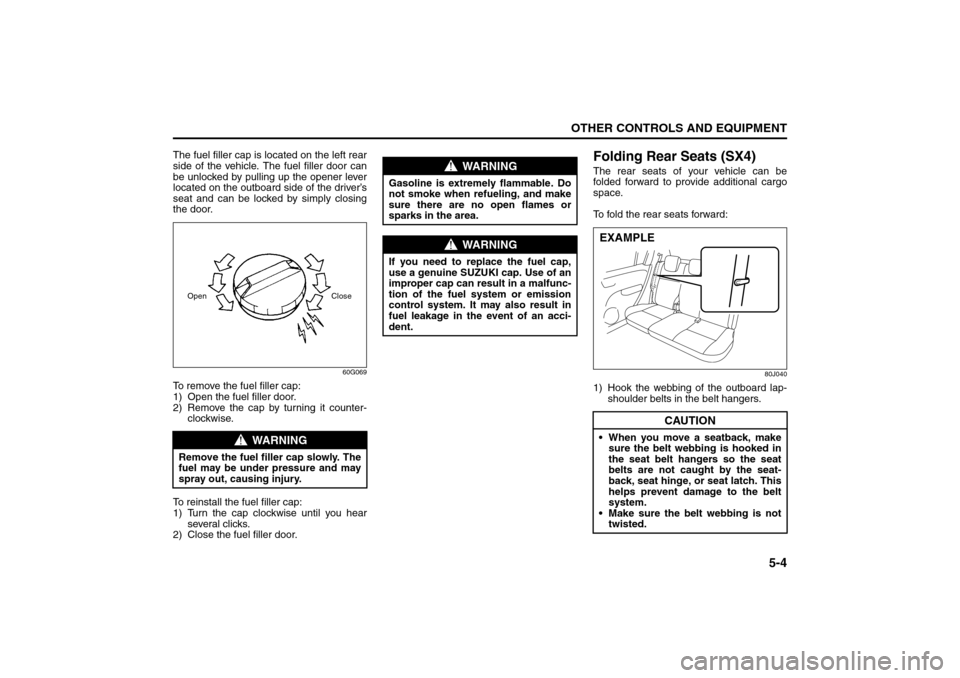
The fuel filler cap is located on the left rear
side of the vehicle. The fuel filler door can
be unlocked by pulling up the opener lever
located on the outboard side of the driver’s
seat and can be locked by simply closing
the door.
60G069
To remove the fuel filler cap:
1) Open the fuel filler door.
2) Remove the cap by turning it counter-
clockwise.
To reinstall the fuel filler cap:
1) Turn the cap clockwise until you hear
several clicks.
2) Close the fuel filler door.
Folding Rear Seats (SX4)The rear seats of your vehicle can be
folded forward to provide additional cargo
space.
To fold the rear seats forward:
80J040
1) Hook the webbing of the outboard lap-
shoulder belts in the belt hangers.
WARNING
Remove the fuel filler cap slowly. The
fuel may be under pressure and may
spray out, causing injury.Open Close
WARNING
Gasoline is extremely flammable. Do
not smoke when refueling, and make
sure there are no open flames or
sparks in the area.
WARNING
If you need to replace the fuel cap,
use a genuine SUZUKI cap. Use of an
improper cap can result in a malfunc-
tion of the fuel system or emission
control system. It may also result in
fuel leakage in the event of an acci-
dent.
CAUTION
When you move a seatback, make
sure the belt webbing is hooked in
the seat belt hangers so the seat
belts are not caught by the seat-
back, seat hinge, or seat latch. This
helps prevent damage to the belt
system.
Make sure the belt webbing is not
twisted.EXAMPLE
Fuel Filler Cap: 5
Folding Rear Seats: 3
Page 205 of 278
9-16
INSPECTION AND MAINTENANCE
80J21-03E
Automatic Transaxle FluidSpecified FluidUse an automatic transaxle fluid equivalent
to DEXRON
®-III.
Fluid Level CheckYou must check the fluid level with the
automatic transaxle fluid at normal operat-
ing temperature.
To check the fluid level:
1) To warm up the transaxle fluid, drive the
vehicle or idle the engine until the tem-
perature gauge indicates normal oper-
ating temperature.
2) Then drive for ten more minutes.
NOTE:
Do not check the fluid level if you have just
driven the vehicle for a long time at high
speed, or if you have driven in city traffic in
hot weather. Wait until the fluid cools down
(about 30 minutes), or the fluid level indica-
tion will not be correct.
3) Park your vehicle on level ground.
4) Apply the parking brake and then start
the engine in “P” (Park). Let it idle for
two minutes and keep it running during
the fluid level check.5) With your foot on the brake pedal, move
the gearshift lever through each gear,
pausing for about three seconds in
each range. Then move it back to the
“P” (Park) position.
75F08654G317
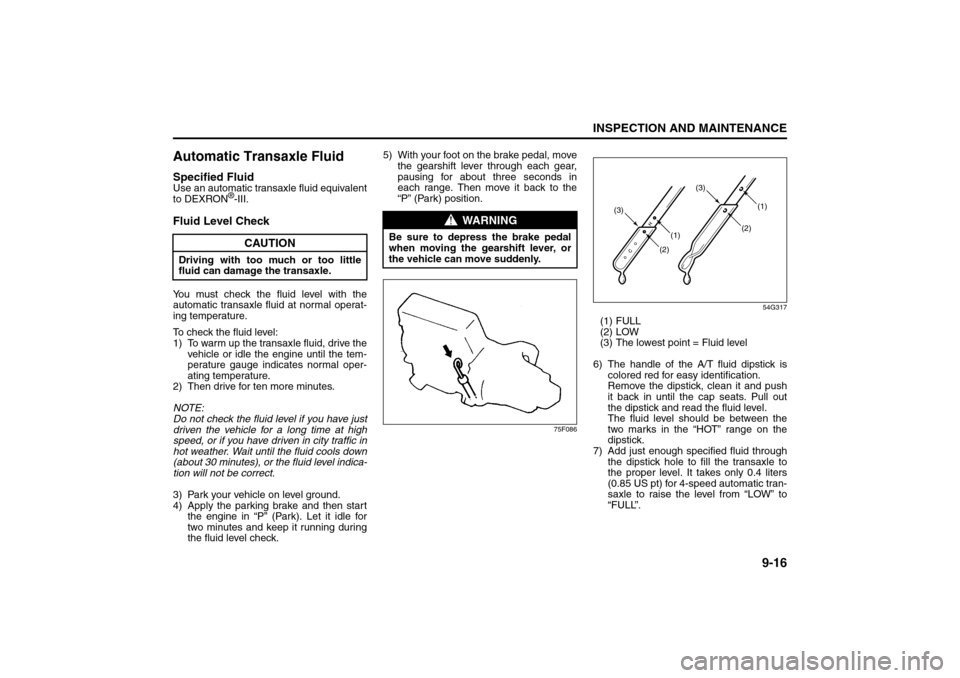
(1) FULL
(2) LOW
(3) The lowest point = Fluid level
6) The handle of the A/T fluid dipstick is
colored red for easy identification.
Remove the dipstick, clean it and push
it back in until the cap seats. Pull out
the dipstick and read the fluid level.
The fluid level should be between the
two marks in the “HOT” range on the
dipstick.
7) Add just enough specified fluid through
the dipstick hole to fill the transaxle to
the proper level. It takes only 0.4 liters
(0.85 US pt) for 4-speed automatic tran-
saxle to raise the level from “LOW” to
“FULL”.
CAUTION
Driving with too much or too little
fluid can damage the transaxle.
WARNING
Be sure to depress the brake pedal
when moving the gearshift lever, or
the vehicle can move suddenly.
(1)(2) (3)(1)
(2)(3)
Windshield Washer Fluid: 3
Air Cleaner: 1, 2