2008 SUZUKI SX4 jack
[x] Cancel search: jackPage 6 of 278
80J21-03E
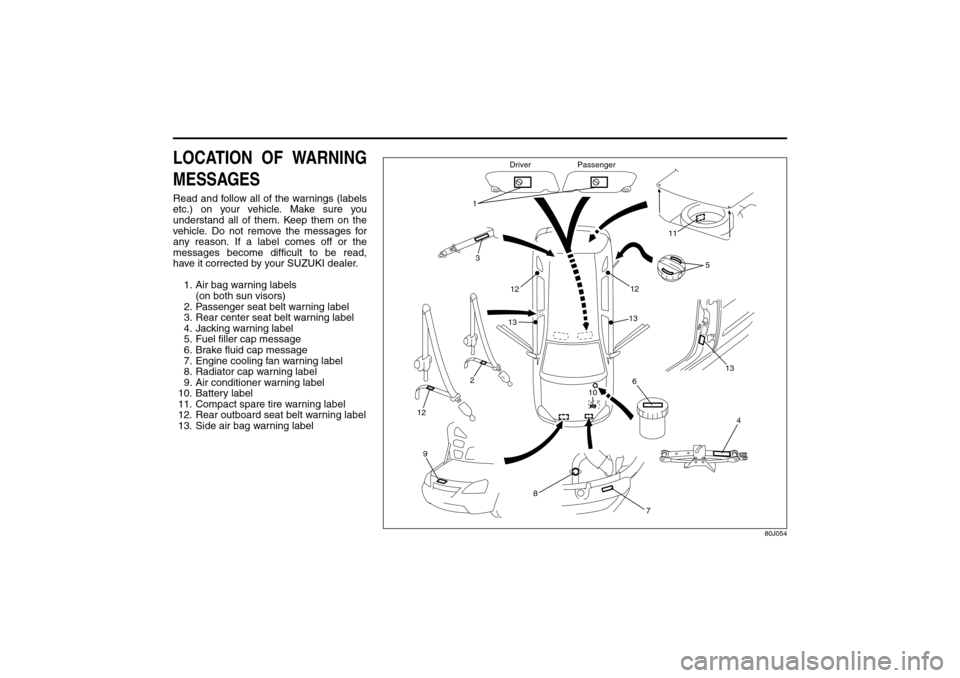
LOCATION OF WARNING
MESSAGESRead and follow all of the warnings (labels
etc.) on your vehicle. Make sure you
understand all of them. Keep them on the
vehicle. Do not remove the messages for
any reason. If a label comes off or the
messages become difficult to be read,
have it corrected by your SUZUKI dealer.
1. Air bag warning labels
(on both sun visors)
2. Passenger seat belt warning label
3. Rear center seat belt warning label
4. Jacking warning label
5. Fuel filler cap message
6. Brake fluid cap message
7. Engine cooling fan warning label
8. Radiator cap warning label
9. Air conditioner warning label
10. Battery label
11. Compact spare tire warning label
12. Rear outboard seat belt warning label
13. Side air bag warning label
80J054
5
6
8
7 10 1
32
9
11
4
12
12
12
13
13
13
Driver Passenger
Page 27 of 278
2-14
BEFORE DRIVING
80J21-03E
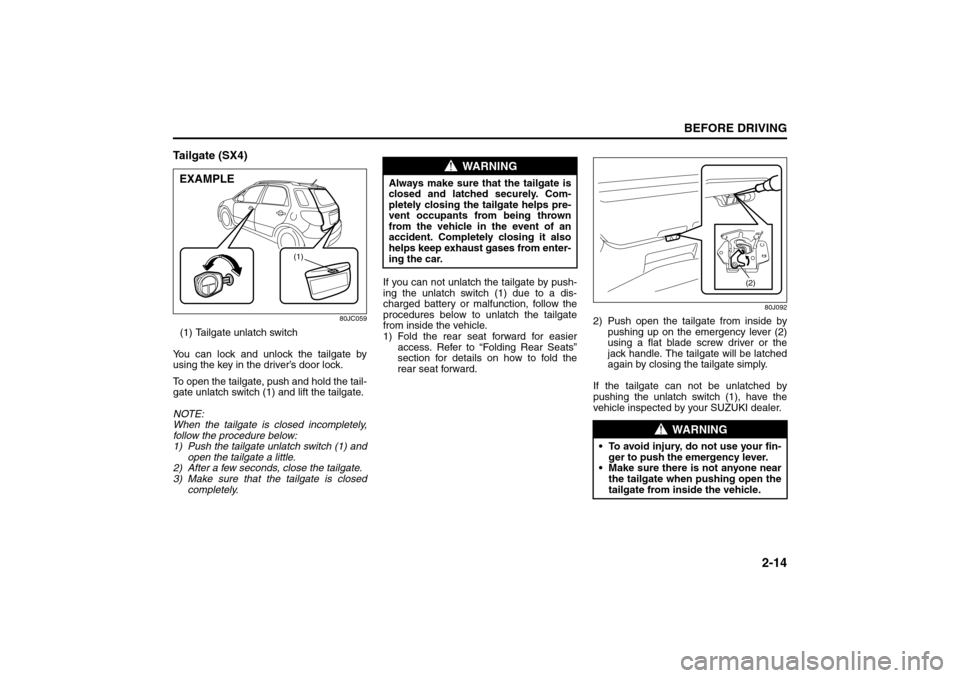
Tailgate (SX4)
80JC059
(1) Tailgate unlatch switch
You can lock and unlock the tailgate by
using the key in the driver’s door lock.
To open the tailgate, push and hold the tail-
gate unlatch switch (1) and lift the tailgate.
NOTE:
When the tailgate is closed incompletely,
follow the procedure below:
1) Push the tailgate unlatch switch (1) and
open the tailgate a little.
2) After a few seconds, close the tailgate.
3) Make sure that the tailgate is closed
completely.If you can not unlatch the tailgate by push-
ing the unlatch switch (1) due to a dis-
charged battery or malfunction, follow the
procedures below to unlatch the tailgate
from inside the vehicle.
1) Fold the rear seat forward for easier
access. Refer to “Folding Rear Seats”
section for details on how to fold the
rear seat forward.
80J092
2) Push open the tailgate from inside by
pushing up on the emergency lever (2)
using a flat blade screw driver or the
jack handle. The tailgate will be latched
again by closing the tailgate simply.
If the tailgate can not be unlatched by
pushing the unlatch switch (1), have the
vehicle inspected by your SUZUKI dealer.
(1)
EXAMPLE
WARNING
Always make sure that the tailgate is
closed and latched securely. Com-
pletely closing the tailgate helps pre-
vent occupants from being thrown
from the vehicle in the event of an
accident. Completely closing it also
helps keep exhaust gases from enter-
ing the car.
WARNING
To avoid injury, do not use your fin-
ger to push the emergency lever.
Make sure there is not anyone near
the tailgate when pushing open the
tailgate from inside the vehicle.
(2)
Head Restraints: 3
Seat Belts and Child Restraint Systems: 3
Page 80 of 278

4-3INSTRUMENT PANEL
80J21-03E
Warning and Indicator LightsLow Tire Pressure Warning Light
52D305
As an added safety feature, your vehicle
has been equipped with a tire pressure
monitoring system (TPMS) that uses a low
tire pressure warning light to inform you
when one or more of your tires is signifi-
cantly under-inflated.
When the ignition switch is turned to the
“ON” position, this light comes on briefly so
you can check that the light is working.
When the low tire pressure warning light is
lit, one or more of your tires is significantly
under-inflated. You should stop and check
your tires as soon as possible, and inflate
them to the proper pressure as indicated
on the vehicle’s tire information placard.
Driving on a significantly under-inflated tire
causes the tire to overheat and can lead to
tire failure. Under-inflation also reduces
fuel efficiency and tire tread life, and may
affect the vehicle’s handling and stopping
ability. Each tire, including the spare,
should be checked at least once a month
when cold and set to the recommendedinflation pressure as specified in the vehi-
cle placard and owner’s manual.
The low tire pressure warning light is also
used to inform you of a TPMS malfunction.
When the system detects a malfunction,
this light will flash for approximately one
minute and then remain continuously illu-
minated. This sequence will be repeated
approximately ten minutes after subse-
quent the ignition switch is turned on as
long as the malfunction exists.
NOTE:
The low tire pressure warning light may not
come on immediately if you have a sudden
loss of air pressure.
WARNING
If the low tire pressure warning light
does not come on when the ignition
is turned to the “ON” position, or
comes on and blinks while driving
there may be a problem with the tire
pressure monitoring system. Have
your vehicle inspected by an autho-
rized SUZUKI dealer. Even if the light
turns off after blinking, indicating
that monitoring system has recov-
ered, make sure to have an autho-
rized SUZUKI dealer check the
system.
WARNING
The load rating of your tires is
reduced at lower inflation pressures.
If your tires become even moderately
under-inflated, the vehicle load may
exceed the load rating of the tires,
which can lead to tire failure. The low
tire pressure warning light will not
alert you of this condition. The warn-
ing light will only come on when one
or more of your tires become signifi-
cantly under-inflated. Check and
adjust your tire inflation pressure at
least once a month. Refer to “Tires”
in the “INSPECTION AND MAINTE-
NANCE” section.
WARNING
If the low tire pressure warning light
comes on and stays on, reduce your
speed and avoid abrupt steering and
braking. Stop in a safe place as soon
as possible and check your tires.
If you have a flat tire, replace it with
the spare tire. Refer to “Jacking
Instructions” in the “EMERGENCY
SERVICE” section. Refer to
“Replacing Tires and/or Wheels”
for instructions on how to restore
normal operation of the tire pres-
sure monitoring system after you
have had a flat tire.
(Continued)
Warning and Indicator Lights: 8
Page 150 of 278
5-13OTHER CONTROLS AND EQUIPMENT
80J21-03E
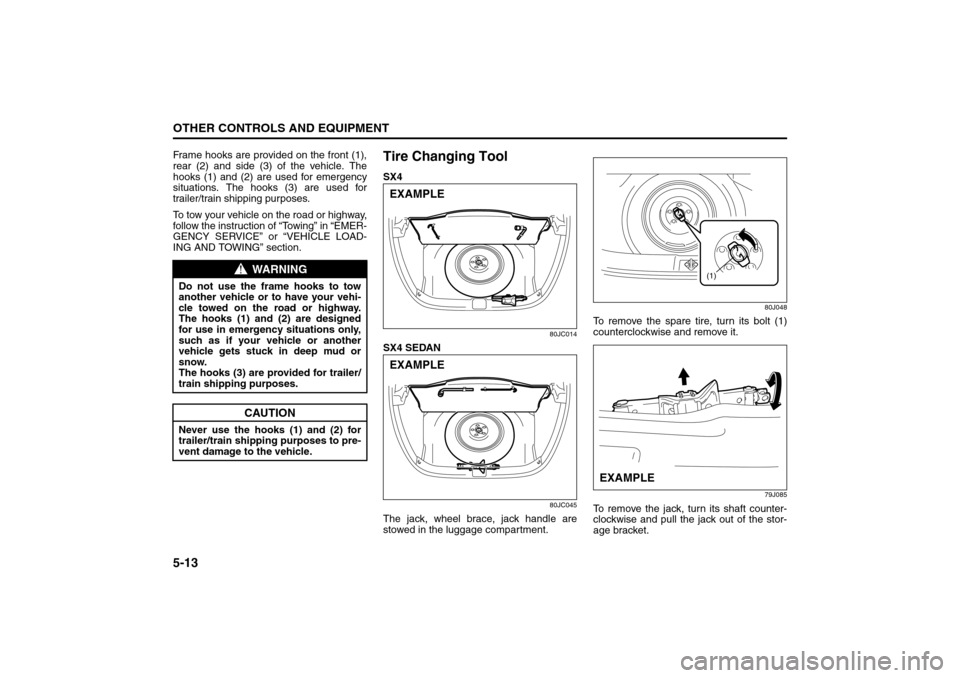
Frame hooks are provided on the front (1),
rear (2) and side (3) of the vehicle. The
hooks (1) and (2) are used for emergency
situations. The hooks (3) are used for
trailer/train shipping purposes.
To tow your vehicle on the road or highway,
follow the instruction of “Towing” in “EMER-
GENCY SERVICE” or “VEHICLE LOAD-
ING AND TOWING” section.
Tire Changing ToolSX4
80JC014
SX4 SEDAN
80JC045
The jack, wheel brace, jack handle are
stowed in the luggage compartment.
80J048
To remove the spare tire, turn its bolt (1)
counterclockwise and remove it.
79J085
To remove the jack, turn its shaft counter-
clockwise and pull the jack out of the stor-
age bracket.
WARNING
Do not use the frame hooks to tow
another vehicle or to have your vehi-
cle towed on the road or highway.
The hooks (1) and (2) are designed
for use in emergency situations only,
such as if your vehicle or another
vehicle gets stuck in deep mud or
snow.
The hooks (3) are provided for trailer/
train shipping purposes.
CAUTION
Never use the hooks (1) and (2) for
trailer/train shipping purposes to pre-
vent damage to the vehicle.
EXAMPLEEXAMPLE
(1)
EXAMPLE
Cup Holder and Storage Area: 3
Page 151 of 278
5-14
OTHER CONTROLS AND EQUIPMENT
80J21-03E
SX4
79J086
SX4 SEDAN
80JC015
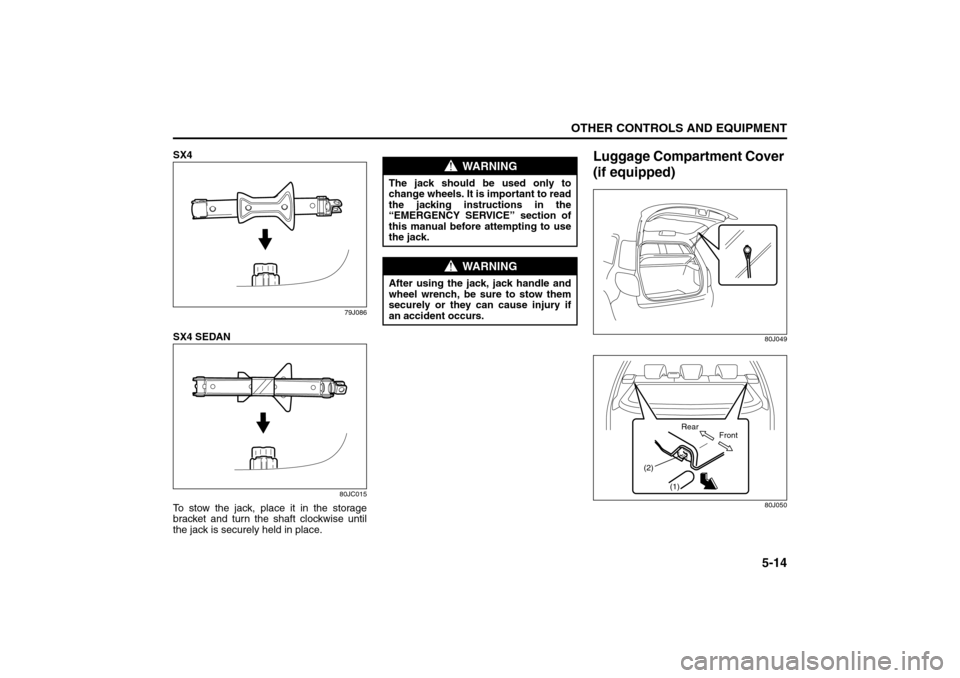
To stow the jack, place it in the storage
bracket and turn the shaft clockwise until
the jack is securely held in place.
Luggage Compartment Cover
(if equipped)
80J049
80J050
WARNING
The jack should be used only to
change wheels. It is important to read
the jacking instructions in the
“EMERGENCY SERVICE” section of
this manual before attempting to use
the jack.
WARNING
After using the jack, jack handle and
wheel wrench, be sure to stow them
securely or they can cause injury if
an accident occurs.
(1) (2)
Front Rear
Accessory Socket: 8
Frame Hooks: 5, 6
Page 154 of 278
5-17OTHER CONTROLS AND EQUIPMENT
80J21-03E
You can use the roof rails or the roof rack
anchors to attach the optional roof rack
which is available at your SUZUKI dealer. If
you use a roof rack, observe the instruc-
tions and precautions in this section and
provided with the roof rack.
Make sure the roof rack is securely
installed.
To mount various types of cargo (such
as skis, bicycles, etc.) properly, use suit-
able attachments which are available
from your SUZUKI dealer. Be sure to
install the attachments properly and
securely according to the instructions
provided. Do not mount cargo directly on
the roof panel. The cargo can damage
the roof panel.
The gross weight of the roof rack plus
cargo must not exceed the loading
capacity (50 kg (110 lbs)). Also, do not
let the gross vehicle weight (fully loaded
vehicle including driver, passengers,
cargo, roof load and trailer tongue
weight) exceed the Gross Vehicle
Weight Rating (GVWR) listed in the
“SPECIFICATIONS” section of this man-
ual.
Mount and secure the cargo onto the
roof rack properly according to the
instructions provided. Be sure to stow
the heaviest items at the bottom and dis-
tribute the cargo as evenly as possible.
Do not carry items so large that they
hang over the bumpers or the sides of
the vehicle, or block your view. Secure the front and rear ends of long
items – such as wood panels, surfboards
and so forth – to both the front and rear
of the vehicle. You should protect the
painted surfaces of the vehicle from
scuffing caused by tie-down ropes.
Check periodically to make sure the roof
rack is securely installed and free from
damage.
For vehicles with roof rack anchors,
make sure the anchors are covered with
the caps when not in use.
WARNING
Abrupt maneuvers or failure to
properly secure cargo can allow the
cargo to fly off the vehicle and hit
others, causing personal injury or
property damage.
Mount cargo securely and avoid
abrupt maneuvers such as “jack-
rabbit” starts, sharp turns, fast cor-
nering and sudden braking. Check
periodically to make sure that
cargo is securely fastened.
Large, bulky, long, or flat items can
affect vehicle aerodynamics or be
caught by the wind, and can reduce
vehicle control resulting in an acci-
dent and personal injury. Drive cau-
tiously at a safely reduced speed
when carrying this type of cargo.
Page 171 of 278
6-16
OPERATING YOUR VEHICLE
80J21-03E
The low tire pressure warning light can
come on due to normal causes such as
natural air leaks and pressure changes
caused by changes in temperature or
atmospheric pressure. Adjusting the air
pressure in the tires to the pressure shownon the tire information placard should
cause the low tire pressure warning light to
turn off.
If the light turns on again shortly after
adjusting the pressure in your tires, you
may have a flat tire. If you have a flat tire,
replace it with the spare tire. Refer to
“Jacking Instructions” in the “EMER-
GENCY SERVICE” section. Refer to
“Replacing Tires and/or Wheels” for
instructions on how to restore normal oper-
ation of the tire pressure monitoring sys-
tem after you have had a flat tire.
NOTE:
When the tire inflation pressure is
adjusted in high altitude areas, the low
tire pressure light may not turn off even
after tire inflation pressure adjustment.
In this case, adjust the inflation pressure
to a slightly higher pressure than is
shown on the tire information placard.
The low tire pressure warning light may
turn off temporarily after coming on. This
could be due to surface temperature
increases after long distance driving or
traveling to a high temperature area.
Even if the tire pressure warning light
turns off after coming on, make sure to
check the inflation pressure of all tires.
To reduce the chance that the low tire
pressure warning light will come on due
to normal changes in temperature and
atmospheric pressure, it is important to
check and adjust the tire pressureswhen the tires are cold. Tires that
appear to be at the specified pressure
when checked after driving, when the
tires are warm, could have pressure
below the specification when the tires
cool down. Also, tires that are inflated to
the specified pressure in a warm garage
may have pressure below the specifica-
tion when the vehicle is driven outside in
very cold temperature. If you adjust the
tire pressure in a garage that is warmer
than the outside temperature, you
should add 1 psi to the recommended
cold tire inflation pressure for every 10°F
difference between garage temperature
and outside temperature.
For tire inflation pressure information, refer
to “Tire Inflation Pressure” in the “INSPEC-
TION AND MAINTENANCE” section.
WARNING
If the low tire pressure warning light
comes on and stays on, reduce your
speed and avoid abrupt steering and
braking. Stop in a safe place as soon
as possible and check your tires.
If you have a flat tire, replace it with
the spare tire. Refer to “Jacking
Instructions” in the “EMERGENCY
SERVICE” section. Refer to
“Replacing Tires and/or Wheels”
for instructions on how to restore
normal operation of the tire pres-
sure monitoring system after you
have had a flat tire.
If one or more of your tires is
under-inflated adjust the inflation
pressure in all of your tires to the
recommended inflation pressure as
soon as possible.
Be aware that driving on a signifi-
cantly under-inflated tire can cause
the tire to overheat and can lead to
tire failure, and may affect steering
control and brake effectiveness. This
could lead to an accident, resulting in
severe injury or death.
Page 175 of 278
6-20
OPERATING YOUR VEHICLE
80J21-03E
Improving Fuel EconomyThe following instructions will help you
improve fuel economy.
Avoid excessive idling
If you are to wait for more than a minute
while you are parked, stop the engine and
start it again later. When warming up a
cold engine, allow the engine to idle until
the temperature gauge pointer comes up
to the “C” position. In this position, the
engine is sufficiently warm for starting off.
Avoid “jackrabbit” starts
Fast starts away from lights or stop signs
will consume fuel unnecessarily and
shorten engine life. Start off slowly.
Avoid unnecessary stops
Avoid unnecessary deceleration and stop-
ping. Try to maintain a slow, steady speed
whenever possible. Slowing down and then
accelerating again uses more fuel.
Keep a steady cruising speed
Keep as constant a speed as road and traf-
fic conditions will permit.
60A183S
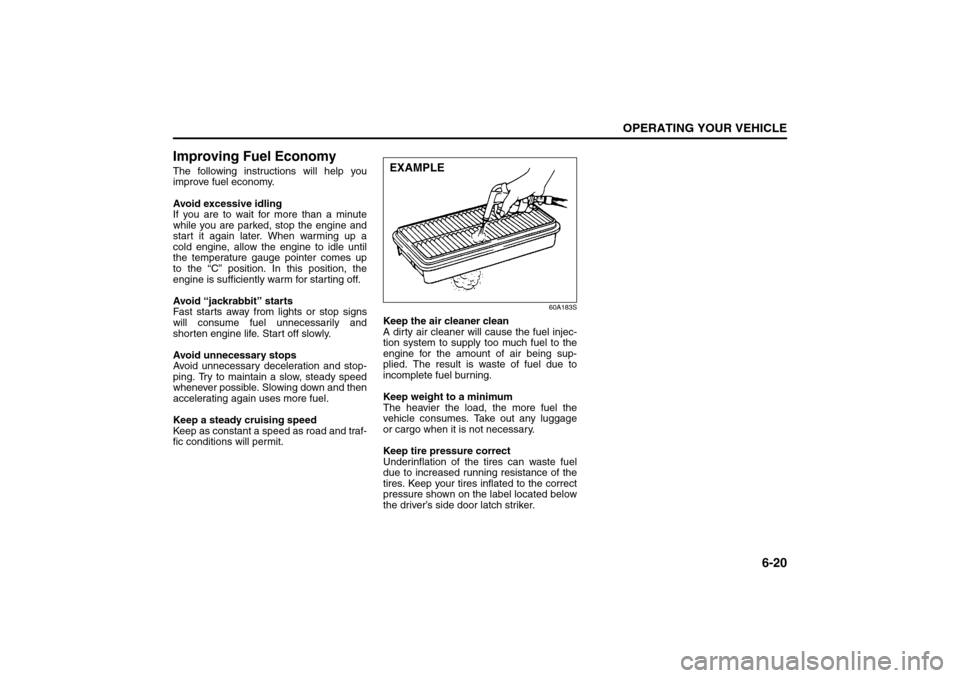
Keep the air cleaner clean
A dirty air cleaner will cause the fuel injec-
tion system to supply too much fuel to the
engine for the amount of air being sup-
plied. The result is waste of fuel due to
incomplete fuel burning.
Keep weight to a minimum
The heavier the load, the more fuel the
vehicle consumes. Take out any luggage
or cargo when it is not necessary.
Keep tire pressure correct
Underinflation of the tires can waste fuel
due to increased running resistance of the
tires. Keep your tires inflated to the correct
pressure shown on the label located below
the driver’s side door latch striker.EXAMPLE