2008 SUZUKI SX4 warning light
[x] Cancel search: warning lightPage 215 of 278
9-26
INSPECTION AND MAINTENANCE
80J21-03E
Tire Inflation PressureTire inflation pressure should be checked
when the tire is cold. “Cold tire inflation
pressure” is the pressure in a tire that has
been driven less than 1 mile (1.6 km) or
has been standing for three hours or more.
80JS025
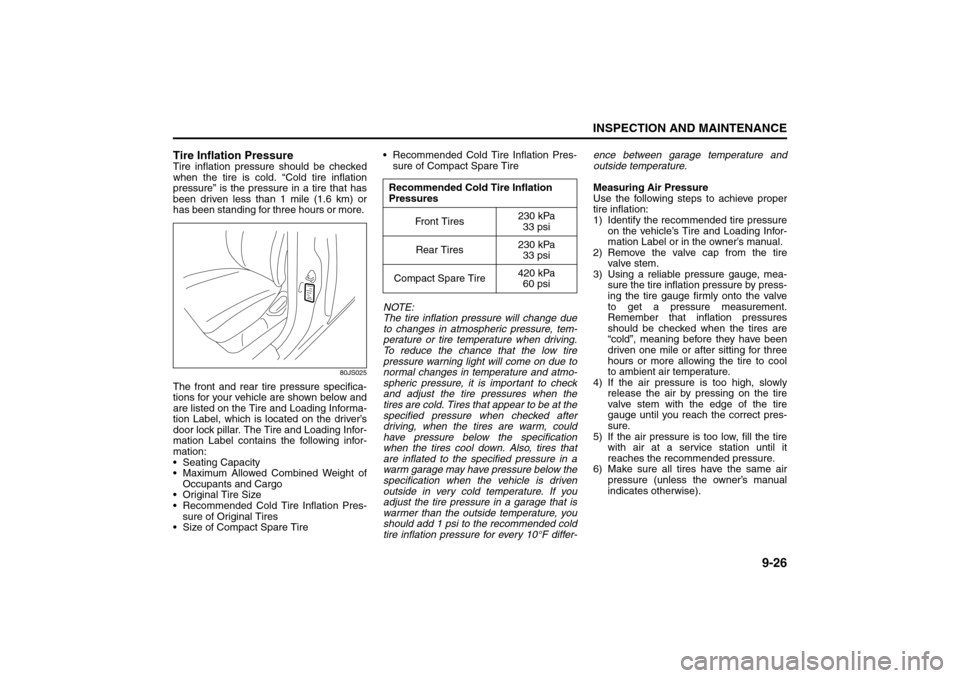
The front and rear tire pressure specifica-
tions for your vehicle are shown below and
are listed on the Tire and Loading Informa-
tion Label, which is located on the driver’s
door lock pillar. The Tire and Loading Infor-
mation Label contains the following infor-
mation:
Seating Capacity
Maximum Allowed Combined Weight of
Occupants and Cargo
Original Tire Size
Recommended Cold Tire Inflation Pres-
sure of Original Tires
Size of Compact Spare Tire Recommended Cold Tire Inflation Pres-
sure of Compact Spare Tire
NOTE:
The tire inflation pressure will change due
to changes in atmospheric pressure, tem-
perature or tire temperature when driving.
To reduce the chance that the low tire
pressure warning light will come on due to
normal changes in temperature and atmo-
spheric pressure, it is important to check
and adjust the tire pressures when the
tires are cold. Tires that appear to be at the
specified pressure when checked after
driving, when the tires are warm, could
have pressure below the specification
when the tires cool down. Also, tires that
are inflated to the specified pressure in a
warm garage may have pressure below the
specification when the vehicle is driven
outside in very cold temperature. If you
adjust the tire pressure in a garage that is
warmer than the outside temperature, you
should add 1 psi to the recommended cold
tire inflation pressure for every 10°F differ-ence between garage temperature and
outside temperature.
Measuring Air Pressure
Use the following steps to achieve proper
tire inflation:
1) Identify the recommended tire pressure
on the vehicle’s Tire and Loading Infor-
mation Label or in the owner’s manual.
2) Remove the valve cap from the tire
valve stem.
3) Using a reliable pressure gauge, mea-
sure the tire inflation pressure by press-
ing the tire gauge firmly onto the valve
to get a pressure measurement.
Remember that inflation pressures
should be checked when the tires are
“cold”, meaning before they have been
driven one mile or after sitting for three
hours or more allowing the tire to cool
to ambient air temperature.
4) If the air pressure is too high, slowly
release the air by pressing on the tire
valve stem with the edge of the tire
gauge until you reach the correct pres-
sure.
5) If the air pressure is too low, fill the tire
with air at a service station until it
reaches the recommended pressure.
6) Make sure all tires have the same air
pressure (unless the owner’s manual
indicates otherwise).
Recommended Cold Tire Inflation
Pressures
Fr on t T ir es230 kPa
33 psi
Rear Tires230 kPa
33 psi
Compact Spare Tire420 kPa
60 psi
Tires: 6
Page 219 of 278
9-30
INSPECTION AND MAINTENANCE
80J21-03E
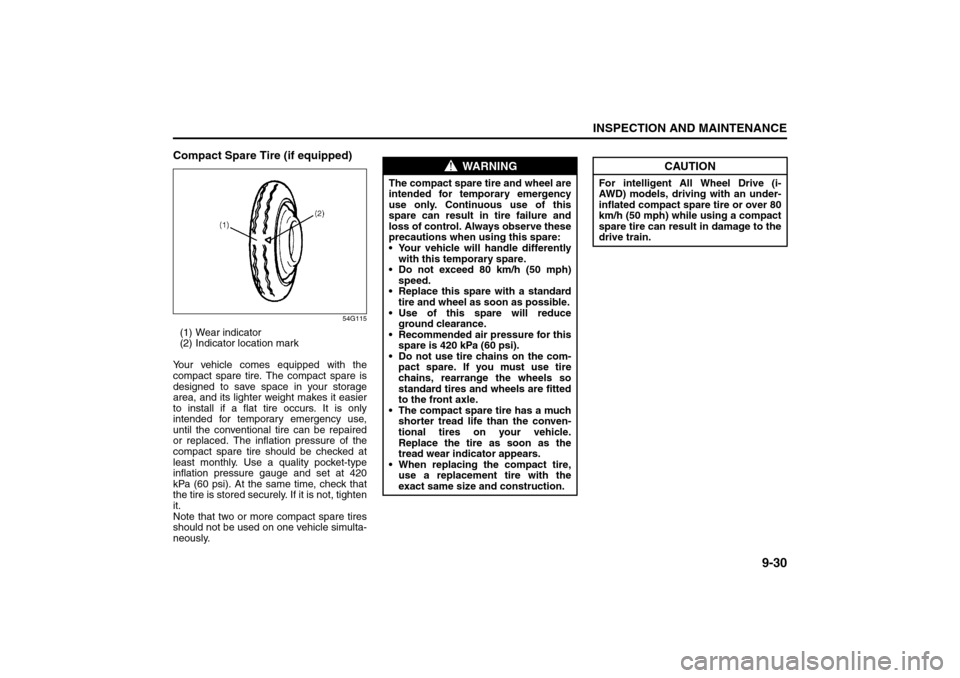
Compact Spare Tire (if equipped)
54G115
(1) Wear indicator
(2) Indicator location mark
Your vehicle comes equipped with the
compact spare tire. The compact spare is
designed to save space in your storage
area, and its lighter weight makes it easier
to install if a flat tire occurs. It is only
intended for temporary emergency use,
until the conventional tire can be repaired
or replaced. The inflation pressure of the
compact spare tire should be checked at
least monthly. Use a quality pocket-type
inflation pressure gauge and set at 420
kPa (60 psi). At the same time, check that
the tire is stored securely. If it is not, tighten
it.
Note that two or more compact spare tires
should not be used on one vehicle simulta-
neously.
WARNING
The compact spare tire and wheel are
intended for temporary emergency
use only. Continuous use of this
spare can result in tire failure and
loss of control. Always observe these
precautions when using this spare:
Your vehicle will handle differently
with this temporary spare.
Do not exceed 80 km/h (50 mph)
speed.
Replace this spare with a standard
tire and wheel as soon as possible.
Use of this spare will reduce
ground clearance.
Recommended air pressure for this
spare is 420 kPa (60 psi).
Do not use tire chains on the com-
pact spare. If you must use tire
chains, rearrange the wheels so
standard tires and wheels are fitted
to the front axle.
The compact spare tire has a much
shorter tread life than the conven-
tional tires on your vehicle.
Replace the tire as soon as the
tread wear indicator appears.
When replacing the compact tire,
use a replacement tire with the
exact same size and construction.
CAUTION
For intelligent All Wheel Drive (i-
AWD) models, driving with an under-
inflated compact spare tire or over 80
km/h (50 mph) while using a compact
spare tire can result in damage to the
drive train.
Tires: 6
Page 226 of 278
9-37INSPECTION AND MAINTENANCE
80J21-03E
60A243
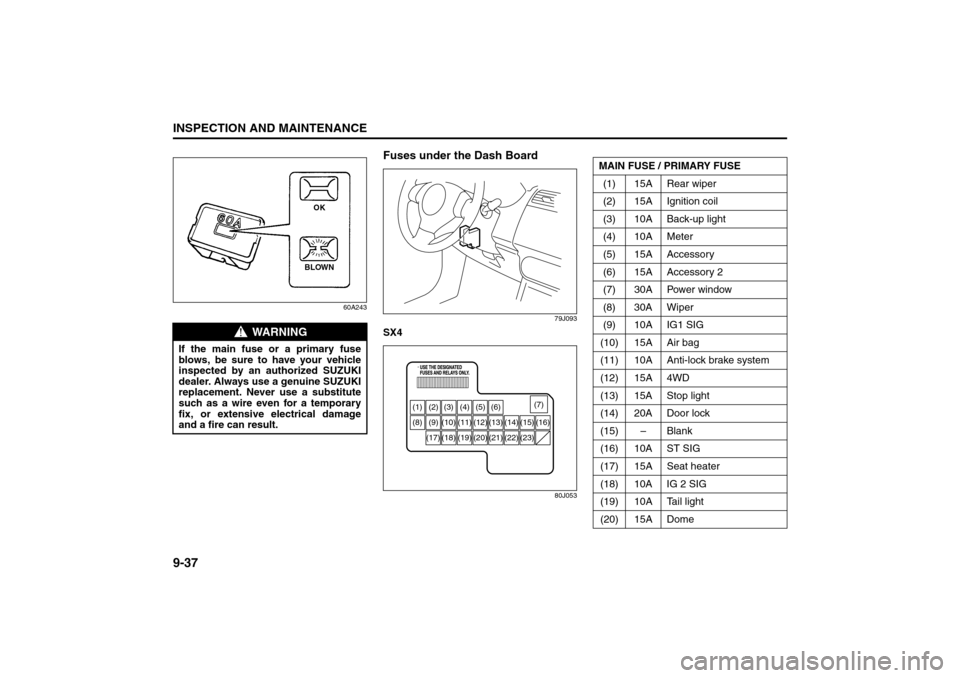
Fuses under the Dash Board
79J093
SX4
80J053
WARNING
If the main fuse or a primary fuse
blows, be sure to have your vehicle
inspected by an authorized SUZUKI
dealer. Always use a genuine SUZUKI
replacement. Never use a substitute
such as a wire even for a temporary
fix, or extensive electrical damage
and a fire can result.
BLOWNOK
(1) (2) (3) (4) (5) (6)
(8) (9) (10) (11) (12) (13) (14) (15) (16)
(18) (17) (19) (20) (21) (22) (23)(7)
MAIN FUSE / PRIMARY FUSE
(1) 15A Rear wiper
(2) 15A Ignition coil
(3) 10A Back-up light
(4) 10A Meter
(5) 15A Accessory
(6) 15A Accessory 2
(7) 30A Power window
(8) 30A Wiper
(9) 10A IG1 SIG
(10) 15A Air bag
(11) 10A Anti-lock brake system
(12) 15A 4WD
(13) 15A Stop light
(14) 20A Door lock
(15) – Blank
(16) 10A ST SIG
(17) 15A Seat heater
(18) 10A IG 2 SIG
(19) 10A Tail light
(20) 15A Dome
Bulb Replacement: 7
Page 228 of 278

9-39INSPECTION AND MAINTENANCE
80J21-03E
65D046
NOTE:
Make sure that the fuse box always carries
spare fuses.
Headlight AimingSince special procedures are required, we
recommend you take your vehicle to your
SUZUKI dealer for headlight alignment.
Bulb ReplacementNOTE:
If it is difficult to replace headlight bulbs or
parking light bulbs due to under-hood com-
ponents trust this job to your dealer.
WARNING
Always be sure to replace a blown
fuse with a fuse of the correct amper-
age. Never use a substitute such as
aluminum foil or wire to replace a
blown fuse. If you replace a fuse and
the new one blows in a short period
of time, you may have a major electri-
cal problem. Have your vehicle
inspected immediately by your
SUZUKI dealer.
BLOWN OK
WARNING
Light bulbs can be hot enough to
burn your finger right after being
turned off. This is true especially
for halogen headlight bulbs.
Replace the bulbs after they
become cool enough.
The headlight bulbs are filled with
pressurized halogen gas. They can
burst and injure you if they are hit
or dropped. Handle them carefully.
CAUTION
The oils from your skin may cause a
halogen bulb to overheat and burst
when the lights are on. Grasp a new
bulb with a clean cloth.
CAUTION
Frequent replacement of a bulb indi-
cates the need for an inspection of
the electrical system. This should be
carried out by your SUZUKI dealer.
Wiper Blades: 3
Page 242 of 278
10-3EMERGENCY SERVICE
80J21-03E
Jump Starting Instructions
When jump starting your vehicle, use
the following procedure:
60A269
1) Use only a 12 volt battery to jump start
your vehicle. Position the good 12V bat-
tery close to your vehicle so that the
jumper cables will reach both batteries.
When using a battery installed on
another vehicle, DO NOT LET THE
VEHICLES TOUCH. Set the parking
brakes fully on both vehicles.2) Turn off all vehicle accessories, except
those necessary for safety reasons (for
example, headlights or hazard lights).
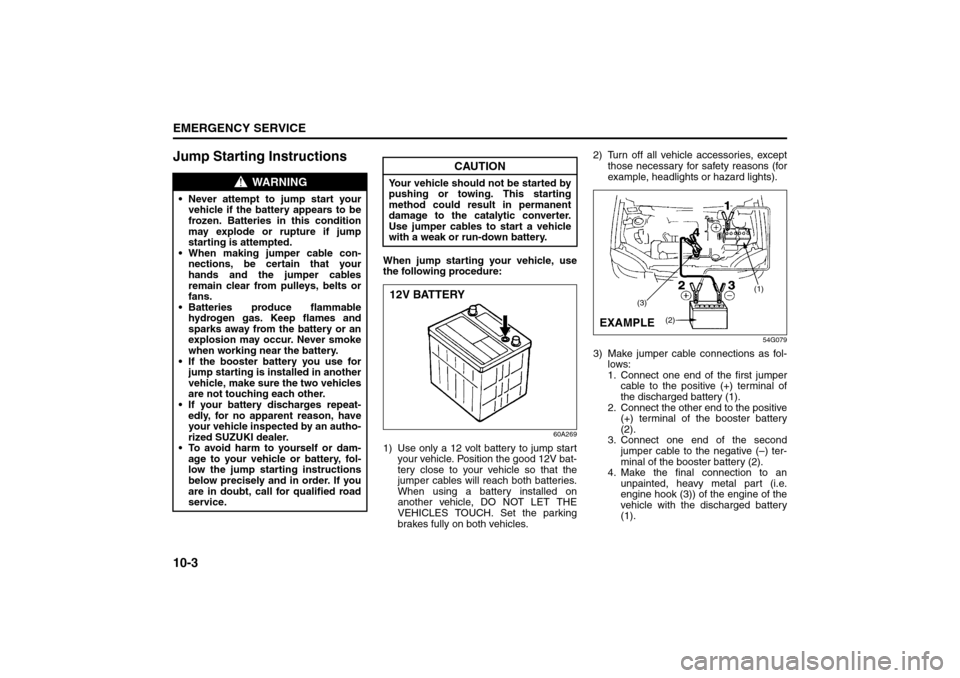
54G079
3) Make jumper cable connections as fol-
lows:
1. Connect one end of the first jumper
cable to the positive (+) terminal of
the discharged battery (1).
2. Connect the other end to the positive
(+) terminal of the booster battery
(2).
3. Connect one end of the second
jumper cable to the negative (–) ter-
minal of the booster battery (2).
4. Make the final connection to an
unpainted, heavy metal part (i.e.
engine hook (3)) of the engine of the
vehicle with the discharged battery
(1).
WARNING
Never attempt to jump start your
vehicle if the battery appears to be
frozen. Batteries in this condition
may explode or rupture if jump
starting is attempted.
When making jumper cable con-
nections, be certain that your
hands and the jumper cables
remain clear from pulleys, belts or
fans.
Batteries produce flammable
hydrogen gas. Keep flames and
sparks away from the battery or an
explosion may occur. Never smoke
when working near the battery.
If the booster battery you use for
jump starting is installed in another
vehicle, make sure the two vehicles
are not touching each other.
If your battery discharges repeat-
edly, for no apparent reason, have
your vehicle inspected by an autho-
rized SUZUKI dealer.
To avoid harm to yourself or dam-
age to your vehicle or battery, fol-
low the jump starting instructions
below precisely and in order. If you
are in doubt, call for qualified road
service.
CAUTION
Your vehicle should not be started by
pushing or towing. This starting
method could result in permanent
damage to the catalytic converter.
Use jumper cables to start a vehicle
with a weak or run-down battery.12V BATTERY
(1)
(3)
(2)
EXAMPLE
Jacking Instructions: 5
Page 243 of 278
10-4
EMERGENCY SERVICE
80J21-03E
4) If the booster battery you are using is
installed on another vehicle, start the
engine of the vehicle with the booster
battery. Run the engine at moderate
speed.
5) Start the engine of the vehicle with the
discharged battery.
6) Remove the jumper cables in the exact
reverse order in which you connected
them.
Towing a Disabled VehicleEmergency TowingIf your vehicle is disabled, it may be towed
by a tow truck using one of the following
methods:
1) Tow the vehicle with two wheels lifted
by the tow truck and the other two
wheels on a towing dolly.
2) Use the appropriate towing method
specified for your vehicle in the “Towing
Your Vehicle (recreational towing)” sec-
tion, but with the wheels lifted by the
tow truck instead of on a towing dolly.
Be sure to carefully follow the specific
instructions provided in the “Towing
Your Vehicle (recreational towing)” sec-
tion.
If the Starter Does Not
Operate1) Try turning the ignition switch to the
“START” position with the headlights
turned on to determine the battery con-
dition. If the headlights go excessively
dim or go off, it usually means that
either the battery has run down or bat-
tery terminal contact is poor. Recharge
the battery or correct battery terminal
contact if necessary.
2) If the headlights remain bright, check
the fuses. If the reason for failure of the
starter is not obvious, there may be a
major electrical problem. Have the vehi-
cle inspected by your authorized
SUZUKI dealer.
WARNING
Never connect the jumper cable
directly to the negative (–) terminal of
the discharged battery, or an explo-
sion may occur.
CAUTION
If vehicle damage (such as steering
or drivetrain damage, etc.) prevents
normal use of the towing procedures
for your vehicle described in the
“Towing Your Vehicle (recreational
towing)” section, have your vehicle
towed with two wheels lifted by the
tow truck and the other two wheels
on a towing dolly.
Jacking Instructions: 5
Jump Starting Instructions: 7
Page 244 of 278
10-5EMERGENCY SERVICE
80J21-03E
If the Engine is FloodedIf the engine is flooded with gasoline, it
may be hard to start. If this happens, press
the accelerator pedal all the way to the
floor and hold it there while cranking the
engine. (Do not operate the starter motor
for more than 15 seconds).
If the Engine OverheatsThe engine could overheat temporarily
under severe driving conditions. If the High
Engine Coolant Temperature Warning
Light in the instrument cluster glows red
during driving:
1) Turn off the air conditioner, if equipped.
2) Take the vehicle to a safe place and
park.
3) Let the engine run at the normal idle
speed for a few minutes until the engine
is cooled down to the normal tempera-
ture.
You can determine the engine tempera-
ture is normal by either condition below:
– Both High Engine Coolant Tempera-
ture Warning Light and Low Engine
Coolant Temperature Light have gone
off.
– Low Engine Coolant Temperature
Light is lit in blue, and High Engine
Coolant Temperature Warning Light
has gone off.
See “High Engine Coolant Temperature
Warning Light” and “Low Engine Coolant
Temperature Light” in the INDEX for further
information.
WARNING
If you see or hear escaping steam,
stop the vehicle in a safe place and
immediately turn off the engine to let
it cool. Do not open the hood when
steam is present. When the steam
can no longer be seen or heard, open
the hood to see if the coolant is still
boiling. If it is, you must wait until it
stops boiling before you proceed.
Also, be careful not to touch hot
engine parts (radiator, water hoses,
engine etc.).
Jump Starting Instructions: 7
Towing a Disabled Vehicle: 6
Page 249 of 278
11-2
APPEARANCE CARE
80J21-03E
Keep passenger and cargo compart-
ments clean
Moisture, dirt or mud can accumulate
under the floor mats and may cause corro-
sion. Occasionally, check under these
mats to ensure that this area is clean and
dry. More frequent checks are necessary if
the vehicle is used off road or in wet
weather.
Certain cargo such as chemicals, fertiliz-
ers, cleaners, salts, etc. are extremely cor-
rosive by nature. These products should
be transported in sealed containers. If a
spill or leak does occur, clean and dry the
area immediately.
Use the body trim
The use of the body trim will help protect
your vehicle, especially if you frequently
drive on gravel or salted roads. The fittings
for such guards should also be corrosion
resistant. Please check with your autho-
rized SUZUKI dealer for information on
these guards.
Store your vehicle in a dry, well-venti-
lated area
Do not park your vehicle in a damp, poorly
ventilated area. If you often wash your
vehicle in the garage or if you frequently
drive it in when wet, your garage may be
damp. The high humidity in the garage
may cause or accelerate corrosion. A wet
vehicle may corrode even in a heated
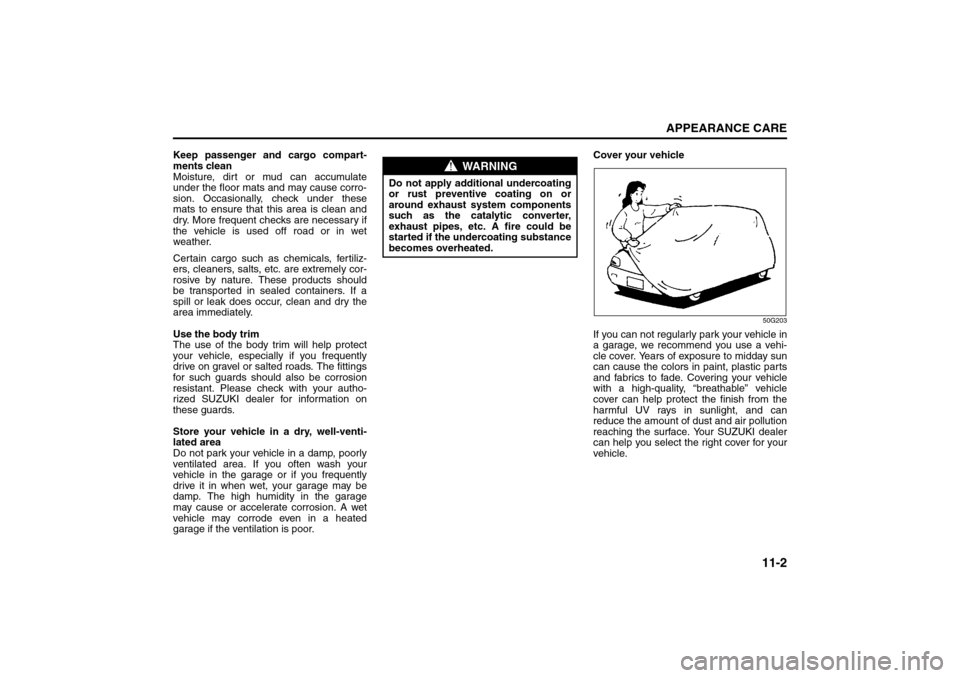
garage if the ventilation is poor.Cover your vehicle
50G203
If you can not regularly park your vehicle in
a garage, we recommend you use a vehi-
cle cover. Years of exposure to midday sun
can cause the colors in paint, plastic parts
and fabrics to fade. Covering your vehicle
with a high-quality, “breathable” vehicle
cover can help protect the finish from the
harmful UV rays in sunlight, and can
reduce the amount of dust and air pollution
reaching the surface. Your SUZUKI dealer
can help you select the right cover for your
vehicle.
WARNING
Do not apply additional undercoating
or rust preventive coating on or
around exhaust system components
such as the catalytic converter,
exhaust pipes, etc. A fire could be
started if the undercoating substance
becomes overheated.
Corrosion Prevention: