2008 SUBARU TRIBECA glove box
[x] Cancel search: glove boxPage 16 of 409
14
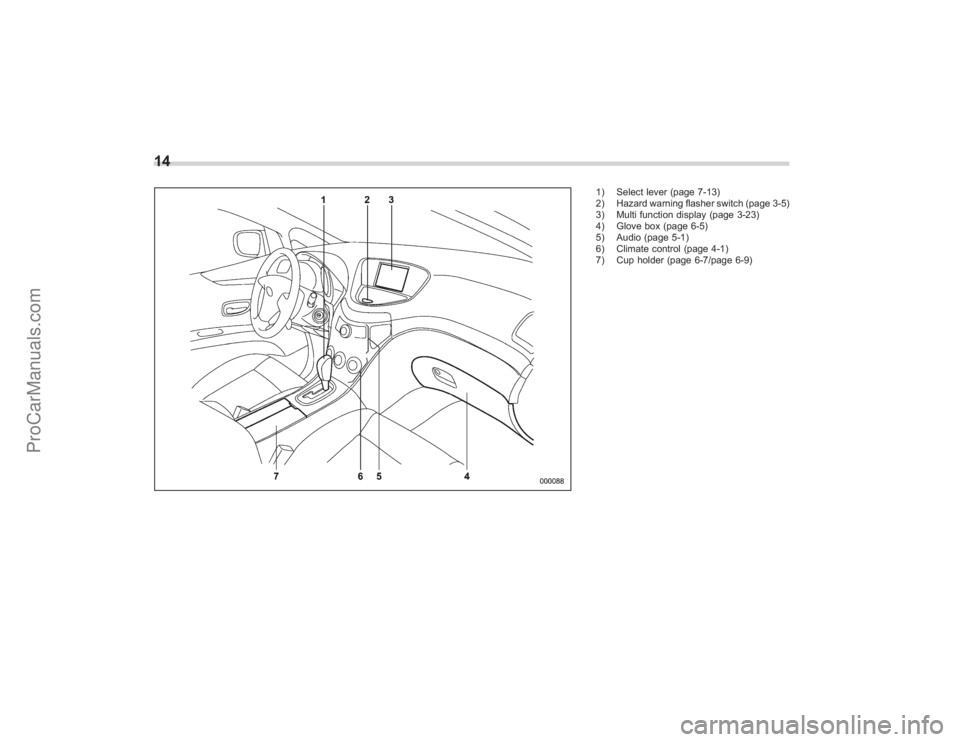
1) Select lever (page 7-13)
2) Hazard warning flasher switch (page 3-5)
3) Multi function display (page 3-23)
4) Glove box (page 6-5)
5) Audio (page 5-1)
6) Climate control (page 4-1)
7) Cup holder (page 6-7/page 6-9)
ProCarManuals.com
Page 72 of 409
1-48
Seat, seatbelt and SRS airbags
&Subaru advanced frontal air-
bag systemYour vehicle is equipped with a Subaru
advanced frontal airbag system that com-
plies with the new advanced frontal airbag
requirements in the amended Federal
Motor Vehicle Safety Standard (FMVSS)
No. 208.
The Subaru advanced frontal airbag sys-
tem automatically determines the deploy-
ment force of the driver ’s SRS frontal
airbag at the time of deployment as well as
whether or not to activate the front
passenger ’s SRS frontal airbag and, if
activated, the deployment force of the
SRS frontal airbag at the time of deploy-
ment.
Your vehicle has warning labels on the
driver ’s and front passenger ’s sun visors
beginning with the phrase “EVEN WITH
ADVANCED AIR BAGS” and a tag
attached to the glove box lid beginning
with the phrase “Even with Advanced Air
Bags”. Make sure that you carefully read
the instructions on the warning labels and
tag.
Always wear your seatbelt. The Subaru
advanced frontal airbag system is a
supplemental restraint system and must
be used in combination with a seatbelt. All
occupants should wear a seatbelt or be
seated in an appropriate child restraint system.
The driver
’s SRS frontal airbag is stowed
in the center portion of the steering wheel.
The front passenger ’s SRS frontal airbag
is stowed near the top of the dashboard
under an “SRS AIRBAG ”mark.
In a moderate to severe frontal collision,
the driver ’s and front passenger ’s SRS
frontal airbags deploy and supplement the
seatbelts by reducing the impact on the
driver ’s and front passenger ’s head and
chest.
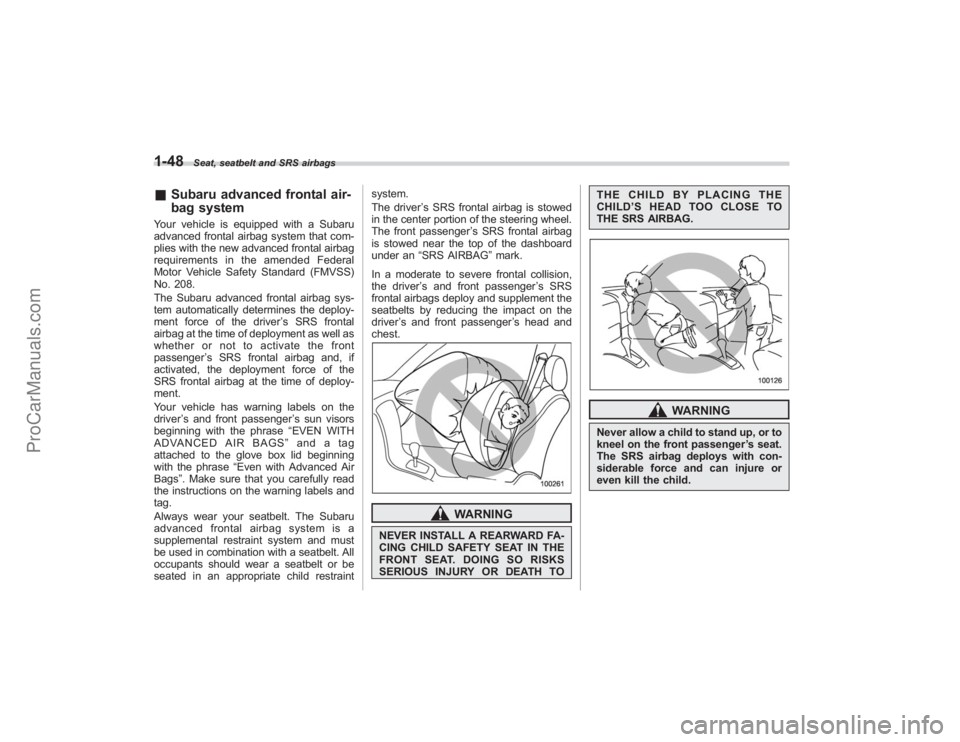
WARNING
NEVER INSTALL A REARWARD FA-
CING CHILD SAFETY SEAT IN THE
FRONTSEAT.DOINGSORISKS
SERIOUS INJURY OR DEATH TO THE CHILD BY PLACING THE
CHILD’
S HEAD TOO CLOSE TO
THE SRS AIRBAG.
WARNING
Never allow a child to stand up, or to
kneel on the front passenger ’s seat.
The SRS airbag deploys with con-
siderable force and can injure or
even kill the child.
ProCarManuals.com
Page 96 of 409
2-2
Keys and doors
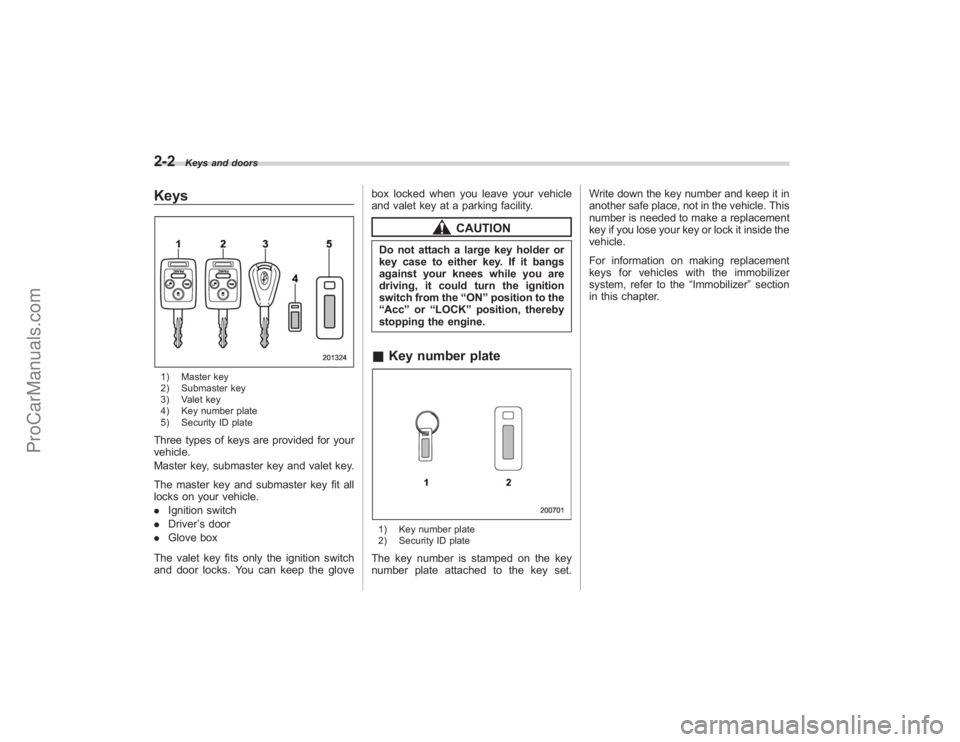
Keys1) Master key
2) Submaster key
3) Valet key
4) Key number plate
5) Security ID plateThree types of keys are provided for your
vehicle.
Master key, submaster key and valet key.
The master key and submaster key fit all
locks on your vehicle.
.Ignition switch
. Driver ’s door
. Glove box
The valet key fits only the ignition switch
and door locks. You can keep the glove box locked when you leave your vehicle
and valet key at a parking facility.
CAUTION
Do not attach a large key holder or
key case to either key. If it bangs
against your knees while you are
driving, it could turn the ignition
switch from the
“ON ”position to the
“ Acc ”or “LOCK ”position, thereby
stopping the engine.& Key number plate1) Key number plate
2) Security ID plateThe key number is stamped on the key
number plate attached to the key set. Write down the key number and keep it in
another safe place, not in the vehicle. This
number is needed to make a replacement
key if you lose your key or lock it inside the
vehicle.
For information on making replacement
keys for vehicles with the immobilizer
system, refer to the
“Immobilizer ”section
in this chapter.
ProCarManuals.com
Page 173 of 409
Air filtration systemReplace the filter element according to the
replacement schedule shown in the fol-
lowing. This schedule should be followed
to maintain the filter’s dust collection
ability. Under extremely dusty conditions,
the filter should be replaced more fre-
quently. It is recommended that you have
your filter checked or replaced by your
SUBARU dealer. For replacement, we
recommend the use of a genuine
SUBARU air filter kit.Replacement schedule:
Every 15 months or 15,000 miles (24,000
km) whichever comes first
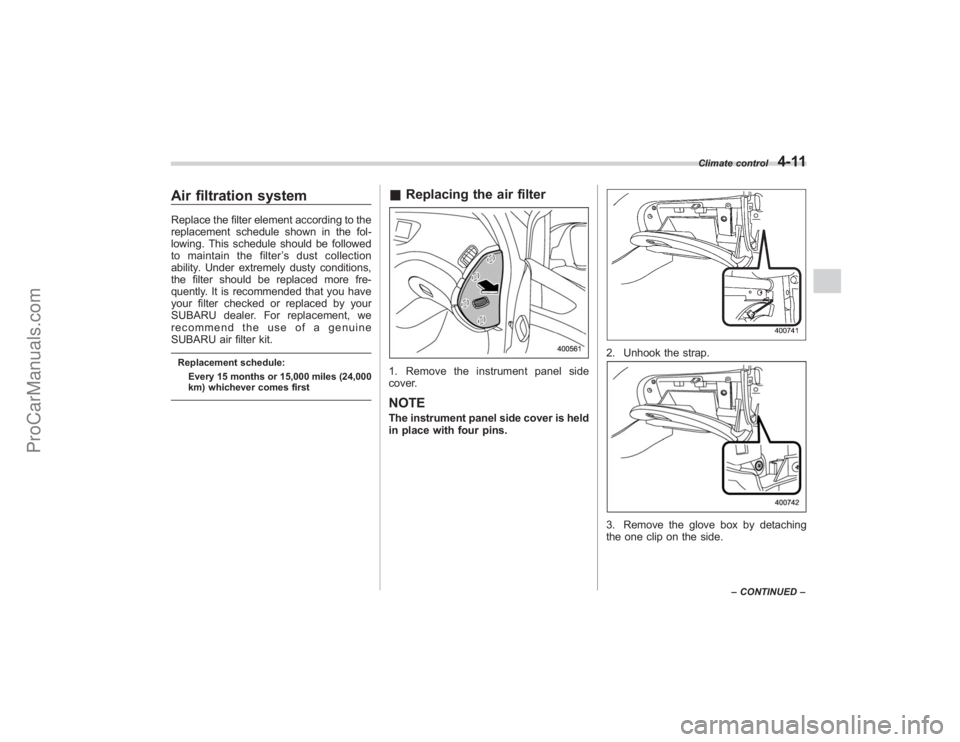
& Replacing the air filter1. Remove the instrument panel side
cover.NOTEThe instrument panel side cover is held
in place with four pins.
2. Unhook the strap.3. Remove the glove box by detaching
the one clip on the side.
Climate control
4-11
–CONTINUED –
ProCarManuals.com
Page 174 of 409
4-12
Climate control
4. Remove the air filter cover by detach-
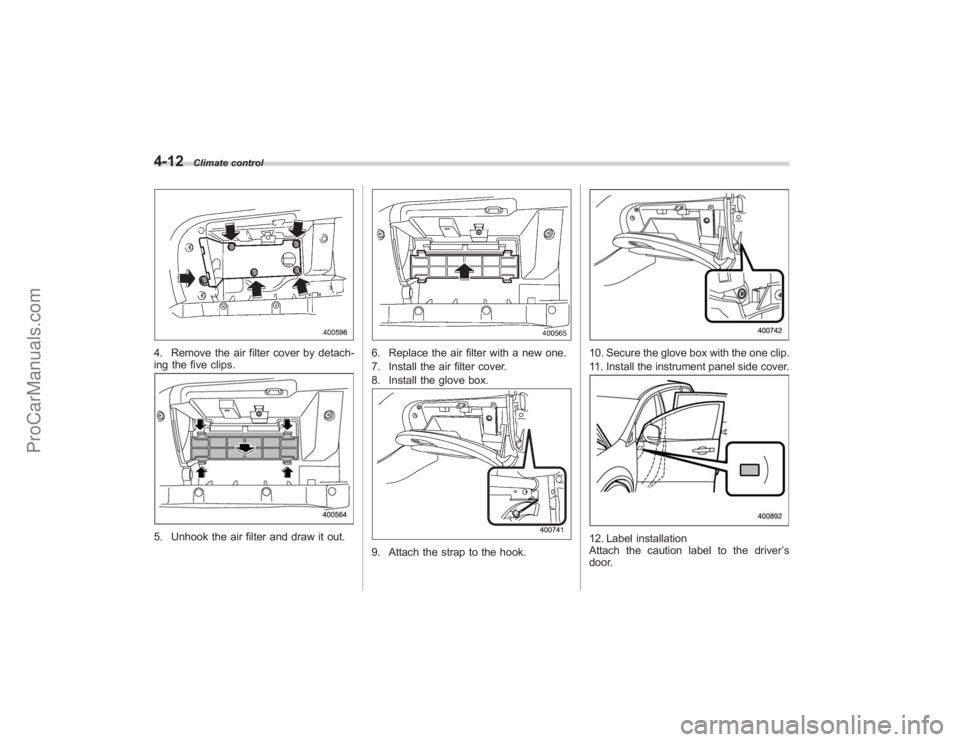
ing the five clips.5. Unhook the air filter and draw it out.
6. Replace the air filter with a new one.
7. Install the air filter cover.
8. Install the glove box.9. Attach the strap to the hook.
10. Secure the glove box with the one clip.
11. Install the instrument panel side cover.12. Label installation
Attach the caution label to the driver’s
door.
ProCarManuals.com
Page 209 of 409
Interior light...................................................... 6-2
Dome light....................................................... 6-2
Cargo area light ............................................... 6-2
Rear gate light ................................................. 6-3
Automatic ambient light for center console area (if equipped) .................................................. 6-3
Map light........................................................... 6-3
Sun visors ........................................................ 6-4
Sun visor extension plate ................................. 6-4
Vanity mirror with light ..................................... 6-4
Storage compartment...................................... 6-5
Glove box........................................................ 6-5
Center console box .......................................... 6-6
Rear console .................................................... 6-7
Overhead console ............................................ 6-7
Cup holder........................................................ 6-7
Front passenger ’s cup holder ........................... 6-8
Rear seat (5-seater models)/Second-row seat (7-seater models) passenger ’s cup holder ....... 6-8
Third-row seat cup holders (7-seater models) ........................................... 6-9
Accessory power outlets ................................. 6-9
Coat hook ....................................................... 6-11
Rear (5-seater models)/Second-row
(7-seater models) passenger area .................. 6-11
Shopping bag hook........................................ 6-12
Floor mat ........................................................ 6-12 Cargo area cover (if equipped)
..................... 6-13
Using the cover.............................................. 6-13
To remove the cover ....................................... 6-14
To install the cover housing ............................ 6-14
Convenient tie-down hooks.......................... 6-15
Under-floor storage compartment ................ 6-15
5-seater models.............................................. 6-15
7-seater models .............................................. 6-16
HomeLink®Wireless Control System
(if equipped) ................................................ 6-16
Garage door opener programming in the
U.S.A. ........................................................... 6-17
Programming rolling-code-protected garage door openers in the U.S.A. .................................... 6-18
Programming for entrance gates and garage door openers in Canada ........................................ 6-19
Programming other devices ............................ 6-20
Operating the HomeLink ®Wireless Control
System ......................................................... 6-20
Reprogramming a single HomeLink ®
button .......................................................... 6-20
Erasing HomeLink ®button memory ................ 6-20
In case a problem occurs ................................ 6-20
Rear view camera (if equipped) .................... 6-21
Position of rear view camera........................... 6-22
How to use the rear view camera .................... 6-22
Viewing range on the screen ........................... 6-22
Distance marker (help line) ............................. 6-24
Interior equipment
6
ProCarManuals.com
Page 213 of 409
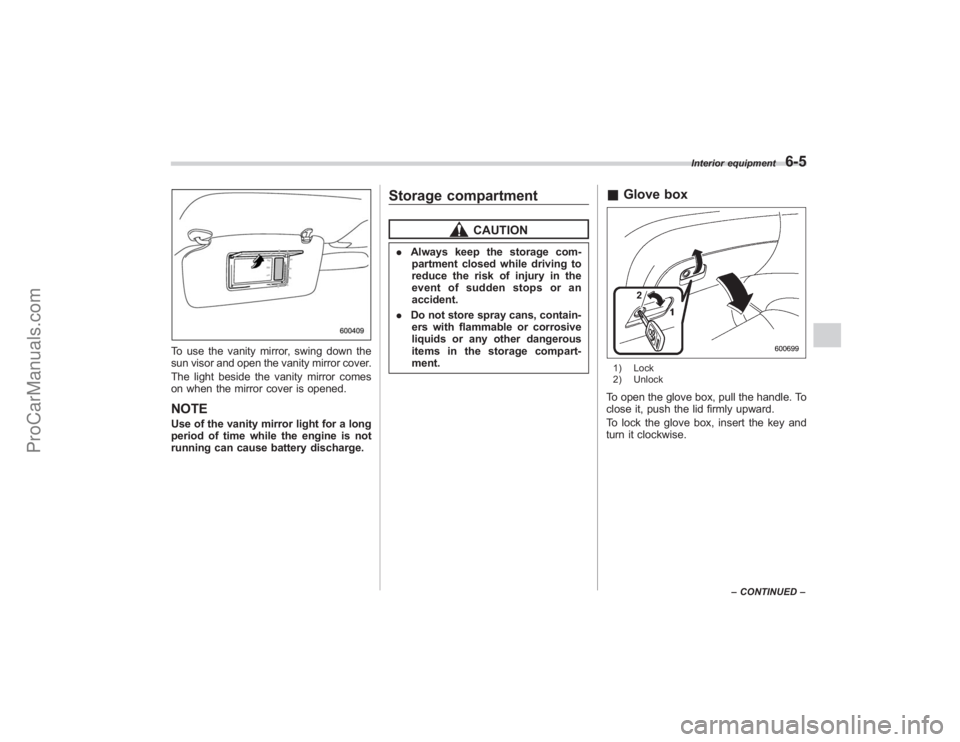
To use the vanity mirror, swing down the
sun visor and open the vanity mirror cover.
The light beside the vanity mirror comes
on when the mirror cover is opened.NOTEUse of the vanity mirror light for a long
period of time while the engine is not
running can cause battery discharge.
Storage compartment
CAUTION
.Always keep the storage com-
partment closed while driving to
reduce the risk of injury in the
event of sudden stops or an
accident.
. Do not store spray cans, contain-
ers with flammable or corrosive
liquids or any other dangerous
items in the storage compart-
ment.
& Glove box1) Lock
2) UnlockTo open the glove box, pull the handle. To
close it, push the lid firmly upward.
To lock the glove box, insert the key and
turn it clockwise.
Interior equipment
6-5
–CONTINUED –
ProCarManuals.com
Page 400 of 409

14-4
Index
Pets........................................................................\
. 7
Snowy and icy roads ............................................... 8-9
Tips....................................................................... 8-4
Tired or sleepy. .......................................................... 7
E
Electrical system ........................................................ 12-3
Electronic Brake Force Distribution (EBD) system ................................................. 3-17, 7-22
Emergency Locking Retractor (ELR) ............................. 1-17
Engine
Compartment overview ........................................... 11-6
Coolant ............................................................... 11-11
Exhaust gas (Carbon monoxide) ............................ 5, 8-2
Hood .................................................................... 11-4
Oil........................................................................\
11-7
Overheating .......................................................... 9-14
Starting .................................................................. 7-7
Stopping ................................................................ 7-8
Exterior care .............................................................. 10-2
F
Flat tires .................................................................... 9-6
Floor mat .................................................................. 6-12
Fluid level Automatic transmission ........................................ 11-15
Brake ................................................................. 11-20
Power steering .................................................... 11-19
Fog light switch .......................................................... 3-32
Folding mirror switch .................................................. 3-41 Front
Differential gear oil ................................................ 11-17
Fog light .............................................................. 11-45
Seatbelt pretensioners ........................................... 1-27
Seats ..................................................................... 1-2
Turn signal light .................................................... 11-45
Front seats Fore and aft adjustment ........................................... 1-3
Reclining ................................................................ 1-3
Fuel ........................................................................\
... 7-2
Economy hints ........................................................ 8-2
Filler lid and cap ...................................................... 7-3
Gauge .................................................................... 3-8
Requirements ......................................................... 7-2
Fuses ..................................................................... 11-38
Fuses and circuits ..................................................... 12-5
G
GAWR (Gross Axle Weight Rating) .............................. 8-12
Glove box ................................................................... 6-5
GVWR (Gross Vehicle Weight Rating) ... ....................... 8-12
H
Hazard warning flasher .......................................... 3-5, 9-2
Head restraint adjustment ............................................. 1-5
Rear .................................................................... 1-11
Headlight Beam leveler. ........................................................ 3-29
Flasher ................................................................. 3-27
Indicator light ........................................................ 3-21
Headlights ....................................................... 3-26, 11-42
ProCarManuals.com