2008 SUBARU OUTBACK turn signal
[x] Cancel search: turn signalPage 166 of 444
&Daytime running light system
WARNING
The brightness of the illumination of
the high beam headlights is reduced
by the daytime running light system.
The light switch must always be
turned to the “
”position when it
is dark outside.
The high beam headlights will automati-
cally come on at reduced brightness when
the engine has started, under the followingconditions: . The parking brake is fully released.
. The light switch is in the “OFF ”or “
”
position.
NOTE
When the light switch is in the “
”
position, the front side marker lights,
parking lights and license plate lights
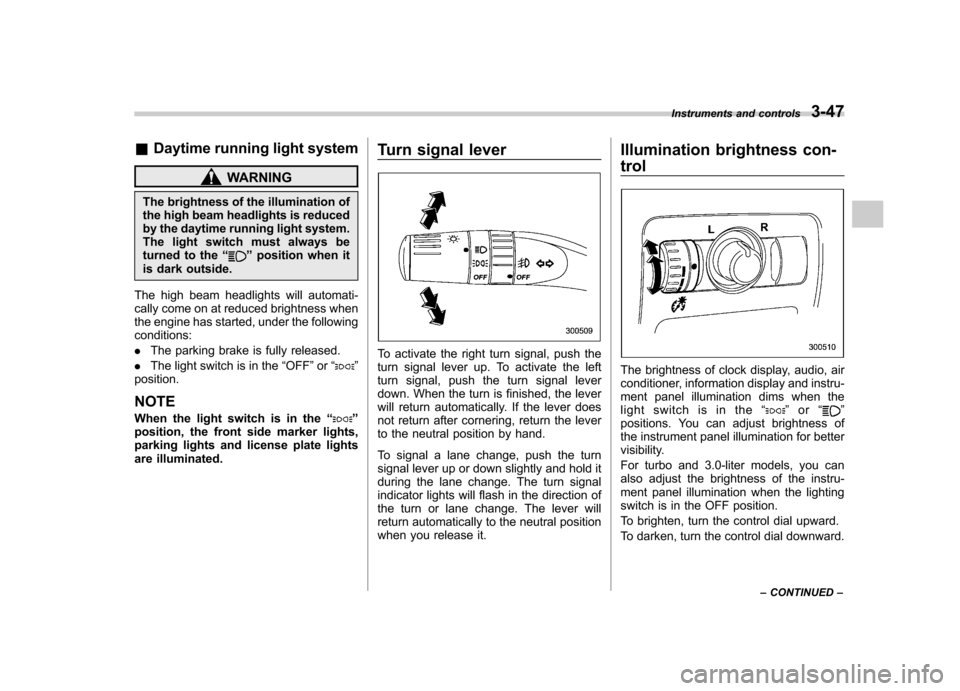
are illuminated. Turn signal lever
To activate the right turn signal, push the
turn signal lever up. To activate the left
turn signal, push the turn signal lever
down. When the turn is finished, the lever
will return automatically. If the lever does
not return after cornering, return the lever
to the neutral position by hand.
To signal a lane change, push the turn
signal lever up or down slightly and hold it
during the lane change. The turn signal
indicator lights will flash in the direction of
the turn or lane change. The lever will
return automatically to the neutral position
when you release it.Illumination brightness con- trol
The brightness of clock display, audio, air
conditioner, information display and instru-
ment panel illumination dims when the
light switch is in the
“
”or “”
positions. You can adjust brightness of
the instrument panel illumination for better
visibility.
For turbo and 3.0-liter models, you can
also adjust the brightness of the instru-
ment panel illumination when the lighting
switch is in the OFF position.
To brighten, turn the control dial upward.
To darken, turn the control dial downward. Instruments and controls
3-47
– CONTINUED –
Page 167 of 444
3-48Instruments and controls
NOTE
When the control dial is turned fully
upward, the illumination brightness
becomes the maximum and the auto-
matic dimming function does not work
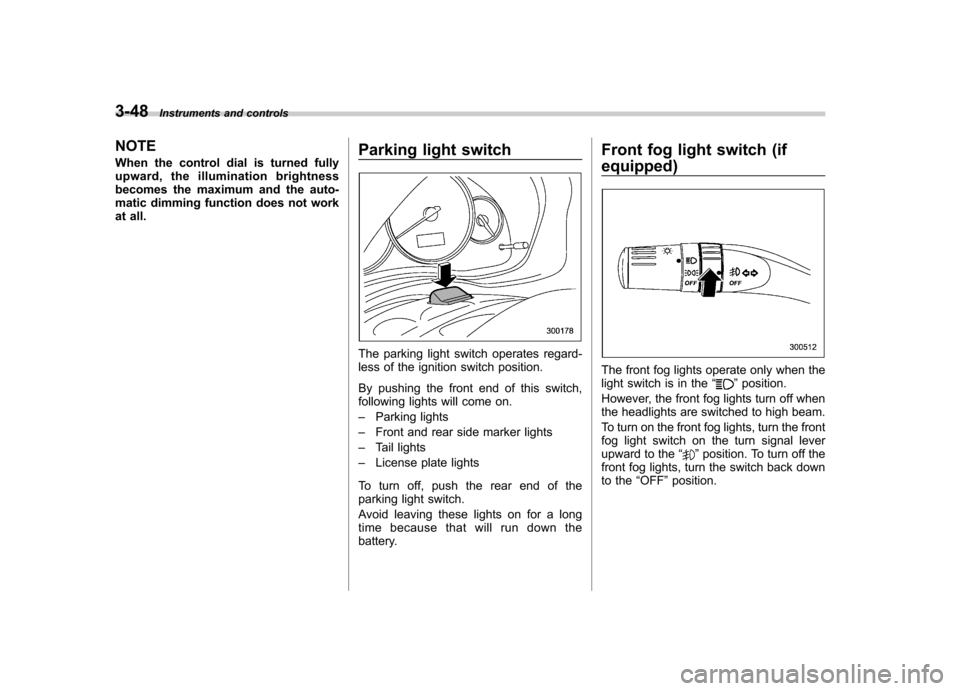
at all. Parking light switch
The parking light switch operates regard-
less of the ignition switch position.
By pushing the front end of this switch,
following lights will come on. –
Parking lights
– Front and rear side marker lights
– Tail lights
– License plate lights
To turn off, push the rear end of the
parking light switch.
Avoid leaving these lights on for a long
time because that will run down the
battery. Front fog light switch (if
equipped)
The front fog lights operate only when the
light switch is in the
“”position.
However, the front fog lights turn off when
the headlights are switched to high beam.
To turn on the front fog lights, turn the front
fog light switch on the turn signal lever
upward to the “
”position. To turn off the
front fog lights, turn the switch back down
to the “OFF ”position.
Page 268 of 444
selector lever to the“P ” position at this
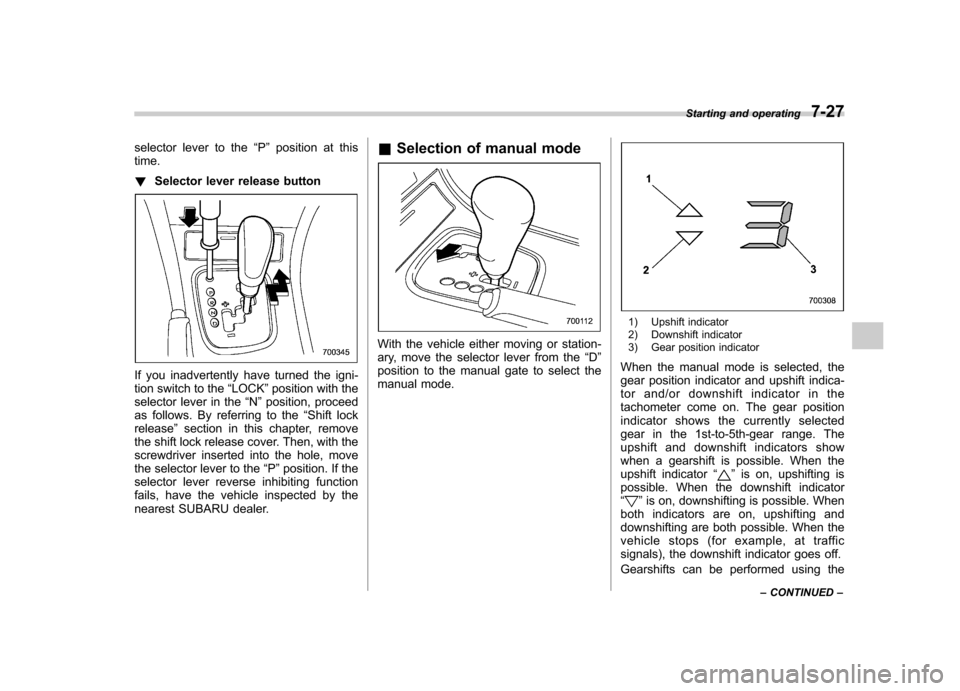
time. ! Selector lever release button
If you inadvertently have turned the igni-
tion switch to the “LOCK ”position with the
selector lever in the “N ”position, proceed
as follows. By referring to the “Shift lock
release ”section in this chapter, remove
the shift lock release cover. Then, with the
screwdriver inserted into the hole, move
the selector lever to the “P ”position. If the
selector lever reverse inhibiting function
fails, have the vehicle inspected by the
nearest SUBARU dealer. &
Selection of manual mode
With the vehicle either moving or station-
ary, move the selector lever from the “D ”
position to the manual gate to select the
manual mode.
1) Upshift indicator
2) Downshift indicator
3) Gear position indicator
When the manual mode is selected, the
gear position indicator and upshift indica-
tor and/or downshift indicator in the
tachometer come on. The gear position
indicator shows the currently selected
gear in the 1st-to-5th-gear range. The
upshift and downshift indicators show
when a gearshift is possible. When the
upshift indicator “
”is on, upshifting is
possible. When the downshift indicator “
” is on, downshifting is possible. When
both indicators are on, upshifting and
downshifting are both possible. When the
vehicle stops (for example, at traffic
signals), the downshift indicator goes off.
Gearshifts can be performed using the Starting and operating
7-27
– CONTINUED –
Page 312 of 444
WARNING
Do not connect safety chains to part
of the vehicle other than the safety
chain hooks.
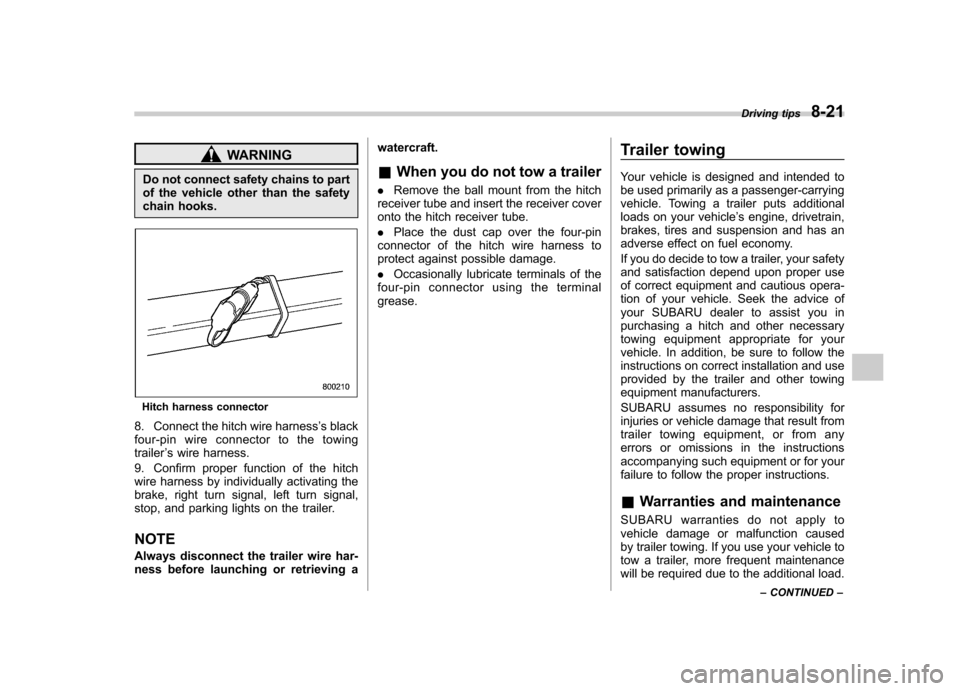
Hitch harness connector
8. Connect the hitch wire harness ’s black
four-pin wire connector to the towing trailer ’s wire harness.
9. Confirm proper function of the hitch
wire harness by individually activating the
brake, right turn signal, left turn signal,
stop, and parking lights on the trailer. NOTE
Always disconnect the trailer wire har-
ness before launching or retrieving a watercraft.
& When you do not tow a trailer
. Remove the ball mount from the hitch
receiver tube and insert the receiver cover
onto the hitch receiver tube. . Place the dust cap over the four-pin
connector of the hitch wire harness to
protect against possible damage. . Occasionally lubricate terminals of the
four-pin connector using the terminal grease. Trailer towing
Your vehicle is designed and intended to
be used primarily as a passenger-carrying
vehicle. Towing a trailer puts additional
loads on your vehicle
’s engine, drivetrain,
brakes, tires and suspension and has an
adverse effect on fuel economy.
If you do decide to tow a trailer, your safety
and satisfaction depend upon proper use
of correct equipment and cautious opera-
tion of your vehicle. Seek the advice of
your SUBARU dealer to assist you in
purchasing a hitch and other necessary
towing equipment appropriate for your
vehicle. In addition, be sure to follow the
instructions on correct installation and use
provided by the trailer and other towing
equipment manufacturers.
SUBARU assumes no responsibility for
injuries or vehicle damage that result from
trailer towing equipment, or from any
errors or omissions in the instructions
accompanying such equipment or for your
failure to follow the proper instructions.
& Warranties and maintenance
SUBARU warranties do not apply to
vehicle damage or malfunction caused
by trailer towing. If you use your vehicle to
tow a trailer, more frequent maintenance
will be required due to the additional load. Driving tips
8-21
– CONTINUED –
Page 318 of 444

!Side mirrors
After hitching a trailer to your vehicle,
check that the standard side mirrors
provide a good rearward field of view
without significant blind spots. If significant
blind spots occur with the vehicle ’s stan-
dard side mirrors, use towing mirrors that
conform with Federal, state/province and/
or other applicable regulations. ! Trailer lights
CAUTION
Direct splicing or other improper
connection of trailer lights may
damage your vehicle ’s electrical
system and cause a malfunction of
your vehicle ’s lighting system. Connection of trailer lights to your vehi-cle
’s electrical system requires modifica-
tions to the vehicle ’s lighting circuit to
increase its capacity and accommodate
wiring changes. To ensure the trailer lights
are connected properly, please consult
your SUBARU dealer. Check for proper
operation of the turn signals, the brake
lights and parking lights each time you
hitch up. ! Tires
WARNING
Never tow a trailer when the tem-
porary spare tire is used. The tem-
porary spare tire is not designed to
sustain the towing load. Use of the
temporary spare tire when towing
can result in failure of the spare tire
and/or less stability of the vehicle.
Make sure that all the tires on your vehicle
are properly inflated.
The recommended cold tire pressure
under trailer towing conditions is shown
in chapter 12, “Specifications ”and in
“ GAS STATION REFERENCE ”at the
end of this manual. Adjust the rear tire
pressure to the recommended pressure
when the tires are cold. Normal pressure
should be maintained in the front tires. Trailer tire condition, size, load rating and
proper inflation pressure should be in
accordance with the trailer manufacturer
’s
specifications.
In the event your vehicle gets a flat tire
when towing a trailer, ask a commercial
road service to repair the flat tire.
If you carry a regular size spare tire in your
vehicle or trailer as a precaution against
getting a flat tire, be sure that the spare
tire is firmly secured.
& Trailer towing tips
CAUTION
. Never exceed 45 mph (72 km/h)
when towing a trailer in hilly
country on hot days.
. When towing a trailer, steering,
stability, stopping distance and
braking performance will be dif-
ferent from normal operation. Forsafety ’s sake, you should employ
extra caution when towing a
trailer and you should never
speed. You should also keep the
following tips in mind: Driving tips
8-27
– CONTINUED –
Page 319 of 444
8-28Driving tips
! Before starting out on a trip
. Check that the vehicle and vehicle-to-
hitch mounting are in good condition. If
any problems are apparent, do not tow the
trailer. . Check that the vehicle sits horizontally
with the trailer attached. If the vehicle is
tipped sharply up at the front and down at
the rear, check the total trailer weight,
GVW, GAWs and tongue load again, then
confirm that the load and its distribution
are acceptable. . Check that the tire pressures are
correct.. Check that the vehicle and trailer are
connected properly. Confirm that
–the trailer tongue is connected
properly to the hitch ball. – the trailer lights connector is con-
nected properly and trailer ’s brake
lights illuminate when the vehicle ’s
brake pedal is pressed, and that the trailer ’s turn signal lights flash when
the vehicle ’s turn signal lever is oper-
ated. – the safety chains are connected
properly.– all cargo in the trailer is secured
safety in position.– the side mirrors provide a good
rearward field of view without a sig- nificant blind spot.
. Sufficient time should be taken to learn
the “feel ”of the vehicle/trailer combination
before starting out on a trip. In an area free
of traffic, practice turning, stopping and
backing up. ! Driving with a trailer
. You should allow for considerably more
stopping distance when towing a trailer.
Avoid sudden braking because it may
result in skidding or jackknifing and loss ofcontrol. . Avoid abrupt starts and sudden accel-
erations. If your vehicle has a manual
transmission, always start out in first gear
and release the clutch at moderate enginerevolution. . Avoid uneven steering, sharp turns and
rapid lane changes.. Slow down before turning. Make a
longer than normal turning radius because
the trailer wheels will be closer than the
vehicle wheels to the inside of the turn. In
a tight turn, the trailer could hit yourvehicle. . Crosswinds will adversely affect the
handling of your vehicle and trailer, caus-
ing sway. Crosswinds can be due to
weather conditions or the passing of large
trucks or buses. If swaying occurs, firmly
grip the steering wheel and slow down immediately but gradually. .
When passing other vehicles, consid-
erable distance is required because of the
added weight and length caused by
attaching the trailer to your vehicle.
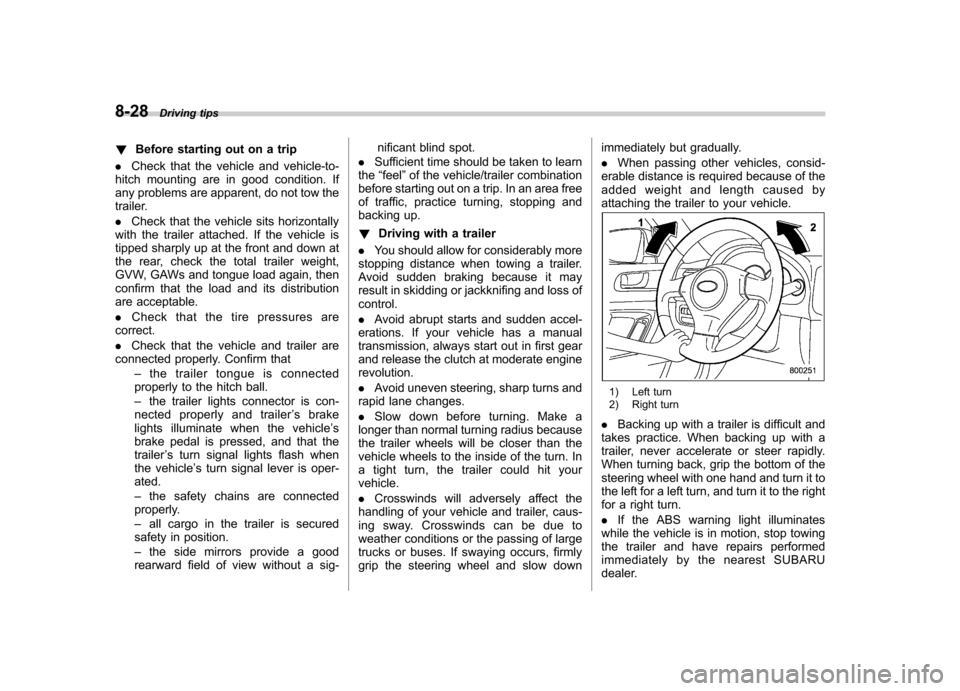
1) Left turn
2) Right turn
. Backing up with a trailer is difficult and
takes practice. When backing up with a
trailer, never accelerate or steer rapidly.
When turning back, grip the bottom of the
steering wheel with one hand and turn it to
the left for a left turn, and turn it to the right
for a right turn. . If the ABS warning light illuminates
while the vehicle is in motion, stop towing
the trailer and have repairs performed
immediately by the nearest SUBARU
dealer.
Page 322 of 444

9-2In case of emergency
If you park your vehicle in an emergency
The hazard warning flasher should be
used in day or night to warn other drivers
when you have to park your vehicle under
emergency conditions.
Avoid stopping on the road. It is best to
safely pull off the road if a problem occurs.
The hazard warning flasher can be acti-
vated regardless of the ignition switchposition.
Turn on the hazard warning by pushing
the hazard warning flasher switch. Turn it
off by pushing the switch again. NOTE
When the hazard warning flasher is on,
the turn signals do not work.
Temporary spare tire
WARNING
. Never tow a trailer when the
temporary spare tire is used.
The temporary spare tire is not
designed to sustain the towing
load. Use of the temporary spare
tire when towing can result in
failure of the spare tire and/or
less stability of the vehicle and
may lead to an accident.
. When a spare tire is mounted or a
wheel rim is replaced without the
original pressure sensor/trans-
mitter being transferred, the low
tire pressure warning light will
illuminate steadily after blinking
for approximately one minute.
This indicates the tire pressure
monitoring system (TPMS) is un-
able to monitor all four road
wheels. Contact your SUBARU
dealer as soon as possible for
tire and sensor replacement and/
or system resetting.
Page 348 of 444

Maintenance and serviceTire pressure monitoring system (TPMS)(if equipped) ................................................... 11-34
Tire inspection ................................................. 11-36
Tire pressures and wear ................................... 11-36
Wheel balance .................................................. 11-38
Wear indicators ................................................ 11-39
Tire rotation direction mark .............................. 11-39
Tire rotation ..................................................... 11-39
Tire replacement .............................................. 11-40
Wheel replacement ........................................... 11-40
Aluminum wheels ............................................. 11-41
Windshield washer fluid .................................. 11-41
Replacement of wiper blades .......................... 11-43
Windshield wiper blade assembly ..................... 11-43
Windshield wiper blade rubber ......................... 11-44
Rear window wiper blade assembly .................. 11-45
Rear window wiper blade rubber ....................... 11-45
Battery. .............................................................. 11-47 Fuses
................................................................ 11-48
Main fuse .......................................................... 11-49
Installation of accessories .............................. 11-50
Replacing bulbs ............................................... 11-51
Headlight ......................................................... 11-52
Front turn signal light and parking light ............ 11-54
Front fog light (if equipped) .............................. 11-54
Rear combination lights ................................... 11-55
Back-up light (Station wagon) .......................... 11-57
License plate light ........................................... 11-57
Dome light ....................................................... 11-58
Map light ......................................................... 11-59
Vanity mirror light ............................................ 11-59
Door step light ................................................. 11-59
Cargo area light (Station wagon) ... ................... 11-60
Trunk light (Sedan) .......................................... 11-60
High mount stop light (Sedan) .......................... 11-60