2008 SUBARU OUTBACK steering
[x] Cancel search: steeringPage 217 of 444
5-26Audio
low, the sound becomes bad when you
turn up the volume of the vehicle audio
system. In this case, adjust the sound
volume of the portable audio player..In some cases, noise occurs be-
cause of a bad connection between the
portable player of the vehicle audio
system or for the player. Audio control buttons (if equipped)
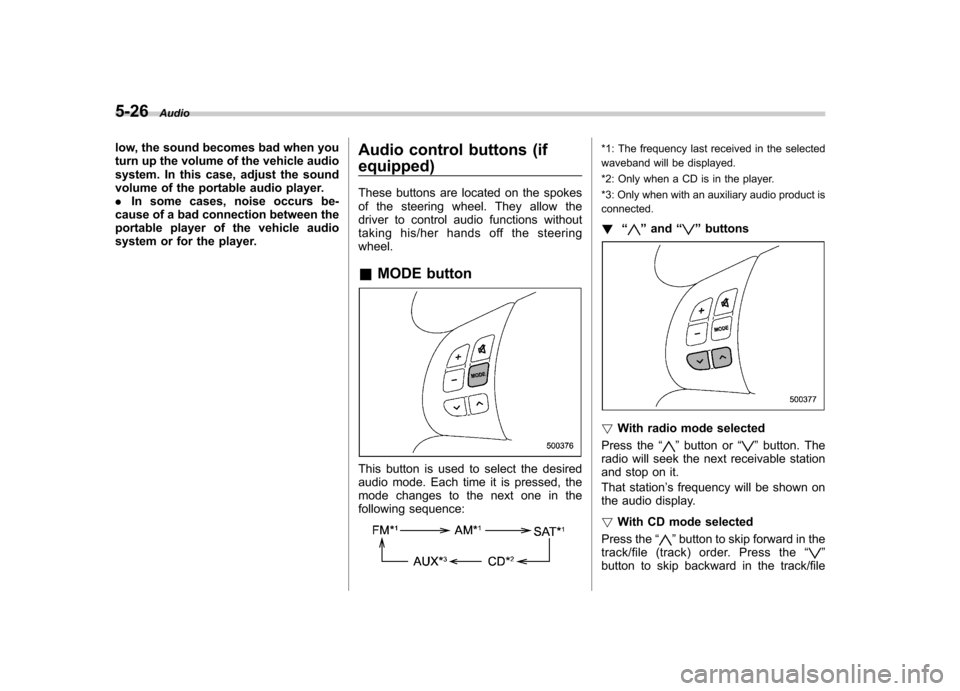
These buttons are located on the spokes
of the steering wheel. They allow the
driver to control audio functions without
taking his/her hands off the steeringwheel. &
MODE button
This button is used to select the desired
audio mode. Each time it is pressed, the
mode changes to the next one in the
following sequence:
*1: The frequency last received in the selected
waveband will be displayed.
*2: Only when a CD is in the player.
*3: Only when with an auxiliary audio product is connected. ! “
”and “”buttons
! With radio mode selected
Press the “
”button or “”button. The
radio will seek the next receivable station
and stop on it.
That station ’s frequency will be shown on
the audio display. ! With CD mode selected
Press the “
”button to skip forward in the
track/file (track) order. Press the “”
button to skip backward in the track/file
Page 242 of 444

Fuel...................................................................... 7-3
Fuel requirements ............................................... 7-3
Fuel filler lid and cap ........................................... 7-5
State emission testing (U.S. only) ...................... 7-7
Preparing to drive ............................................... 7-8
Starting the engine .............................................. 7-9
Manual transmission vehicle ................................ 7-9
Automatic transmission vehicle ........................... 7-9
Stopping the engine ........................................... 7-10
Remote engine start system (dealer option) ................................................. 7-11
Starting your vehicle .......................................... 7-11
Remote start safety features ............................... 7-11
Entering the vehicle while it is running via remote start ................................................................. 7-12
Entering the vehicle following remote engine start shutdown ......................................................... 7-12
Pre-heating or pre-cooling the interior of the vehicle ............................................................. 7-12
Service mode ..................................................... 7-12
Remote transmitter programming and programmable feature option ............................ 7-12
System maintenance .......................................... 7-13
Manual transmission –5 speeds ...................... 7-14
Shifting speeds .................................................. 7-15
Driving tips ........................................................ 7-15
Manual transmission –6 speeds (2.5GT
spec.B) ............................................................. 7-16
Selecting reverse gear ........................................ 7-16
Shifting speeds .................................................. 7-17
Driving tips ........................................................ 7-17 Automatic transmission
–4-speed ................... 7-18
Selector lever .................................................... 7-18
Selector lever reverse inhibiting function ............ 7-20
Selection of manual mode .................................. 7-21
Maximum speeds ............................................... 7-22
Driving tips ........................................................ 7-22
SPORT mode ..................................................... 7-23
Shift lock release ............................................... 7-23
Automatic transmission –5-speed ................... 7-24
Selector lever .................................................... 7-25
Selector lever reverse inhibiting function ............ 7-26
Selection of manual mode .................................. 7-27
Maximum speeds ............................................... 7-29
Driving tips ........................................................ 7-29
Shift lock release ............................................... 7-29
SI-DRIVE (Except 2.5-liter non-Turbo models) ............................................................ 7-30
Intelligent (I) mode ............................................. 7-31
Sport (S) mode .................................................. 7-31
Sport Sharp (S#) mode. ...................................... 7-32
SI-DRIVE selector .............................................. 7-32
SI-DRIVE Sport Sharp (S#) switch ...................... 7-32
Rear viscous limited slip differential (LSD) (if equipped) .................................................... 7-33
Power steering ................................................... 7-33
Braking ............................................................... 7-34
Braking tips ....................................................... 7-34
Brake system .................................................... 7-34
Disc brake pad wear warning indicators ............. 7-34
ABS (Anti-lock Brake System) .......................... 7-35
Starting and operating
7
Page 251 of 444
7-10Starting and operating
tor pedal. Release the key immediately
after the engine has started.
If the engine does not start, try the following.
(1) Turn the ignition switch to the“LOCK ”position and wait for at least
10 seconds. After checking that the
parking brake is firmly set, turn the
ignition switch to the “START ”position
while depressing the accelerator pedal
slightly (approximately a quarter of the
full stroke). Release the accelerator
pedal as soon as the engine starts.
(2) If this fails to start the engine, turn
the ignition switch back to the “LOCK ”
position and wait for at least 10
seconds. Then fully depress the accel-
erator pedal and turn the ignition
switch to the “START ”position. If the
engine starts, quickly release the
accelerator pedal.
(3) If this fails to start the engine, turn
the ignition switch again to the “LOCK ”
position. After waiting for 10 seconds
or longer, turn the ignition switch to the“ START ”position without depressing
the accelerator pedal.
(4) If the engine still refuses to start,
contact your nearest SUBARU dealer
for assistance.
6. Confirm that all warning and indicator
lights have gone out after the engine has started. The fuel injection system auto-
matically lowers the idle speed as the
engine warms up.
While the engine is warming up, make
sure that the selector lever is at the
“P ”or
“ N ”position and that the parking brake is
applied. Stopping the engine
WARNING
Do not stop the engine when the
vehicle is moving. This will cause
loss of power to the power steering
and the brake booster, making steer-
ing and braking more difficult. It
could also result in accidental acti-
vation of the “LOCK ”position on the
ignition switch, causing the steering
wheel to lock.
The ignition switch should be turned off
only when the vehicle is stopped and the
engine is idling.
Page 269 of 444
7-28Starting and operating
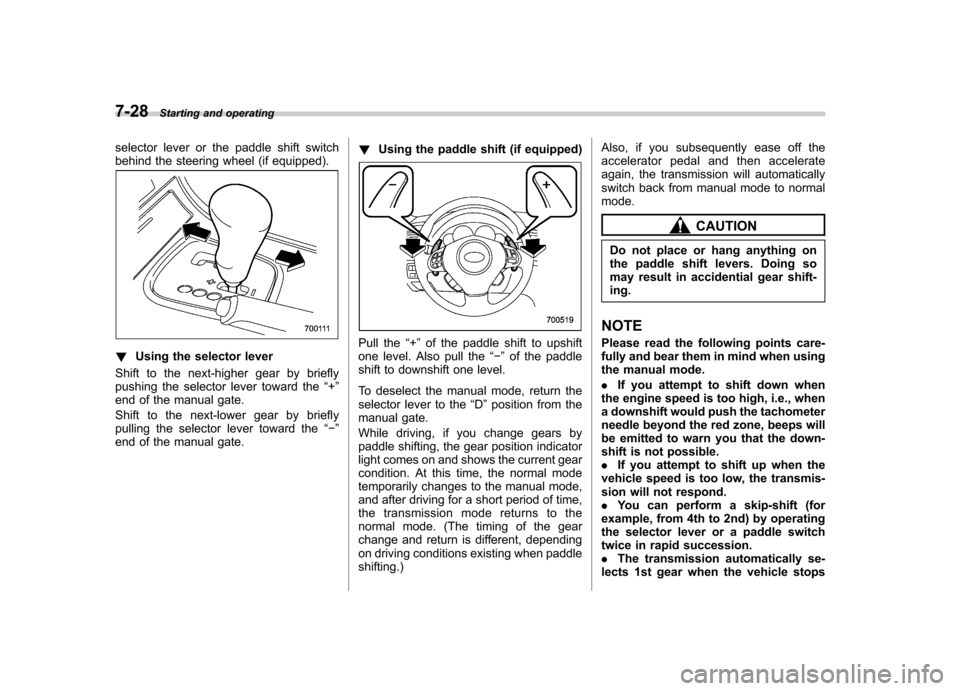
selector lever or the paddle shift switch
behind the steering wheel (if equipped).
!Using the selector lever
Shift to the next-higher gear by briefly
pushing the selector lever toward the “+ ”
end of the manual gate.
Shift to the next-lower gear by briefly
pulling the selector lever toward the “� ”
end of the manual gate. !
Using the paddle shift (if equipped)Pull the “+ ” of the paddle shift to upshift
one level. Also pull the “� ” of the paddle
shift to downshift one level.
To deselect the manual mode, return the
selector lever to the “D ”position from the
manual gate.
While driving, if you change gears by
paddle shifting, the gear position indicator
light comes on and shows the current gear
condition. At this time, the normal mode
temporarily changes to the manual mode,
and after driving for a short period of time,
the transmission mode returns to the
normal mode. (The timing of the gear
change and return is different, depending
on driving conditions existing when paddleshifting.) Also, if you subsequently ease off the
accelerator pedal and then accelerate
again, the transmission will automatically
switch back from manual mode to normalmode.
CAUTION
Do not place or hang anything on
the paddle shift levers. Doing so
may result in accidential gear shift-ing.
NOTE
Please read the following points care-
fully and bear them in mind when using
the manual mode. . If you attempt to shift down when
the engine speed is too high, i.e., when
a downshift would push the tachometer
needle beyond the red zone, beeps will
be emitted to warn you that the down-
shift is not possible.. If you attempt to shift up when the
vehicle speed is too low, the transmis-
sion will not respond.. You can perform a skip-shift (for
example, from 4th to 2nd) by operating
the selector lever or a paddle switch
twice in rapid succession.. The transmission automatically se-
lects 1st gear when the vehicle stops
Page 273 of 444
7-32Starting and operating
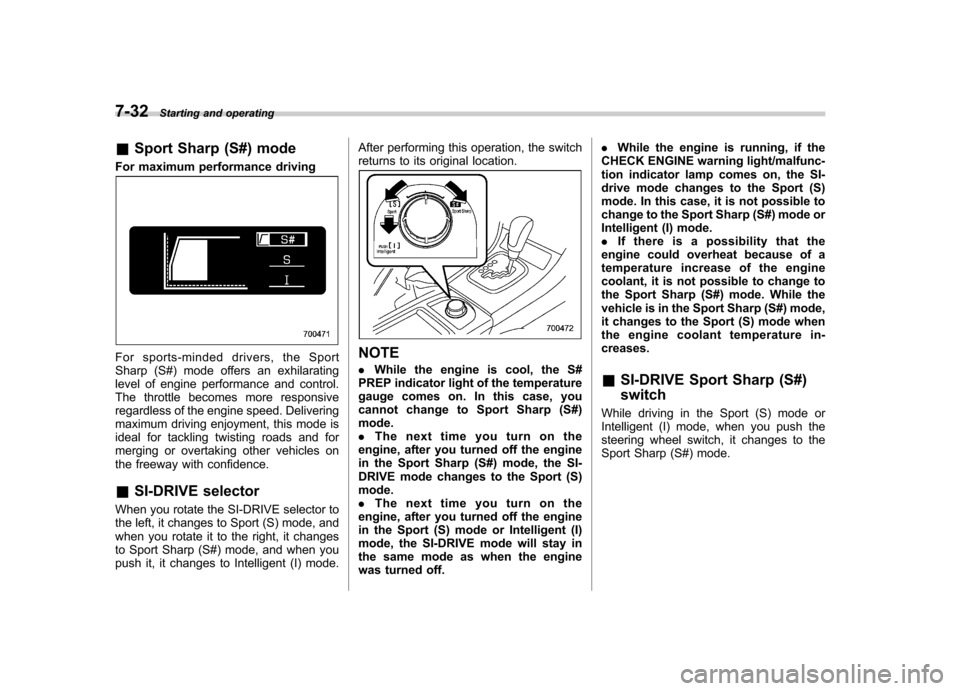
& Sport Sharp (S#) mode
For maximum performance driving
For sports-minded drivers, the Sport
Sharp (S#) mode offers an exhilarating
level of engine performance and control.
The throttle becomes more responsive
regardless of the engine speed. Delivering
maximum driving enjoyment, this mode is
ideal for tackling twisting roads and for
merging or overtaking other vehicles on
the freeway with confidence. & SI-DRIVE selector
When you rotate the SI-DRIVE selector to
the left, it changes to Sport (S) mode, and
when you rotate it to the right, it changes
to Sport Sharp (S#) mode, and when you
push it, it changes to Intelligent (I) mode. After performing this operation, the switch
returns to its original location.NOTE .
While the engine is cool, the S#
PREP indicator light of the temperature
gauge comes on. In this case, you
cannot change to Sport Sharp (S#)mode. . The next time you turn on the
engine, after you turned off the engine
in the Sport Sharp (S#) mode, the SI-
DRIVE mode changes to the Sport (S)mode.. The next time you turn on the
engine, after you turned off the engine
in the Sport (S) mode or Intelligent (I)
mode, the SI-DRIVE mode will stay in
the same mode as when the engine
was turned off. .
While the engine is running, if the
CHECK ENGINE warning light/malfunc-
tion indicator lamp comes on, the SI-
drive mode changes to the Sport (S)
mode. In this case, it is not possible to
change to the Sport Sharp (S#) mode or
Intelligent (I) mode.. If there is a possibility that the
engine could overheat because of a
temperature increase of the engine
coolant, it is not possible to change to
the Sport Sharp (S#) mode. While the
vehicle is in the Sport Sharp (S#) mode,
it changes to the Sport (S) mode when
the engine coolant temperature in-creases. & SI-DRIVE Sport Sharp (S#) switch
While driving in the Sport (S) mode or
Intelligent (I) mode, when you push the
steering wheel switch, it changes to the
Sport Sharp (S#) mode.
Page 274 of 444
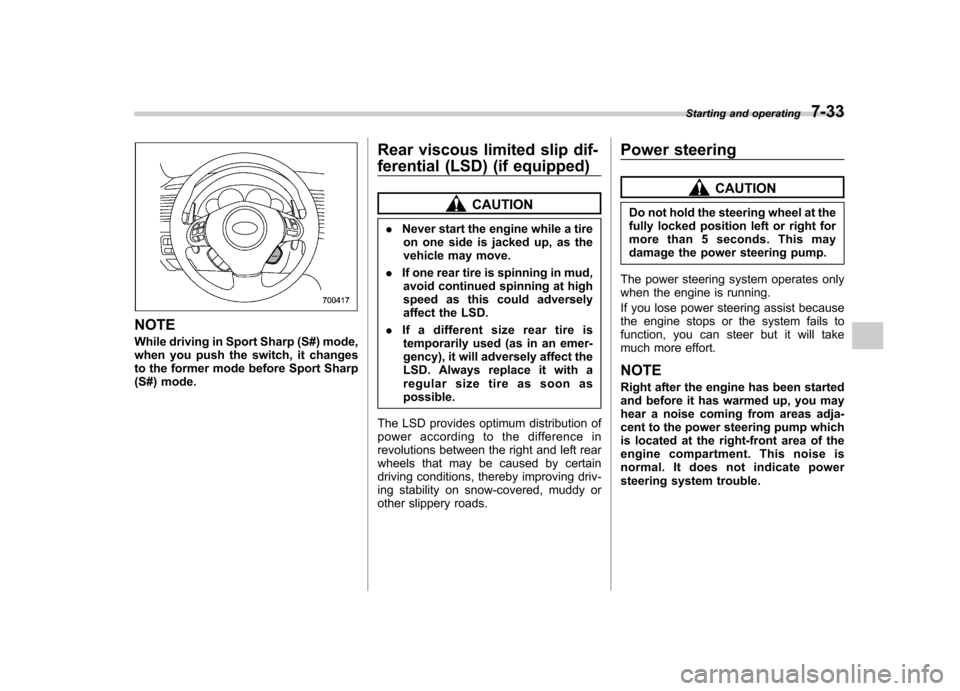
NOTE
While driving in Sport Sharp (S#) mode,
when you push the switch, it changes
to the former mode before Sport Sharp
(S#) mode.Rear viscous limited slip dif-
ferential (LSD) (if equipped)
CAUTION
. Never start the engine while a tire
on one side is jacked up, as the
vehicle may move.
. If one rear tire is spinning in mud,
avoid continued spinning at high
speed as this could adversely
affect the LSD.
. If a different size rear tire is
temporarily used (as in an emer-
gency), it will adversely affect the
LSD. Always replace it with a
regularsizetireassoonaspossible.
The LSD provides optimum distribution of
power according to the difference in
revolutions between the right and left rear
wheels that may be caused by certain
driving conditions, thereby improving driv-
ing stability on snow-covered, muddy or
other slippery roads. Power steering
CAUTION
Do not hold the steering wheel at the
fully locked position left or right for
more than 5 seconds. This may
damage the power steering pump.
The power steering system operates only
when the engine is running.
If you lose power steering assist because
the engine stops or the system fails to
function, you can steer but it will take
much more effort. NOTE
Right after the engine has been started
and before it has warmed up, you may
hear a noise coming from areas adja-
cent to the power steering pump which
is located at the right-front area of the
engine compartment. This noise is
normal. It does not indicate power
steering system trouble. Starting and operating
7-33
Page 276 of 444
ABS (Anti-lock Brake Sys- tem)
WARNING
Always use the utmost care in driving –overconfidence because
youaredrivingwithanABS
equipped vehicle could easily lead
to a serious accident.
CAUTION
. The ABS system does not always
decrease stopping distance. You
should always maintain a safe
following distance from othervehicles.
. When driving on badly surfaced
roads, gravel roads, icy road, or
over deep newly fallen snow,
stopping distances may be long-
er for a vehicle with the ABS
system than one without. When
driving under these conditions,
therefore, reduce your speed and
leave ample distance from othervehicles.
. When you feel the ABS system
operating, you should maintain constant brake pedal pressure.
Do not pump the brake pedal
since doing so may defeat the
operation of the ABS system.
The ABS system prevents the lock-up of
wheels which may occur during sudden
braking or braking on slippery road sur-
faces. This helps prevent the loss of
steering control and directional stability
caused by wheel lock-up.
When the ABS system is operating, you
may hear a chattering noise or feel a slight
vibration in the brake pedal. This is normal
when the ABS operates.
The ABS system will not operate when the
vehicle speed is below approximately 6
mph (10 km/h).
& ABS system self-check
You may feel a slight shock in the brake
pedal and hear the operating sound of
ABS from the engine compartment just
after the vehicle is started. This is caused
by an automatic functional test of the ABS
system being carried out and does not
indicate any abnormal condition. &
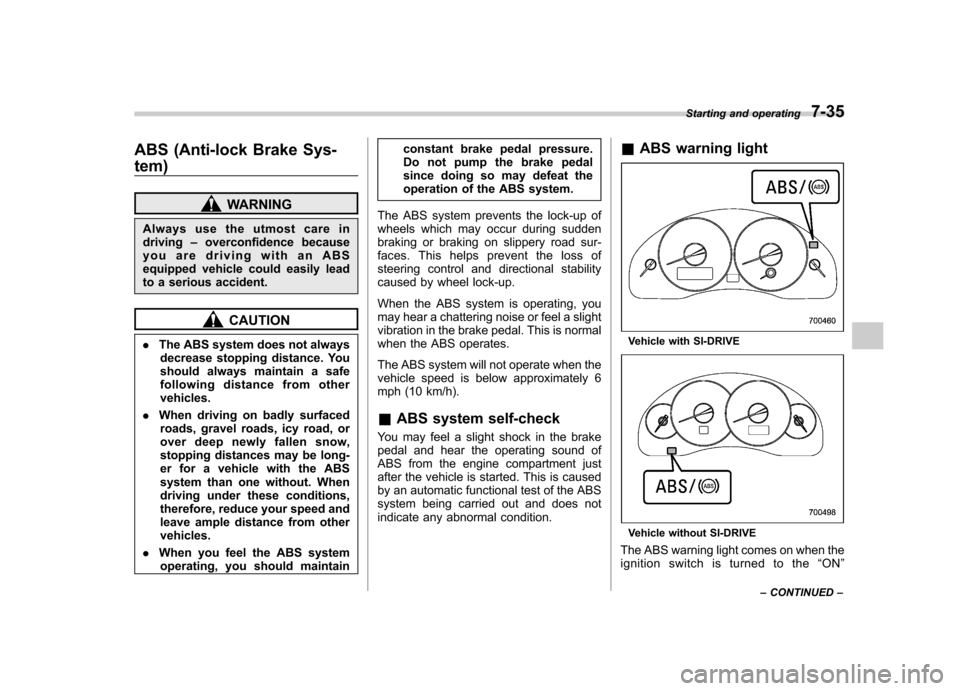
ABS warning light
Vehicle with SI-DRIVE
Vehicle without SI-DRIVE
The ABS warning light comes on when the
ignition switch is turned to the “ON ”
Starting and operating
7-35
– CONTINUED –
Page 279 of 444
7-38Starting and operating
Vehicle Dynamics Control
system (if equipped)
WARNING
Always use the utmost care in driving –overconfidence because
you are driving with a Vehicle Dy-
namics Control system equipped
vehicle could easily lead to a ser-
ious accident.
CAUTION
. Even if your vehicle is equipped
with Vehicle Dynamics Control,
winter tires or snow chains
should be used when driving on
snow-covered or icy roads; in
addition, vehicle speed should
be reduced considerably. Simply
having a Vehicle Dynamics Con-
trol system does not guarantee
that the vehicle will be able to
avoid accidents in any situation.
. Activation of the Vehicle Dy-
namics Control system is an
indication that the road being
travelled on has a slippery sur-
face; since having Vehicle Dy-
namics Control is no guarantee that full vehicle control will be
maintained at all times and under
all conditions, its activation
should be seen as a sign that
the speed of the vehicle should
be reduced considerably.
. Whenever suspension compo-
nents, steering components, or
an axle are removed from a
vehicle equipped with Vehicle
Dynamics Control, have an
authorized SUBARU dealer per-
form an inspection of that sys-tem.
. The following precautions should
be observed in order to ensure
that the Vehicle Dynamics Con-
trol system is operating properly: – All four wheels should be
fitted with tires of the same
size, type, and brand. Further-
more, the amount of wear
should be the same for all
four tires.
– Keep the tire pressure at the
proper level as shown on the
vehicle placard attached to
the driver ’s side door pillar.
– Use only the specified tem-
porary spare tire to replace a
flat tire. With a temporary spare tire, the effectiveness of
the Vehicle Dynamics Control
system is reduced and this
should be taken into account
when driving the vehicle in
such a condition.
In the event of wheelspin and/or skidding
on a slippery road surface and/or during
cornering and/or an evasive maneuver,
the Vehicle Dynamics Control system
adjusts the engine ’s output and the
wheels ’respective braking forces to help
maintain traction and directional control. . Traction Control Function
The traction control function is designed to
prevent spinning of the driving wheels on
slippery road surfaces, thereby helping to
maintain traction and directional control.
Activation of this function is shown by
steady illumination of the Vehicle Dy-
namics Control operation indicator light. . Skid Suppression Function
The skid suppression function is designed
to help maintain directional stability by
suppressing the wheels ’tendency to slide
sideways during steering operations. Acti-
vation of this function is shown by flashing
of the Vehicle Dynamics Control operation
indicator light.