2008 SUBARU OUTBACK spare wheel
[x] Cancel search: spare wheelPage 323 of 444

CAUTION
Never use any temporary spare tire
other than the original. Using other
sizes may result in severe mechan-
ical damage to the drive train of yourvehicle.
The temporary spare tire is smaller and
lighter than a conventional tire and is
designed for emergency use only. Re-
move the temporary spare tire and re-
install the conventional tire as soon as
possible because the spare tire is de-
signed only for temporary use.
Check the inflation pressure of the tem-
porary spare tire periodically to keep the
tire ready for use. The correct pressure is
60 psi (420 kPa, 4.2 kgf/cm
2) .
When using the temporary spare tire, note
the following. . Do not exceed 50 mph (80 km/h).
. Do not put a tire chain on the temporary
spare tire. Because of the smaller tire size,
a tire chain will not fit properly. . Do not use two or more temporary
spare tires at the same time.. Do not drive over obstacles. This tire
has a smaller diameter, so road clearance
is reduced.
1) Tread wear indicator bar
2) Indicator location mark
. When the wear indicator appears on
the tread, replace the tire. . The temporary spare tire must be used
only on a rear wheel. If a front wheel tire
gets punctured, replace the wheel with a
rear wheel and install the temporary spare
tire in place of the removed rear wheel.NOTE
If your vehicle is an AWD type with an
automatic transmission but is neither a
Turbo model nor a 3.0-liter model,
deactivate its All-Wheel-Drive capabil-
ity as follows: Before driving your
vehicle with the temporary spare tire,
putasparefuseinsidetheFWD
connector located in the engine com-
partment and confirm that the “
”
warning light comes on. The All-Wheel-
Drive capability of the vehicle has now
been deactivated. After re-installing the
conventional tire, remove the spare
fuse from the FWD connector in order
to reactivate All-Wheel Drive. In case of emergency
9-3
Page 324 of 444

9-4In case of emergency
Flat tires
If you have a flat tire while driving, never
brake suddenly; keep driving straight
ahead while gradually reducing speed.
Then slowly pull off the road to a safeplace. &Changing a flat tire
WARNING
. Do not jack up the vehicle on an
incline or a loose road surface.
The jack can come out of the
jacking point or sink into the
ground and this can result in a
severe accident.
. Use only the jack provided with
your vehicle. The jack supplied
with the vehicle is designed only
for changing a tire. Never get
under the vehicle while support-
ing the vehicle with this jack. .
Always turn off the engine before
raising the flat tire off the ground
using the jack. Never swing or
push the vehicle supported with
the jack. The jack can come out
of the jacking point due to a jolt
and this can result in a severeaccident.
1. Park on a hard, level surface, when-
ever possible, then stop the engine.
2. Set the parking brake securely and
shift a manual transmission vehicle in
reverse or an automatic transmission
vehicle in the “P ”(Park) position.
3. Turn on the hazard warning flasher
and have everyone get out of the vehicle.
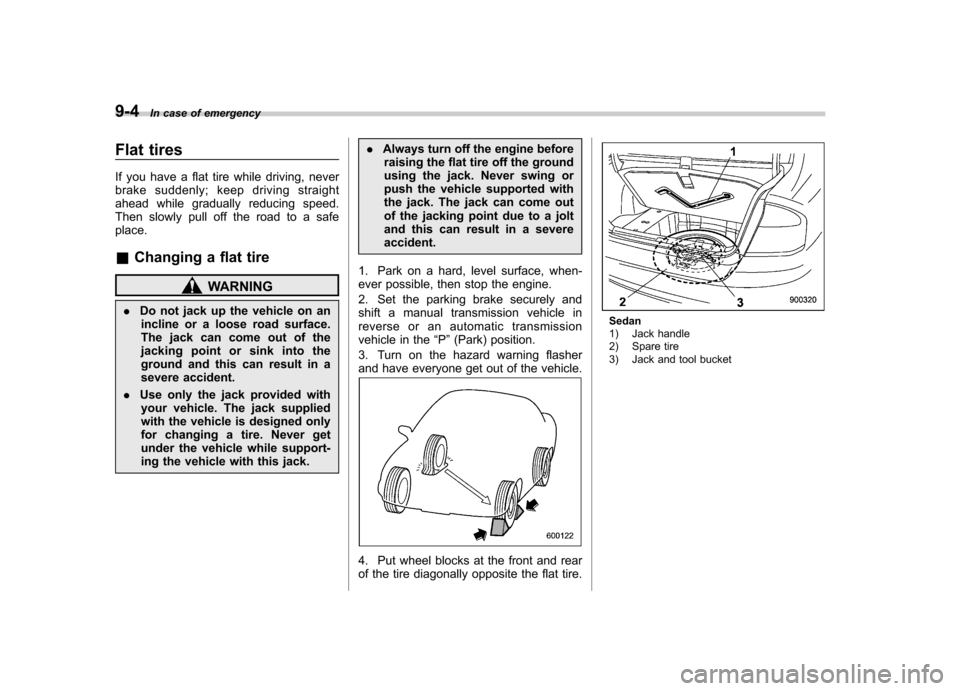
4. Put wheel blocks at the front and rear
of the tire diagonally opposite the flat tire.
Sedan
1) Jack handle
2) Spare tire
3) Jack and tool bucket
Page 325 of 444

Station wagon
1) Jack handle
2) Jack and tool bucket
3) Spare tire
5. Take out the spare tire, jack, and jack handle.
The spare tire and jack are stored under
the floor of the trunk or cargo area.
To remove the spare tire and jack,
proceed as follows: Sedan:
1. Lift the handle of the floor cover and
hook the handle onto the trunk edge.
2. Remove the jack handle from the back
of the floor cover.
3. Take out the storage tray.
4. Take out the jack and tool bucket.
1) Wheel nut wrench
2) Jack
5. Take the wheel nut wrench and jack
out of the tool bucket. In case of emergency
9-5
– CONTINUED –
Page 326 of 444

9-6In case of emergency
6. Turn the attaching bolt counterclock-
wise, then take the spare tire out.
Station wagon:
1. Open the lid and hang the hook
provided on the under side of the lid on the rear edge of the roof to keep the lidopen.
2. Remove the left-hand part of the lid
and take out the jack handle.
3. Take out the storage tray.
4. Take out the jack and tool bucket.
1) Wheel nut wrench
2) Jack
5. Take the wheel nut wrench and jack
out of the tool bucket.
Page 327 of 444

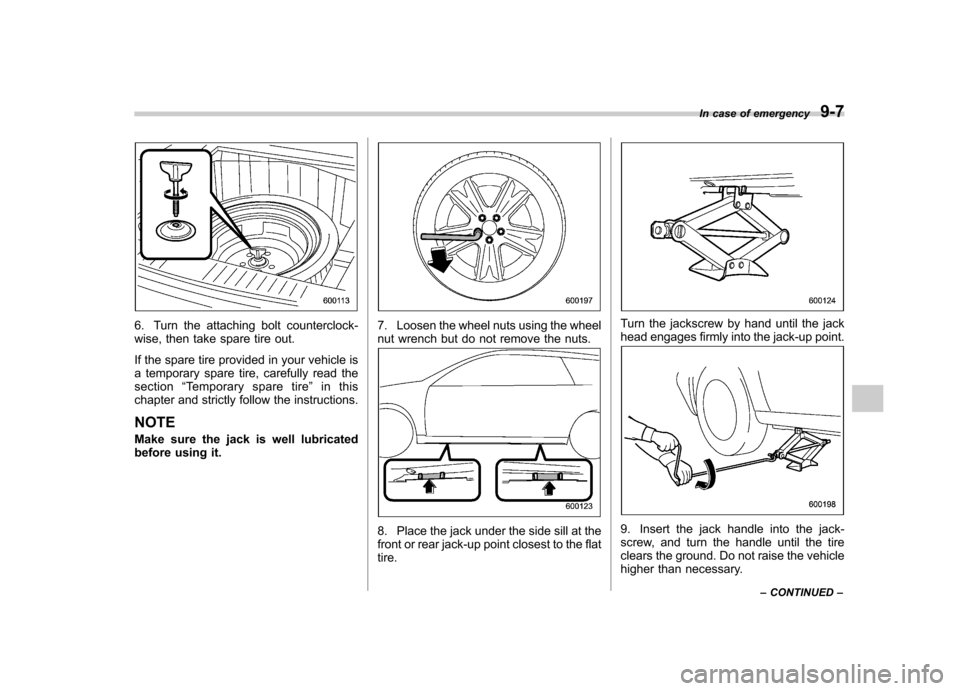
6. Turn the attaching bolt counterclock-
wise, then take spare tire out.
If the spare tire provided in your vehicle is
a temporary spare tire, carefully read thesection“Temporary spare tire ”in this
chapter and strictly follow the instructions. NOTE
Make sure the jack is well lubricated
before using it.7. Loosen the wheel nuts using the wheel
nut wrench but do not remove the nuts.
8. Place the jack under the side sill at the
front or rear jack-up point closest to the flattire.
Turn the jackscrew by hand until the jack
head engages firmly into the jack-up point.
9. Insert the jack handle into the jack-
screw, and turn the handle until the tire
clears the ground. Do not raise the vehicle
higher than necessary. In case of emergency
9-7
– CONTINUED –
Page 328 of 444

9-8In case of emergency
10. Remove the wheel nuts and the flat tire.
11. Before putting the spare tire on, clean
the mounting surface of the wheel and hub
with a cloth.
12. Put on the spare tire. Replace the wheel nuts. Tighten them by hand.
WARNING
Do not use oil or grease on the
wheel studs or nuts when the spare
tire is installed. This could cause the
nuts to become loose and lead to anaccident.
13. Turn the jack handle counterclockwise
to lower the vehicle.
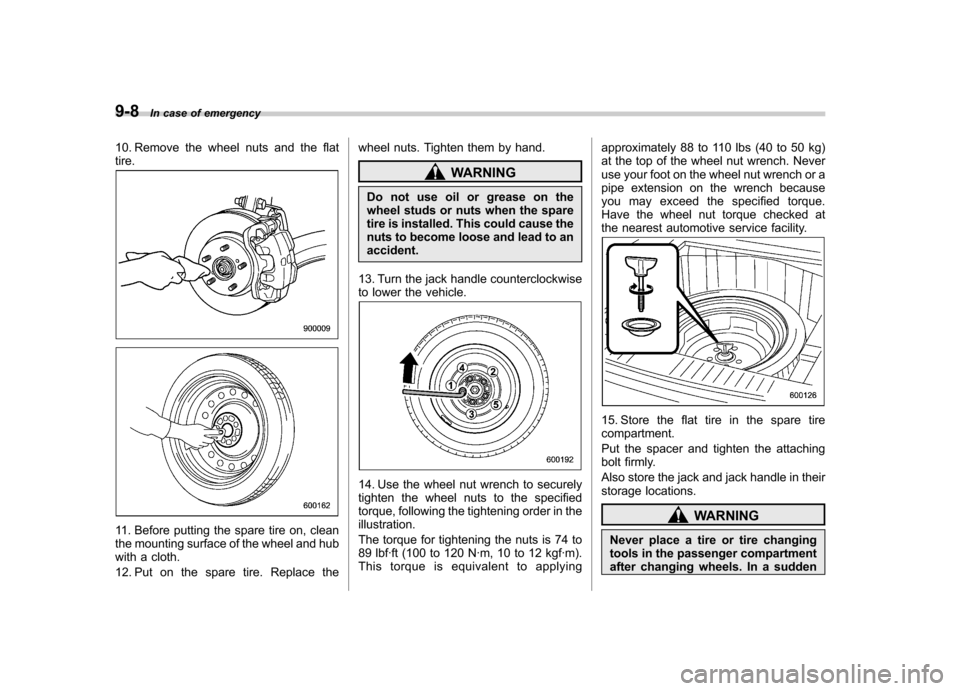
14. Use the wheel nut wrench to securely
tighten the wheel nuts to the specified
torque, following the tightening order in the illustration.
The torque for tightening the nuts is 74 to
89 lbf·ft (100 to 120 N·m, 10 to 12 kgf·m).
This torque is equivalent to applying approximately 88 to 110 lbs (40 to 50 kg)
at the top of the wheel nut wrench. Never
use your foot on the wheel nut wrench or a
pipe extension on the wrench because
you may exceed the specified torque.
Have the wheel nut torque checked at
the nearest automotive service facility.
15. Store the flat tire in the spare tire compartment.
Put the spacer and tighten the attaching
bolt firmly.
Also store the jack and jack handle in their
storage locations.
WARNING
Never place a tire or tire changing
tools in the passenger compartment
after changing wheels. In a sudden
Page 329 of 444

stop or collisions, loose equipment
could strike occupants and cause
injury. Store the tire and all tools in
the proper place.
& Tire pressure monitoring
system (TPMS) (if equipped)
Vehicle with SI-DRIVE
Vehicle without SI-DRIVE
The tire pressure monitoring system pro-
vides the driver with the warning message
indicated by sending a signal from a
sensor that is installed in each wheel
when tire pressure is severely low.
The tire pressure monitoring system will
activate only when the vehicle is driven.
Also, this system may not react immedi-
ately to a sudden drop in tire pressure (for
example, a blow-out caused running over
a sharp object).
WARNING
If the low tire pressure warning light
comes on while driving, never brake
suddenly and keep driving straight
ahead while gradually reducing speed. Then slowly pull off the road
to a safe place. Otherwise an acci-
dent involving serious vehicle da-
mage and serious personal injury
could occur.
Check the pressure for all four tires
and adjust the pressure to the COLD
tire pressure shown on the vehicle
placard on the door pillar on thedriver
’s side. If this light still comes
on while driving after adjusting the
tire pressure, a tire may have sig-
nificant damage and a fast leak that
causes the tire to lose air rapidly. If
you have a flat tire, replace it with a
spare tire as soon as possible.
When a spare tire is mounted or a
wheel rim is replaced without the
original pressure sensor/transmitter
being transferred, the low tire pres-
sure warning light will illuminate
steadily after blinking for approxi-
mately one minute. This indicates
the TPMS is unable to monitor all
four road wheels. Contact your
SUBARU dealer as soon as possible
for tire and sensor replacement and/
or system resetting.
Do not inject any tire liquid or
aerosol tire sealant into the tires,
as this may cause a malfunction of
the tire pressure sensors. In case of emergency
9-9
– CONTINUED –
Page 382 of 444

11-36Maintenance and service
serious vehicle damage and serious
personal injury could occur.
If this light still comes on while
driving after adjusting the tire pres-
sure, a tire may have significant
damage and a fast leak that causes
the tire to lose air rapidly. If you have
a flat tire, replace it with a spare tire
as soon as possible.
When a spare tire is mounted or a
wheel rim is replaced without the
original pressure sensor/transmitter
being transferred, the low tire pres-
sure warning light will illuminate
steadily after blinking for approxi-
mately one minute. This indicates
the TPMS is unable to monitor all
four road wheels. Contact your
SUBARU dealer as soon as possible
for tire and sensor replacement and/
or system resetting. If the light
illuminates steadily after blinking
for approximately one minute,
promptly contact a SUBARU dealer
to have the system inspected.
& Tire inspection
Check on a daily basis that the tires are
free from serious damage, nails, and
stones. At the same time, check the tires for abnormal wear.
Contact your SUBARU dealer immedi-
ately if you find any problem.
NOTE . When the wheels and tires strike
curbs or are subjected to harsh treat-
ment as when the vehicle is driven on a
rough surface, they can suffer damage
that cannot be seen with the naked eye.
This type of damage does not become
evident until time has passed. Try not
to drive over curbs, potholes or on
other rough surfaces. If doing so is
unavoidable, keep the vehicle ’s speed
down to a walking pace or less, and
approach the curbs as squarely as
possible. Also, make sure the tires are
not pressed against the curb when you
park the vehicle.. If you feel unusual vibration while
driving or find it difficult to steer the
vehicle in a straight line, one of the
tires and/or wheels may be damaged.
Drive slowly to the nearest authorized
SUBARU dealer and have the vehicleinspected.
& Tire pressures and wear
Maintaining the correct tire pressures
helps to maximize the tires ’service lives
and is essential for good running perfor- mance. Check and, if necessary, adjust
the pressure of each tire (including the
spare) at least once a month (for example,
during a fuel stop) and before any long
journey.
Check the tire pressures when the tires
are cold. Use a pressure gauge to adjust
the tire pressures to the values shown on
the tire placard. The tire placard is located
on the door pillar on the driver
’s side.
Driving even a short distance warms up
the tires and increases the tire pressures.
Also, the tire pressures are affected by the
outside temperature. It is best to check tire
pressure outdoors before driving thevehicle.
When a tire becomes warm, the air inside
it expands, causing the tire pressure to