2008 SKODA FABIA wheel
[x] Cancel search: wheelPage 104 of 252

Automatic gearbox103
Using the systemSafetyDriving TipsGeneral MaintenanceBreakdown assistanceTechnical Data
•When the engine is running and the vehicle is stationary, it is necessary to hold the car with the brake pedal in all the positions of the selector lever (except P and N) since the power transmission is never completely inter-rupted, also not when the engine is idling - the vehicle "creeps".
Selector lever positions
The selector lever position you have engaged is shown in the information display of the instrument cluster with the corresponding gear symbol highlighted
⇒fig. 119. In the positions D and S the gear you have already engaged will be addi-tionally displayed on the display.
P - Parklock
The driven wheels are locked mechanically in this position.
The Parklock must only be engaged when the vehicle is stationary ⇒.
If you wish to move the selector lever into or out of this position, you must press the Shiftlock button in the handle of the selector lever and at the same time depress the brake pedal.
R - Reverse
Reverse gear must only be engaged when the vehicle is stationary and the engine idling ⇒.
The brake pedal must be depressed and at the same time the Shiftlock must be pressed, if you wish to obtain the selector lever positions R, P or N.
When the ignition is switched on and the selector lever is in position R, the reverse lights will come on.
N - Neutral
The transmission is in Neutral in this position.
The brake pedal must be depressed (if the lever is in its position for longer than 2 seconds) in order to move the selector lever out of the position N into the position D, with the ignition switched on, on a vehicle travelling at less than 5 km/hour or on a stationary vehicle.
The brake pedal must be depressed (if the lever is in its position for longer than 2 seconds) in order to move the selector lever out of the position N into the position R, with the ignition switched on, on a vehicle travelling at less than 5 km/hour or on a stationary vehicle.
D - Drive, position for driving forward
When the selector lever is in this position, the forward gears are shifted up and down automatically in line with engine load, vehicle speed and the dynamic shift programme.
You must depress the brake pedal if you wise to move into position D from N when the vehicle is travelling at less than 5 km/hour or is stationary ⇒.
WARNING (continued)
Fig. 118 Selector lever
Fig. 119 Information display: Selector lever posi-tions
NKO A05F 20.book Page 103 Wednesday, April 2, 2008 1:02 PM
Page 106 of 252

Automatic gearbox105
Using the systemSafetyDriving TipsGeneral MaintenanceBreakdown assistanceTechnical Data
or several gears in line with the driving state and the vehicle accelerates. The gearbox does not shift up into the highest gear until the engine has reached its maximum revolutions for this gear range.
WARNING
Please note that using the kickdown function can result in the driven wheels spinning on a smooth or slippery road surface - risk of skidding!
Dynamic shift programme
The automatic gearbox of your vehicle is controlled electronically. Shifting up and down through the gears is performed automatically on the basis of pre-defined driving programmes.
Adopting a moderate style of driving will cause the gearbox to select the most economical driving programme. Shifting up into a higher gear as soon as possible and shifting down as late as possible will have a favourable effect on your fuel consumption.
Adopting a sporty style of driving with rapid movements of the accelerator pedal combined with sharp acceleration and frequent changes in speed, exploiting the top speed of the car or depressing the accelerator pedal (kickdown function), will cause the gearbox to switch over to this style of driving and shift down earlier with frequent changes in gears in comparison to the moderate style of driving.
Selecting the most appropriate driving programme for the particular style of driving is a continuous process. Irrespective of this it is, however, possible to switch or shift down into a dynamic shift programme by depressing the accelerator rapidly. The gearbox shifts down into a lower gear matching the speed of the car and this allows you to accelerate rapidly (e.g. when overtaking) without having to depress the accelerator pedal fully into the kickdown range. The original programme will be reactivated to match your particular style of driving once the gearbox has shifted up again.
When driving in hilly regions, the gears are selected to match uphill and downhill sections. This avoids the gearbox frequently shifting up and down when negotiating an uphill stretch. When driving downhill, it is possible to shift down into the Tiptronic position, in order to exploit the engine brake torque.
Tiptronic
The Tiptronic allows the driver to also shift gears manually.
Switching over to manual shifting
– Push the selector lever to the right out of position D. As soon as the
gearbox has switched over, 6 5 4 3 2 1 appears in the display, with the
gear engaged being highlighted.
Shifting up gears
– One-touch forward of the selector lever (in the Tiptronic position)
⇒fig. 120 .
Fig. 120 Selector lever: Manual shifting of gears
Fig. 121 Information display: Manual shifting of gears
A+
NKO A05F 20.book Page 105 Wednesday, April 2, 2008 1:02 PM
Page 108 of 252
Communication107
Using the systemSafetyDriving TipsGeneral MaintenanceBreakdown assistanceTechnical Data
Communication
Operating the radio
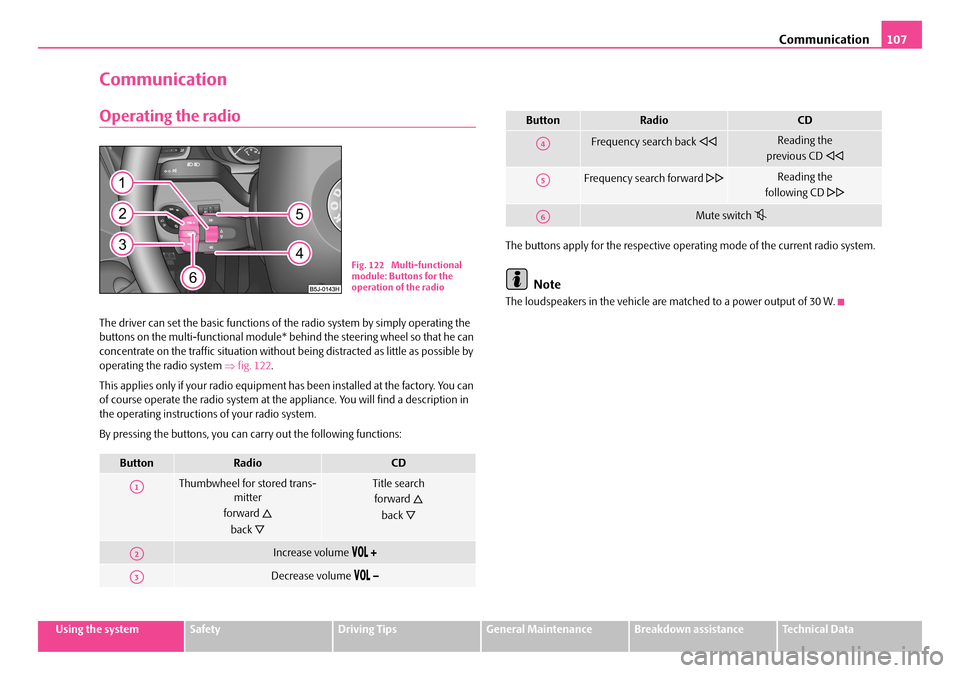
The driver can set the basic functions of the radio system by simply operating the buttons on the multi-functional module* behind the steering wheel so that he can concentrate on the traffic situation without being distracted as little as possible by operating the radio system ⇒fig. 122.
This applies only if your radio equipment has been installed at the factory. You can of course operate the radio system at the appliance. You will find a description in the operating instructions of your radio system.
By pressing the buttons, you can carry out the following functions:
The buttons apply for the respective operating mode of the current radio system.
Note
The loudspeakers in the vehicle are matched to a power output of 30 W.
ButtonRadioCD
Thumbwheel for stored trans-mitter
forward
back
Title search
forward
back
Increase volume
Decrease volume
Fig. 122 Multi-functional module: Buttons for the operation of the radio
A1
A2
A3
Frequency search back Reading the
previous CD
Frequency search forward Reading the
following CD
Mute switch
ButtonRadioCD
A4
A5
A6
NKO A05F 20.book Page 107 Wednesday, April 2, 2008 1:02 PM
Page 109 of 252

Communication108
Radio and mobile phone operation
The driver can set the basic functions of the radio and telephone system by simply operating the buttons on the multi-functional module* behind the steering wheel so that he can concentrate on the traffic situation without being distracted as little as possible by operating the radio system ⇒fig. 123.
This applies only if your radio and mobile phone equipment has been installed at the factory. You can of course operate the radio and mobile system at the appliance. You will find a description in the operating instructions of your radio system.
By pressing the buttons, you can carry out the following functions:
The buttons apply for the respective operating mode of the current radio system.Note
The operation of the mobile phone fitted with multi-functional module* is only possible on certain models of mobile phone. More detailed information is available from your Škoda Service Partner.
Fig. 123 Multi-functional module: Buttons for the radio and mobile phone operation
ButtonRadioCDPhone
Thumbwheel for stored transmitter
forward
back
Title search
forward
back
Scroll through with the aid of the thumbwheel
Increase volume
Decrease volume
Switching over between radio system and mobile phone
without functionReceive, accept a call, call up menu telephone,
confirm menu selection / /
without functionActivation/deactivation button for voice control
(button PTT)
A1
A2
A3
A4
A5
A6
NKO A05F 20.book Page 108 Wednesday, April 2, 2008 1:02 PM
Page 110 of 252

Communication109
Using the systemSafetyDriving TipsGeneral MaintenanceBreakdown assistanceTechnical Data
Universal telephone preinstallation with voice
control*
The voice control is activated according to equipment installed on the vehicle by pressing the button PTT (push to talk) on the adapter ⇒fig. 124 or the button on the multi-functional module* ⇒page 108.
A phone phonebook is part of the mobile phone preinstallation with voice control. In the phone phonebook there are 1500 free memory locations available. This phone phonebook can be used in line with the mobile telephone.
For vehicles fitted with multi-functional module*, the operation is performed via the function buttons on the module ⇒page 108.
Furthermore the volume can be changed individually at any time with the button for setting the radio or on vehicles fitted with multi-functional module* with func-tion buttons on the steering wheel.
If the system answers with the voice response “Telephone is not ready”, please check the operating state of the telephone as follows:
•Is the telephone switched on?
•Is the PIN code entered?
Dialogue
The period, in which the telephone system is ready to receive voice commands and carry out the voice commands, is called DIALOGUE. The system gives audible feed-
back and guides you if necessary through the relevant functions. You can start or end the dialogue at any time by pressing the PTT button. You can also end the dialogue with the voice command CANCEL.
The dialogue is always automatically ended after carrying out an operation, e.g. after erasing the name from the phonebook.
The dialogue of the incoming call is immediately interrupted and you can accept the call by pressing the button .
If a voice command is not detected, the system answers with “Sorry?” and a new entry can be performed. After the 3rd error the answer “Cancel” is given and the dialogue is ended.
Optimum understanding of the voice commands depends on the following factors:
•Speak with a normal tone of voice without intonation and excessive voice pauses.
•Avoid insufficient articulation.
•Close the doors, windows and sliding roof, in order to reduce or stop disturbing exterior noise.
•It is recommended to speak louder at higher speeds, so that the tone of your voice is louder than the increased surrounding noise.
•During the dialogue avoid additional noise in the vehicle, e.g. simultaneously talking occupants.
•Do not speak, if the system makes an announcement.
•The microphone for voice control is directed to the driver and front passenger. Therefore the driver and the front passenger can operate the equipment.
WARNING
Pay attention primarily to the traffic situation! As the driver you are fully responsible for road safety. Use the telephone system only to such an extent, so that you are in full control of your vehicle at any time.
Fig. 124 Button for switching on the voice control
NKO A05F 20.book Page 109 Wednesday, April 2, 2008 1:02 PM
Page 112 of 252
Communication111
Using the systemSafetyDriving TipsGeneral MaintenanceBreakdown assistanceTechnical Data
When inserting the mobile phone the next time only perform an update of the rele-vant phone book. The updating takes a few minutes, first of all the last read phone-book appears on the information display. Newly stored telephone numbers are only shown after the updating has ended.
The telephone numbers are loaded from the mobile phone depending on the memory date, beginning with the oldest entry. If the number of telephone numbers exceed 1 500, the newly stored telephone numbers are not loaded from the mobile phone. If several telephone numbers in the phonebook are under one name, all the telephone numbers with the same name are loaded separately.
If a telephone event (e.g. incoming or outgoing call, dialogue of the voice control) occurs during the updating procedure, the updating is interrupted. After the tele-phone event has ended, the updating starts anew.
The following is shown one after the other on the display:
PLEASE WAIT
LOADING... LAST CALLS
LOADING... ACCEPTED CALLS
LOADING... MISSED CALLS
LOADING... PHONE BOOK
After loading is completed, phone book, last calls, accepted calls, missed calls and memory appear in the display.
Using the system
•You can scroll through the telephone memory for individual names or menus by slowly turning the thumbwheel ⇒page 110, fig. 126.
•You can scroll through from A to Z or from Z to A within the telephone memory by slowly turning the thumbwheel downwards or upwards.
•You can always return to one level higher in the menu of the information display by pressing the button at the top for a lengthy period.
•The selected menu is displayed by briefly pressing the button .
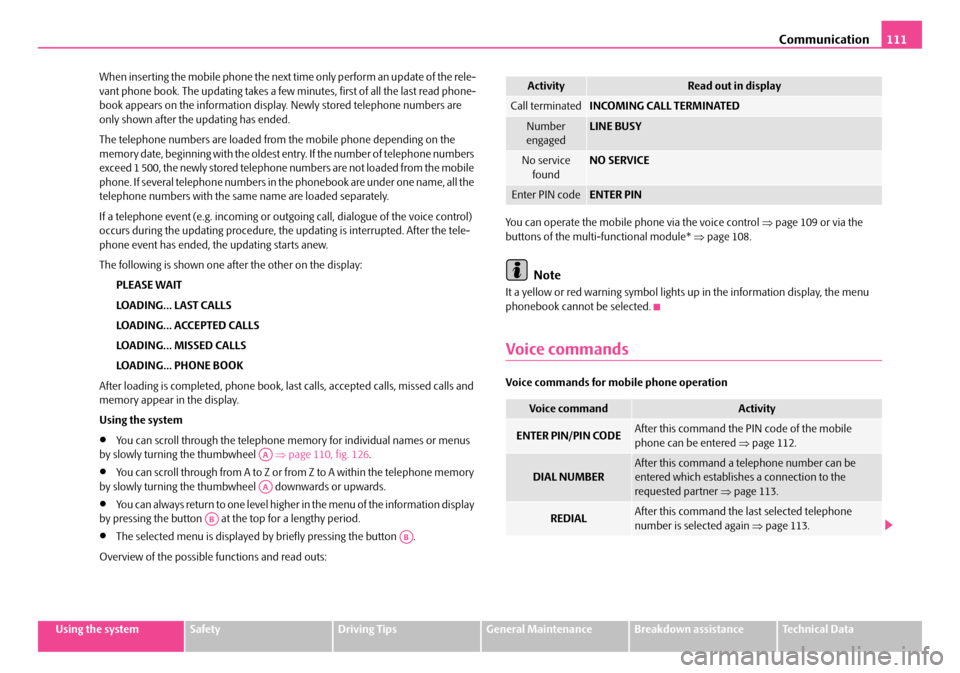
Overview of the possible functions and read outs:
You can operate the mobile phone via the voice control ⇒page 109 or via the buttons of the multi-functional module* ⇒page 108.
Note
It a yellow or red warning symbol lights up in the information display, the menu phonebook cannot be selected.
Voice commands
Voice commands for mobile phone operation
AA
AA
AB
AB
ActivityRead out in display
Call terminatedINCOMING CALL TERMINATED
Number engagedLINE BUSY
No service foundNO SERVICE
Enter PIN codeENTER PIN
Voice commandActivity
ENTER PIN/PIN CODEAfter this command the PIN code of the mobile phone can be entered ⇒page 112.
DIAL NUMBERAfter this command a telephone number can be entered which establishes a connection to the requested partner ⇒page 113.
REDIALAfter this command the last selected telephone number is selected again ⇒page 113.
NKO A05F 20.book Page 111 Wednesday, April 2, 2008 1:02 PM
Page 123 of 252

Passive Safety122
Before setting off
The driver is always fully responsible for his occupants and for the
operating safety of the vehicle.
For your own safety and the safety of the people travelling with you, please pay attention to the following points before setting off.
•Ensure that the lighting and the turn signal system are functioning properly.
•Inspect the tyre inflation pressure.
•Ensure that all the windows offer a good visibility to the outside.
•Safely attach the items of luggage ⇒page 61, “Loading the luggage compart-ment”.
•Ensure that no objects can obstruct the pedal.
•Adjust the mirror, the front seat and the head restraint to match your body size.
•Point out to your occupants that the head restraints must be adjusted to match their body size.
•Protect the children in suitable child seats with correctly fastened seat belts ⇒page 142, “Transporting children safely”.
•Adopt the correct seated position. Also inform your occupants to adopt the correct seated position.
•Fasten the seat belt correctly. Also inform your occupants to properly fasten the seat belts ⇒page 128, “How are seat belts correctly fastened?”.
What influences the driving safety?
The driving safety is primarily determined by the style of driving and
the personal behaviour of all the occupants.
The driver is fully responsible for himself and his occupants. If your driving safety is effected, you place yourself and the oncoming traffic at risk. Please refer to the following guidelines.
•Do not get distracted from concentrating on the traffic situation, e.g. by your occupants or mobile phone calls.
•Never drive when your driving ability is impaired, e.g. through medication, alcohol, drugs.
•Keep to the traffic regulations and the permissible speed limit.
•Adjust the driving speed at all times to the road condition as well as to the traffic and weather conditions.
•Take regular breaks on long journeys - at the latest every two hours.
Correct seated position
Correct seated position for the driver
Correct seated position for the driver is important for safe and
relaxed driving.
Fig. 128 The correct distance of the driver from the steering wheel
NKO A05F 20.book Page 122 Wednesday, April 2, 2008 1:02 PM
Page 124 of 252

Passive Safety123
Using the systemSafetyDriving TipsGeneral MaintenanceBreakdown assistanceTechnical Data
For your own safety and to reduce the risk of injury in the event of an accident, we recommend the following setting.
•Adjust the steering wheel so that the distance between the steering wheel and your chest is at least 25 cm ⇒page 122, fig. 128.
•Position the driver seat in the forward/back direction so that you are able to press the pedals with your legs at a slight angle .
•Adjust the backrest so that you are able to reach the highest point of the steering wheel with your arms at a slight angle.
•Adjust the head restraint so that the top edge of the head restraint is at the same level as the upper part of your head ⇒fig. 129.
•Fasten the seat belt correctly ⇒page 128, “How are seat belts correctly fastened?”.
Driver seat adjustment ⇒page 56, “Adjusting the front seats”.
WARNING
•The front seats and the head restraints must always be adjusted to match the body size of the seat occupant as well as the seat belts must always be correctly fastened in order to provide an optimal protection for you and your occupants.
•The driver must maintain a distance of at least 25 cm to the steering wheel ⇒page 122, fig. 128. Not maintaining this minimum distance will
mean that the airbag system will not be able to properly protect you - hazard!
•When driving, hold the steering wheel with both hands firmly on the outer edge in the 9 o'clock and 3 o'clock position. Never hold the steering wheel firmly in the 12 o'clock position or in another way (e.g. in the middle of the steering wheel or at the inner steering wheel edge). In such cases, injuries to the arms, the hands and the head can occur when the driver airbag is deployed.
•Ensure that there are no objects in the footwell as any objects may get behind the pedals during a driving or braking manoeuvre. You would then no longer be able to operate the clutch, to brake or accelerate.
Correct seated position for the front passenger
The front passenger must maintain a distance of at least 25 cm from
the dash panel so that the airbag offers the greatest possible safety
when an airbag is deployed.
For the safety of the front passenger and to reduce the risk of injury in the event of an accident, we recommend the following setting.
•Adjust the front passenger seat as far as possible to the rear.
•Adjust the head restraint so that the top edge of the head restraint is at the same level as the upper part of your head ⇒fig. 129.
•Fasten the seat belt correctly ⇒page 128, “How are seat belts correctly fastened?”.
In exceptional cases the front passenger airbag can be deactivated ⇒page 139, “Deactivating an airbag”.
Adjusting the passenger seat ⇒page 56, “Adjusting the front seats”.
WARNING
•The front seats and the head restraints must always be adjusted to match the body size of the seat occupant as well as the seat belts must always be
Fig. 129 The correct head restraint adjustment for the driver
WARNING (continued)
NKO A05F 20.book Page 123 Wednesday, April 2, 2008 1:02 PM