2008 Seat Altea XL lights
[x] Cancel search: lightsPage 193 of 317

Driving and the environment191
Safety First
Operating instructions
Tips and Maintenance
Te c h n i c a l D a t a
•
In some countries it is possible that a vehicle model is sold under condi-
tions where some spare parts are not available or that the Authorised Service
Centres may only carry out limited repairs.
SEAT importers and distributors will gladly provide information about the
technical preparation of your vehicle in addition to necessary maintenance
and repair possibilities.
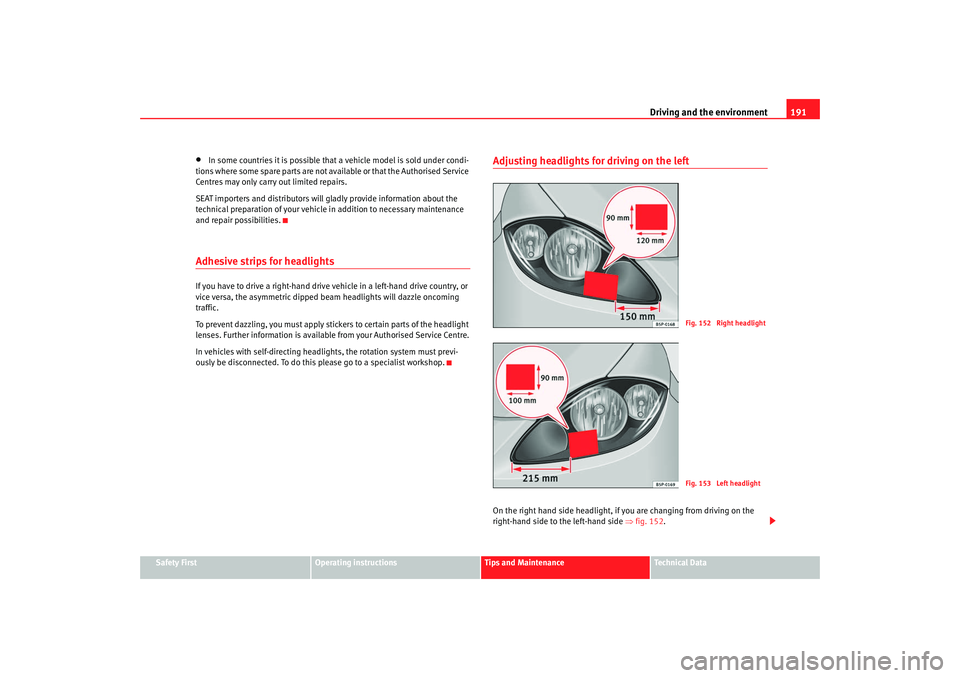
Adhesive strips for headlightsIf you have to drive a right-hand drive vehicle in a left-hand drive country, or
vice versa, the asymmetric dipped beam headlights will dazzle oncoming
traffic.
To prevent dazzling, you must apply stickers to certain parts of the headlight
lenses. Further information is available from your Authorised Service Centre.
In vehicles with self-directing headlights, the rotation system must previ-
ously be disconnected. To do this please go to a specialist workshop.
Adjusting headlights for driving on the leftOn the right hand side headlight, if you are changing from driving on the
right-hand side to the left-hand side ⇒ fig. 152.
Fig. 152 Right headlightFig. 153 Left headlight
altea_XL ingles.book Seite 191 Donnerstag, 13. September 2007 10:36 10
Page 194 of 317

Driving and the environment
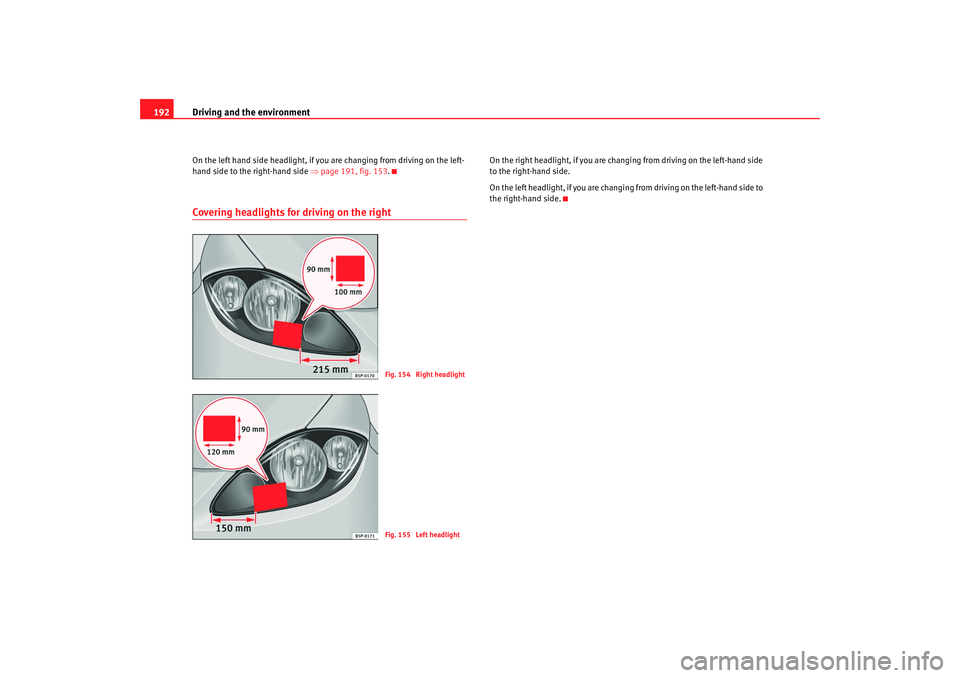
192On the left hand side headlight, if you are changing from driving on the left-
hand side to the right-hand side ⇒page 191, fig. 153 .Covering headlights for driving on the right
On the right headlight, if you are changing from driving on the left-hand side
to the right-hand side.
On the left headlight, if you are changi ng from driving on the left-hand side to
the right-hand side.
Fig. 154 Right headlightFig. 155 Left headlight
altea_XL ingles.book Seite 192 Donnerstag, 13. September 2007 10:36 10
Page 195 of 317

Driving and the environment193
Safety First
Operating instructions
Tips and Maintenance
Te c h n i c a l D a t a
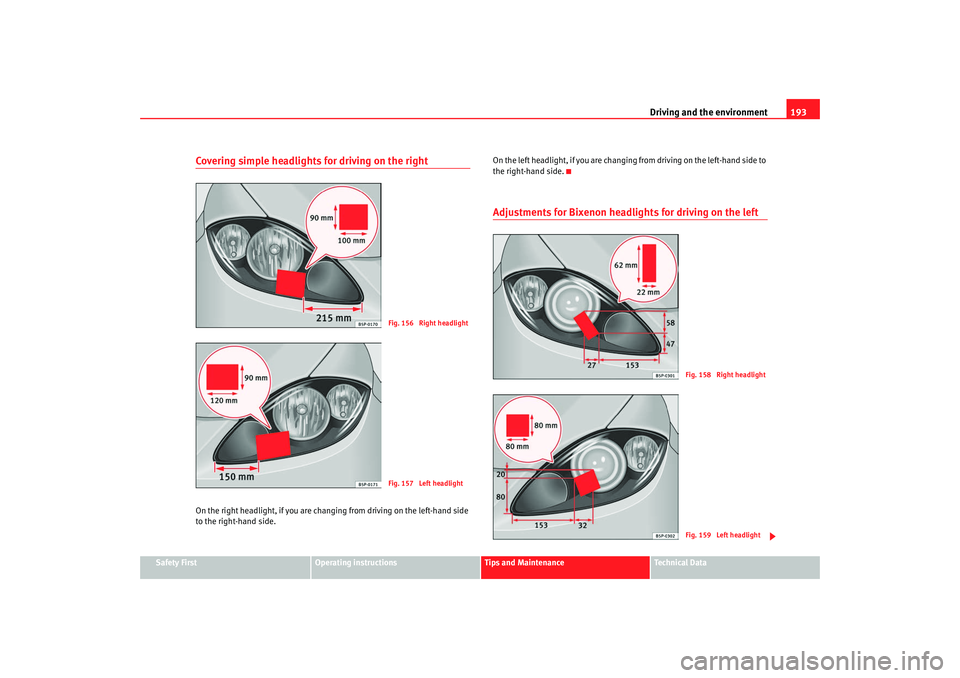
Covering simple headlights for driving on the rightOn the right headlight, if you are changing from driving on the left-hand side
to the right-hand side. On the left headlight, if you are changing from driving on the left-hand side to
the right-hand side.
Adjustments for Bixenon headlights for driving on the left
Fig. 156 Right headlightFig. 157 Left headlight
Fig. 158 Right headlightFig. 159 Left headlight
altea_XL ingles.book Seite 193 Donnerstag, 13. September 2007 10:36 10
Page 196 of 317

Driving and the environment
194On the right hand side headlight, if you are changing from driving on the
right-hand side to the left-hand side ⇒page 193, fig. 158.
On the left hand side headlight, if you are changing from driving on the left-
hand side to the right-hand side ⇒page 193, fig. 159 .Driving economically and with respect for the
environmentGeneral ObservationsFuel consumption, environmental pollution and wear to the engine, brakes
and tyres depends in large part on your driving style. Fuel consumption may
be reduced from 10 to 15 % by driving defensively and economically. Below
we will give you some suggestions to "alleviate" some of the strain in the
environment and, at the same time, your wallet.
Anticipate the traffic situation well in advance
A vehicle uses most fuel when accelerating. When you anticipate the situa-
tion, you will have to brake less often and, thus, accelerate less. If it is
possible, let the vehicle roll with a gear engaged, for example, if you see a red
light ahead.
Change gear early to save energy
An effective way of saving fuel is to change up quickly through the gears.
Running the engine at high rpm in the lower gears uses an unnecessary
amount of fuel.
Manual gearbox: Change from first to second gear as quickly as possible. We
recommend that, whenever possible, you change to a higher gear upon
reaching 2,000 rpms.
Automatic gearbox: Accelerate slowly and avoid the “kick-down” position. Avoid driving at high speed
We advise you not to drive at the top speed permitted by the vehicle. Fuel
consumption, exhaust emissions and noise levels all increase very rapidly at
higher speeds. Driving at moderate speeds will help to save fuel.
Avoid idling
It is worthwhile switching off the engine when waiting in a traffic jam, at level
crossings or at traffic lights with a long red phase. The fuel saved after only
30 - 40 seconds is greater than the amount of fuel needed to restart the
engine.
The engine takes a very long time to
warm up when it is running at idling
speed. Mechanical wear and pollutant emissions are also especially high
during this initial warm-up phase. It is therefore best to drive off immediately
after starting the engine . Avoid running the engine at high speed.
Periodic maintenance
Periodic maintenance work guarantees that, before beginning a journey, you
will not waste fuel. A well-serviced engine gives you the benefit of improved
fuel efficiency as well as maximum reliability and an enhanced resale value.
A maladjusted engine may mean an increase of 10 % over normal fuel
consumption.
Check the oil level every time you fill the tank. Oil consumption depends to a
great extent on the engine load and engi ne speed. It is quite normal that the
oil consumption of a new engine only reaches its lowest level after a certain
mileage. This means that the oil consumption can only be properly assessed
after about 5,000 km. Depending on your personal driving style, oil consump-
tion can be up to 0.5 litres per 1,000 km.
Avoid short journeys
To reduce the consumption and emission of polluting gases, the engine and
the exhaust filtration systems should reach the optimum service tempera-
ture.
altea_XL ingles.book Seite 194 Donnerstag, 13. September 2007 10:36 10
Page 227 of 317

Checking and refilling levels225
Safety First
Operating instructions
Tips and Maintenance
Te c h n i c a l D a t a
Washer fluid and windscreen wiper bladesTopping up washer fluid
The water for cleaning the windscreen should always be
mixed with washer fluid.The windscreen washer and the headlight washing system are supplied with
fluid from the windscreen washer flui d container in the engine compartment.
The reservoir is located on the right-hand side of the engine compartment.
Plain water is not enough to clean the windscreen and headlights. We recom-
mend that you always add a product to the windscreen washer fluid.
Approved windscreen cleaning products exist on the market with high deter-
gent and anti-freeze properties, these may be added all-year-round. Please
follow the dilution instructions on the packaging.
WARNING
Any work carried out in the engine compartment or on the engine must be
carried out cautiously.•
When working in the engine compartm ent, always observe the safety
warnings ⇒page 215Caution
•
Never put radiator anti-freeze or other additives into the windscreen
washer fluid.
•
Always use approved windscreen cleansing products diluted as per
instructions. If you use other washer fl uids or soap solutions, the tiny holes
in the fan-shaped nozzles could become blocked.
Fig. 168 In the engine
compartment: Cap of
windscreen washer fluid
reservoir.
altea_XL ingles.book Seite 225 Donnerstag, 13. September 2007 10:36 10
Page 232 of 317

Checking and refilling levels
230BatteryWarnings on handling the battery
WARNING
Always be aware of the danger of injury and chemical burns as well as the
risk of accident or fire when working on the battery and the electrical
system:•
Wear eye protection. Protect your ey es, skin and clothing from acid and
particles containing lead.
•
Battery acid is very corrosive and caustic. Wear protective gloves and
eye protection. Do not tilt the batteries. This could spill acid through the
vents. Rinse battery acid from eyes immediately for several minutes with
clear water. Then seek medical care immediately. Neutralize any acid
splashes on the skin or clothing with a soapy solution, and rinse off with
plenty of water. If acid is swallowed by mistake, consult a doctor immedi-
ately.
•
Fires, sparks, naked lights and smoki ng are prohibited. When handling
cables and electrical equipment, avoid causing sparks and electrostatic charge. Never short the battery terminals. High-energy sparks can cause
injury.
•
A highly explosive mixture of gases is released when the battery is
under charge. The batteries should be charged in a well-ventilated room
only.
•
Keep children away from acid and batteries.
•
Before working on the electrical system, you must switch off the
engine, the ignition and all consumers. The negative cable on the battery
must be disconnected. When a light bu lb is changed, you need only switch
off the light.
•
Deactivate the anti-theft alarm by unlocking the vehicle before you
disconnect the battery! The alar m will otherwise be triggered.
•
When disconnecting the battery from the vehicle electrical system,
disconnect first the negative ca ble and then the positive cable.
•
Switch off all electrical consumers before reconnecting the battery.
Reconnect first the positive cable and then the negative cable. Never
reverse the polarity of the connections. This could cause an electrical fire.
•
Never charge a frozen battery, or one which has thawed. This could
result in explosions and chemical burns. Always replace a battery which
has frozen. A flat battery can freeze at temperatures around 0°C.
•
Ensure that the vent hose is always connected to the battery.
•
Never use a defective battery. This may be fatally explosive. Replace a
damaged battery immediately.Caution
•
Never disconnect the battery if the ignition is switched on or if the engine
is running. This could damage the elec trical system or electronic compo-
nents.
•
Do not expose the battery to direct sunlight over a long period of time, as
the intense ultraviolet radiation can damage the battery housing.
Wear eye protection
Battery acid is very corrosive and caustic. Wear protec-
tive gloves and eye protection!
Fires, sparks, naked lights and smoking are prohibited!
A highly explosive mixture of gases is released when the
battery is under charge.
Keep children away from acid and batteries!
WARNING (continued)
altea_XL ingles.book Seite 230 Donnerstag, 13. September 2007 10:36 10
Page 245 of 317

If and when243
Safety First
Operating instructions
Tips and Maintenance
Te c h n i c a l D a t a
Note
•
Seek professional assistance if the repair of a tyre puncture is not
possible with the sealing compound.
Wheel changePreparation work
What you must do before changing a wheel.– If you have a flat tyre or puncture, park the vehicle as far away from the flow of traffic as possible. Choose a location that is as
level as possible.
– All passengers should leave the vehicle. They should wait in a safe area (for instance behind the roadside crash barrier).
– Switch off the engine. Switch on the hazard warning lights.
–Apply the handbrake firmly.
–Engage the first gear, or put the selector lever to position P for
those vehicles with an automatic gearbox.
– If you are towing a trailer, unhitch it from your vehicle.
–Take the vehicle tools and the spare wheel out of the luggage
compartment.
WARNING
Put the hazard warning lights on and place the warning triangle in position.
This is for your own safety and also warns other road users.
Caution
If you have to change the tyre on a gradient, block the wheel opposite the
wheel being changed by placing a stone or similar object under it to prevent
the vehicle from rolling away.
Note
Please observe legal requirements when doing so.Changing a wheelChange the wheel as described below
–Pull off the hub cap . Also refer to ⇒page 244.
–Slacken the wheel bolts.
– Raise the car with the jack in the corresponding zone.
– Ta k e o f f the wheel and then put on the spare wheel.
– Lower the vehicle.
– Tighten the wheel bolts firmly i n d i a go na l s e q u e n ce wi t h t h e b ox
spanner.
–Replace the hub cap.
altea_XL ingles.book Seite 243 Donnerstag, 13. September 2007 10:36 10
Page 252 of 317

If and when
250Tyre repair kit (Tyre-Mobility-System)*General information and safety notesYour vehicle is equipped with a tyre repair kit: the Tyre Mobility System.
In the event of a tyre puncture, sealing compound and an air compressor are
located in the luggage compartment under the floor panel.
The Tyre Mobility System will reliably seal punctures caused by the penetra-
tion of a foreign body of up to about 4 mm in diameter.
It is not necessary to remove the foreign body from the tyre.
Instructions for the sealing compound are located on the sealing compound
container.
Notes for the proper use of the air comp ressor are included in an additional
instruction leaflet.
WARNING
•
Do not attempt to repair a puncture with the sealing compound if the
tyre has been damaged by driving the car after the tyre has lost its air.
•
Always observe warnings and follow instructions concerning
compressor and sealing compound carefully.
•
Do not drive faster than 80 km/h, avoid heavy acceleration, hard
braking and fast cornering.
•
Tyres which have been repaired with sealing compound are only suit-
able for temporary use over a short period. Therefore, please drive carefully
to the next available qualified workshop.For the sake of the environment
Used sealing compound cont ainers should be disposed of at a proper facility.
Note
Seek professional assistance if the repair of a tyre puncture is not possible
with the sealing compound.Preparation work
Certain steps must be taken before repairing a tyre.– If you have a flat tyre or puncture, park the vehicle as far away
from the flow of traffic as possible.
–Apply the handbrake firmly.
– Engage first gear, or put the selector lever to position P.
– All passengers should leave the vehicle. They should wait in a
safe area (for instance behind the roadside crash barrier).
– Check whether a repair is possible using the Tyre Mobility System “General information and safety notes.”
– Unscrew inflation cap from the affected wheel.
–Take the tyre repair kit out of the luggage compartment.
WARNING
Put the hazard warning lights on and place the warning triangle in position.
This is for your own safety and also warns other road users.
Caution
Take special care if you have to repair a tyre on a gradient.
altea_XL ingles.book Seite 250 Donnerstag, 13. September 2007 10:36 10