Page 144 of 317

Seats and stowage
142
Opening
– Lift the cover , in area ⇒page 141, fig. 114 .
Closing
– Push the cover down, until it clips into place.Uses of the mobile stowage compartment•
The front open glove box may be used to store small objects that will not
damage passengers in the event that the objects are flung around the interior
of the vehicle.
•
The drink holders are used for holding drink cans or cups.
•
The elastic belt on the side may be used for keeping papers and maga-
zines.
•
The tables may be used as a support for writing.
To use the table ⇒page 141, fig. 115, it must be removed from its
compartment on the side of the mobile stowage compartment and fitted into
compartment ⇒page 141, fig. 115 on the front section of the mobile
stowage compartment.
The table in the right-hand compartment is fitted in the left-hand compart-
ment of the front of the mobile stowage compartment and the table in the left-
hand compartment is fitted in the right-hand compartment.
The tables have two positions for use and cannot be interchanged.
WARNING
•
The mobile stowage compartment supports a maximum load of 5 kg. Do
not overload.
•
Do not drive when the cover of the mobile stowage compartment is
open.
•
Do not drive when the tables are set up for use.
•
When the vehicle is moving, keep the tables stored inside the mobile
stowage compartment with the cover closed, and likewise when they are
not in use
•
Never place hot drinks in the drink holders. The drink may spill and
cause burns when the vehicle is moving.
•
Do not leave cans in the drinkholder when the vehicle is in motion,
there is a danger that the can may be flung around the vehicle and cause
injury.
•
Make sure that the mounting plate is correctly clipped onto the cushion
frame.
•
When the plate is not in use, store inside the stowage compartment.
•
When the mobile stowage compartment is not in use, it should always
be fastened by the retaining net in the luggage compartment.Note
•
Check that the mobile stowage compartment is correctly fitted, pulling it
forwards by the front glove box and checking that both safety clips are
correctly clipped onto the rings.
AB
AA
AC
AD
WARNING (continued)
altea_XL ingles.book Seite 142 Donnerstag, 13. September 2007 10:36 10
Page 150 of 317

Seats and stowage
148
CautionHard objects on the shelf could chafe against the wires of the heating
element in the rear window and cause damage.
Note
The ventilation slots in front of the rear side windows must not be covered as
this would prevent stale air being extracted from the vehicle.Luggage compartment cover
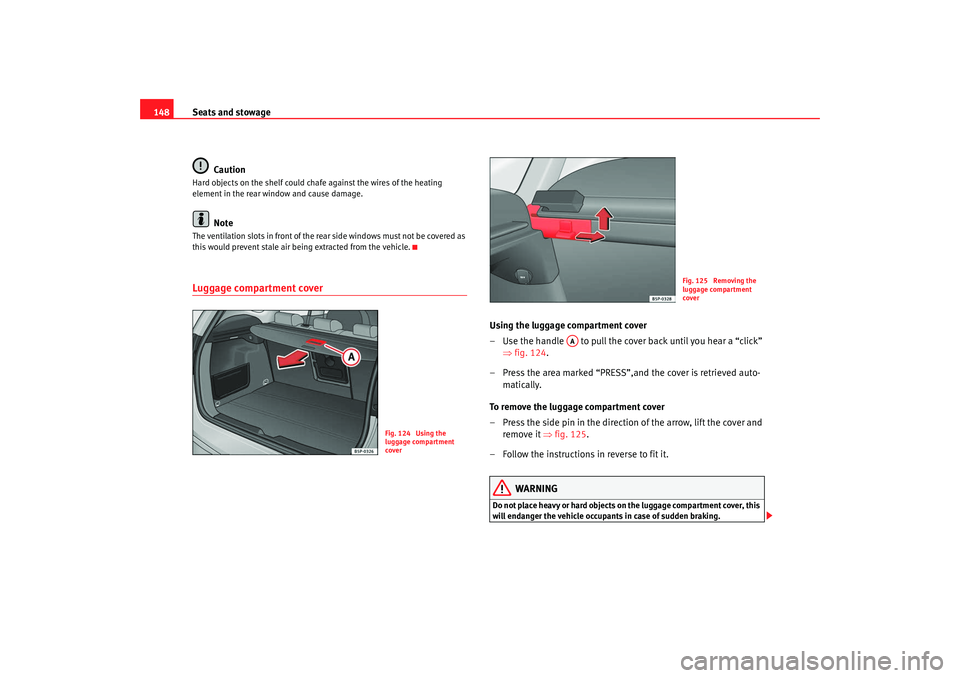
Using the luggage compartment cover
– Use the handle to pull the cover back until you hear a “click” ⇒fig. 124.
– Press the area marked “PRESS”,and the cover is retrieved auto- matically.
To remove the luggage compartment cover
– Press the side pin in the direction of the arrow, lift the cover and remove it ⇒fig. 125.
– Follow the instructions in reverse to fit it.
WARNING
Do not place heavy or hard objects on the luggage compartment cover, this
will endanger the vehicle occupants in case of sudden braking.
Fig. 124 Using the
luggage compartment
cover
Fig. 125 Removing the
luggage compartment
cover
AA
altea_XL ingles.book Seite 148 Donnerstag, 13. September 2007 10:36 10
Page 151 of 317

Seats and stowage149
Safety First
Operating instructions
Tips and Maintenance
Te c h n i c a l D a t a
Caution
•
Before closing the tailgate, ensure that the stowage compartment tray is
correctly fitted.
•
An overloaded boot could mean that the rear stowage tray is not correctly
seated and it may be bent or damaged.
•
If the boot is overloaded, remove the tray.Note
•
Ensure that, when placing items of clothing on the luggage compartment
cover, rear visibility is not reduced.
Cargo divider net*
The partition grille prevents loose objects in the luggage
compartment from being thrown forward into the passenger
compartment (e.g. under sudden braking).
– Pass the retaining net up between the backrest and the roll-up
cover, and place it in the ceiling allotments - first into the right
one and then into the left one ⇒fig. 126.
– Hook the seat belts into the fastening rings before tightening the retaining net ⇒fig. 127.Roof carrier*Please observe the following points if you intend to carry loads on the roof:•
For safety reasons, only luggage racks and accessories approved by SEAT
should be used.
•
It is essential that you follow the assembly instructions included with the
bars exactly, being especially careful to position front and rear luggage
compartment cover bars on the specia l housings on the longitudinal bars.
You must also respect their position according to the direction of travel indi-
Fig. 126 Divider net
Fig. 127 Fastening rings
to tighten the divider net
altea_XL ingles.book Seite 149 Donnerstag, 13. September 2007 10:36 10