Page 218 of 295

Checking and refilling levels
216•
Before opening the bonnet, read and observe the warnings
⇒ page 209, “Safety instructions on working in the engine compartment”.
•
Wait for the engine to cool down. Hot oil may cause burn injuries.
•
Wear eye protection to avoid injuries caused by splashes of oil.
•
When removing the oil drain plug with your fingers, keep your arm hori-
zontal to help prevent oil from running down your arm.
•
Wash your skin thoroughly if it comes into contact with engine oil.
•
Engine oil is poisonous! Used oil must be stored in a safe place out of
the reach of children until it is disposed of.Caution
No additives should be used with engine oil. This could result in engine
damage. Any damage caused by the use of such additives would not be
covered by the factory warranty.
For the sake of the environment
•
Because of the disposal problems, the necessary special tools and
specialist knowledge required, we recommend that you have the engine oil
and filter changed by an Authorised Service Centre.
•
Never pour oil down drains or into the ground.
•
Use a suitable container when draining the used oil. It has to be large
enough to hold all the engine oil
CoolantCoolant specifications
Coolant is a mixture of water and at least 40% coolant addi-
tive.The cooling system must be filled with a mixture of water and at least 40 % of
our coolant additive G 12+ or an additive with the specification TT-VW 774 F
(it is dyed purple). This mixture gives the necessary frost protection down to
-25°C and protects the alloy parts of the cooling system against corrosion. It
also prevents scaling and raises the boiling point of the coolant.
The concentration of coolant must always be at least 40% - even if frost
protection is not required.
If greater frost protection is required in very cold climates, the proportion of
the antifreeze additive G 12+ can be increased. However, the percentage of
coolant additives should not exceed 60%, as this would reduce the frost
protection. It would also reduce the cooling effect. A mixture with 60%
coolant additive will give frost protection to approx. -40°C.
WARNING
•
The coolant additive is toxic. There is a toxic risk. Always keep the
coolant additive in the original container which should be stored out of the
reach of children. The same applies to coolant which you have drained off.
•
The coolant additive G 12+ must be added in sufficient quantities to
provide anti-freeze protection at the coldest ambient temperatures that
can be expected. At extremely cold ambient temperatures, the coolant
could freeze, causing the vehicle to breakdown. As the heater would also
not work in this situation, there is a risk of suffering exposure!
WARNING (continued)
alhambra_ingles_0708 Seite 216 Mittwoch, 10. September 2008 10:55 10
Page 245 of 295
If and when243
Safety First
Operating instructions
Tips and Maintenance
Te c h n i c a l D a t a
Main beam headlights
Rear window heater
Rear windscreen wiper
Horn
Interior lights
Electric windows
Usable electric windows
Fog lights
Rear fog light
Hazard warning light switch
Instrument panel lighting
Climate control
Heating
Radio, navigation system
/
Rear light
-
Registration plate light
Electrical consumer Symbol
alhambra_ingles_0708 Seite 243 Mittwoch, 10. September 2008 10:55 10
Page 252 of 295

If and when
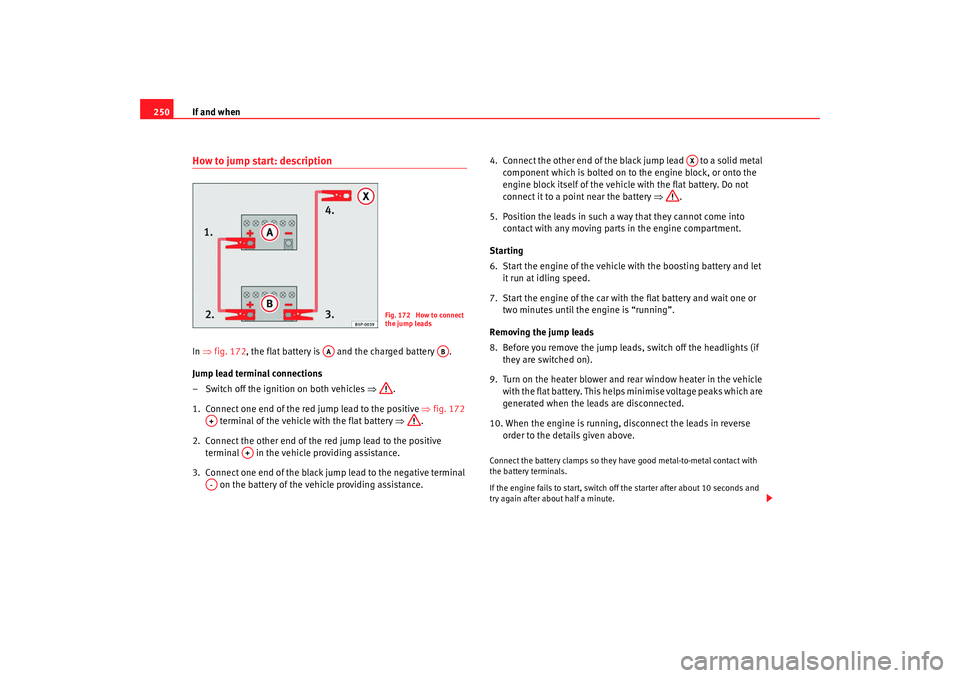
250How to jump start: descriptionIn ⇒ fig. 172 , the flat battery is and the charged battery .
Jump lead terminal connections
– Switch off the ignition on both vehicles ⇒.
1. Connect one end of the red jump lead to the positive ⇒fig. 172
terminal of the vehicle with the flat battery ⇒.
2. Connect the other end of the red jump lead to the positive terminal in the vehicle providing assistance.
3. Connect one end of the black jump lead to the negative terminal on the battery of the vehicle providing assistance. 4. Connect the other end of the black jump lead to a solid metal
component which is bolted on to the engine block, or onto the
engine block itself of the vehicle with the flat battery. Do not
connect it to a point near the battery ⇒.
5. Position the leads in such a way that they cannot come into contact with any moving parts in the engine compartment.
Starting
6. Start the engine of the vehicle with the boosting battery and let it run at idling speed.
7. Start the engine of the car with the flat battery and wait one or two minutes until the engine is “running”.
Removing the jump leads
8. Before you remove the jump leads, switch off the headlights (if they are switched on).
9. Turn on the heater blower and rear window heater in the vehicle with the flat battery. This helps minimise voltage peaks which are
generated when the leads are disconnected.
10. When the engine is running, disconnect the leads in reverse order to the details given above.
Connect the battery clamps so they have good metal-to-metal contact with
the battery terminals.
If the engine fails to start, switch off the starter after about 10 seconds and
try again after about half a minute.
Fig. 172 How to connect
the jump leads
AA
AB
A+
A+
A-
AX
alhambra_ingles_0708 Seite 250 Mittwoch, 10. September 2008 10:55 10