2008 Peugeot 407 C lights
[x] Cancel search: lightsPage 23 of 211
1
26
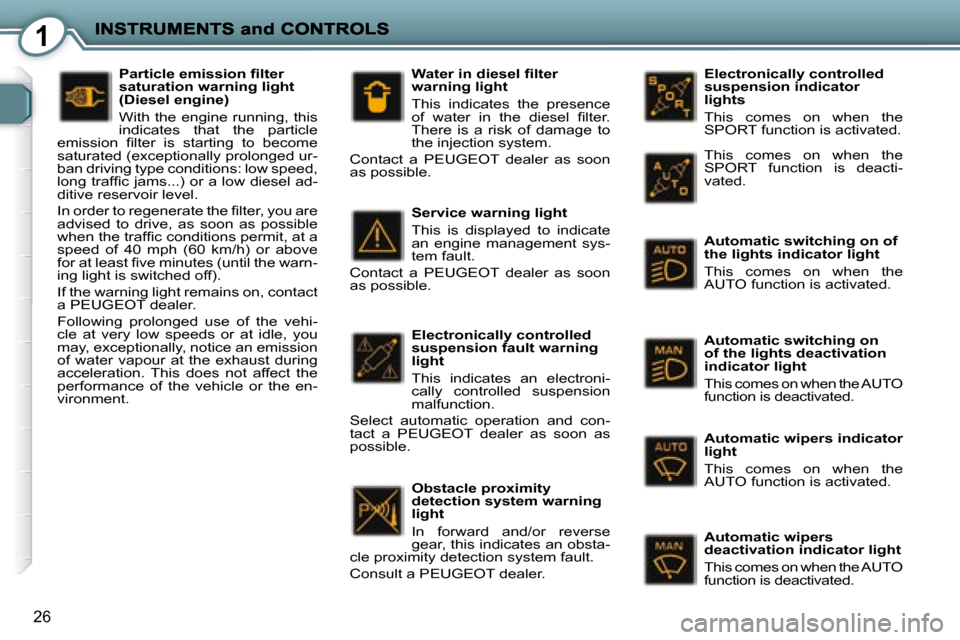
Electronically controlled
suspension indicator
lights
This comes on when the
SPORT function is activated.
Automatic switching on of
the lights indicator light
This comes on when the
AUTO function is activated.
Automatic switching on
of the lights deactivation
indicator light
This comes on when the AUTO
function is deactivated.
Automatic wipers indicator
light
This comes on when the
AUTO function is activated.
Automatic wipers
deactivation indicator light
This comes on when the AUTO
function is deactivated.
Service warning light
This is displayed to indicate
an engine management sys-
tem fault.
Contact a PEUGEOT dealer as soon
as possible.
Electronically controlled
suspension fault warning
light
This indicates an electroni-
cally controlled suspension
malfunction.
Select automatic operation and con-
tact a PEUGEOT dealer as soon as
possible.
Obstacle proximity
detection system warning
light
In forward and/or reverse
gear, this indicates an obsta-
cle proximity detection system fault.
Consult a PEUGEOT dealer. This comes on when the
SPORT function is deacti-
vated.
Particle emission fi lter
saturation warning light
(Diesel engine)
With the engine running, this
indicates that the particle
emission fi lter is starting to become
saturated (exceptionally prolonged ur-
ban driving type conditions: low speed,
long traffi c jams...) or a low diesel ad-
ditive reservoir level.
In order to regenerate the fi lter, you are
advised to drive, as soon as possible
when the traffi c conditions permit, at a
speed of 40 mph (60 km/h) or above
for at least fi ve minutes (until the warn-
ing light is switched off).
If the warning light remains on, contact
a PEUGEOT dealer.
Following prolonged use of the vehi-
cle at very low speeds or at idle, you
may, exceptionally, notice an emission
of water vapour at the exhaust during
acceleration. This does not affect the
performance of the vehicle or the en-
vironment. Water in diesel fi lter
warning light
This indicates the presence
of water in the diesel fi lter.
There is a risk of damage to
the injection system.
Contact a PEUGEOT dealer as soon
as possible.
Page 24 of 211

1
27
Coolant temperature indicator
When the needle is in zone A , the
temperature is correct.
When the needle is in zone B , the
temperature is too high.
If the coolant temperature
warning light comes on
(linked with the STOP warn-
ing light), stop immediately.
Wait for the engine to cool
down before topping up the level, if
necessary.
As the cooling circuit is pres-
surised, in order to prevent
any risk of scalding, unscrew
the cap by two turns to allow
the pressure to drop.
When the pressure has dropped, re-
move the cap and top up the level with
coolant, if necessary.
Consult a PEUGEOT dealer.
This indicates an automatic
gearbox programme fault.
Automatic gearbox lever position indicator lights
Automatic gearbox fault
warning light
This indicates an automatic
gearbox fault.
The gearbox will operate in down-
grade mode, locked in 3rd gear.
Never force the selector lever.
Consult a PEUGEOT dealer.
6 speed automatic gearbox
"Park" indicator
lights
"Reverse" indicator
lights
"Neutral" indicator
lights
"Drive" indicator
lights
The letter S or the symbol
, associat-
ed with the gate lever position indicator
lights, corresponds to the Sport or Snow
programme selected intentionally. "Manual" indicator lights
These correspond to the manual con-
trol of the gearbox.
When the engine speed is too low
or too high in relation to the gear en-
gaged, the gear selected fl ashes for
a few seconds, then the actual gear
is displayed, the auto-adaptive pro-
gramme having taken control tempo-
rarily.
Page 29 of 211

1
30
Trip recorder zero reset
With the trip distance displayed, press
the button for a few seconds.
Distance recorder
The total distance is displayed in zone
A of the display and the trip distance
in zone B .
LIGHTING RHEOSTAT
With the lights on, press the button to
vary the intensity of the lighting of the
instruments and controls. When the
lighting reaches the minimum (or max-
imum) setting, release the button then
press it again to increase (or reduce)
the brightness.
As soon as the lighting is of the
required brightness, release the button.
Page 32 of 211

2
33
COLOUR SCREEN C
This displays the following informa-
tion, via the WIP Sound audio system
control pad:
- the time,
- the date,
- the exterior temperature (the value displayed fl ashes if there is a risk
of ice),
- the accesses check,
- the warning messages,
- the audio functions,
- the trip computer information,
-
the personalisation and confi guration
displays,
- the air conditioning parameters,
-
the front and rear parking assistance
display,
- the hands-free kit displays. Management of the displays
General menu
Press the
"MENU" button to gain ac-
cess to the general menu and select
one of the following functions:
- "Audio functions",
- "Trip computer",
- "Personalisation-Confi guration",
- "Air conditioning",
- "Telephone". "Personalisation-Confi guration"
menu
This provides access to successive
confi rmation windows.
Defi ning the vehicle parameters
This enables you to activate or de-
activate certain driving and comfort
elements:
-
"Automatic switching on of the lights", - "Follow-me-home lighting" and
"Duration",
- "Remote control action",
- "Permanent locking of the boot",
- "Directional headlamps".
Example: "Automatic switching on of
the lights"
The
"AUDIO" , "TRIP" , "CLIM" and
"TEL" buttons on the RD4 audio
equipment control pad permit display-
ing in the main window.
Example: "TRIP"
Example: "Audio functions"
Page 40 of 211

3
Blower (4)
Air fl ow
Turn dial 4 to the
right to increase the
air fl ow or to the left
to reduce it.
Turn the dial 4 to the
left until the fl ow of
air stops.
The "OFF" symbol is displayed on the
multifunction display.
This action switches off the display
and the indicator lights.
It deactivates all of the system's func-
tions, with the exception of the rear
screen demisting.
The temperature-related comfort is no
longer controlled (temperature, humid-
ity, odour, condensation).
Avoid driving for too long with the air
conditioning off.
Switching off the ventilation
The
"AUTO" button indicator light is
switched off.
The air fl ow symbol (fan) is displayed
on the multifunction display and is fi lled
in in relation to the value required.
To prevent condensation and dete-
rioration of the quality of the air in the
passenger compartment, ensure that
an adequate fl ow of air is maintained. Adjustment of
the driver's air
distribution (5)
Successive or continuous pressure on
button 5 or 6 enables you to direct the
fl ow of air on the driver's side or on the
passenger side independently.
The "AUTO" button indicator light is
switched off.
The symbol (arrows) corresponding to
the chosen direction 5 or 6 is displayed
on the multifunction display.
Windscreen and front side windows.
Front and rear ventilation.
Front and rear footwells.
AUTO Automatic distribution. Adjustment of
the passenger air
distribution (6)
Control via the manual controls
It is possible to adjust one or more
functions manually while leaving the
other functions in automatic mode.
Switching to manual mode may result
in discomfort (temperature, humidity,
odour, condensation) and is not ad-
vantageous (comfort).
To return to automatic mode, press the
"AUTO" button.
On entering the vehicle, the
interior temperature may be
much colder (or warmer) than
is comfortable. There is no
need to change the temperature dis-
played in order to obtain rapidly the
level of comfort required.
The automatic regulation of the air
conditioning will use its maximum
performance settings to correct the
temperature difference as quickly as
possible.
To reactivate the air conditioning:
Press button 1 .
Page 41 of 211

3
42
Front visibility control
(7)
In certain cases, the comfort pro-
gramme may not be suffi cient to de-
mist or de-ice the windows (humidity,
several passengers, ice).
In this case, select the front vis-
ibility programme in order to clear
the windows quickly. The indicator
light comes on.
It controls the air conditioning, air fl ow
and intake and distributes the ventila-
tion to the windscreen and front side
windows.
The front visibility control symbol is
displayed on the multifunction display.
Once the inconvenience has been
eliminated, pressing button 1 returns
the system to the comfort setting. Intake of exterior
air/Recirculation of
interior air (8)
This function enables you to isolate
the passenger compartment from ex-
terior fumes and odours.
Press button 8 several times to
set the air intake mode, the indica-
tor light which corresponds to the
mode set comes on at your prefer-
ence:
- intake of exterior air. Forced ex- terior air intake mode.
- recirculation of the air inside the passenger compartment.
The indicator light which corre- sponds to the mode set comes
on. Prolonged operation in inte-
rior air recirculation mode may
result in the formation of con-
densation and deterioration of
the quality of the interior air.
Do not drive in air recirculation mode for prolonged periods, ex-
cept in truly exceptional atmos-
pheric conditions.
The message associated with the control is displayed on the
multifunction display.
Press button 8 to return to auto-
matic control of the air intake. The
indicator lights are switched off.
For your comfort, when the igni-
tion is switched off, the settings are
stored until it is switched on again. Rear screen
demisting (9)
The heated rear screen operates inde-
pendently of the air conditioning system.
Press button 9 , with the engine
running, to demist the rear screen
and the mirrors. The indicator light
comes on.
Demisting is switched off automatical-
ly to avoid an excessive consumption
of current and in relation to the exterior
temperature.
It may be stopped by pressing button 9
again or when the engine is switched
off.
However, the demisting resumes if the
engine is switched on again within one
minute.
Switch off the rear screen and exterior
mirrors demisting when you consider
this necessary as low current con-
sumption reduces fuel consumption.
Page 43 of 211

3
44
PROGRAMMABLE HEATING Programming remote control
The heating system programming re-
mote control consists of the following
buttons and displays:
1. Scrolling functions menu buttons.
2. Function indicator lights: clock,
temperature, operating time, pro-
grammed time, heater operation,
heating management symbols.
3. Digital displays: time, temperature,
duration of operation, programmed
time or level of heating.
4. Off button.
5. On button.
Displaying the functions
If a malfunction of the programma-
ble heating system occurs, contact
a PEUGEOT dealer.
The programmable heating operates
independently of the engine.
When the engine is off, it pre-heats
the coolant circuit in order to benefi t
from an optimum engine operating
temperature from the time the engine
is switched on.
The programmable heating system
is switched on using the long range
remote control. Activation can be im-
mediate or deferred by means of a
programming function.
screen
Press the buttons
1 in succession to
display the functions.
The fi rst press of the left-hand or right-
hand button displays the time.
Next, the left-hand button permits ac-
cess to the programming time then to
the level of heating (C1 to C5).
The right-hand button permits access
to the passenger compartment tem-
perature then to the duration of opera-
tion of the heater if it is to be switched
on immediately.
The passenger compartment
temperature information is only
available when the engine is off.
Page 68 of 211

4
When the windows are closed
automatically using the remote
control, ensure that no one is
preventing them from closing
correctly.
The folding and unfolding of the ex-
terior mirrors can be deactivated by a
PEUGEOT dealer.
The complete or selective
unlocking can be confi g-
ured by means of a param-
eter, via the multifunction
display "Personalisation-
Confi guration" menu.
boot
Press button D to unlock and open
the boot.
This action also unlocks the doors.
If the permanent locking of the boot is
activated, opening is only possible via
button D on the remote control.
When the vehicle is locked,
if unlocking is activated inad-
vertently, without a door being
opened within 30 seconds, the
vehicle will lock automatically.
This function can be confi g-
ured by means of a param-
eter, via the multifunction
display "Personalisation -
Confi guration" menu.
Key in ignition
A buzzer sounds on opening the driv-
er’s door, if the key has been left in the
ignition.
LOCATING YOUR VEHICLE
To locate your vehicle, if you have
locked or deadlocked it, in a car park:
press button B on the remote con-
trol, the courtesy lights come on
and the direction indicators fl ash
for a few seconds.
Unlocking
Selective (if activated)
Press button C to unlock the driv-
er's door only.
Press the button again to unlock
the passenger door and the boot.
Each action is confi rmed by rapid
fl ashing of the direction indicators for
approximately two seconds.
The exterior mirrors unfold at the same
time.
Complete
Press button C for complete un-
locking of the vehicle.
This is confi rmed by rapid fl ashing of
the direction indicators for approxi-
mately two seconds.
The exterior mirrors unfold at the same
time.