2008 Peugeot 206 SW Dag weight
[x] Cancel search: weightPage 46 of 123

47
COMFORT
-
FRONT SEATS It is impossible to access the
rear seats if the front seat is in
the reclining position.
B. Pull one of the two handles and
push forwards to fold the seat
back. The seat does not move
forward.
On repositioning, the seat back
returns to its initial angle.
Never drive with the head
�r�e�s�t�r�a�i�n�t�s� �r�e�m�o�v�e�d�;� �t�h�e�y�
must be in place and cor-
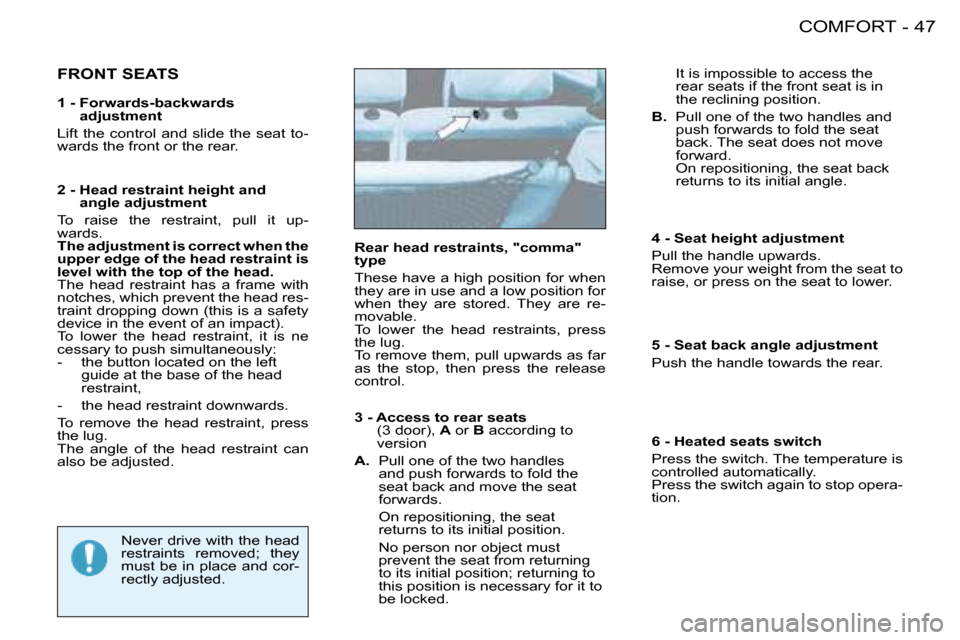
rectly adjusted. Rear head restraints, "comma"
type
These have a high position for when
they are in use and a low position for
when they are stored. They are re-
movable.
To lower the head restraints, press
the lug.
To remove them, pull upwards as far
as the stop, then press the release
control.
�1� �-� � �F�o�r�w�a�r�d�s�-�b�a�c�k�w�a�r�d�s�
adjustment
Lift the control and slide the seat to-
wards the front or the rear.
2 - Head restraint height and angle adjustment
To raise the restraint, pull it up-
wards.
�T�h�e� �a�d�j�u�s�t�m�e�n�t� �i�s� �c�o�r�r�e�c�t� �w�h�e�n� �t�h�e�
upper edge of the head restraint is
�l�e�v�e�l� �w�i�t�h� �t�h�e� �t�o�p� �o�f� �t�h�e� �h�e�a�d�.
The head restraint has a frame with
notches, which prevent the head res-
traint dropping down (this is a safety
device in the event of an impact).
To lower the head restraint, it is ne
cessary to push simultaneously:
- the button located on the left guide at the base of the head
restraint,
- the head restraint downwards.
To remove the head restraint, press
the lug.
The angle of the head restraint can
also be adjusted. 3 - Access to rear seats
(3 door), A or B according to
version
A. Pull one of the two handles
and push forwards to fold the
seat back and move the seat
forwards.
On repositioning, the seat returns to its initial position.
No person nor object must prevent the seat from returning
�t�o� �i�t�s� �i�n�i�t�i�a�l� �p�o�s�i�t�i�o�n�;� �r�e�t�u�r�n�i�n�g� �t�o�
this position is necessary for it to
be locked. 4 - Seat height adjustment
Pull the handle upwards.
Remove your weight from the seat to
raise, or press on the seat to lower.
5 - Seat back angle adjustment
Push the handle towards the rear.
6 -
�H�e�a�t�e�d� �s�e�a�t�s� �s�w�i�t�c�h
Press the switch. The temperature is
controlled automatically.
Press the switch again to stop opera-
tion.
Page 47 of 123

47
COMFORT
-
FRONT SEATS It is impossible to access the
rear seats if the front seat is in
the reclining position.
B. Pull one of the two handles and
push forwards to fold the seat
back. The seat does not move
forward.
On repositioning, the seat back
returns to its initial angle.
Never drive with the head
�r�e�s�t�r�a�i�n�t�s� �r�e�m�o�v�e�d�;� �t�h�e�y�
must be in place and cor-
rectly adjusted. Rear head restraints, "comma"
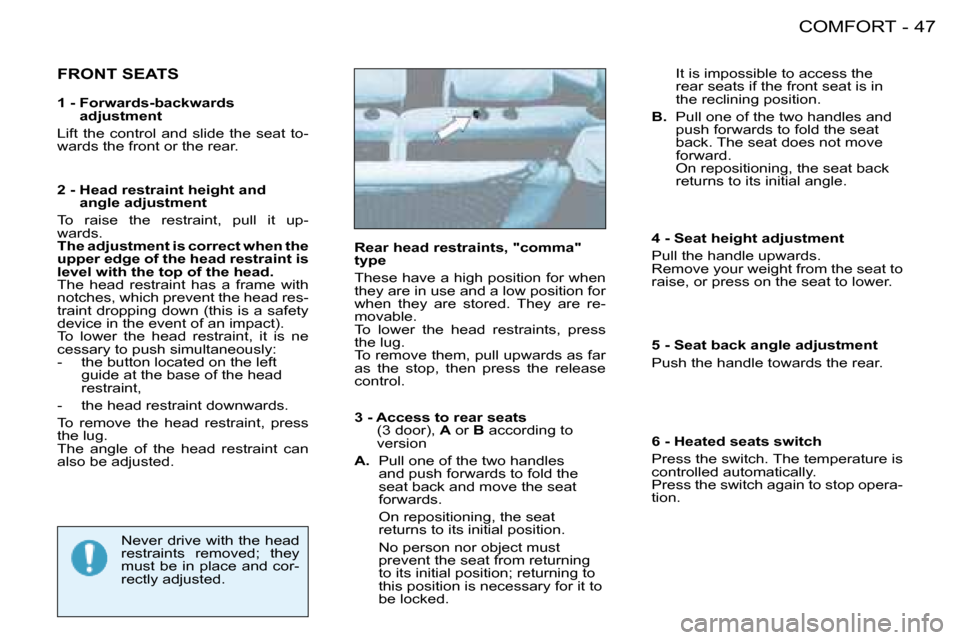
type
These have a high position for when
they are in use and a low position for
when they are stored. They are re-
movable.
To lower the head restraints, press
the lug.
To remove them, pull upwards as far
as the stop, then press the release
control.
�1� �-� � �F�o�r�w�a�r�d�s�-�b�a�c�k�w�a�r�d�s�
adjustment
Lift the control and slide the seat to-
wards the front or the rear.
2 - Head restraint height and angle adjustment
To raise the restraint, pull it up-
wards.
�T�h�e� �a�d�j�u�s�t�m�e�n�t� �i�s� �c�o�r�r�e�c�t� �w�h�e�n� �t�h�e�
upper edge of the head restraint is
�l�e�v�e�l� �w�i�t�h� �t�h�e� �t�o�p� �o�f� �t�h�e� �h�e�a�d�.
The head restraint has a frame with
notches, which prevent the head res-
traint dropping down (this is a safety
device in the event of an impact).
To lower the head restraint, it is ne
cessary to push simultaneously:
- the button located on the left guide at the base of the head
restraint,
- the head restraint downwards.
To remove the head restraint, press
the lug.
The angle of the head restraint can
also be adjusted. 3 - Access to rear seats
(3 door), A or B according to
version
A. Pull one of the two handles
and push forwards to fold the
seat back and move the seat
forwards.
On repositioning, the seat returns to its initial position.
No person nor object must prevent the seat from returning
�t�o� �i�t�s� �i�n�i�t�i�a�l� �p�o�s�i�t�i�o�n�;� �r�e�t�u�r�n�i�n�g� �t�o�
this position is necessary for it to
be locked. 4 - Seat height adjustment
Pull the handle upwards.
Remove your weight from the seat to
raise, or press on the seat to lower.
5 - Seat back angle adjustment
Push the handle towards the rear.
6 -
�H�e�a�t�e�d� �s�e�a�t�s� �s�w�i�t�c�h
Press the switch. The temperature is
controlled automatically.
Press the switch again to stop opera-
tion.
Page 56 of 123

53
COMFORT
-
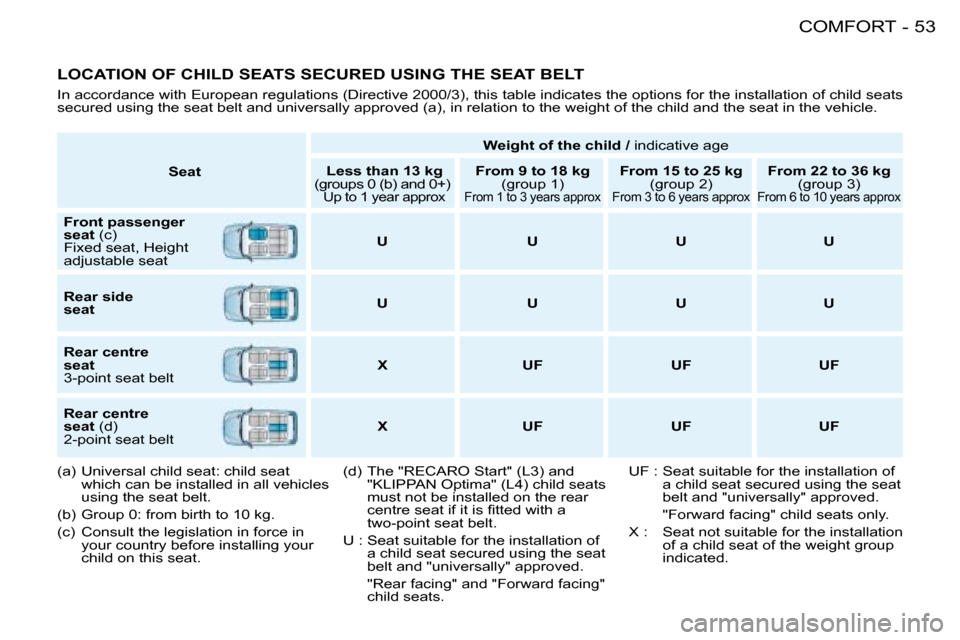
LOCATION OF CHILD SEATS SECURED USING THE SEAT BELT
In accordance with European regulations (Directive 2000/3), this table indicates the options for the installation of child seats
secured using the seat belt and universally approved (a), in rela tion to the weight of the child and the seat in the vehicle.
Seat Weight of the child /
indicative age
Less than 13 kg
(groups 0 (b) and 0+)
Up to 1 year approx
�F�r�o�m� �9� �t�o� �1�8� �k�g (group 1)
From 1 to 3 years approx
From 15 to 25 kg (group 2)
From 3 to 6 years approx
From 22 to 36 kg(group 3)
From 6 to 10 years approx
Front passenger
seat (c)
Fixed seat, Height
adjustable seat U U U U
Rear side
seat U U U U
Rear centre
seat
3-point seat belt X UF UF UF
Rear centre
seat (d)
2-point seat belt X UF UF UF
(a) Universal child seat: child seat which can be installed in all vehicles
using the seat belt.
(b) Group 0: from birth to 10 kg.
(c) Consult the legislation in force in your country before installing your
child on this seat. (d) The "RECARO Start" (L3) and
"KLIPPAN Optima" (L4) child seats
must not be installed on the rear
�c�e�n�t�r�e� �s�e�a�t� �i�f� �i�t� �i�s� �i�t�t�e�d� �w�i�t�h� �a�
two-point seat belt.
U : Seat suitable for the installation of a child seat secured using the seat
belt and "universally" approved.
"Rear facing" and "Forward facing" child seats. UF : Seat suitable for the installation of
a child seat secured using the seat
belt and "universally" approved.
"Forward facing" child seats only.
X : Seat not suitable for the installation of a child seat of the weight group
indicated.
Page 114 of 123

�1�0�7
PRACTICAL INFORMATION
-
TOWING A TRAILER,
CARAVAN, BOAT, ETC.
We recommend the use of original
PEUGEOT towbars and their har-
nesses that have been tested and
approved from the design stage of
�y�o�u�r� �v�e�h�i�c�l�e� �a�n�d� �t�h�a�t� �t�h�e� �i�t�t�i�n�g� �o�f� �t�h�e�
towbar is entrusted to a PEUGEOT
dealer.
�I�f� �t�h�e� �t�o�w�b�a�r� �i�s� �n�o�t� �i�t�t�e�d� �b�y� �a� �P�E�U�G�E�O�T�
�d�e�a�l�e�r�,� �i�t� �i�s� �i�m�p�e�r�a�t�i�v�e� �t�h�a�t� �i�t� �i�s� �i�t�t�e�d� �u�s -
ing the electrical pre-equipment installed
at the rear of the vehicle, in accordance
with the manufacturer's instructions.
Your vehicle is primarily designed
for transporting people and luggage
but it may also be used for towing a
trailer.
Driving with a trailer subjects the tow-
�i�n�g� �v�e�h�i�c�l�e� �t�o� �m�o�r�e� �s�i�g�n�i�i�c�a�n�t� �s�t�r�e�s�s�
and its driver must be particularly
careful.
Air density decreases with altitude,
thus reducing engine performance.
�A�b�o�v�e� �1�0�0�0� �m�e�t�r�e�s�,� �t�h�e� �m�a�x�i�m�u�m�
�t�o�w�i�n�g� �l�o�a�d� �m�u�s�t� �b�e� �r�e�d�u�c�e�d� �b�y� �1�0�%�
�a�n�d� �s�o� �o�n� �f�o�r� �e�v�e�r�y� �1�0�0�0� �m�e�t�r�e�s� �o�f�
altitude. Driving advice
Distribution of loads:
Distribute the
load in the trailer so that the heaviest
items are as close as possible to the
axle and the nose weight approach-
es the maximum permitted without
exceeding it.
Cooling: Towing a trailer on a slope
increases the temperature of the
coolant.
As the fan is electrically controlled,
its cooling capacity is not dependent
on the engine speed.
On the contrary, use a high gear to
lower the engine speed and reduce
your speed.
The maximum towing load on a long
slope depends on the gradient and
the outside temperature. In all cases, pay attention to the cool-
ant temperature.
In certain cases of particularly ardu-
�o�u�s� �u�s�e� �(�t�o�w�i�n�g� �t�h�e� �m�a�x�i�m�u�m� �l�o�a�d�
on a steep gradient in high tempera-
tures), switching off the air condition-
ing permits the recovery of engine
power and therefore an increase in
the towing capacity.
If the warning light comes on, stop
the vehicle and switch off the engine
as soon as possible.
Tyres :
Check the tyre pressures of
the towing vehicle and of the trailer,
observing the recommended pres-
sures.
Braking : Towing increases the brak-
ing distance.
Lights : Check the electrical signal-
ling on the trailer.
Side wind : Take into account the in-
creased sensitivity to side wind.
Page 119 of 123

TECHNICAL DATA
112 -
CONSUMPTION
In accordance with EC Directive 80/1268 (as amended) mpg (litres/100 km)
Engine Gearbox Model
codes 2... Urban
driving Inter-
urban MixedEmission of
CO
2 by
weight (g/km)
1.1 litre Manual HFXF 8.2 5 6.2 148
1.4 litre Manual KFWF 8.4 5 6.3 149
KFWA 8.5 5.2 6.3 151
1.4 litre Automatic KFWR 9.6 5.3 6.9 165
1.6 litre 16V Manual NFUF 8.6 5.1 6.4 153
HNFUF/NFUA 8.7 5.5 6.7 159
1.6 litre 16V Automatic NFUR 9.9 5.5 7.1 179
HNFUR 10.2 5.8 7.5 176
NFUB 10.2 5.7 7.4 176
1.4 litre Turbo HDI Manual 8HXF 5.5 3.6 4.3 113
8HZA 5.4 3.7 4.3 112
Fuel consumption values correct at time of printing. These consump tion values were established in accordance with EC
�D�i�r�e�c�t�i�v�e� �8�0�/�1�2�6�8� �(�a�s� �a�m�e�n�d�e�d�)�.� �T�h�e�y� �m�a�y� �v�a�r�y� �d�e�p�e�n�d�i�n�g� �o�n� �t�h�e� �s�t �y�l�e� �o�f� �d�r�i�v�i�n�g�,� �t�r�a�f�i�c� �c�o�n�d�i�t�i�o�n�s�,� �w�e�a�t�h�e�r� �c�o�n�d�i�t�i�o�n�s�,� �t�h�e�
load in the vehicle, the maintenance of the vehicle and t he use of the accessories.
Page 120 of 123

113
TECHNICAL DATA
-
WEIGHTS AND TOWING LOADS (IN KG)
Petrol engine 1.1 litre 1.4 litre 1.4 litre 1.6 litre 16V 1.6 litre 16V
Gearbox Manual Manual Auto Manual Auto
Model codes : HFX KFWF/A KFWR
NFUA NFUF
NFUB NFUR
Kerb weight 985 1 025 1 055 1 100 1 055
Gross vehicle weight (GVW) 1405 1 450 1 480 1 567 1 614
Gross train weight (GTW) 1 920 2 365 2 395 2 467 2 504
Unbraked trailer 485 510 525 550 550
Braked trailer * (within GTW) 700 1 100 1 100 1 100 1 100
Recommended nose weight 50 50 50 50 50
Diesel engine 1.4 litre HDI
1.4 litre HDI
Gearbox ManualManuelle
Model codes : 8HX
8HZA2S8HZA
2S8HXF
Kerb weight 1 0611 049
Gross vehicle weight (GVW) 1 5251 525
Gross train weight (GTW) 2 4252 425
Unbraked trailer 530524
Braked trailer * (within GTW) 1 1001 100
Recommended nose weight 50 -
VANS
Page 121 of 123

TECHNICAL DATA
114 -
The GTW and towing load values indicated are valid for a maximum altitude of 1000 metres; the towing load men-
tioned must be reduced by 10 % for every additional 1000 metre s.
In the case of a towing vehicle, the speed must not exceed 6 0 mph (100 km/h) (comply with the legislation in force in your
country).
High exterior temperatures may result in a reduction in the perfo rmance of the vehicle to protect the engine; when the
exterior temperature is higher than 37 °C, limit the towed l oad.
* The weight of the braked trailer may be increased, within the GTW limit, on condition that the GVW of the towing
vehicle is reduced by the same amount; warning, towing with a lightly loaded towing vehicle may have an adverse
effect on its road holding ability.