2008 Peugeot 206 SW Dag air condition
[x] Cancel search: air conditionPage 2 of 123

5
FAMILIARISATION
-
INSTRUMENTS AND
CONTROLS
1. Steering lock and ignition.
2. � �S�t�e�e�r�i�n�g� �w�h�e�e�l� �a�u�d�i�o� �e�q�u�i�p�m�e�n�t�
control.
3. � �W�i�p�e�r�s� �/� �w�a�s�h�-�w�i�p�e� �/� �t�r�i�p�
computer stalk.
4. Central adjustable and closing
vents.
5. � �H�a�z�a�r�d� �w�a�r�n�i�n�g� �l�i�g�h�t�s� �s�w�i�t�c�h�.
Central locking button.
6. Multifunction display.
7. Passenger air bag.
8. Glove box.
9. � �R�e�a�r� �e�l�e�c�t�r�i�c� �w�i�n�d�o�w�s� �c�o�n�t�r�o�l�.
10. Heated seats control
(according to country).
11. � �F�r�o�n�t� �e�l�e�c�t�r�i�c� �w�i�n�d�o�w� �c�o�n�t�r�o�l�s�.
12. Exterior mirrors control.
13. Lighter.
14. Front ashtray.
15. Heating / air conditioning
controls.
16. Audio RD3.
Page 9 of 123

FAMILIARISATION
12 -
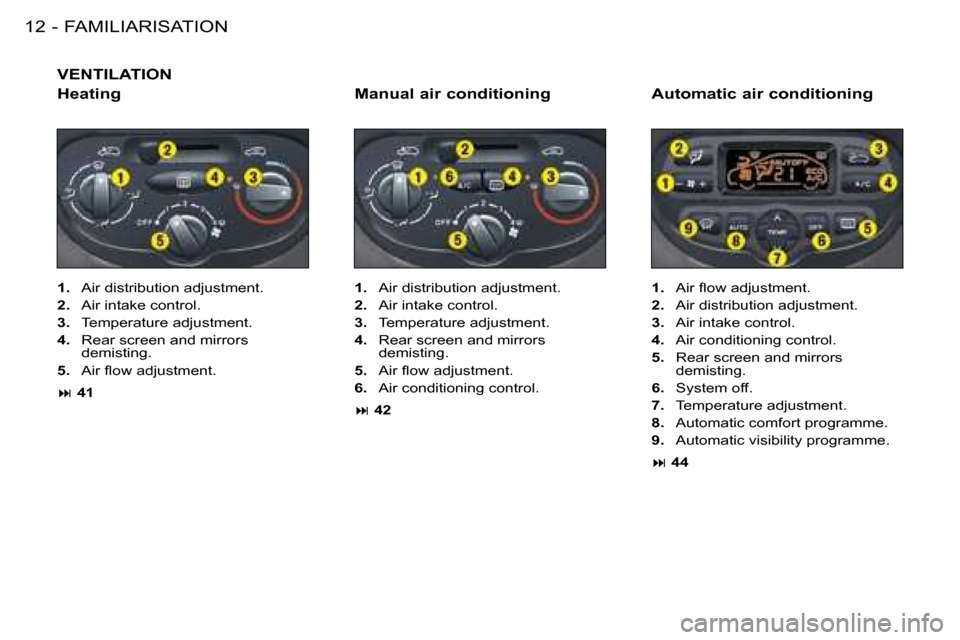
VENTILATION
1. Air distribution adjustment.
2. Air intake control.
3. Temperature adjustment.
4. Rear screen and mirrors
demisting.
5. � �A�i�r� �l�o�w� �a�d�j�u�s�t�m�e�n�t�.
6. Air conditioning control.
�: 42 1.
� �A�i�r� �l�o�w� �a�d�j�u�s�t�m�e�n�t�.
2. Air distribution adjustment.
3. Air intake control.
4. Air conditioning control.
5. Rear screen and mirrors
demisting.
6. System off.
7. Temperature adjustment.
8. Automatic comfort programme.
9. Automatic visibility programme.
�: 44
1.
Air distribution adjustment.
2. Air intake control.
3. Temperature adjustment.
4. Rear screen and mirrors
demisting.
5. � �A�i�r� �l�o�w� �a�d�j�u�s�t�m�e�n�t�.
�: 41
Heating Manual air conditioning Automatic air conditioning
Page 10 of 123

13
FAMILIARISATION
-
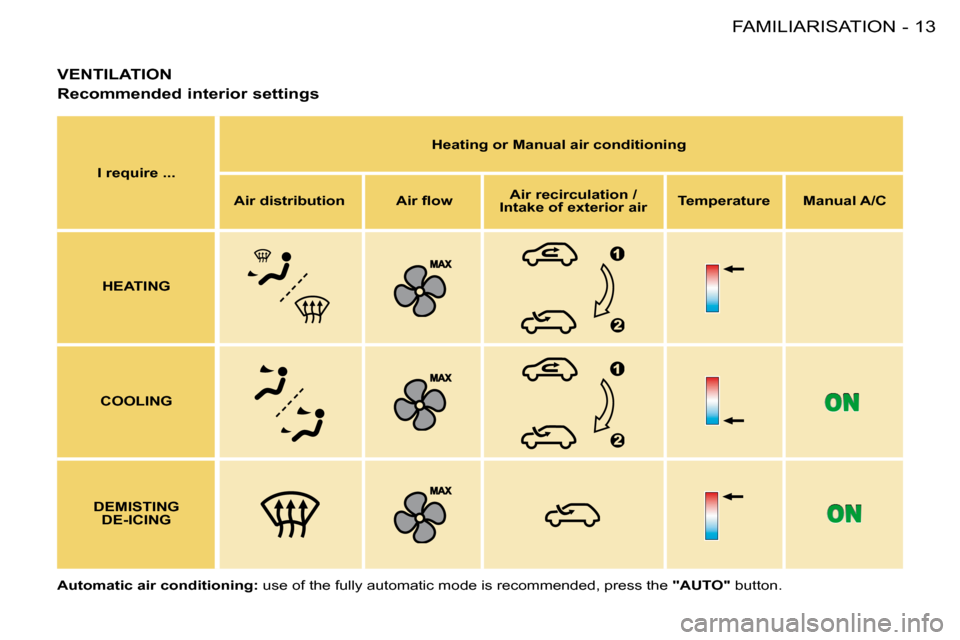
VENTILATION
Recommended interior settings
I require ... Heating or Manual air conditioning
Air distribution � �A�i�r� �l�o�wAir recirculation /
Intake of exterior air Temperature Manual A/C
HEATING
COOLING
DEMISTING DE-ICING
Automatic air conditioning: � �u�s�e� �o�f� �t�h�e� �f�u�l�l�y� �a�u�t�o�m�a�t�i�c� �m�o�d�e� �i�s� �r�e�c�o�m�m�e�n�d�e�d�,� �p�r�e�s�s� �t�h�e� "AUTO" button.
Page 38 of 123

39
COMFORT
-
VENTILATION
1. Windscreen de-icing or
demisting vents.
2. Front door windows
de-icing or demisting
vents.
3. Side vents.
4. Centre vents.
5. Air outlet to front
footwells.
6. Air outlet to rear footwells
(with automatic air
conditioning only). Advice on operation and
notes
�P�l�a�c�e� �t�h�e� �a�i�r� �l�o�w� �c�o�n�t�r�o�l� �a�t� �a� �l�e�v�e�l�
�s�u�f�i�c�i�e�n�t� �t�o� �e�n�s�u�r�e� �a�n� �a�d�e�q�u�a�t�e� �r�e
-
newal of air in the passenger com-
partment.
�W�h�e�n� �t�h�e� �a�i�r� �l�o�w� �c�o�n�t�r�o�l� �i�s� �i�n� �t�h�e�
OFF position (system switched off),
temperature-related comfort is no
longer guaranteed. However, a slight
�l�o�w� �o�f� �a�i�r�,� �d�u�e� �t�o� �t�h�e� �m�o�v�e�m�e�n�t� �o�f�
the vehicle, can still be felt.
Select the air distribution which is
�m�o�s�t� �s�u�i�t�e�d� �t�o� �y�o�u�r� �r�e�q�u�i�r�e�m�e�n�t�s� �a�n�d�
the weather conditions.
Change the temperature setting pro-
gressively for greater comfort.
Place the air intake control in the
"Exterior air" position, this facilitates
demisting.
If the interior temperature remains
very high following a long period
parked in the sun, do not hesitate to
ventilate the passenger compartment
for a few minutes.
To obtain a perfectly uniform distribu-
tion of air, do not cover the exterior
air intake grille, the vents, the air pas-
sages and the air outlets in the foot-
wells. In certain cases of particularly ardu-
ous use (towing the maximum load
on a steep gradient in a high temper-
ature), cutting off the air conditioning
permits recovery of the engine power
and, therefore improvement of the
towing capacity.
Ensure that the passenger com-
�p�a�r�t�m�e�n�t� �i�l�t�e�r�,� �l�o�c�a�t�e�d� �b�y� �t�h�e� �w�i�n�d
-
screen, under the bonnet, is in good
�c�o�n�d�i�t�i�o�n�.� �H�a�v�e� �t�h�e� �i�l�t�e�r� �e�l�e�m�e�n�t�s�
replaced regularly. If you drive in a
dusty environment, change them
twice as often.
The air conditioning system does not
contain chlorine and does not present
any danger to the ozone layer.
Operate the air conditioning system
for 5 to 10 minutes, once or twice a
month to keep it in perfect working
order.
The water formed by the condensa-
tion of the air conditioning system is
discharged via an opening provided
for this purpose. Therefore, a pud-
dle may form underneath the vehicle
when stationary.
If the system does not produce
cold air, do not use it and contact a
PEUGEOT dealer.
Page 39 of 123

COMFORT
40 -
DE-ICING AND DEMISTING
De-icing the rear screen and
mirrors
When the engine is running,
pressing this button de-ices
the rear screen and exterior
mirrors.
It switches off automatically, after approximately twelve minutes,
to prevent an excessive consumption
of current. Pressing the button again
restarts operation for twelve minutes.
It is possible to stop the operation of
the de-icing before it is switched off
automatically by pressing the button
again.
Switch off the de-icing as soon as
you consider this necessary as low
current consumption reduces fuel
consumption. Manual demisting
�T�o� �q�u�i�c�k�l�y� �d�e�m�i�s�t� �t�h�e� �w�i�n�d�s�c�r�e�e�n� �a�n�d�
side windows:
- switch on the air conditioning,
- place the temperature and air
�l�o�w� �c�o�n�t�r�o�l�s� �i�n� �t�h�e� �m�a�x�i�m�u�m�
position,
- close the central vents,
- place the exterior air intake control on the left, in the
"Exterior Air" position. Automatic demisting,
visibility programme
In some cases, the AUTO programme
�m�a�y� �n�o�t� �b�e� �s�u�f�i�c�i�e�n�t� �t�o� �d�e�m�i�s�t� �t�h�e�
windscreen and side windows (hu-
midity, several passengers, ice...).
Select the
"visibility" demisting pro-
gramme by pressing this button to
�c�l�e�a�r� �t�h�e� �w�i�n�d�o�w�s� �q�u�i�c�k�l�y�.
To exit from this programme and re-
turn to the AUTO programme, press
the AUTO button.
Page 41 of 123

COMFORT
42 -
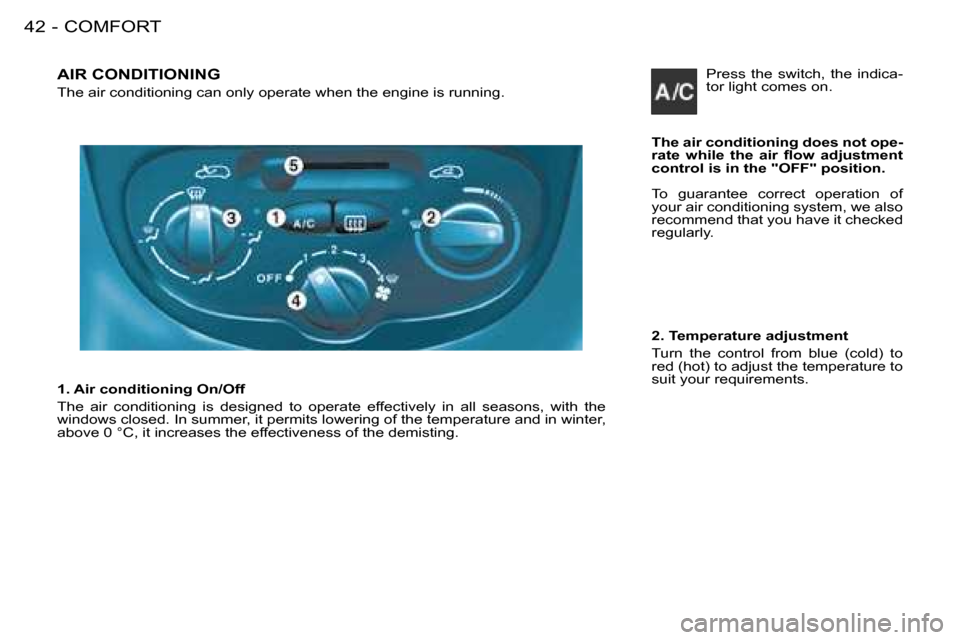
AIR CONDITIONING
The air conditioning can only operate when the engine is running.
The air conditioning does not ope-
�r�a�t�e� �w�h�i�l�e� �t�h�e� �a�i�r� �l�o�w� �a�d�j�u�s�t�m�e�n�t�
control is in the "OFF" position.
To guarantee correct operation of
your air conditioning system, we also
recommend that you have it checked
regularly.
1. Air conditioning On/Off
The air conditioning is designed to operate effectively in all seasons, with the
windows closed. In summer, it permits lowering of the temperatu re and in winter,
above 0 °C, it increases the effectiveness of the demisting. 2. Temperature adjustment
Turn the control from blue (cold) to
red (hot) to adjust the temperature to
�s�u�i�t� �y�o�u�r� �r�e�q�u�i�r�e�m�e�n�t�s�.Press the switch, the indica-
tor light comes on.
Page 42 of 123

43
COMFORT
-
Windscreen and side win-
dows (de-icing/demisting).
Windscreen, side windows
and footwells.
Footwells.
3. Air distribution adjustment
Centre and side vents. This
setting is recommended for
hot climates.
These settings are recommended for
cold climates.
The air distribution can be adjusted
by placing the control in an interme-
diate position. �4�.� �A�i�r� �l�o�w� �a�d�j�u�s�t�m�e�n�t
Turn the control from position
1 to position 4 to obtain an
�a�i�r� �l�o�w� �s�u�f�i�c�i�e�n�t� �t�o� �e�n�s�u�r�e�
your comfort. Intake of exterior air.
Air recirculation.
The recirculation of interior air pre-
vents exterior odours and smoke en-
tering the passenger compartment.
The intake of exterior air prevents
and eliminates misting of the wind-
screen and side windows.
Used simultaneously with the air con-
ditioning, air recirculation improves
air conditioning performance.
Used in a damp climate, air recircula-
tion may result in misting of the win-
dows.
Move the manual control 5 to the
right to the "Interior air recirculation"
position.
Move the manual control 5 to the left
to the "Exterior air intake" position as
soon as possible to prevent deterio-
�r�a�t�i�o�n� �o�f� �t�h�e� �a�i�r� �q�u�a�l�i�t�y�.
5. Air intake / Air recirculation
Page 43 of 123

COMFORT
44 -
AUTOMATIC AIR CONDITIONING
The air conditioning can only operate when the engine is running.
Automatic operation 2. Control by the AUTO programme
Press the "AUTO" button.
We recommend that you use
this mode: it provides opti-
mised automatic control of
all of the functions, passenger com-
�p�a�r�t�m�e�n�t� �t�e�m�p�e�r�a�t�u�r�e�,� �a�i�r� �l�o�w�,� �a�i�r�
distribution and air recirculation, in
accordance with the comfort value
that you have chosen. This system is
designed to operate effectively in all
seasons, with the windows closed. Note:
for your comfort, the values
set when the engine is switched off
are retained on re-starting if the tem-
perature in the passenger compart-
�m�e�n�t� �h�a�s� �n�o�t� �c�h�a�n�g�e�d� �s�i�g�n�i�i�c�a�n�t�l�y�;�
otherwise, operation resumes in au-
tomatic mode.
When the engine is cold, to prevent
too great a distribution of cold air, the
ventilation will only reach its optimum
level gradually.
On entering the vehicle, if the interior
temperature is much colder or war-
mer than is comfortable, there is no
need to change the value displayed
�i�n� �o�r�d�e�r� �t�o� �r�e�a�c�h� �t�h�e� �r�e�q�u�i�r�e�d� �l�e�v�e�l� �o�f�
comfort. The system eliminates the
temperature difference automatically
�a�n�d� �a�s� �q�u�i�c�k�l�y� �a�s� �p�o�s�s�i�b�l�e�.
Manual operation
If you wish, you can make a different
choice from that offered by the sys-
tem by changing a setting. The other
functions will still be controlled auto-
matically.
Pressing the AUTO button returns
the system to completely automatic
operation.
1. Temperature adjustment
The value indicated on the
display corresponds to a
level of comfort and not to a
temperature in degrees Cel-
sius or Fahrenheit.
Press the arrows 1 (up and down) to
change this value. A setting around
21 enables a comfortable tempera-
ture to be obtained.