2008 NISSAN XTERRA seats
[x] Cancel search: seatsPage 38 of 320
cPeriodically check to see that the seat
belt and the metal components,such as
buckles, tongues, retractors, flexible wires
and anchors, work properly. If loose parts,
deterioration, cuts or other damage on the
webbing is found, the entire seat belt as-
sembly should be replaced.
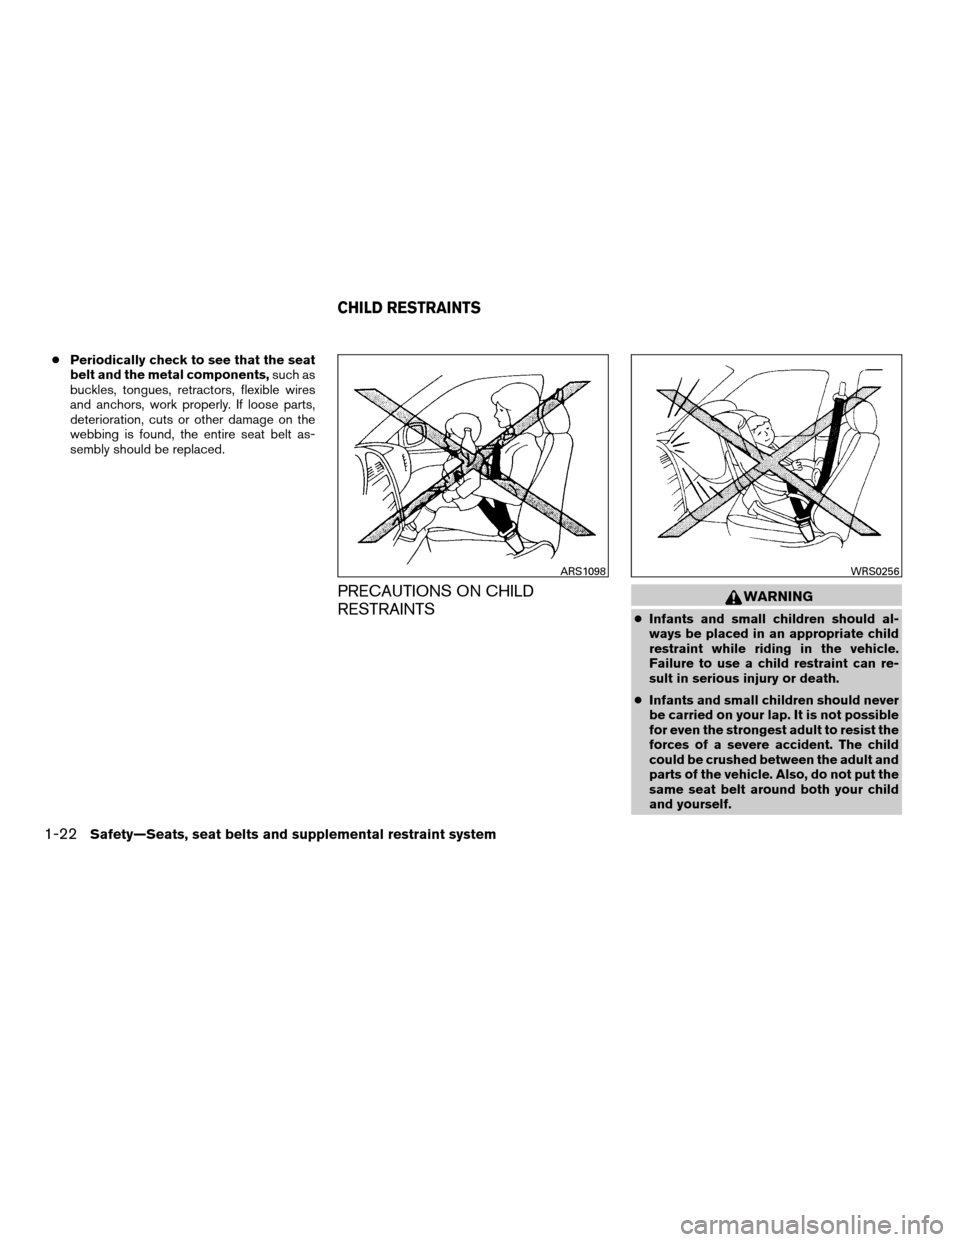
PRECAUTIONS ON CHILD
RESTRAINTSWARNING
cInfants and small children should al-
ways be placed in an appropriate child
restraint while riding in the vehicle.
Failure to use a child restraint can re-
sult in serious injury or death.
cInfants and small children should never
be carried on your lap. It is not possible
for even the strongest adult to resist the
forces of a severe accident. The child
could be crushed between the adult and
parts of the vehicle. Also, do not put the
same seat belt around both your child
and yourself.
ARS1098WRS0256
CHILD RESTRAINTS
1-22Safety—Seats, seat belts and supplemental restraint system
ZREVIEW COPYÐ2008 Xterra(xtr)
Owners ManualÐUSA_English(nna)
06/26/07Ðdebbie
X
Page 39 of 320
cEven with the NISSAN Advanced Air
Bag System, never install a rear-facing
child restraint in the front seat. An in-
flating front air bag could seriously in-
jure or kill your child. A rear-facing child
restraint must only be used in the rear
seat.
cNISSAN recommends that the child re-
straint be installed in the rear seat. Ac-
cording to accident statistics, children
are safer when properly restrained in
the rear seat than in the front seat. If
you must install a front facing child re-
straint in the front seat, see “Child re-
straint installation using the seat belts”
later in this section.
cImproper use or improper installation
of a child restraint can increase the risk
or severity of injury for both the child
and other occupants of the vehicle and
can lead to serious injury or death in an
accident.
cFollow all of the child restraint manu-
facturer’s instructions for installation
and use. When purchasing a child re-
straint, be sure to select one which will
fit your child and vehicle. It may not be
possible to properly install some types
of child restraints in your vehicle.cIf the child restraint is not anchored
properly, the risk of a child being in-
jured in a collision or a sudden stop
greatly increases.
cChild restraint anchor points are de-
signed to withstand only those loads
imposed by correctly fitted child re-
straints. Under no circumstances are
they to be used for adult seat belts or
harnesses.
cAdjustable seatbacks should be posi-
tioned to fit the child restraint, but as
upright as possible.
cAfter attaching the child restraint, test it
before you place the child in it. Push it
from side to side while holding the seat
near the LATCH attachment or by the
seat belt path. Try to tug it forward and
check to see if the belt holds the re-
straint in place. The child restraint
should not move more than 1 inch (25
mm) . If the restraint is not secure,
tighten the belt as necessary, or put the
restraint in another seat and test it
again. You may need to try a different
child restraint. Not all child restraints fit
in all types of vehicles.cWhen your child restraint is not in use,
keep it secured with the LATCH System
or a seat belt to prevent it from being
thrown around in case of a sudden stop
or accident.
CAUTION
Remember that a child restraint left in a
closed vehicle can become very hot.
Check the seating surface and buckles
before placing your child in the child
restraint.
This vehicle is equipped with a universal child
restraint lower anchor system, referred to as the
Lower Anchors and Tethers for CHildren System
or LATCH. Some child restraints include two rigid
or webbing-mounted attachments that can be
connected to these lower anchors. For details,
see the “Lower Anchors and Tethers for CHildren
System (LATCH)” later in this section.
If you do not have a LATCH compatible child
restraint, the vehicle seat belts can be used. See
“Child restraint installation using the seat belts”
later in this section. In general, child restraints are
also designed to be installed with the lap portion
of a lap/shoulder seat belt.
Safety—Seats, seat belts and supplemental restraint system1-23
ZREVIEW COPYÐ2008 Xterra(xtr)
Owners ManualÐUSA_English(nna)
06/26/07Ðdebbie
X
Page 40 of 320
Several manufacturers offer child restraints for
infants and small children of various sizes. When
selecting any child restraint, keep the following
points in mind:
cChoose only a restraint with a label certifying
that it complies with Federal Motor Vehicle
Safety Standard 213 or Canadian Motor
Vehicle Safety Standard 213.
cCheck the child restraint in your vehicle to be
sure it is compatible with the vehicle’s seat
and seat belt system.
cIf the child restraint is compatible with your
vehicle, place your child in the child restraint
and check the various adjustments to be
sure the child restraint is compatible with
your child. Choose a child restraint that is
designed for your child’s height and weight.
Always follow all recommended procedures.
All U.S. states and Canadian provinces or
territories require that infants and small
children be restrained in an approved child
restraint at all times while the vehicle is
being operated.
LOWER ANCHORS AND TETHERS
FOR CHILDREN SYSTEM (LATCH)
Your vehicle is equipped with special anchor
points that are used with Lower Anchors and
Tethers for CHildren System (LATCH) compat-
ible child restraints. This system may also be
referred to as the ISOFIX or ISOFIX compatible
system. With this system, you do not have to use
a vehicle seat belt to secure the child restraint.
The LATCH anchor points are provided to install
child restraints in the rear outboard seating posi-
tions only. Do not attempt to install a child restraint
in the center position using the LATCH anchors.
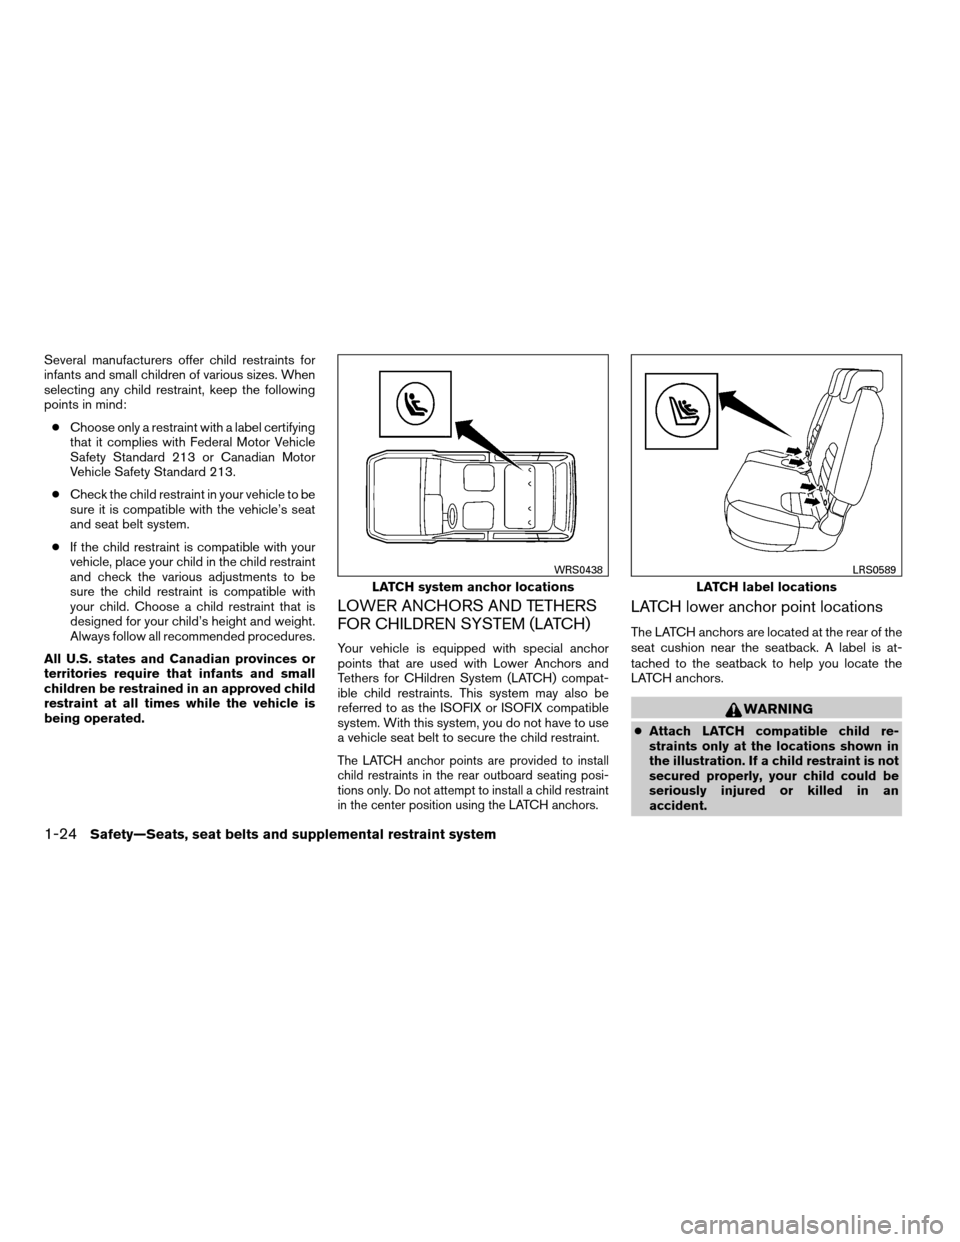
LATCH lower anchor point locations
The LATCH anchors are located at the rear of the
seat cushion near the seatback. A label is at-
tached to the seatback to help you locate the
LATCH anchors.
WARNING
cAttach LATCH compatible child re-
straints only at the locations shown in
the illustration. If a child restraint is not
secured properly, your child could be
seriously injured or killed in an
accident.
LATCH system anchor locations
WRS0438
LATCH label locations
LRS0589
1-24Safety—Seats, seat belts and supplemental restraint system
ZREVIEW COPYÐ2008 Xterra(xtr)
Owners ManualÐUSA_English(nna)
06/26/07Ðdebbie
X
Page 41 of 320
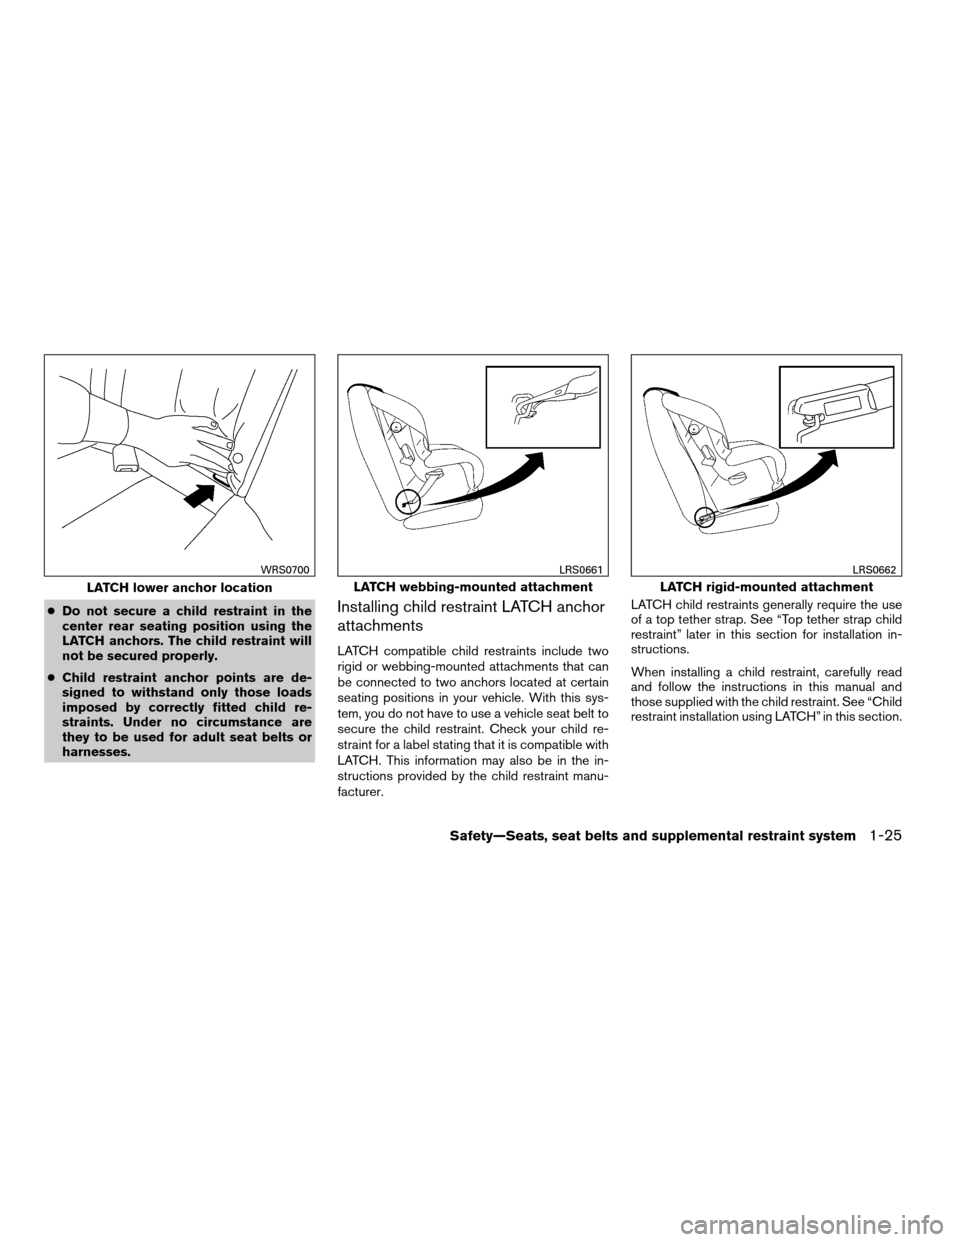
cDo not secure a child restraint in the
center rear seating position using the
LATCH anchors. The child restraint will
not be secured properly.
cChild restraint anchor points are de-
signed to withstand only those loads
imposed by correctly fitted child re-
straints. Under no circumstance are
they to be used for adult seat belts or
harnesses.Installing child restraint LATCH anchor
attachments
LATCH compatible child restraints include two
rigid or webbing-mounted attachments that can
be connected to two anchors located at certain
seating positions in your vehicle. With this sys-
tem, you do not have to use a vehicle seat belt to
secure the child restraint. Check your child re-
straint for a label stating that it is compatible with
LATCH. This information may also be in the in-
structions provided by the child restraint manu-
facturer.LATCH child restraints generally require the use
of a top tether strap. See “Top tether strap child
restraint” later in this section for installation in-
structions.
When installing a child restraint, carefully read
and follow the instructions in this manual and
those supplied with the child restraint. See “Child
restraint installation using LATCH” in this section.
LATCH lower anchor location
WRS0700
LATCH webbing-mounted attachment
LRS0661
LATCH rigid-mounted attachment
LRS0662
Safety—Seats, seat belts and supplemental restraint system1-25
ZREVIEW COPYÐ2008 Xterra(xtr)
Owners ManualÐUSA_English(nna)
06/26/07Ðdebbie
X
Page 42 of 320
TOP TETHER STRAP CHILD
RESTRAINT
If the manufacturer of your child restraint requires
the use of a top tether strap, it must be secured to
the anchor point.
WARNING
cChild restraint anchor points are de-
signed to withstand only those loads
imposed by correctly fitted child re-
straints. Under no circumstances are
they to be used for adult seat belts or
harnesses.
cDo not allow cargo to contact the top
tether strap when it is attached to the
top tether anchor. Properly secure the
cargo so it does not contact the top
tether strap. Cargo that is not properly
secured or cargo that contacts the top
tether strap may damage it during a
collision. Your child could be seriously
injured or killed in a collision if the top
tether strap is damaged.
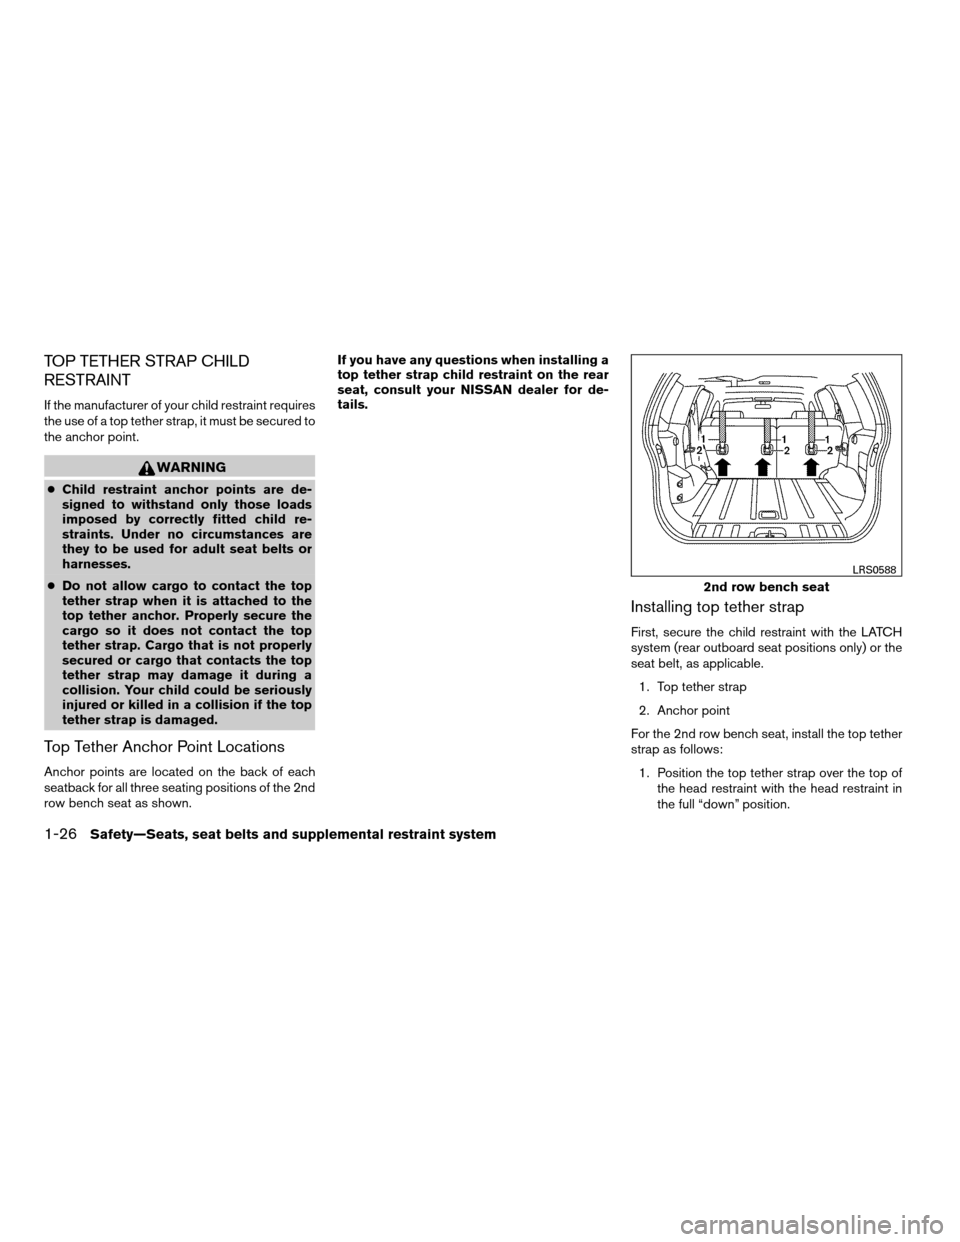
Top Tether Anchor Point Locations
Anchor points are located on the back of each
seatback for all three seating positions of the 2nd
row bench seat as shown.If you have any questions when installing a
top tether strap child restraint on the rear
seat, consult your NISSAN dealer for de-
tails.
Installing top tether strap
First, secure the child restraint with the LATCH
system (rear outboard seat positions only) or the
seat belt, as applicable.
1. Top tether strap
2. Anchor point
For the 2nd row bench seat, install the top tether
strap as follows:
1. Position the top tether strap over the top of
the head restraint with the head restraint in
the full “down” position.
2nd row bench seat
LRS0588
1-26Safety—Seats, seat belts and supplemental restraint system
ZREVIEW COPYÐ2008 Xterra(xtr)
Owners ManualÐUSA_English(nna)
06/26/07Ðdebbie
X
Page 43 of 320
2. Secure the tether strap to the tether anchor
point on the seat directly behind the child
restaint.
3. Tighten the tether strap according to the
manufacturer’s instructions to remove any
slack.
For best child restraint fit, see the child restraint
installation instructions in this section and the
child restraint manufacturer’s instructions.
CHILD RESTRAINT INSTALLATION
USING LATCH
WARNING
cAttach LATCH compatible child re-
straints only at the locations shown. For
the LATCH lower anchor locations, see
“Lower Anchors and Tethers for CHil-
dren System (LATCH)” in this section. If
a child restraint is not secured properly,
your child could be seriously injured or
killed in an accident.
cThe LATCH anchors are designed to
withstand only those loads imposed by
correctly fitted child restraints. Under
no circumstance are they to be used for
adult seat belts or harnesses.cInspect the lower anchors by inserting
your fingers into the lower anchor area
and feeling to make sure there are no
obstructions over the LATCH anchors,
such as seat belt webbing or seat cush-
ion material. The child restraint will not
be secured properly if the LATCH an-
chors are obstructed.
Front-facing
Follow these steps to install a front-facing child
restraint using LATCH:
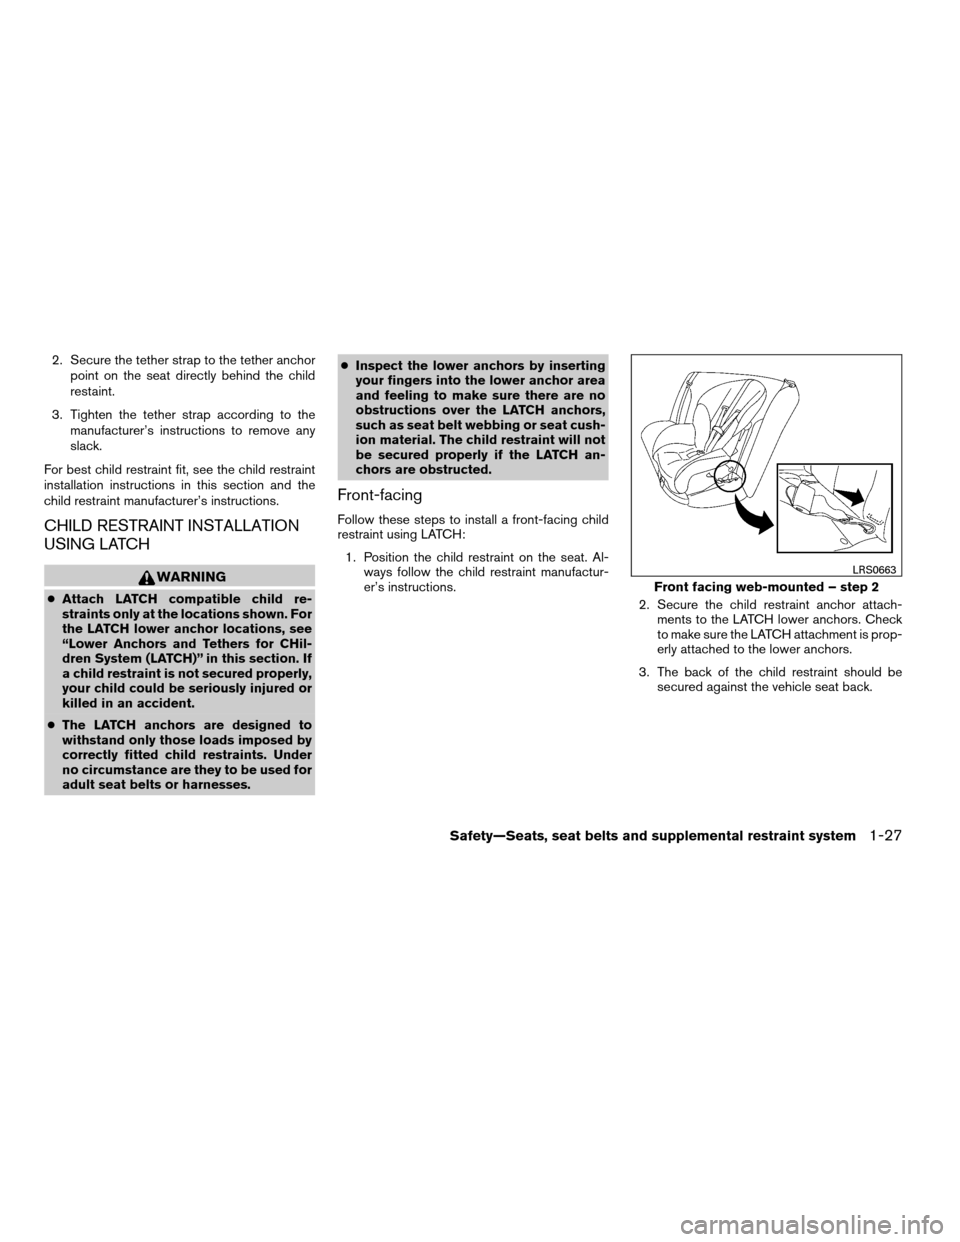
1. Position the child restraint on the seat. Al-
ways follow the child restraint manufactur-
er’s instructions.
2. Secure the child restraint anchor attach-
ments to the LATCH lower anchors. Check
to make sure the LATCH attachment is prop-
erly attached to the lower anchors.
3. The back of the child restraint should be
secured against the vehicle seat back.
Front facing web-mounted – step 2
LRS0663
Safety—Seats, seat belts and supplemental restraint system1-27
ZREVIEW COPYÐ2008 Xterra(xtr)
Owners ManualÐUSA_English(nna)
06/26/07Ðdebbie
X
Page 44 of 320

If necessary, adjust or remove the head restraint
to obtain the correct child restraint fit. See “Head
restraint adjustment” in this section. If the head
restraint is removed, store it in a secure place. Be
sure to install the head restraint when the child
restraint is removed. If the seating position does
not have an adjustable head restraint and it is
interfering with the proper child restraint fit, try
another seating position or a different child re-
straint.4. For child restraints that are equipped with
webbing mounted attachments, remove any
additional slack from the anchor attach-
ments. Press downward and rearward firmly
in the center of the child restraint with your
knee to compress the vehicle seat cushion
and seatback while tightening the webbing
of the anchor attachments.
5. If the child restraint is equipped with a top
tether strap, route the top tether strap and
secure the tether strap to the tether anchor
point. See “Top tether strap child restraint” in
this section.6. Before placing the child in the child restraint,
hold the child restraint near the LATCH at-
tachment and use force to push the child
restraint from side to side, and tug it forward
to make sure that it is securely held in place.
It should not move more than 1 in (25 mm) . If
it does move more than 1 in (25 mm) , pull
again on the anchor attachments to further
tighten the child restraint. If you are unable to
properly secure the restraint, move the re-
straint to another seating position and try
again, or try a different child restraint. Not all
child restraints fit in all types of vehicles.
Front facing rigid-mounted – step 2
LRS0664
Front facing – step 4
LRS0671
Front facing – step 6
WRS0697
1-28Safety—Seats, seat belts and supplemental restraint system
ZREVIEW COPYÐ2008 Xterra(xtr)
Owners ManualÐUSA_English(nna)
06/26/07Ðdebbie
X
Page 45 of 320

7. Check to make sure the child restraint is
properly secured prior to each use. If the
child restraint is loose, repeat steps 3
through 6.
Rear-facing
Follow these steps to install a rear-facing child
restraint using LATCH System:
1. Position the child restraint on the seat. Al-
ways follow the child restraint manufactur-
er’s instructions.
2. Secure the child restraint anchor attach-
ments to the LATCH lower anchors. Check
to make sure the LATCH attachment is prop-
erly attached to the lower anchors.
Rear facing web-mounted – step 2
LRS0665
Rear facing rigid-mounted – step 2
LRS0666
Safety—Seats, seat belts and supplemental restraint system1-29
ZREVIEW COPYÐ2008 Xterra(xtr)
Owners ManualÐUSA_English(nna)
06/26/07Ðdebbie
X