2008 NISSAN XTERRA mirror
[x] Cancel search: mirrorPage 125 of 320

3 Pre-driving checks and adjustments
Keys .............................................3-2
NISSAN vehicle immobilizer system keys
(if so equipped)................................3-2
Doors............................................3-3
Locking with key................................3-3
Locking with inside lock knob....................3-4
Locking with power door lock switch
(if so equipped)................................3-4
Child safety rear door lock.......................3-5
Remote keyless entry system (if so equipped).........3-5
How to use remote keyless entry system..........3-6
Hood............................................3-8
Lift gate..........................................3-9Fuel-filler door....................................3-9
Opening the fuel-filler lid........................3-9
Fuel-filler cap.................................3-10
Steering wheel...................................3-11
Tilt operation..................................3-11
Sun visors.......................................3-11
Vanity mirrors (if so equipped)...................3-12
Mirrors..........................................3-12
Rearview mirror...............................3-12
Automatic anti-glare rearview mirror
(if so equipped)...............................3-13
Outside mirrors...............................3-13
ZREVIEW COPYÐ2008 Xterra(xtr)
Owners ManualÐUSA_English(nna)
06/26/07Ðdebbie
X
Page 136 of 320

s3Slide the extension sun visor (if so equipped)
in or out as needed.
CAUTION
cDo not store the sun visor before return-
ing the extension to its original
position.
cDo not pull the extension sun visor forc-
edly downward.
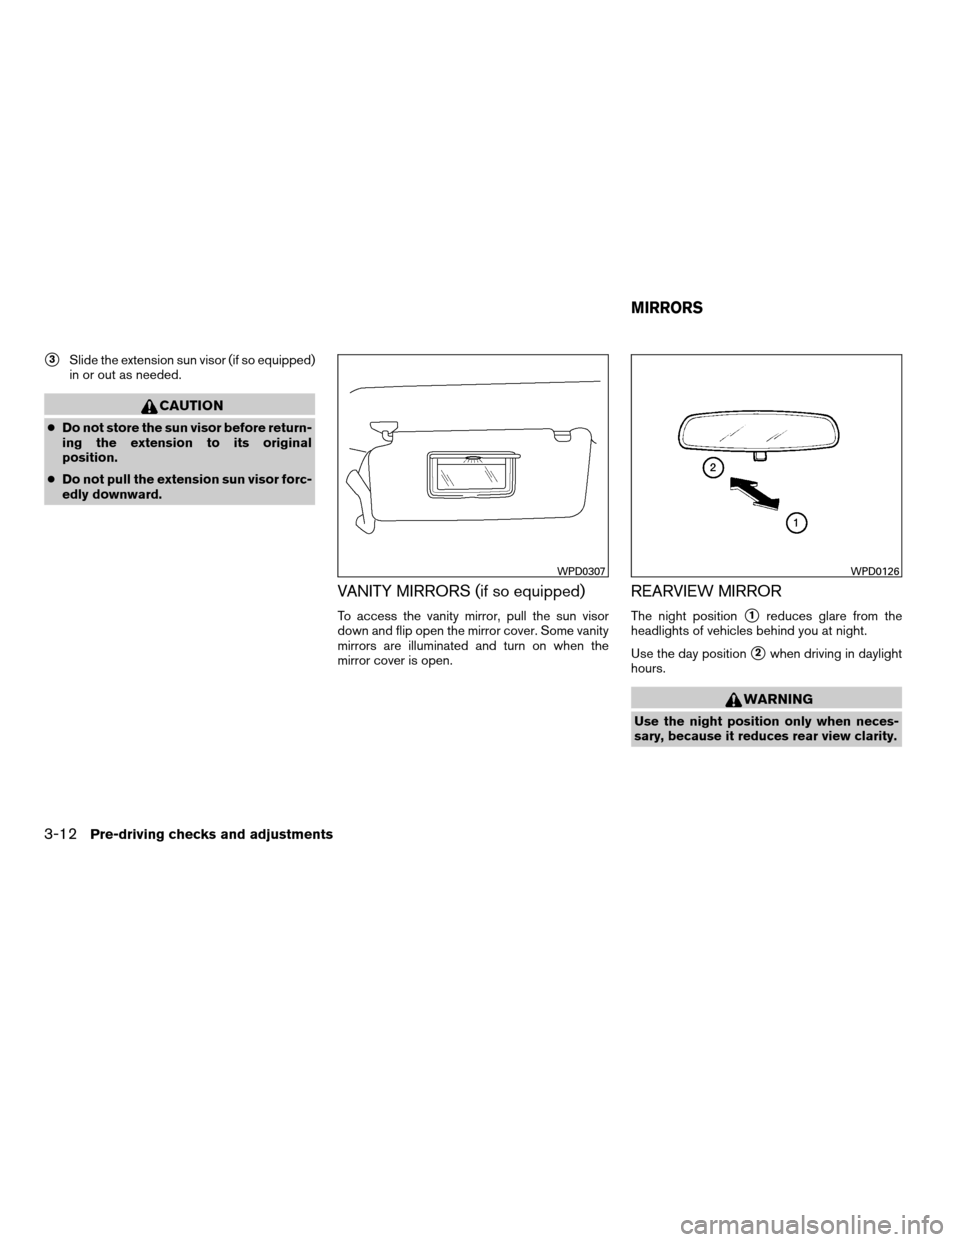
VANITY MIRRORS (if so equipped)
To access the vanity mirror, pull the sun visor
down and flip open the mirror cover. Some vanity
mirrors are illuminated and turn on when the
mirror cover is open.
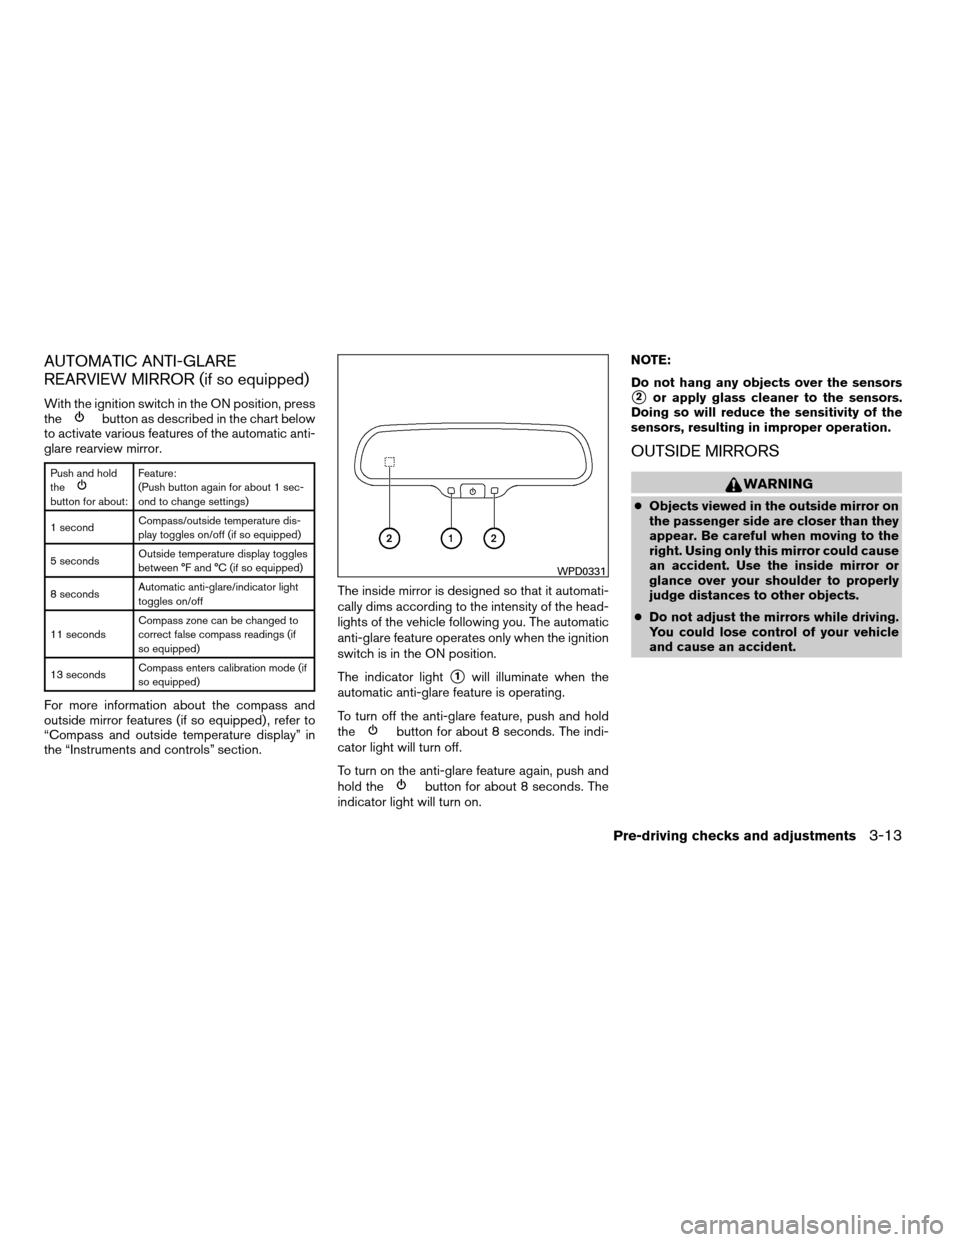
REARVIEW MIRROR
The night positions1reduces glare from the
headlights of vehicles behind you at night.
Use the day position
s2when driving in daylight
hours.
WARNING
Use the night position only when neces-
sary, because it reduces rear view clarity.
WPD0307WPD0126
MIRRORS
3-12Pre-driving checks and adjustments
ZREVIEW COPYÐ2008 Xterra(xtr)
Owners ManualÐUSA_English(nna)
06/26/07Ðdebbie
X
Page 137 of 320

AUTOMATIC ANTI-GLARE
REARVIEW MIRROR (if so equipped)
With the ignition switch in the ON position, press
thebutton as described in the chart below
to activate various features of the automatic anti-
glare rearview mirror.
Push and hold
the
button for about:Feature:
(Push button again for about 1 sec-
ond to change settings)
1 secondCompass/outside temperature dis-
play toggles on/off (if so equipped)
5 secondsOutside temperature display toggles
between °F and °C (if so equipped)
8 secondsAutomatic anti-glare/indicator light
toggles on/off
11 secondsCompass zone can be changed to
correct false compass readings (if
so equipped)
13 secondsCompass enters calibration mode (if
so equipped)
For more information about the compass and
outside mirror features (if so equipped) , refer to
“Compass and outside temperature display” in
the “Instruments and controls” section.The inside mirror is designed so that it automati-
cally dims according to the intensity of the head-
lights of the vehicle following you. The automatic
anti-glare feature operates only when the ignition
switch is in the ON position.
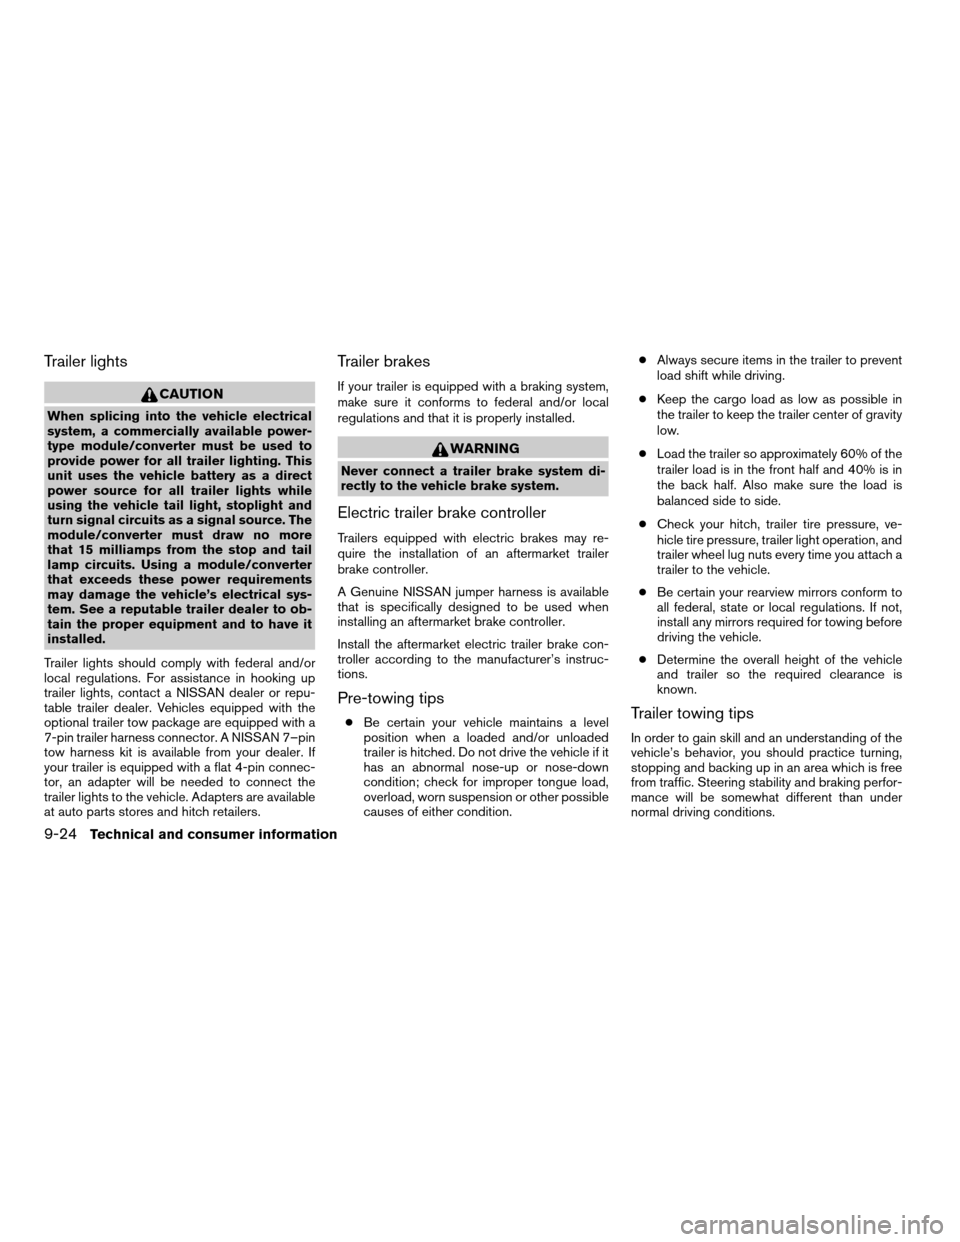
The indicator light
s1will illuminate when the
automatic anti-glare feature is operating.
To turn off the anti-glare feature, push and hold
the
button for about 8 seconds. The indi-
cator light will turn off.
To turn on the anti-glare feature again, push and
hold the
button for about 8 seconds. The
indicator light will turn on.NOTE:
Do not hang any objects over the sensors
s2or apply glass cleaner to the sensors.
Doing so will reduce the sensitivity of the
sensors, resulting in improper operation.
OUTSIDE MIRRORS
WARNING
cObjects viewed in the outside mirror on
the passenger side are closer than they
appear. Be careful when moving to the
right. Using only this mirror could cause
an accident. Use the inside mirror or
glance over your shoulder to properly
judge distances to other objects.
cDo not adjust the mirrors while driving.
You could lose control of your vehicle
and cause an accident.
WPD0331
Pre-driving checks and adjustments3-13
ZREVIEW COPYÐ2008 Xterra(xtr)
Owners ManualÐUSA_English(nna)
06/26/07Ðdebbie
X
Page 138 of 320

Electric control type
The outside mirror remote control will operate
only when the ignition switch is in the ACC or ON
position.
Move the small switch
s1to select the right or left
mirror. Adjust each mirror to the desired position
using the large switch
s2.
Heated mirrors (if so equipped)
Some outside mirrors can be heated to defrost,
defog, or de-ice for improved visibility. For addi-
tional information, see “Rear window and outside
mirror (if so equipped) defroster switch” in the
“Instrument and controls” section of this manual.
Foldable outside mirrors
Pull the outside mirror toward the door to fold it.
LPD0237LPD0259
3-14Pre-driving checks and adjustments
ZREVIEW COPYÐ2008 Xterra(xtr)
Owners ManualÐUSA_English(nna)
06/26/07Ðdebbie
X
Page 190 of 320

To lock the steering wheel, turn the key to
the LOCK position. Remove the key. To
unlock the steering wheel, insert the key
and turn it gently while rotating the steer-
ing wheel slightly right and left.
KEY POSITIONS
LOCK: Normal parking position (0)
OFF: (Not used) (1)
ACC: (Accessories) (2)
This position activates electrical accessories
such as the radio when the engine is not running.
ON: Normal operating position (3)
This position turns on the ignition system and the
electrical accessories.
START: (4)
This position starts the engine. As soon as the
engine has started, release the key. It automati-
cally returns to the ON position.
NISSAN VEHICLE IMMOBILIZER
SYSTEM (if so equipped)
The NISSAN Vehicle Immobilizer System will not
allow the engine to start without the use of the
registered key.If the engine fails to start using a registered key
(for example, when interference is caused by
another registered key, an automated toll road
device or automatic payment device on the key
ring) , restart the engine using the following pro-
cedures:
1. Leave the ignition switch in the ON position
for approximately 5 seconds.
2. Turn the ignition switch to the OFF or LOCK
position, and wait approximately 10 sec-
onds.
3. Repeat steps 1 and 2.
4. Restart the engine while holding the device
(which may have caused the interference)
separate from the registered key.
If the no start condition re-occurs, NISSAN rec-
ommends placing the registered key on a sepa-
rate key ring to avoid interference from other
devices.cMake sure the area around the vehicle is
clear.
cCheck fluid levels such as engine oil, cool-
ant, brake fluid, and window washer fluid as
frequently as possible, or at least whenever
you refuel.
cCheck that all windows and lights are clean.
cVisually inspect tires for their appearance
and condition. Also check tires for proper
inflation.
cLock all doors.
cPosition seat and adjust head restraints.
cAdjust inside and outside mirrors.
cFasten seat belts and ask all passengers to
do likewise.
cCheck the operation of warning lights when
the key is turned to the ON (3) position. See
“Warning/indicator lights and audible re-
minders” in the “Instruments and controls”
section of this manual.
BEFORE STARTING THE ENGINE
5-10Starting and driving
ZREVIEW COPYÐ2008 Xterra(xtr)
Owners ManualÐUSA_English(nna)
06/26/07Ðdebbie
X
Page 302 of 320

Trailer lights
CAUTION
When splicing into the vehicle electrical
system, a commercially available power-
type module/converter must be used to
provide power for all trailer lighting. This
unit uses the vehicle battery as a direct
power source for all trailer lights while
using the vehicle tail light, stoplight and
turn signal circuits as a signal source. The
module/converter must draw no more
that 15 milliamps from the stop and tail
lamp circuits. Using a module/converter
that exceeds these power requirements
may damage the vehicle’s electrical sys-
tem. See a reputable trailer dealer to ob-
tain the proper equipment and to have it
installed.
Trailer lights should comply with federal and/or
local regulations. For assistance in hooking up
trailer lights, contact a NISSAN dealer or repu-
table trailer dealer. Vehicles equipped with the
optional trailer tow package are equipped with a
7-pin trailer harness connector. A NISSAN 7–pin
tow harness kit is available from your dealer. If
your trailer is equipped with a flat 4-pin connec-
tor, an adapter will be needed to connect the
trailer lights to the vehicle. Adapters are available
at auto parts stores and hitch retailers.
Trailer brakes
If your trailer is equipped with a braking system,
make sure it conforms to federal and/or local
regulations and that it is properly installed.
WARNING
Never connect a trailer brake system di-
rectly to the vehicle brake system.
Electric trailer brake controller
Trailers equipped with electric brakes may re-
quire the installation of an aftermarket trailer
brake controller.
A Genuine NISSAN jumper harness is available
that is specifically designed to be used when
installing an aftermarket brake controller.
Install the aftermarket electric trailer brake con-
troller according to the manufacturer’s instruc-
tions.
Pre-towing tips
cBe certain your vehicle maintains a level
position when a loaded and/or unloaded
trailer is hitched. Do not drive the vehicle if it
has an abnormal nose-up or nose-down
condition; check for improper tongue load,
overload, worn suspension or other possible
causes of either condition.cAlways secure items in the trailer to prevent
load shift while driving.
cKeep the cargo load as low as possible in
the trailer to keep the trailer center of gravity
low.
cLoad the trailer so approximately 60% of the
trailer load is in the front half and 40% is in
the back half. Also make sure the load is
balanced side to side.
cCheck your hitch, trailer tire pressure, ve-
hicle tire pressure, trailer light operation, and
trailer wheel lug nuts every time you attach a
trailer to the vehicle.
cBe certain your rearview mirrors conform to
all federal, state or local regulations. If not,
install any mirrors required for towing before
driving the vehicle.
cDetermine the overall height of the vehicle
and trailer so the required clearance is
known.Trailer towing tips
In order to gain skill and an understanding of the
vehicle’s behavior, you should practice turning,
stopping and backing up in an area which is free
from traffic. Steering stability and braking perfor-
mance will be somewhat different than under
normal driving conditions.
9-24Technical and consumer information
ZREVIEW COPYÐ2008 Xterra(xtr)
Owners ManualÐUSA_English(nna)
06/26/07Ðdebbie
X
Page 311 of 320

10 Index
4WD warning light...............2-15
A
Active brake limited slip (ABLS) system
(if so equipped).................5-32
Active Head Restraint..............1-5
Air bag (See supplemental restraint
system).....................1-42
Air bag system
Front (See supplemental front impact air
bag system).................1-50
Air bag warning labels.............1-57
Air bag warning light...........1-57, 2-17
Air cleaner housing filter............8-17
Air conditioner
Air conditioner operation...........4-5
Air conditioner service............4-9
Air conditioner specification label.....9-11
Air conditioner system refrigerant and oil
recommendations..............9-6
Heater and air conditioner controls.....4-2
Servicing air conditioner...........4-9
Air flow charts..................4-6
Alarm system
(See vehicle security system).........2-21
Anchor point locations.............1-26
Antenna.....................4-27
Anti-lock brake warning light..........2-13
Anti-lock Braking System (ABS)........5-31
Audible reminders................2-21Audio system..................4-10
Compact Disc (CD) changer.......4-23
Compact disc (CD) player.........4-18
FM/AM radio with compact disc (CD)
player....................4-16
FM-AM radio with compact disc (CD)
player....................4-20
Radio....................4-10
Audio System
Settings...................4-21
Audio system
Steering wheel audio control switch. . . .4-26
Automatic
Automatic power window switch.....2-45
Automatic transmission position indicator
light.....................2-17
Driving with automatic transmission. . . .5-12
Transmission selector lever lock
release....................5-14
Automatic anti-glare inside mirror.......3-13
AUX jack.....................4-25
B
Battery......................8-13
Charge warning light............2-14
Before starting the engine...........5-10
Belt (See drive belt)..............8-15
Block heater
Engine....................5-36
BluetoothThands-free phone system.....4-28Booster seats..................1-37
Brake
Anti-lock Braking System (ABS)......5-31
Brake fluid..................8-11
Brake light (See stop light).........8-28
Brake system................5-30
Brake warning light.............2-13
Brake wear indicators........2-21, 8-21
Parking brake operation..........5-17
Self-adjusting brakes............8-21
Brakes......................8-21
Break-in schedule................5-20
Brightness control
Instrument panel..............2-27
Bulb check/instrument panel..........2-13
Bulb replacement................8-28
C
Capacities and recommended
fuel/lubricants...................9-2
Car phone or CB radio.............4-27
Cargo light...................2-47
Cargo net....................2-40
Cargo (See vehicle loading information) . . .9-12
CD care and cleaning.............4-25
CD changer (See audio system)........4-23
CD player (See audio system).........4-18
Child restraint with top tether strap......1-26
Child restraints.......1-12, 1-13, 1-22, 1-24
ZREVIEW COPYÐ2008 Xterra(xtr)
Owners ManualÐUSA_English(nna)
06/26/07Ðdebbie
X
Page 312 of 320

Precautions on child
restraints............1-22, 1-31, 1-37
Top tether strap anchor point locations . .1-26
Child safety rear door lock............3-5
Chimes, audible reminders...........2-21
Cleaning exterior and interior..........7-2
Clock......................4-17
Clutch
Clutch fluid.................8-12
Clutch interlock (clutch start) switch.....2-31
C.M.V.S.S. certification label..........9-10
Cold weather driving..............5-35
Compact disc (CD) player...........4-18
Console box...................2-34
Controls
Audio controls (steering wheel)......4-26
Heater and air conditioner controls.....4-2
Coolant
Capacities and recommended
fuel/lubricants.................9-2
Changing engine coolant..........8-8
Checking engine coolant level........8-7
Engine coolant temperature gauge.....2-6
Corrosion protection...............7-5
Cruise control..................5-18
Cup holders...................2-36
Curtain side-impact and rollover air bag . . .1-54
D
Daytime running light system
(Canada only)..................2-26
Defroster switch
Rear window and outside mirror defroster
switch....................2-25Dimensions and weights.............9-8
Dimmer switch for instrument panel......2-27
Door locks....................3-3
Door open warning light............2-14
Drive belt....................8-15
Driving
Cold weather driving............5-35
Driving with automatic transmission. . . .5-12
Driving with manual transmission.....5-15
Precautions when starting and driving . . .5-2
E
Economy - fuel.................5-20
Electronic locking rear differential (E-Lock)
system......................5-27
Electronic locking rear differential (E-Lock)
system switch..................2-30
Emission control information label.......9-10
Emission control system warranty.......9-28
Engine
Before starting the engine.........5-10
Block heater.................5-36
Capacities and recommended
fuel/lubricants.................9-2
Changing engine coolant..........8-8
Changing engine oil.............8-9
Changing engine oil filter..........8-10
Checking engine coolant level........8-7
Checking engine oil level..........8-8
Engine compartment check locations. . . .8-6
Engine coolant temperature gauge.....2-6
Engine cooling system............8-7
Engine oil...................8-8
Engine oil and oil filter recommendation . .9-5Engine oil pressure warning light.....2-14
Engine oil viscosity..............9-5
Engine serial number............9-10
Engine specifications.............9-7
Starting the engine.............5-11
Engine oil pressure gauge............2-8
Event data recorders..............9-30
Exhaust gas (Carbon monoxide)........5-2
F
First aid kit....................6-2
Flashers
(See hazard warning flasher switch)......2-28
Flat tire......................6-2
Floor mat positioning aid.............7-4
Fluid
Brake fluid..................8-11
Capacities and recommended
fuel/lubricants.................9-2
Clutch fluid.................8-12
Engine coolant................8-7
Engine oil...................8-8
Power steering fluid.............8-11
Window washer fluid............8-12
F.M.V.S.S. certification label..........9-10
Fog light switch.................2-28
Front air bag system
(See supplemental restraint system).....1-50
Front seats....................1-2
Fuel
Capacities and recommended
fuel/lubricants.................9-2
Fuel economy................5-20
Fuel gauge..................2-7
10-2
ZREVIEW COPYÐ2008 Xterra(xtr)
Owners ManualÐUSA_English(nna)
06/26/07Ðdebbie
X