2008 NISSAN VERSA battery
[x] Cancel search: batteryPage 240 of 304

WINDOW WASHER FLUID
RESERVOIR
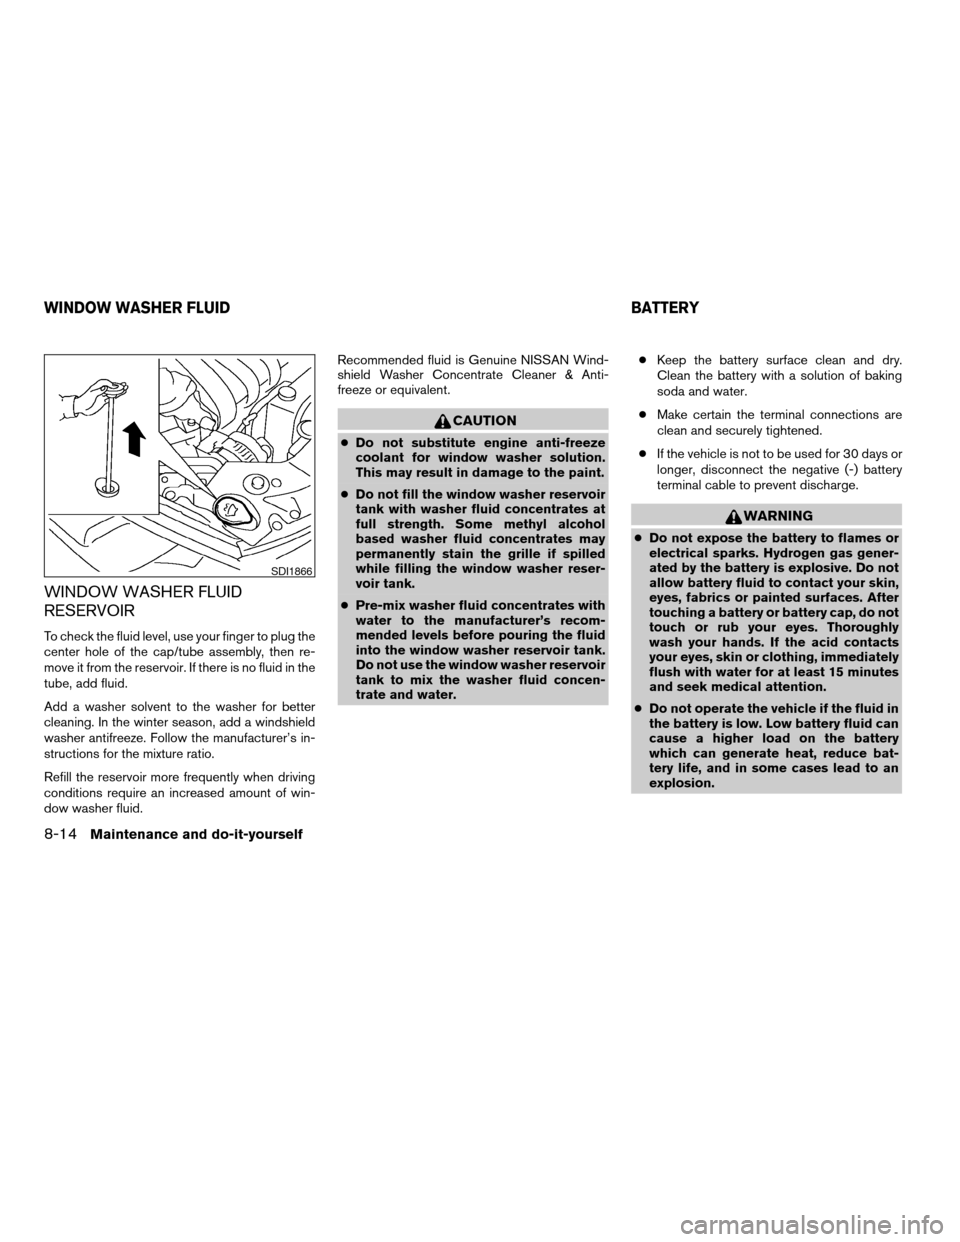
To check the fluid level, use your finger to plug the
center hole of the cap/tube assembly, then re-
move it from the reservoir. If there is no fluid in the
tube, add fluid.
Add a washer solvent to the washer for better
cleaning. In the winter season, add a windshield
washer antifreeze. Follow the manufacturer’s in-
structions for the mixture ratio.
Refill the reservoir more frequently when driving
conditions require an increased amount of win-
dow washer fluid.Recommended fluid is Genuine NISSAN Wind-
shield Washer Concentrate Cleaner & Anti-
freeze or equivalent.
CAUTION
cDo not substitute engine anti-freeze
coolant for window washer solution.
This may result in damage to the paint.
cDo not fill the window washer reservoir
tank with washer fluid concentrates at
full strength. Some methyl alcohol
based washer fluid concentrates may
permanently stain the grille if spilled
while filling the window washer reser-
voir tank.
cPre-mix washer fluid concentrates with
water to the manufacturer’s recom-
mended levels before pouring the fluid
into the window washer reservoir tank.
Do not use the window washer reservoir
tank to mix the washer fluid concen-
trate and water.cKeep the battery surface clean and dry.
Clean the battery with a solution of baking
soda and water.
cMake certain the terminal connections are
clean and securely tightened.
cIf the vehicle is not to be used for 30 days or
longer, disconnect the negative (-) battery
terminal cable to prevent discharge.
WARNING
cDo not expose the battery to flames or
electrical sparks. Hydrogen gas gener-
ated by the battery is explosive. Do not
allow battery fluid to contact your skin,
eyes, fabrics or painted surfaces. After
touching a battery or battery cap, do not
touch or rub your eyes. Thoroughly
wash your hands. If the acid contacts
your eyes, skin or clothing, immediately
flush with water for at least 15 minutes
and seek medical attention.
cDo not operate the vehicle if the fluid in
the battery is low. Low battery fluid can
cause a higher load on the battery
which can generate heat, reduce bat-
tery life, and in some cases lead to an
explosion.
SDI1866
WINDOW WASHER FLUID BATTERY
8-14Maintenance and do-it-yourself
ZREVIEW COPYÐ2008 Versa(vrs)
Owners ManualÐUSA_English(nna)
01/02/08Ðdebbie
X
Page 241 of 304

cWhen working on or near a battery, al-
ways wear suitable eye protection and
remove all jewelry.
cBattery posts, terminals and related ac-
cessories contain lead and lead com-
pounds. Wash hands after handling.
cKeep battery out of the reach of
children.
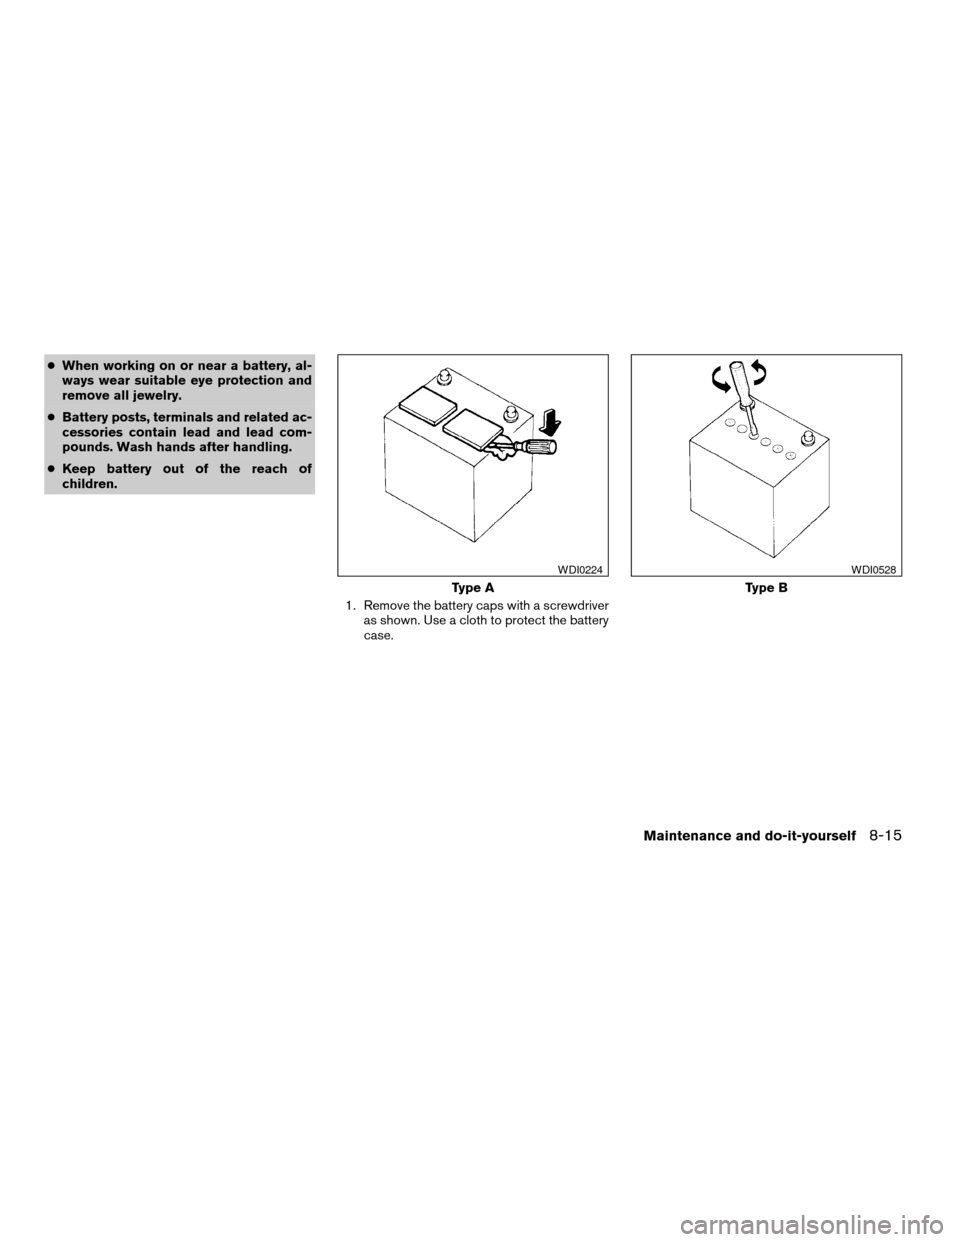
1. Remove the battery caps with a screwdriver
as shown. Use a cloth to protect the battery
case.
Type A
WDI0224
Type B
WDI0528
Maintenance and do-it-yourself8-15
ZREVIEW COPYÐ2008 Versa(vrs)
Owners ManualÐUSA_English(nna)
01/02/08Ðdebbie
X
Page 242 of 304

2. Check the fluid level in each cell. If it is
necessary to add fluid, add only distilled
water to bring the level up to the bottom of
the filler opening.Do not overfill.Vehicles operated in high temperatures or under
severe conditions require frequent checks of the
battery fluid level.
JUMP STARTING
If jump starting is necessary, see “Jump starting”
in the “In case of emergency” section of this
manual. If the engine does not start by jump
starting, the battery may have to be replaced.
Contact a NISSAN dealer.
Type A
LDI0302
Type B
WDI0529
8-16Maintenance and do-it-yourself
ZREVIEW COPYÐ2008 Versa(vrs)
Owners ManualÐUSA_English(nna)
01/02/08Ðdebbie
X
Page 250 of 304

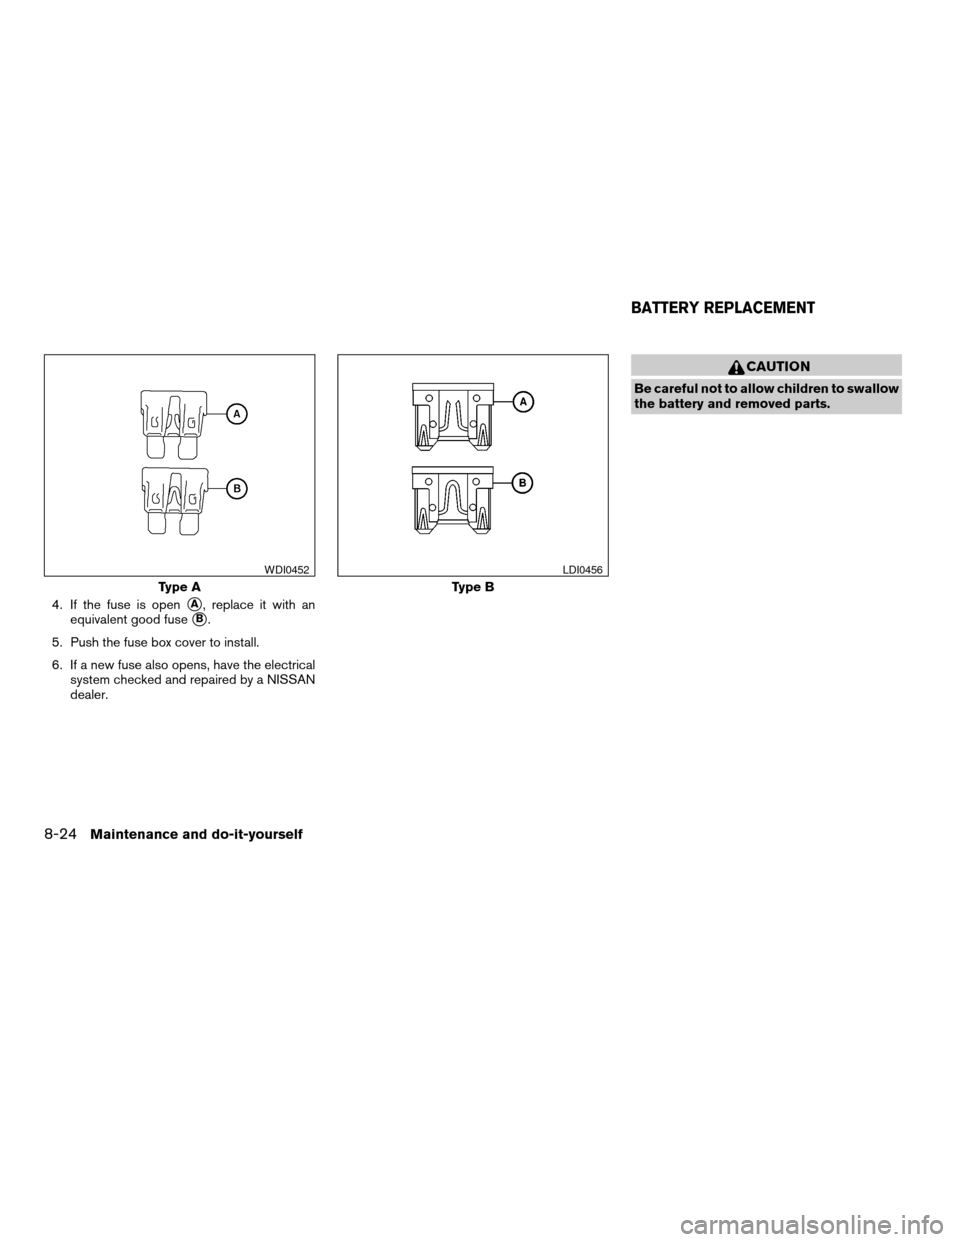
4. If the fuse is opensA, replace it with an
equivalent good fuse
sB.
5. Push the fuse box cover to install.
6. If a new fuse also opens, have the electrical
system checked and repaired by a NISSAN
dealer.
CAUTION
Be careful not to allow children to swallow
the battery and removed parts.
Type A
WDI0452
Type B
LDI0456
BATTERY REPLACEMENT
8-24Maintenance and do-it-yourself
ZREVIEW COPYÐ2008 Versa(vrs)
Owners ManualÐUSA_English(nna)
01/02/08Ðdebbie
X
Page 251 of 304

KEYFOB
Replace the battery in the keyfob as follows:
s1Open the lid using a coinsA.
s2Remove the batterysB.
s3Install a new batterysCwith the “+” facing
down.
cHold the battery by the edges. Holding the
battery across the contact points will seri-
ously deplete the storage capacity.cDo not touch the internal circuit and electric
terminals as it could cause a malfunction.
Recommended battery: CR2025 or equivalent.
s4Close the lid securely.
5. Press the
button, then thebutton two or three times to check the key-
fob operation.
If the battery is removed for any reason
other than replacement, perform step 5.
cAn improperly disposed battery can
hurt the environment. Always confirm
local regulations for battery disposal.
cThe keyfob is water-resistant; how-
ever, if it does get wet, immediately
wipe completely dry.
cThe operational range of the keyfob
extends to approximately 33 ft (10 m)
from the vehicle. This range may vary
with conditions.
FCC Notice:
Changes or modifications not expressly ap-
proved by the party responsible for compli-
ance could void the user’s authority to op-
erate the equipment.
LDI0484
Maintenance and do-it-yourself8-25
ZREVIEW COPYÐ2008 Versa(vrs)
Owners ManualÐUSA_English(nna)
01/02/08Ðdebbie
X
Page 252 of 304

This device complies with Part 15 of the
FCC Rules and RSS-210 of Industry
Canada.
Operation is subject to the following two
conditions: (1) This device may not cause
harmful interference, and (2) this device
must accept any interference received, in-
cluding interference that may cause undes-
ired operation of the device.INTELLIGENT KEY BATTERY
Replace the battery in the Intelligent Key as fol-
lows:
1. Remove the mechanical key from the Intelli-
gent Key.
2. Insert a small screwdriver
sAinto the slitsB
of the corner and twist it to separate the
upper part from the lower part. Use a cloth to
protect the casing.
3. Replace the battery with a new one.
Recommended battery: CR2025 or equiva-
lent.
cDo not touch the internal circuit and elec-
tric terminals as doing so could cause a
malfunction.
cHold the battery by the edges. Holding
the battery across the contact points will
seriously deplete the storage capacity.
cMake sure that the + side faces the bot-
tom of the case.
SDI1867
8-26Maintenance and do-it-yourself
ZREVIEW COPYÐ2008 Versa(vrs)
Owners ManualÐUSA_English(nna)
01/02/08Ðdebbie
X
Page 286 of 304

If you believe that your vehicle has a de-
fect which could cause a crash or could
cause injury or death, you should immedi-
ately inform the National Highway Traffic
Safety Administration (NHTSA) in addi-
tion to notifying NISSAN.
If NHTSA receives similar complaints, it
may open an investigation, and if it finds
that a safety defect exists in a group of
vehicles, it may order a recall and remedy
campaign. However, NHTSA cannot be-
come involved in individual problems be-
tween you, your dealer, or NISSAN.
To contact NHTSA, you may call the Ve-
hicle Safety Hotline toll-free at 1-888-
327-4236 (TTY: 1-800-424-9153); go
to http://www.safercar.gov; or write to:
Administrator, NHTSA, 400 Seventh
Street, SW., Washington, D.C. 20590.
You can also obtain other information
about motor vehicle safety from
http://www.safercar.gov.
You may notify NISSAN by contacting our
Consumer Affairs Department, toll-free, at
1-800-NISSAN-1.Due to legal requirements in some states and
Canadian Provinces, your vehicle may be re-
quired to be in what is called the “ready condi-
tion” for an Inspection/Maintenance (I/M) test of
the emission control system.
The vehicle is set to the “ready condition” when it
is driven through certain driving patterns. Usually,
the ready condition can be obtained by ordinary
usage of the vehicle.
If a powertrain system component is repaired or
the battery is disconnected, the vehicle may be
reset to a “not ready” condition. Before taking the
I/M test, check the vehicle’s
inspection/maintenance test readiness condi-
tion. Turn the ignition switch ON without starting
the engine. If the Malfunction Indicator Light
(MIL) comes on steady for 20 seconds and then
blinks for 10 seconds , the I/M test condition is
“not ready”. If the MIL does not blink after 20
seconds, the I/M test condition is “ready”. If the
MIL indicates the vehicle is in a “not ready” con-
dition, drive the vehicle through the following
pattern to set the vehicle to the ready condition. If
you cannot or do not want to perform the driving
pattern, a NISSAN dealer can conduct it for you.WARNING
Always drive the vehicle in a safe and
prudent manner according to traffic con-
ditions and obey all traffic laws.
1. Start the engine, the low temperature indi-
cator light
illuminates in blue. Allow
the engine to idle until the low temperature
indicator light
goes out, indicating
normal operating temperature.
2. Accelerate the vehicle to 55 MPH (88
km/h) , then quickly release the accelerator
pedal completely and keep it released for at
least 10 seconds.
3. Quickly depress the accelerator pedal for a
moment, then drive the vehicle at a speed of
53 - 60 MPH (86 - 96 km/h) for at least 9
minutes.
4. Stop the vehicle.
5. Accelerate the vehicle to 35 MPH (55 km/h)
and maintain the speed for 20 seconds.
6. Repeat steps 4 through 5 at least 10 times.
7. Accelerate the vehicle to 55 MPH (88 km/h)
and maintain the speed for at least 3 min-
utes.
REPORTING SAFETY DEFECTS (US
only)READINESS FOR INSPECTION/
MAINTENANCE (I/M) TEST
9-18Technical and consumer information
ZREVIEW COPYÐ2008 Versa(vrs)
Owners ManualÐUSA_English(nna)
01/03/08Ðcathy
X
Page 291 of 304

10 Index
A
Active Head Restraint..............1-6
Air bag (See supplemental restraint
system).....................1-35
Air bag system
Front (See supplemental front impact air
bag system).................1-42
Side and curtain (See supplemental side
air bag and curtain side-impact air bag
system)...................1-46
Air bag warning labels.............1-49
Air bag warning light...........1-49, 2-11
Air cleaner housing filter............8-18
Air conditioner
Air conditioner operation...........4-5
Air conditioner service............4-9
Air conditioner specification label.....9-11
Air conditioner system refrigerant and oil
recommendations..............9-6
Heater and air conditioner controls.....4-3
Servicing air conditioner...........4-9
Air flow charts..................4-6
Alarm system
(See vehicle security system).........2-14
Anchor point locations.............1-19
Antenna.....................4-28
Anti-lock brake warning light..........2-7
Anti-lock Braking System (ABS)........5-28
Armrests.....................1-5
Audible reminders................2-13Audio system..................4-10
Compact Disc (CD) changer.......4-24
Compact disc (CD) player.........4-18
FM-AM radio with compact disc (CD)
player....................4-16
FM/AM/SAT radio with compact disc (CD)
changer...................4-20
Radio....................4-10
Steering wheel audio control switch. . . .4-27
Automatic
Automatic power window switch.....2-29
Automatic transmission fluid (ATF). . . .8-11
Driving with automatic transmission. . . .5-13
Transmission selector lever lock
release................5-15, 5-19
B
Battery......................8-14
Charge warning light.............2-8
Before starting the engine...........5-11
Belt (See drive belt)..............8-17
Block heater
Engine....................5-31
BluetoothThands-free phone system.....4-29
Booster seats..................1-30
Brake
Anti-lock Braking System (ABS)......5-28
Brake fluid..................8-13
Brake light (See stop light).........8-28
Brake system................5-27Brake warning light..............2-7
Brake wear indicators........2-13, 8-20
Parking brake operation..........5-22
Self-adjusting brakes............8-20
Brakes......................8-20
Break-in schedule................5-25
Brightness control
Instrument panel..............2-21
Bulb check/instrument panel..........2-7
Bulb replacement................8-28
C
Capacities and recommended
fuel/lubricants...................9-2
Car phone or CB radio.............4-28
Cargo (See vehicle loading information) . . .9-12
CD care and cleaning.............4-26
CD changer (See audio system)........4-24
CD player (See audio system).........4-18
Child restraint with top tether strap......1-19
Child restraints..........1-10, 1-15, 1-17
Precautions on child
restraints............1-15, 1-24, 1-30
Top tether strap anchor point locations . .1-19
Child safety rear door lock............3-6
Chimes, audible reminders...........2-13
Cleaning exterior and interior..........7-2
Clock...................4-17, 4-21
Clutch
Clutch fluid.................8-13
ZREVIEW COPYÐ2008 Versa(vrs)
Owners ManualÐUSA_English(nna)
01/03/08Ðdebbie
X