2008 NISSAN VERSA instrument panel
[x] Cancel search: instrument panelPage 121 of 304
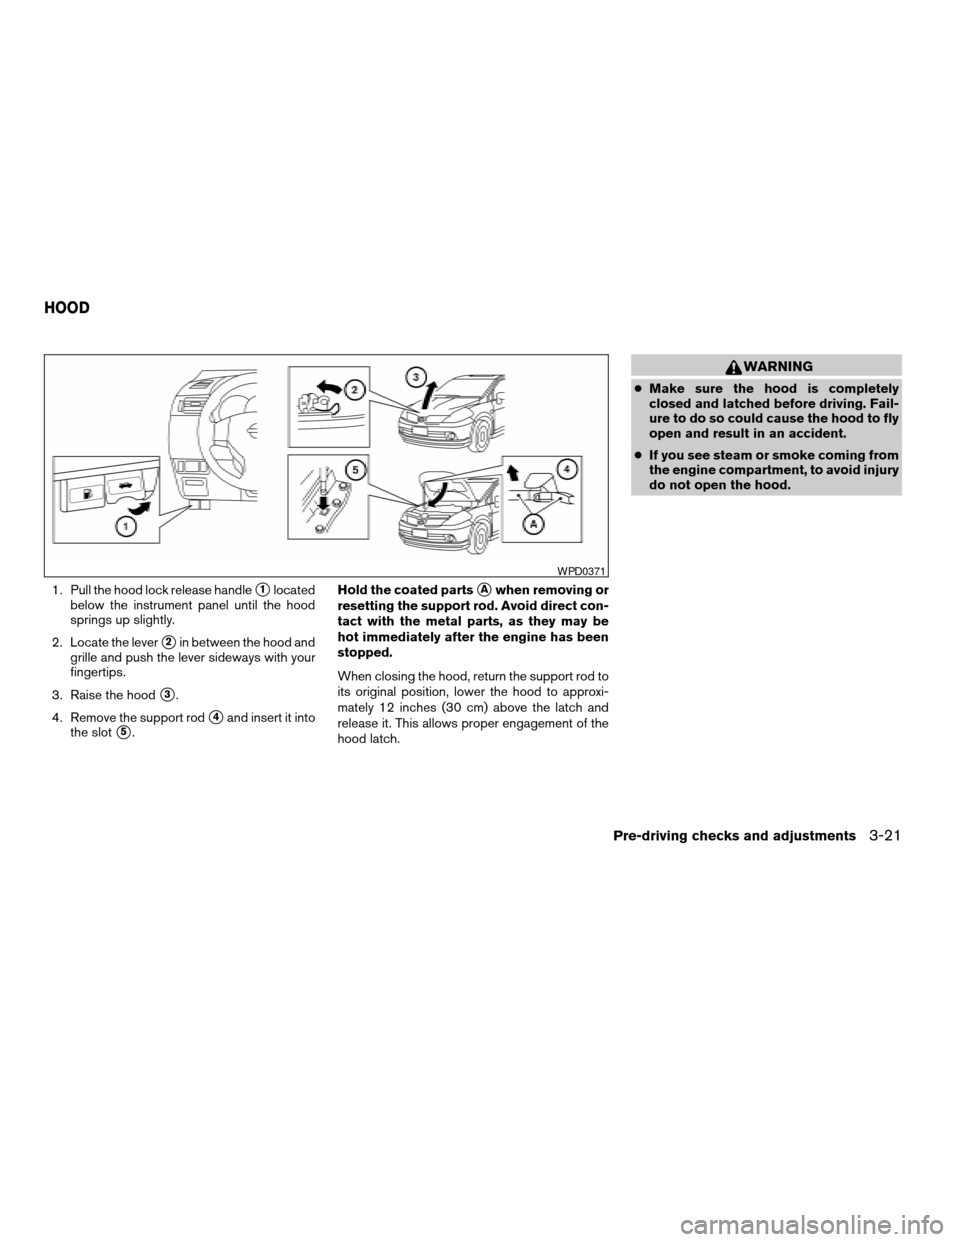
1. Pull the hood lock release handles1located
below the instrument panel until the hood
springs up slightly.
2. Locate the lever
s2in between the hood and
grille and push the lever sideways with your
fingertips.
3. Raise the hood
s3.
4. Remove the support rod
s4and insert it into
the slot
s5.Hold the coated parts
sAwhen removing or
resetting the support rod. Avoid direct con-
tact with the metal parts, as they may be
hot immediately after the engine has been
stopped.
When closing the hood, return the support rod to
its original position, lower the hood to approxi-
mately 12 inches (30 cm) above the latch and
release it. This allows proper engagement of the
hood latch.
WARNING
cMake sure the hood is completely
closed and latched before driving. Fail-
ure to do so could cause the hood to fly
open and result in an accident.
cIf you see steam or smoke coming from
the engine compartment, to avoid injury
do not open the hood.
WPD0371
HOOD
Pre-driving checks and adjustments3-21
ZREVIEW COPYÐ2008 Versa(vrs)
Owners ManualÐUSA_English(nna)
01/02/08Ðdebbie
X
Page 126 of 304
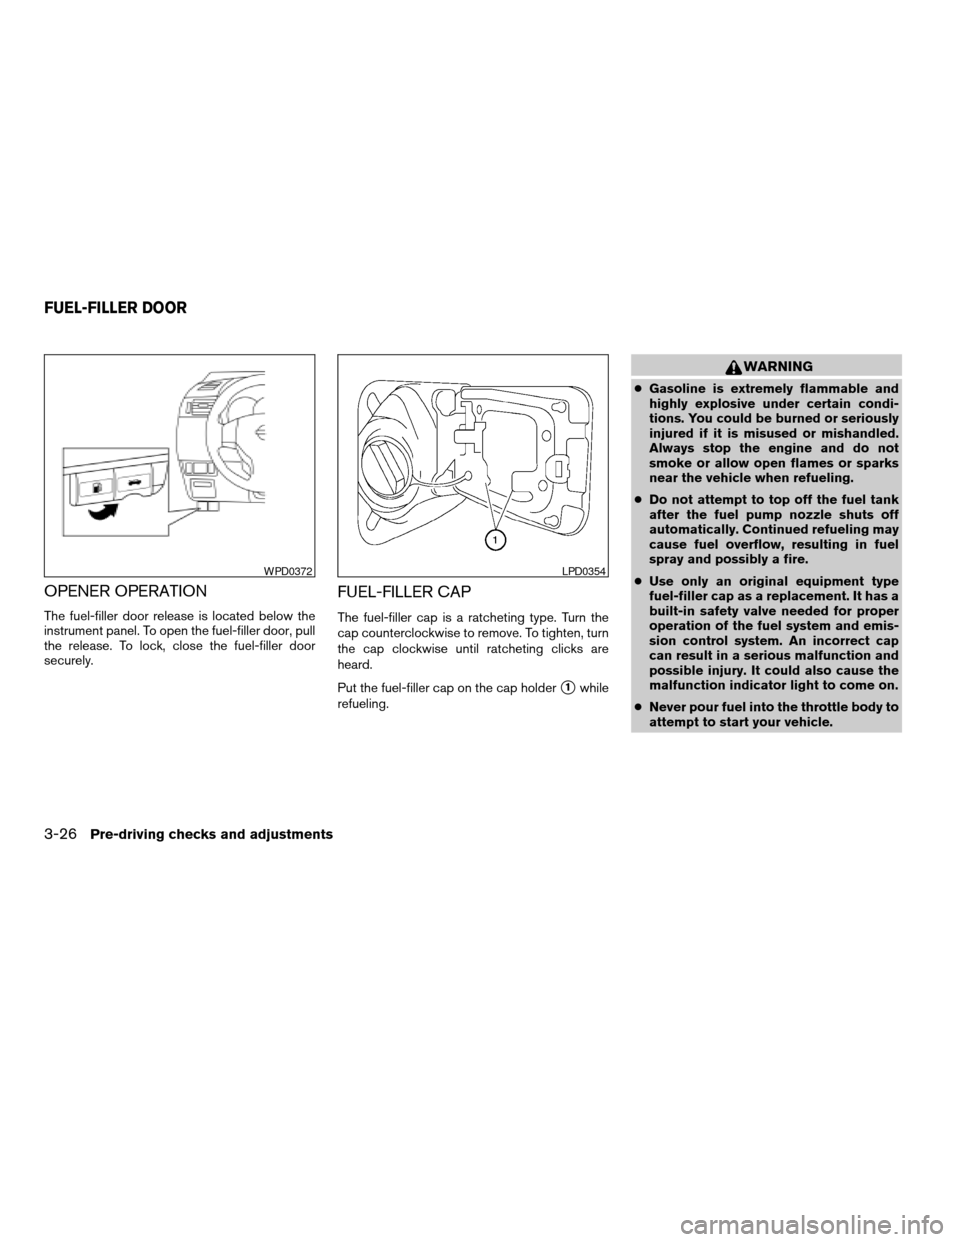
OPENER OPERATION
The fuel-filler door release is located below the
instrument panel. To open the fuel-filler door, pull
the release. To lock, close the fuel-filler door
securely.
FUEL-FILLER CAP
The fuel-filler cap is a ratcheting type. Turn the
cap counterclockwise to remove. To tighten, turn
the cap clockwise until ratcheting clicks are
heard.
Put the fuel-filler cap on the cap holder
s1while
refueling.
WARNING
cGasoline is extremely flammable and
highly explosive under certain condi-
tions. You could be burned or seriously
injured if it is misused or mishandled.
Always stop the engine and do not
smoke or allow open flames or sparks
near the vehicle when refueling.
cDo not attempt to top off the fuel tank
after the fuel pump nozzle shuts off
automatically. Continued refueling may
cause fuel overflow, resulting in fuel
spray and possibly a fire.
cUse only an original equipment type
fuel-filler cap as a replacement. It has a
built-in safety valve needed for proper
operation of the fuel system and emis-
sion control system. An incorrect cap
can result in a serious malfunction and
possible injury. It could also cause the
malfunction indicator light to come on.
cNever pour fuel into the throttle body to
attempt to start your vehicle.
WPD0372LPD0354
FUEL-FILLER DOOR
3-26Pre-driving checks and adjustments
ZREVIEW COPYÐ2008 Versa(vrs)
Owners ManualÐUSA_English(nna)
01/02/08Ðdebbie
X
Page 190 of 304

Accelerator downshift
— in D position —
For passing or hill climbing, depress the accel-
erator pedal to the floor. This shifts the transmis-
sion down into a lower gear, depending on the
vehicle speed.
Overdrive switch
Each time your vehicle is started, the transmis-
sion is automatically “reset” to overdrive ON.
ON: With the engine running and the
shift selector lever in the D (Drive)
position, the transmission upshifts
into Overdrive as vehicle speed
increases.
Overdrive does not engage until the engine
has reached operating temperature.
OFF: For driving up and down long
slopes where engine braking is nec-
essary push the Overdrive switch
once. The
indicator light in
the instrument panel will illuminate.
When cruising at a low speed or climbing a
gentle slope, you may feel uncomfortable shift
shocks as the transmission shifts into and out of
Overdrive repeatedly. In this case, push the Over-
drive switch to turn the Overdrive off. The
indicator light in the instrument panel will illumi-
nate.
When driving conditions change, depress the
Overdrive switch to turn the Overdrive on.
The
indicator light in the instrument panel
will turn off.
Remember not to drive at high speeds for ex-
tended periods of time with the Overdrive off.
This reduces fuel economy.
Fail-safe
When the fail-safe operation occurs, the AT will
be locked in third gear.
SSD0533
5-16Starting and driving
ZREVIEW COPYÐ2008 Versa(vrs)
Owners ManualÐUSA_English(nna)
01/02/08Ðdebbie
X
Page 194 of 304
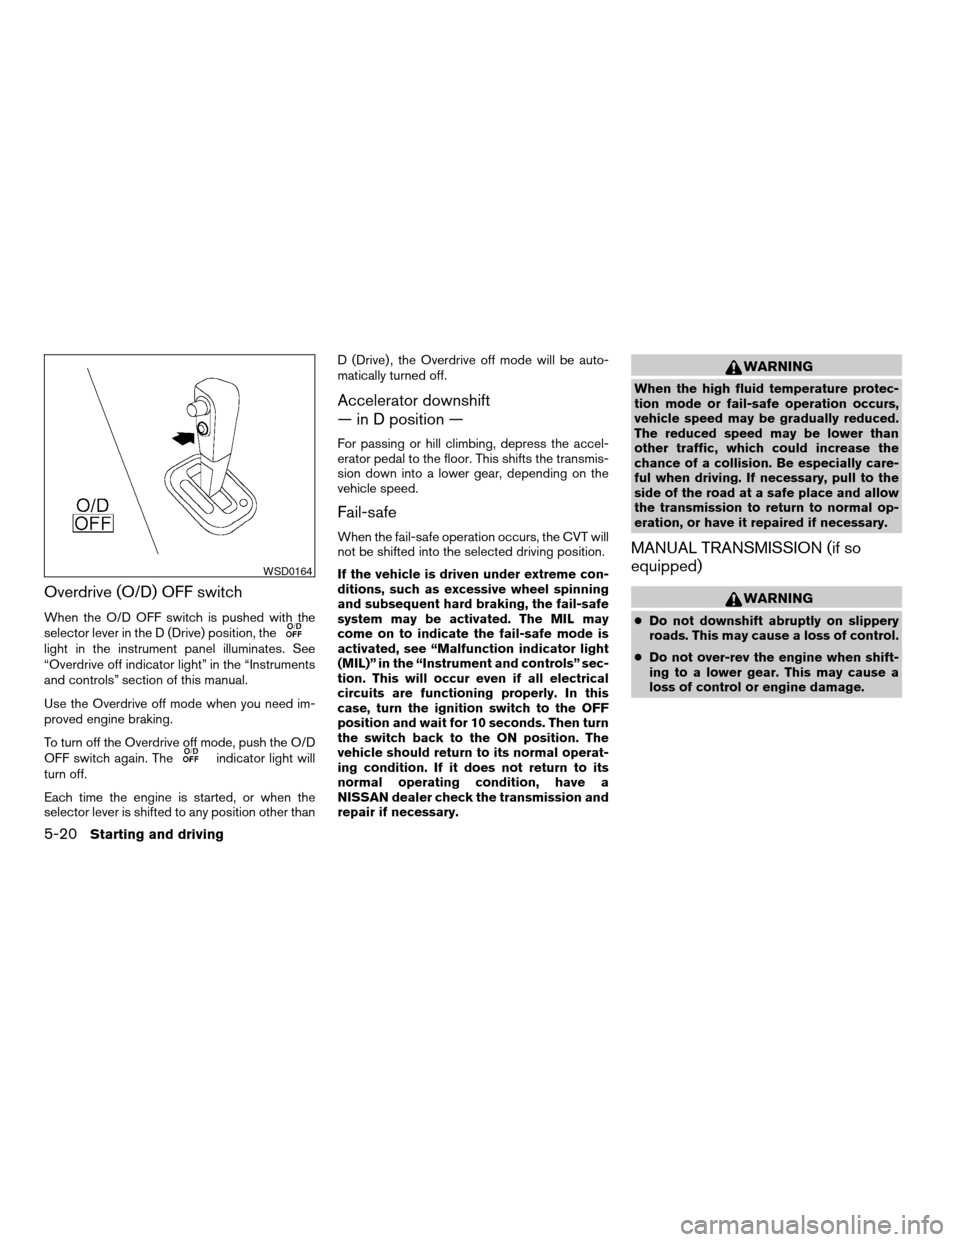
Overdrive (O/D) OFF switch
When the O/D OFF switch is pushed with the
selector lever in the D (Drive) position, the
light in the instrument panel illuminates. See
“Overdrive off indicator light” in the “Instruments
and controls” section of this manual.
Use the Overdrive off mode when you need im-
proved engine braking.
To turn off the Overdrive off mode, push the O/D
OFF switch again. The
indicator light will
turn off.
Each time the engine is started, or when the
selector lever is shifted to any position other thanD (Drive) , the Overdrive off mode will be auto-
matically turned off.
Accelerator downshift
— in D position —
For passing or hill climbing, depress the accel-
erator pedal to the floor. This shifts the transmis-
sion down into a lower gear, depending on the
vehicle speed.
Fail-safe
When the fail-safe operation occurs, the CVT will
not be shifted into the selected driving position.
If the vehicle is driven under extreme con-
ditions, such as excessive wheel spinning
and subsequent hard braking, the fail-safe
system may be activated. The MIL may
come on to indicate the fail-safe mode is
activated, see “Malfunction indicator light
(MIL)” in the “Instrument and controls” sec-
tion. This will occur even if all electrical
circuits are functioning properly. In this
case, turn the ignition switch to the OFF
position and wait for 10 seconds. Then turn
the switch back to the ON position. The
vehicle should return to its normal operat-
ing condition. If it does not return to its
normal operating condition, have a
NISSAN dealer check the transmission and
repair if necessary.
WARNING
When the high fluid temperature protec-
tion mode or fail-safe operation occurs,
vehicle speed may be gradually reduced.
The reduced speed may be lower than
other traffic, which could increase the
chance of a collision. Be especially care-
ful when driving. If necessary, pull to the
side of the road at a safe place and allow
the transmission to return to normal op-
eration, or have it repaired if necessary.
MANUAL TRANSMISSION (if so
equipped)
WARNING
cDo not downshift abruptly on slippery
roads. This may cause a loss of control.
cDo not over-rev the engine when shift-
ing to a lower gear. This may cause a
loss of control or engine damage.
WSD0164
5-20Starting and driving
ZREVIEW COPYÐ2008 Versa(vrs)
Owners ManualÐUSA_English(nna)
01/02/08Ðdebbie
X
Page 197 of 304
4. Before driving, be sure the brake warning
light goes out.
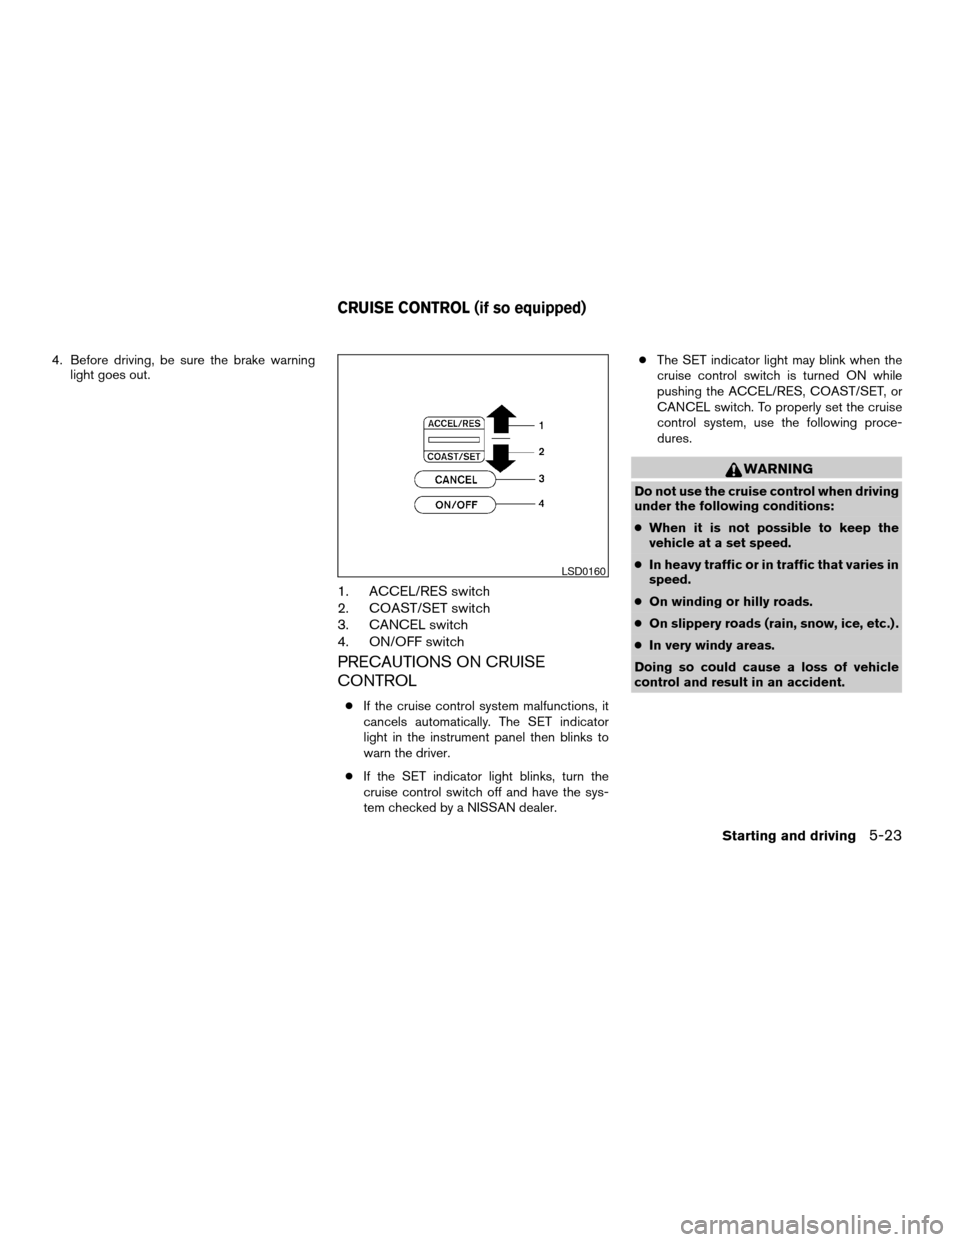
1. ACCEL/RES switch
2. COAST/SET switch
3. CANCEL switch
4. ON/OFF switch
PRECAUTIONS ON CRUISE
CONTROL
cIf the cruise control system malfunctions, it
cancels automatically. The SET indicator
light in the instrument panel then blinks to
warn the driver.
cIf the SET indicator light blinks, turn the
cruise control switch off and have the sys-
tem checked by a NISSAN dealer.cThe SET indicator light may blink when the
cruise control switch is turned ON while
pushing the ACCEL/RES, COAST/SET, or
CANCEL switch. To properly set the cruise
control system, use the following proce-
dures.
WARNING
Do not use the cruise control when driving
under the following conditions:
cWhen it is not possible to keep the
vehicle at a set speed.
cIn heavy traffic or in traffic that varies in
speed.
cOn winding or hilly roads.
cOn slippery roads (rain, snow, ice, etc.) .
cIn very windy areas.
Doing so could cause a loss of vehicle
control and result in an accident.
LSD0160
CRUISE CONTROL (if so equipped)
Starting and driving5-23
ZREVIEW COPYÐ2008 Versa(vrs)
Owners ManualÐUSA_English(nna)
01/02/08Ðdebbie
X
Page 198 of 304
CAUTION
On manual transmission models, do not
shift into N (Neutral) without depressing
the clutch pedal when the cruise control is
set. Should this occur, depress the clutch
pedal and turn the main switch off imme-
diately. Failure to do so may cause engine
damage.
CRUISE CONTROL OPERATIONS
The cruise control allows driving at a speed be-
tween 25 - 89 MPH (40 - 144 km/h) without
keeping your foot on the accelerator pedal.
To turn on the cruise control,push the main
switch. The CRUISE indicator light in the instru-
ment panel comes on.
To set cruising speed,
accelerate the vehicle to
the desired speed, push the COAST/SET switch
and release it. The SET indicator light in the instru-
ment panel comes on. Take your foot off the accel-
erator pedal. Your vehicle maintains the set speed.
cTo pass another vehicle,depress the ac-
celerator pedal. When you release the
pedal, the vehicle returns to the previously
set speed.
cThe vehicle may not maintain the set speed
when going up or down steep hills. If this
happens, drive without the cruise control.To cancel the preset speed,use one of the
following three methods.
cPush the CANCEL button; the SET indicator
light in the instrument panel goes out.
cTap the brake pedal; the SET indicator light
goes out.
cTurn the main switch off. Both the CRUISE
indicator light and SET indicator light in the
instrument panel go out.
The cruise control is automatically canceled and
the SET light in the instrument panel goes out if:
cyou depress the brake or clutch pedal while
pushing the ACCEL/RES or SET/COAST
switch. The preset speed is deleted from
memory.
cthe vehicle slows down more than 8 MPH
(13 km/h) below the set speed.
cyou depress the clutch pedal (manual trans-
mission) , or move the shift selector lever to N
(Neutral) (CVT) .
To reset at a faster cruising speed,use one
of the following three methods.
cDepress the accelerator pedal. When the
vehicle attains the desired speed, push and
release the COAST/SET switch.cPush and hold the ACCEL/RES switch.
When the vehicle attains the speed you de-
sire, release the switch.
cPush and release the ACCEL/RES switch.
Each time you do this, the set speed in-
creases by about 1 MPH (1.6 km/h) .
To reset at a slower cruising speed,use one
of the following three methods.
cLightly tap the brake pedal. When the ve-
hicle attains the desired speed, push the
COAST/SET switch and release it.
cPush and hold the COAST/SET switch. Re-
lease the switch when the vehicle slows to
the desired speed.
cPush and release the COAST/SET switch.
Each time you do this, the set speed de-
creases by about 1 MPH (1.6 km/h) .
To resume the preset speed,push and re-
lease the ACCEL/RES switch. The vehicle re-
turns to the last set cruising speed when the
vehicle speed is over 25 MPH (40 km/h) .
5-24Starting and driving
ZREVIEW COPYÐ2008 Versa(vrs)
Owners ManualÐUSA_English(nna)
01/02/08Ðdebbie
X
Page 203 of 304

WARNING
Do not pump the brake pedal. Doing so
may result in increased stopping
distances.
Self-test feature
The ABS includes electronic sensors, electric
pumps, hydraulic solenoids and a computer. The
computer has a built-in diagnostic feature that
tests the system each time you start the engine
and move the vehicle at a low speed in forward or
reverse. When the self-test occurs, you may hear
a “clunk” noise and/or feel a pulsation in the brake
pedal. This is normal and does not indicate a
malfunction. If the computer senses a malfunc-
tion, it switches the ABS off and illuminates the
ABS warning light on the instrument panel. The
brake system then operates normally, but without
anti-lock assistance.
If the ABS warning light illuminates during the
self-test or while driving, have the vehicle
checked by a NISSAN dealer.
Normal operation
The ABS operates at speeds above3-6MPH(5
- 10 km/h) .When the ABS senses that one or more wheels
are close to locking up, the system electronically
controls the pressure applied to each brake.
This action is similar to pumping the brakes very
quickly. You may feel a pulsation in the brake
pedal and hear a noise from under the hood or
feel a vibration from the actuator when it is oper-
ating. This is normal and indicates that the ABS is
operating properly. However, the pulsation may
indicate that road conditions are hazardous and
extra care is required while driving.
FREEING A FROZEN DOOR LOCK
To prevent a door lock from freezing, apply de-
icer through the key hole. If the lock becomes
frozen, heat the key before inserting it into the key
hole or use the remote keyless entry keyfob (if so
equipped) .
ANTI-FREEZE
In the winter when it is anticipated that the tem-
perature will drop below 32°F (0°C) , check the
anti-freeze to assure proper winter protection.
For details, see “Engine cooling system” in the
“Maintenance and do-it-yourself” section of this
manual.
BATTERY
If the battery is not fully charged during extremely
cold weather conditions, the battery fluid may
freeze and damage the battery. To maintain maxi-
mum efficiency, the battery should be checked
regularly. For details, see “Battery” in the “Main-
tenance and do-it-yourself” section of this
manual.
COLD WEATHER DRIVING
Starting and driving5-29
ZREVIEW COPYÐ2008 Versa(vrs)
Owners ManualÐUSA_English(nna)
01/02/08Ðdebbie
X
Page 291 of 304

10 Index
A
Active Head Restraint..............1-6
Air bag (See supplemental restraint
system).....................1-35
Air bag system
Front (See supplemental front impact air
bag system).................1-42
Side and curtain (See supplemental side
air bag and curtain side-impact air bag
system)...................1-46
Air bag warning labels.............1-49
Air bag warning light...........1-49, 2-11
Air cleaner housing filter............8-18
Air conditioner
Air conditioner operation...........4-5
Air conditioner service............4-9
Air conditioner specification label.....9-11
Air conditioner system refrigerant and oil
recommendations..............9-6
Heater and air conditioner controls.....4-3
Servicing air conditioner...........4-9
Air flow charts..................4-6
Alarm system
(See vehicle security system).........2-14
Anchor point locations.............1-19
Antenna.....................4-28
Anti-lock brake warning light..........2-7
Anti-lock Braking System (ABS)........5-28
Armrests.....................1-5
Audible reminders................2-13Audio system..................4-10
Compact Disc (CD) changer.......4-24
Compact disc (CD) player.........4-18
FM-AM radio with compact disc (CD)
player....................4-16
FM/AM/SAT radio with compact disc (CD)
changer...................4-20
Radio....................4-10
Steering wheel audio control switch. . . .4-27
Automatic
Automatic power window switch.....2-29
Automatic transmission fluid (ATF). . . .8-11
Driving with automatic transmission. . . .5-13
Transmission selector lever lock
release................5-15, 5-19
B
Battery......................8-14
Charge warning light.............2-8
Before starting the engine...........5-11
Belt (See drive belt)..............8-17
Block heater
Engine....................5-31
BluetoothThands-free phone system.....4-29
Booster seats..................1-30
Brake
Anti-lock Braking System (ABS)......5-28
Brake fluid..................8-13
Brake light (See stop light).........8-28
Brake system................5-27Brake warning light..............2-7
Brake wear indicators........2-13, 8-20
Parking brake operation..........5-22
Self-adjusting brakes............8-20
Brakes......................8-20
Break-in schedule................5-25
Brightness control
Instrument panel..............2-21
Bulb check/instrument panel..........2-7
Bulb replacement................8-28
C
Capacities and recommended
fuel/lubricants...................9-2
Car phone or CB radio.............4-28
Cargo (See vehicle loading information) . . .9-12
CD care and cleaning.............4-26
CD changer (See audio system)........4-24
CD player (See audio system).........4-18
Child restraint with top tether strap......1-19
Child restraints..........1-10, 1-15, 1-17
Precautions on child
restraints............1-15, 1-24, 1-30
Top tether strap anchor point locations . .1-19
Child safety rear door lock............3-6
Chimes, audible reminders...........2-13
Cleaning exterior and interior..........7-2
Clock...................4-17, 4-21
Clutch
Clutch fluid.................8-13
ZREVIEW COPYÐ2008 Versa(vrs)
Owners ManualÐUSA_English(nna)
01/03/08Ðdebbie
X