2008 NISSAN VERSA automatic transmission
[x] Cancel search: automatic transmissionPage 215 of 304
CAUTION
cAlways connect positive (1) to positive
(1) and negative (2) to body ground (for
example, strut mounting bolt, engine
lift bracket, etc.) — not to the battery.
cMake sure the jumper cables do not
touch moving parts in the engine com-
partment and that the cable clamps do
not contact any other metal.
5. Start the engine of the booster vehicle and
let it run for a few minutes.
For Intelligent Key system equipped models,
use the mechanical key to start the engine.
6. Keep the engine speed of the booster ve-
hicle at about 2,000 rpm, and start the en-
gine of the vehicle being jump started.
CAUTION
Do not keep the starter motor engaged for
more than 10 seconds. If the engine does
not start right away, turn the key off and
wait 3 to 4 seconds before trying again.
7. After starting the engine, carefully discon-
nect the negative cable and then the positive
cable.8. Replace the vent caps (if so equipped) . Be
sure to dispose of the cloth used to cover
the vent holes as it may be contaminated
with corrosive acid.
CAUTION
cDo not push start this vehicle. The
three-way catalyst may be damaged.
cAutomatic Transmission (AT) or Con-
tinuously Variable Transmission (CVT)
models cannot be push-started or tow-
started. Attempting to do so may cause
transmission damage.
cFor manual transmission models, never
try to start the vehicle by towing it.
When the engine starts, the forward
surge could cause the vehicle to collide
with the tow vehicle.
PUSH STARTING
In case of emergency6-9
ZREVIEW COPYÐ2008 Versa(vrs)
Owners ManualÐUSA_English(nna)
01/02/08Ðdebbie
X
Page 218 of 304
CAUTION
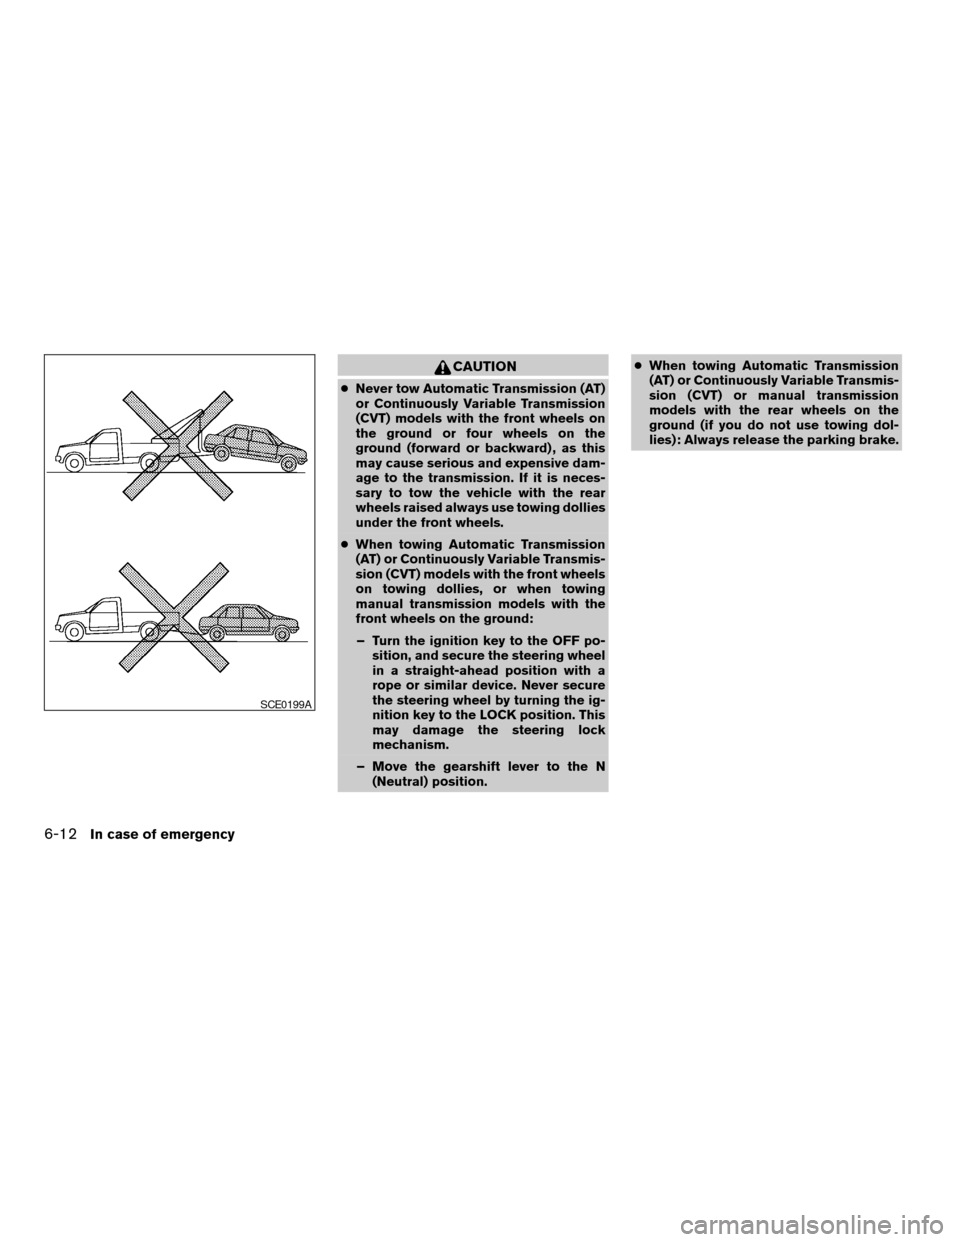
cNever tow Automatic Transmission (AT)
or Continuously Variable Transmission
(CVT) models with the front wheels on
the ground or four wheels on the
ground (forward or backward) , as this
may cause serious and expensive dam-
age to the transmission. If it is neces-
sary to tow the vehicle with the rear
wheels raised always use towing dollies
under the front wheels.
cWhen towing Automatic Transmission
(AT) or Continuously Variable Transmis-
sion (CVT) models with the front wheels
on towing dollies, or when towing
manual transmission models with the
front wheels on the ground:
– Turn the ignition key to the OFF po-
sition, and secure the steering wheel
in a straight-ahead position with a
rope or similar device. Never secure
the steering wheel by turning the ig-
nition key to the LOCK position. This
may damage the steering lock
mechanism.
– Move the gearshift lever to the N
(Neutral) position.cWhen towing Automatic Transmission
(AT) or Continuously Variable Transmis-
sion (CVT) or manual transmission
models with the rear wheels on the
ground (if you do not use towing dol-
lies): Always release the parking brake.
SCE0199A
6-12In case of emergency
ZREVIEW COPYÐ2008 Versa(vrs)
Owners ManualÐUSA_English(nna)
01/02/08Ðdebbie
X
Page 227 of 304

8 Maintenance and do-it-yourself
Maintenance requirements..........................8-2
General maintenance..............................8-2
Explanation of general maintenance items.........8-2
Maintenance precautions...........................8-5
Engine compartment check locations................8-6
Engine cooling system.............................8-7
Checking engine coolant level...................8-7
Changing engine coolant........................8-8
Engine oil.........................................8-8
Checking engine oil level........................8-8
Changing engine oil............................8-9
Changing engine oil filter.......................8-10
4-speed automatic transmission fluid...............8-11
Temperature conditions for checking.............8-11
Continuously Variable Transmission (CVT) fluid......8-12
Brake and clutch fluid.............................8-13
Brake fluid....................................8-13
Clutch fluid...................................8-13
Window washer fluid.............................8-14
Window washer fluid reservoir..................8-14
Battery..........................................8-14
Jump starting.................................8-16
Drive belt........................................8-17Spark plugs......................................8-17
Replacing spark plugs.........................8-17
Air cleaner.......................................8-18
In-cabin microfilter (if so equipped)..............8-18
Windshield wiper blades..........................8-19
Cleaning.....................................8-19
Replacing....................................8-19
Brakes..........................................8-20
Fuses...........................................8-21
Engine compartment...........................8-22
Passenger compartment.......................8-23
Battery replacement..............................8-24
Keyfob.......................................8-25
Intelligent Key battery..........................8-26
Lights...........................................8-27
Headlights....................................8-27
Exterior and interior lights.......................8-28
Wheels and tires.................................8-32
Tire pressure..................................8-32
Tire labeling...................................8-35
Types of tires..................................8-37
Tire chains....................................8-38
Changing wheels and tires.....................8-39
ZREVIEW COPYÐ2008 Versa(vrs)
Owners ManualÐUSA_English(nna)
01/02/08Ðdebbie
X
Page 229 of 304

When driving in areas using road salt or other
corrosive materials, check lubrication frequently.
Lights*Clean the headlights on a regular basis.
Make sure that the headlights, stop lights, tail
lights, turn signal lights, and other lights are all
operating properly and installed securely. Also
check headlight aim.
Road wheel nuts (lug nuts)*When checking
the tires, make sure no wheel nuts are missing,
and check for any loose wheel nuts. Tighten if
necessary.
Tire rotation*Tires should be rotated every
7,500 miles (12,000 km) .
Tires*Check the pressure with a gauge often
and always prior to long distance trips. If neces-
sary, adjust the pressure in all tires, including the
spare, to the pressure specified. Check carefully
for damage, cuts or excessive wear.
Tire Pressure Monitoring System (TPMS)
transmitter componentsReplace the TPMS
transmitter grommet seal, valve core and cap
when the tires are replaced due to wear or age.
Wheel alignment and balanceIf the vehicle
should pull to either side while driving on a
straight and level road, or if you detect uneven or
abnormal tire wear, there may be a need for wheelalignment. If the steering wheel or seat vibrates at
normal highway speeds, wheel balancing may be
needed.
cFor additional information regarding tires,
refer to “Important Tire Safety Information”
(US) or “Tire Safety Information” (Canada) in
the Warranty Information Booklet .
WindshieldClean the windshield on a regular
basis. Check the windshield at least every six
months for cracks or other damage. Have a dam-
aged windshield repaired by a qualified repair
facility.
Windshield wiper blades*Check for cracks or
wear if they do not wipe properly.
Inside the vehicle
The maintenance items listed here should be
checked on a regular basis, such as when per-
forming periodic maintenance, cleaning the ve-
hicle, etc.
Additional information on the following
items with an “*” is found later in this sec-
tion.
Accelerator pedalCheck the pedal for smooth
operation and make sure the pedal does not bind
or require uneven effort. Keep the floor mat away
from the pedal.Brake pedalCheck the pedal for smooth opera-
tion. If the brake pedal suddenly goes down fur-
ther than normal, the pedal feels spongy or the
vehicle seems to take longer to stop, see a
NISSAN dealer immediately. Keep the floor mat
away from the pedal.
BrakesCheck that the brakes do not pull the
vehicle to one side when applied.
Automatic Transmission (AT) or Continu-
ously Variable Transmission (CVT) P (Park)
position mechanismOn a fairly steep hill
check that the vehicle is held securely with the
selector lever in the P (Park) position without
applying any brakes.
Parking brakeCheck the parking brake opera-
tion regularly. The vehicle should be securely held
on a fairly steep hill with only the parking brake
applied. If the parking brake needs adjustment,
see a NISSAN dealer.
SeatsCheck seat position controls such as seat
adjusters, seatback recliner, etc. to ensure they
operate smoothly and all latches lock securely in
every position. Check that the head restraints
move up and down smoothly and the locks (if so
equipped) hold securely in all latched positions.
Seat beltsCheck that all parts of the seat belt
system (for example, buckles, anchors, adjusters
and retractors) operate properly and smoothly,
Maintenance and do-it-yourself8-3
ZREVIEW COPYÐ2008 Versa(vrs)
Owners ManualÐUSA_English(nna)
01/02/08Ðdebbie
X
Page 231 of 304
When performing any inspection or maintenance
work on your vehicle, always take care to prevent
serious accidental injury to yourself or damage to
the vehicle. The following are general precau-
tions which should be closely observed.
WARNING
cPark the vehicle on a level surface, ap-
ply the parking brake securely and
block the wheels to prevent the vehicle
from moving. For manual transmission
models, move the shift lever to N (Neu-
tral) . For Automatic Transmission (AT)
or CVT models, move the selector lever
to P (Park) .
cBe sure the ignition key is in the OFF or
LOCK position when performing any
parts replacement or repairs.
cYour vehicle is equipped with an auto-
matic engine cooling fan. It may come
on at any time without warning, even if
the ignition key is in the OFF position
and the engine is not running. To avoid
injury, always disconnect the negative
battery cable before working near the
fan.cIf you must work with the engine run-
ning, keep your hands, clothing, hair
and tools away from moving fans, belts
and any other moving parts.
cIt is advisable to secure or remove any
loose clothing and remove any jewelry,
such as rings, watches, etc. before
working on your vehicle.
cAlways wear eye protection whenever
you work on your vehicle.
cIf you must run the engine in an en-
closed space such as a garage, be sure
there is proper ventilation for exhaust
gases to escape.
cNever get under the vehicle while it is
supported only by a jack. If it is neces-
sary to work under the vehicle, support
it with safety stands.
cKeep smoking materials, flame and
sparks away from the fuel tank and
battery.
cOn gasoline engine models, the fuel
filter or fuel lines should be serviced by
a NISSAN dealer because the fuel lines
are under high pressure even when the
engine is off.
CAUTION
cDo not work under the hood while the
engine is hot. Turn the engine off and
wait until it cools down.
cAvoid contact with used engine oil and
coolant. Improperly disposed engine
oil, engine coolant and/or other vehicle
fluids can damage the environment. Al-
ways conform to local regulations for
disposal of vehicle fluid.
cNever leave the engine or the transmis-
sion related component harness con-
nector disconnected while the ignition
switch is in the ON position.
cNever connect or disconnect the battery
or any transistorized component while
the ignition switch is in the ON position.
This “Maintenance and do-it-yourself” section
gives instructions regarding only those items
which are relatively easy for an owner to perform.
A genuine NISSAN service manual is also avail-
able. See “Owner’s Manual/Service Manual or-
der information” in the “Technical and consumer
information” section of this manual.
You should be aware that incomplete or improper
servicing may result in operating difficulties or
excessive emissions, and could affect warranty
coverage.If in doubt about any servicing,
have it done by a NISSAN dealer.
MAINTENANCE PRECAUTIONS
Maintenance and do-it-yourself8-5
ZREVIEW COPYÐ2008 Versa(vrs)
Owners ManualÐUSA_English(nna)
01/02/08Ðdebbie
X
Page 232 of 304

1. Engine oil filler cap
2. Brake and clutch (*1) fluid reservoir
3. Air cleaner
4. Battery
5. Fuse/Fusible link box
6. Automatic Transmission Fluid (ATF)
dipstick (*2)
7. Radiator cap
8. Engine coolant reservoir
9. Engine oil dipstick
10. Drive belt location
11. Windshield washer fluid reservoir
*1: For Manual Transmission (M/T) model
*2: For Automatic Transmission (AT) model
NOTE:
Engine cover removed for clarity.
WDI0631
ENGINE COMPARTMENT CHECK
LOCATIONS
8-6Maintenance and do-it-yourself
ZREVIEW COPYÐ2008 Versa(vrs)
Owners ManualÐUSA_English(nna)
01/03/08Ðcathy
X
Page 237 of 304
WARNING
cWhen the engine is running, keep
hands, jewelry and clothing away from
any moving parts such as the cooling
fan and drive belts.
cAutomatic transmission fluid is poison-
ous and should be stored carefully in
marked containers out of the reach of
children.
TEMPERATURE CONDITIONS FOR
CHECKING
cThe fluid level should be checked using the
HOT range on the dipstick after the following
conditions have been met:
– The engine should be warmed up to op-
erating temperature.
– The vehicle should be driven at least 5
minutes.
– The automatic transmission fluid should
be warmed to 122 - 176°F (50 - 80°C) .cThe fluid can be checked at fluid tempera-
tures of 86 - 122°F (30 - 50°C) using the
COLD range on the dipstick after the engine
is warmed up and before driving. However,
the fluid should be re-checked using the
HOT range.
1. Park the vehicle on a level surface and set
the parking brake.
2. Start the engine and then move the shift
selector lever through each gear range, end-
ing in P (Park) .
3. Check the fluid level with the engine idling.
Automatic Transmission (AT)
SDI1896
4-SPEED AUTOMATIC
TRANSMISSION FLUID
Maintenance and do-it-yourself8-11
ZREVIEW COPYÐ2008 Versa(vrs)
Owners ManualÐUSA_English(nna)
01/02/08Ðdebbie
X
Page 238 of 304
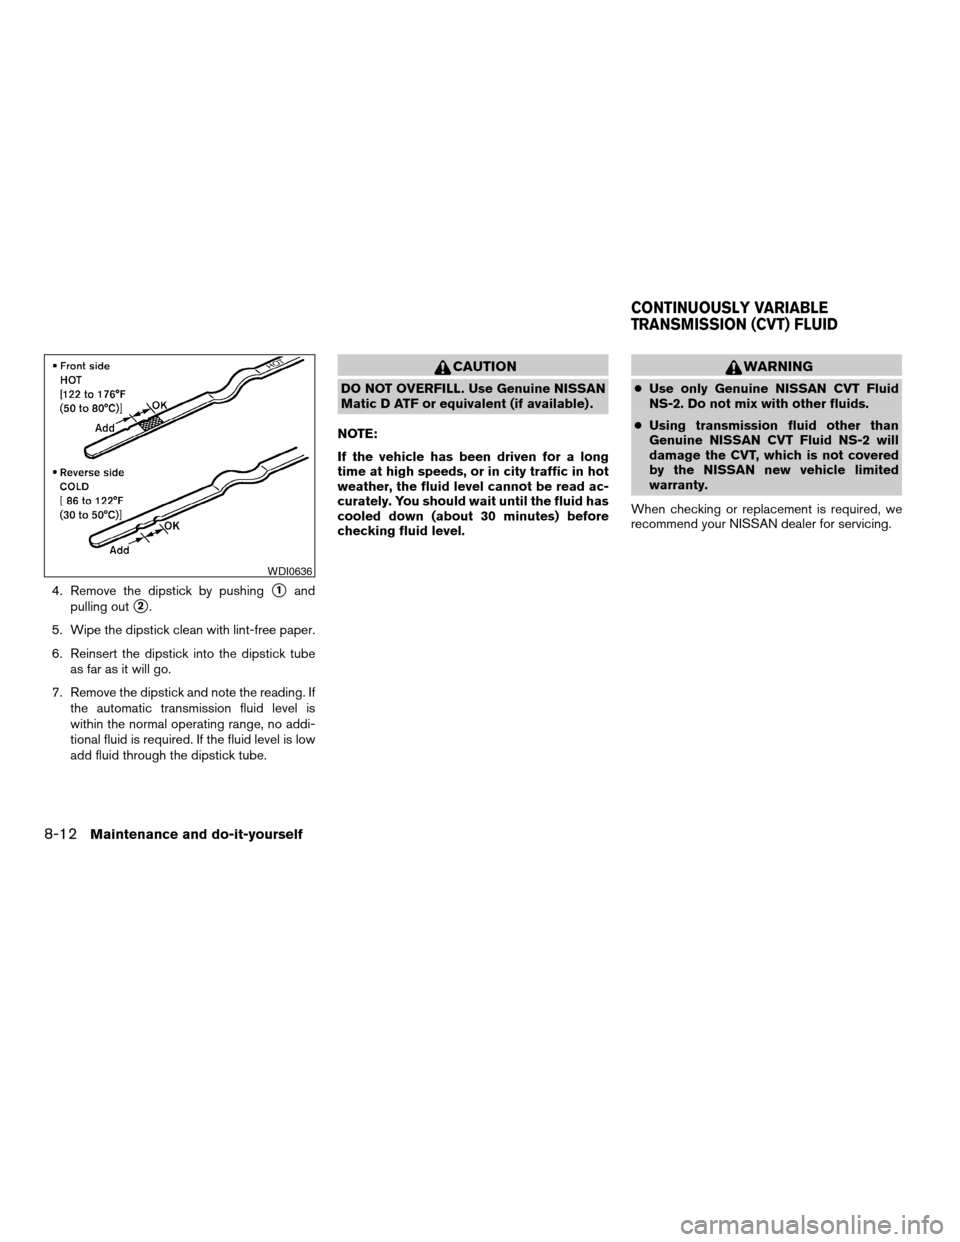
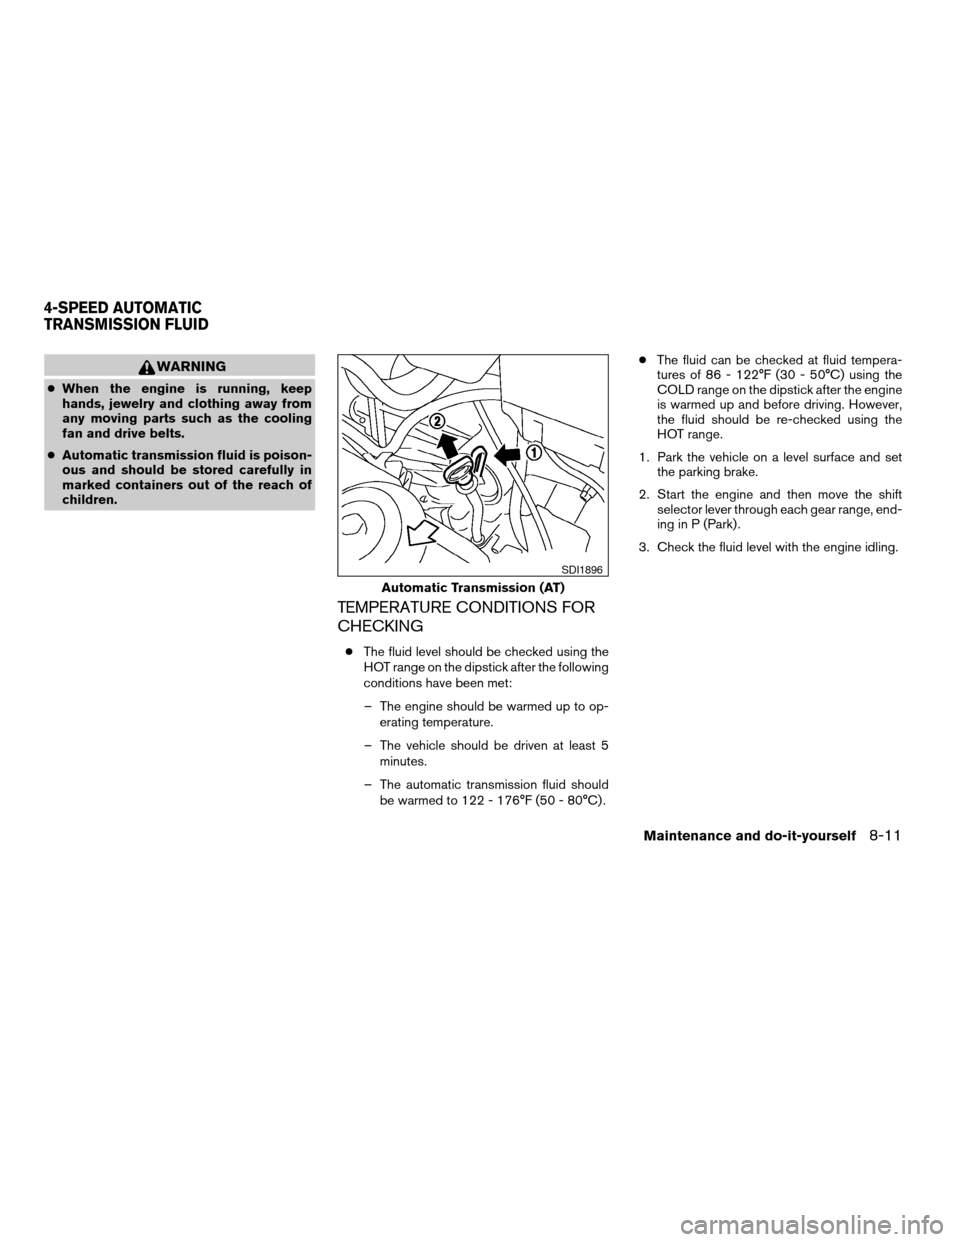
4. Remove the dipstick by pushings1and
pulling out
s2.
5. Wipe the dipstick clean with lint-free paper.
6. Reinsert the dipstick into the dipstick tube
as far as it will go.
7. Remove the dipstick and note the reading. If
the automatic transmission fluid level is
within the normal operating range, no addi-
tional fluid is required. If the fluid level is low
add fluid through the dipstick tube.
CAUTION
DO NOT OVERFILL. Use Genuine NISSAN
Matic D ATF or equivalent (if available) .
NOTE:
If the vehicle has been driven for a long
time at high speeds, or in city traffic in hot
weather, the fluid level cannot be read ac-
curately. You should wait until the fluid has
cooled down (about 30 minutes) before
checking fluid level.
WARNING
cUse only Genuine NISSAN CVT Fluid
NS-2. Do not mix with other fluids.
cUsing transmission fluid other than
Genuine NISSAN CVT Fluid NS-2 will
damage the CVT, which is not covered
by the NISSAN new vehicle limited
warranty.
When checking or replacement is required, we
recommend your NISSAN dealer for servicing.
WDI0636
CONTINUOUSLY VARIABLE
TRANSMISSION (CVT) FLUID
8-12Maintenance and do-it-yourself
ZREVIEW COPYÐ2008 Versa(vrs)
Owners ManualÐUSA_English(nna)
01/02/08Ðdebbie
X