2008 NISSAN VERSA HATCHBACK display
[x] Cancel search: displayPage 65 of 304

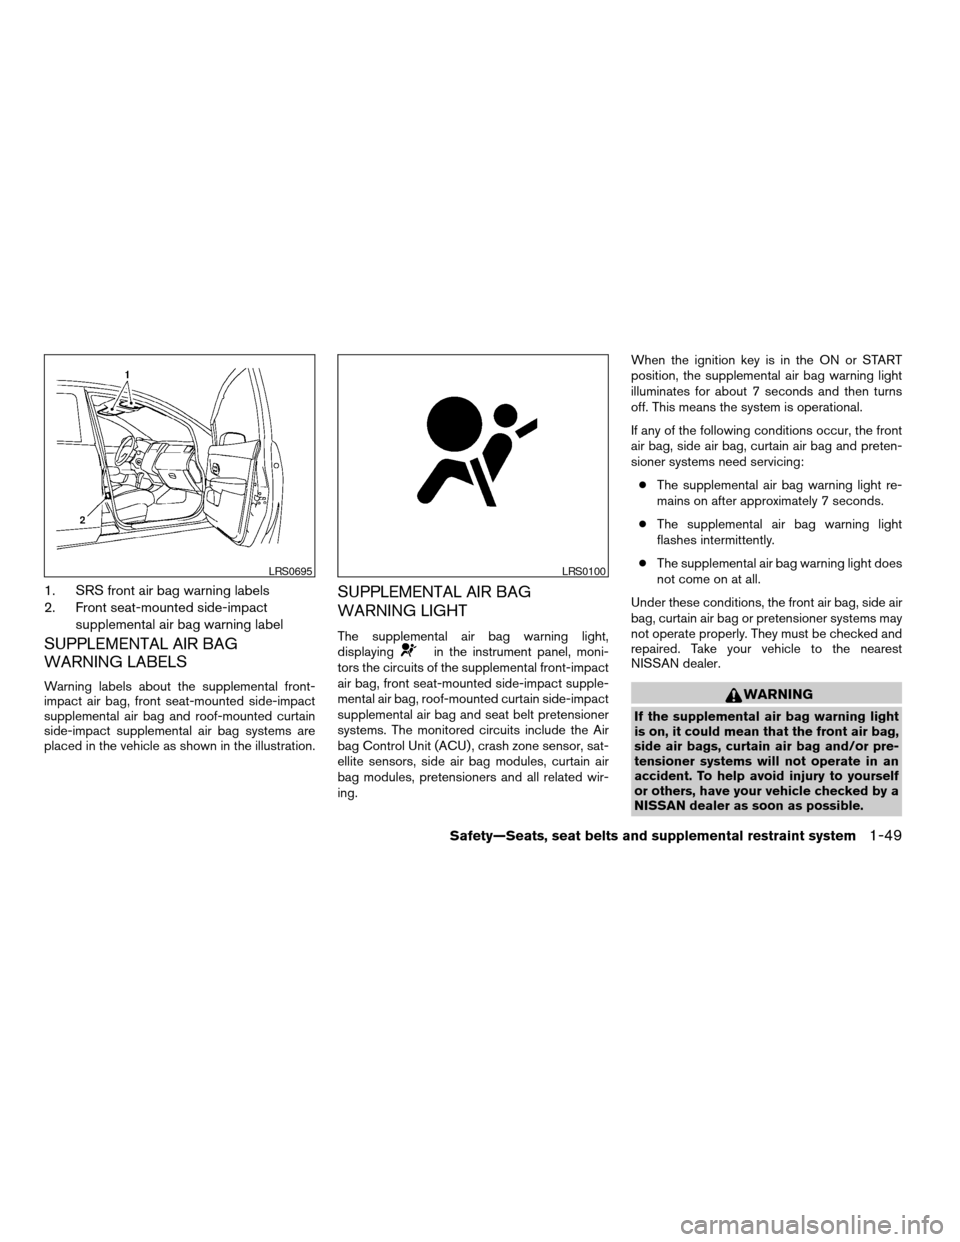
1. SRS front air bag warning labels
2. Front seat-mounted side-impact
supplemental air bag warning label
SUPPLEMENTAL AIR BAG
WARNING LABELS
Warning labels about the supplemental front-
impact air bag, front seat-mounted side-impact
supplemental air bag and roof-mounted curtain
side-impact supplemental air bag systems are
placed in the vehicle as shown in the illustration.
SUPPLEMENTAL AIR BAG
WARNING LIGHT
The supplemental air bag warning light,
displayingin the instrument panel, moni-
tors the circuits of the supplemental front-impact
air bag, front seat-mounted side-impact supple-
mental air bag, roof-mounted curtain side-impact
supplemental air bag and seat belt pretensioner
systems. The monitored circuits include the Air
bag Control Unit (ACU) , crash zone sensor, sat-
ellite sensors, side air bag modules, curtain air
bag modules, pretensioners and all related wir-
ing.When the ignition key is in the ON or START
position, the supplemental air bag warning light
illuminates for about 7 seconds and then turns
off. This means the system is operational.
If any of the following conditions occur, the front
air bag, side air bag, curtain air bag and preten-
sioner systems need servicing:
cThe supplemental air bag warning light re-
mains on after approximately 7 seconds.
cThe supplemental air bag warning light
flashes intermittently.
cThe supplemental air bag warning light does
not come on at all.
Under these conditions, the front air bag, side air
bag, curtain air bag or pretensioner systems may
not operate properly. They must be checked and
repaired. Take your vehicle to the nearest
NISSAN dealer.
WARNING
If the supplemental air bag warning light
is on, it could mean that the front air bag,
side air bags, curtain air bag and/or pre-
tensioner systems will not operate in an
accident. To help avoid injury to yourself
or others, have your vehicle checked by a
NISSAN dealer as soon as possible.
LRS0695LRS0100
Safety—Seats, seat belts and supplemental restraint system1-49
ZREVIEW COPYÐ2008 Versa(vrs)
Owners ManualÐUSA_English(nna)
01/02/08Ðdebbie
X
Page 70 of 304

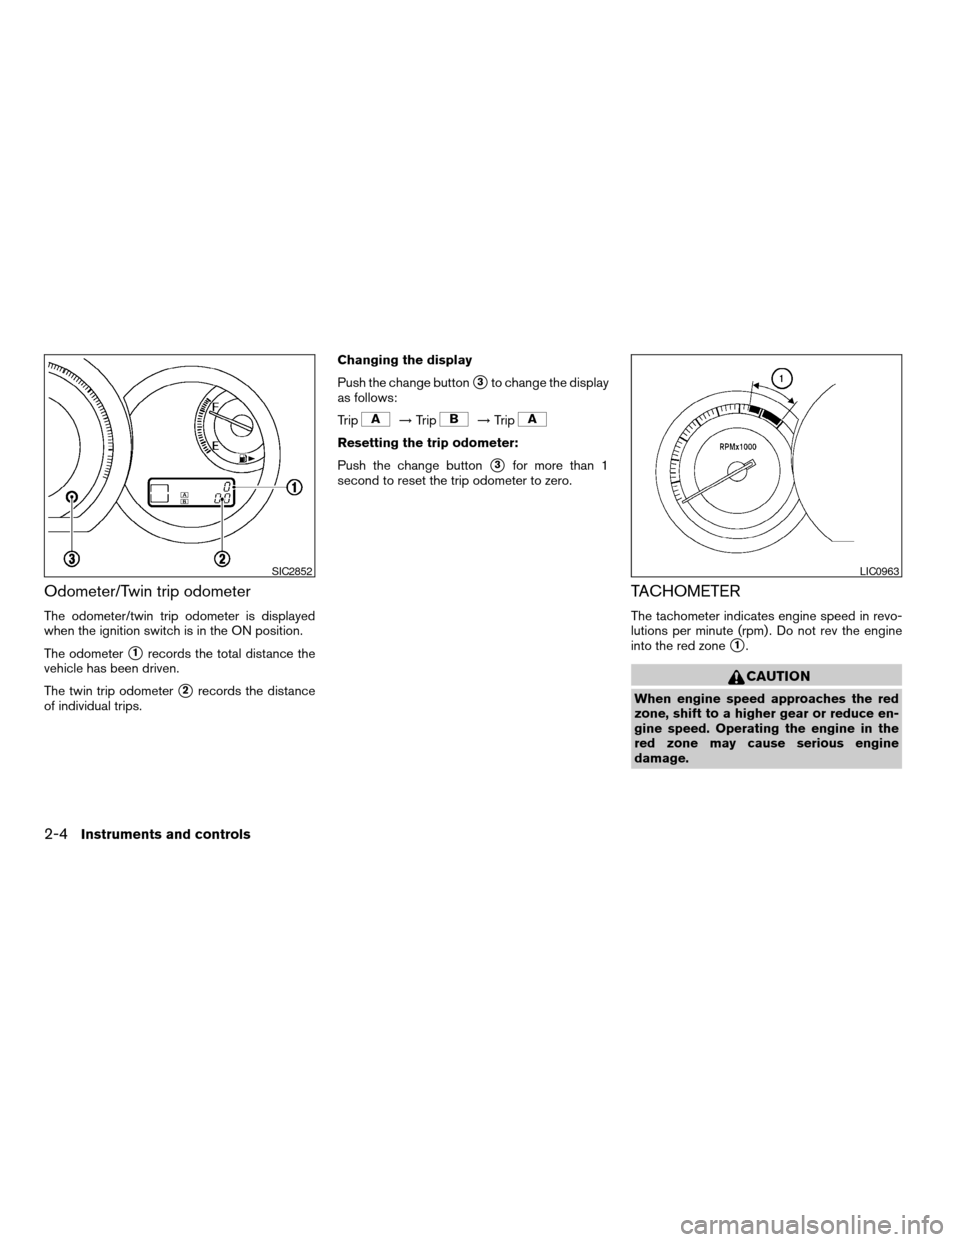
Odometer/Twin trip odometer
The odometer/twin trip odometer is displayed
when the ignition switch is in the ON position.
The odometer
s1records the total distance the
vehicle has been driven.
The twin trip odometer
s2records the distance
of individual trips.Changing the display
Push the change button
s3to change the display
as follows:
Trip
!Trip!Trip
Resetting the trip odometer:
Push the change button
s3for more than 1
second to reset the trip odometer to zero.
TACHOMETER
The tachometer indicates engine speed in revo-
lutions per minute (rpm) . Do not rev the engine
into the red zone
s1.
CAUTION
When engine speed approaches the red
zone, shift to a higher gear or reduce en-
gine speed. Operating the engine in the
red zone may cause serious engine
damage.
SIC2852LIC0963
2-4Instruments and controls
ZREVIEW COPYÐ2008 Versa(vrs)
Owners ManualÐUSA_English(nna)
01/02/08Ðdebbie
X
Page 142 of 304

cDo not expose the CD to direct sun-
light.
cCDs that are in poor condition or are
dirty, scratched or covered with finger-
prints may not work properly.
cThe following CDs may not work prop-
erly:
cCopy control compact discs (CCCD)
cRecordable compact discs (CD-R)
cRewritable compact discs (CD-RW)
cDo not use the following CDs as they
may cause the CD player to malfunc-
tion:
c3.1 in (8 cm) discs with an adapter
cCDs that are not round
cCDs with a paper label
cCDs that are warped, scratched, or
have abnormal edges
cThis audio system can only play pre-
recorded CDs. It has no capability to
record or burn CDs.
cIf the CD cannot be played, one of the
following messages will be displayed.CHECK DISC:
cConfirm that the CD is inserted cor-
rectly (the label side is facing up,
etc.) .
cConfirm that the CD is not bent or
warped and it is free of scratches.
PRESS EJECT:
This is an error due to excessive tem-
perature inside the player. Remove the
CD by pressing the EJECT button. After
a short time, reinsert the CD. The CD
can be played when the temperature of
the player returns to normal.
UNPLAYABLE:
The file is unplayable in this audio sys-
tem (only MP3 CD) .
Compact Disc with MP3
Terms:
cMP3 — MP3 is short for Moving Pictures
Experts Group Audio Layer 3. MP3 is the
most well-known compressed digital audio
file format. This format allows for near “CD
quality” sound, but at a fraction of the size of
normal audio files. MP3 conversion of an
audio track from CD-ROM can reduce the
file size by approximately a 10:1 ratio withvirtually no perceptible loss in quality. MP3
compression removes the redundant and
irrelevant parts of a sound signal that the
human ear doesn’t hear.
cBit rate — Bit rate denotes the number of
bits per second used by a digital music file.
The size and quality of a compressed digital
audio file is determined by the bit rate used
when encoding the file.
cSampling frequency — Sampling frequency
is the rate at which the samples of a signal
are converted from analog to digital (A/D
conversion) per second.
cID3 tag — The ID3 tag is the part of the
encoded MP3 file that contains information
about the digital music file such as song title,
artist, album title, encoding bit rate, track
time duration, etc. ID3 tag information is
displayed on the Album/Artist/Track title line
on the display.
4-12Heater, air conditioner, audio and phone systems
ZREVIEW COPYÐ2008 Versa(vrs)
Owners ManualÐUSA_English(nna)
01/02/08Ðdebbie
X
Page 143 of 304

Playback order:
Playback order of the CD with compressed files
(MP3) is as illustrated.
cThe names of folders not containing MP3
files are not shown in the display.
cIf there is a file in the top level of the disc,
“ROOT” is displayed.
cThe playback order is the order in which the
files were written by the writing software.
Therefore, the files might not play in the
desired order.
Playback order chartWHA1090
Heater, air conditioner, audio and phone systems4-13
ZREVIEW COPYÐ2008 Versa(vrs)
Owners ManualÐUSA_English(nna)
01/02/08Ðdebbie
X
Page 144 of 304

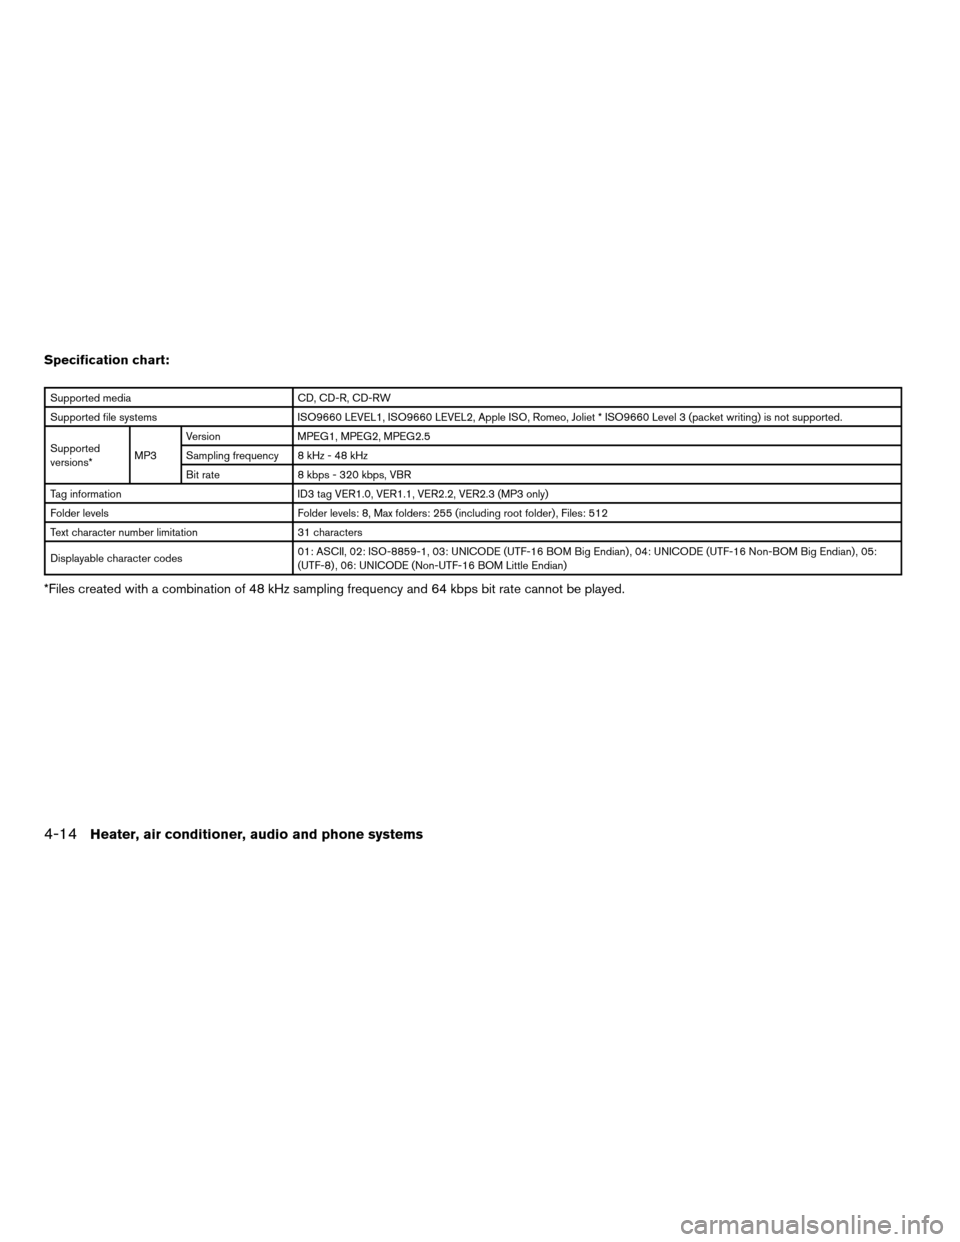
Specification chart:
Supported media CD, CD-R, CD-RW
Supported file systems ISO9660 LEVEL1, ISO9660 LEVEL2, Apple ISO, Romeo, Joliet * ISO9660 Level 3 (packet writing) is not supported.
Supported
versions*MP3Version MPEG1, MPEG2, MPEG2.5
Sampling frequency 8 kHz - 48 kHz
Bit rate 8 kbps - 320 kbps, VBR
Tag information ID3 tag VER1.0, VER1.1, VER2.2, VER2.3 (MP3 only)
Folder levels Folder levels: 8, Max folders: 255 (including root folder) , Files: 512
Text character number limitation 31 characters
Displayable character codes01: ASCII, 02: ISO-8859-1, 03: UNICODE (UTF-16 BOM Big Endian) , 04: UNICODE (UTF-16 Non-BOM Big Endian) , 05:
(UTF-8) , 06: UNICODE (Non-UTF-16 BOM Little Endian)
*Files created with a combination of 48 kHz sampling frequency and 64 kbps bit rate cannot be played.
4-14Heater, air conditioner, audio and phone systems
ZREVIEW COPYÐ2008 Versa(vrs)
Owners ManualÐUSA_English(nna)
01/02/08Ðdebbie
X
Page 147 of 304

To adjust Bass, Treble, Fade and Balance, press
the MENU button until the desired mode appears
in the display. Press the TUNE/SEEK button to
adjust Bass and Treble to the desired level. You
can also use the TUNE/SEEK button to adjust
Fader and Balance modes. Fader adjusts the
sound level between the front and rear speakers
and Balance adjusts the sound between the right
and left speakers.
Once you have adjusted the sound quality to the
desired level, press the MENU button repeatedly
until the radio or CD display reappears. Other-
wise, the radio or CD display will automatically
reappear after about 10 seconds.
Clock operation
Press the MENU button until CLK-ON or CLK-
OFF is displayed, use the TUNE/SEEK button to
turn the clock display on or off.
Clock set
If the clock is not displayed with the ignition
switch in the ACC or ON position, you need to
select the CLK-ON mode. Press the MENU but-
ton repeatedly until CLK-OFF mode is displayed.
Use the TUNE/SEEK button to enable CLK-ON
mode.
1. Press the MENU button repeatedly until
CLK-ON mode appears.2. Press the MENU button again, the time will
start flashing.
3. Press the TUNE/SEEK button
orto adjust the hour.
4. Press the MENU button again; the display
will switch to the minute adjustment mode.
5. The minutes will start flashing. Press
TUNE/SEEK button
orto ad-
just the minutes.
6. Press the MENU button again to exit the
clock set mode.
The display will return to the regular clock display
after 10 seconds, or press the MENU button
again to return to the regular clock display.
Resetting the time
Hold the MENU button down and then press the
TUNE/SEEK button; the time will reset as fol-
lows:
cIf the displayed minutes before the reset are
in the range of :00 - :29, the hour displayed
before the reset will stay the same and the
minutes will be reset to :00.
cIf the displayed minutes before the reset are
in the range of :30 - :59, the hour displayed
before the reset will advance by one hour
and the minutes will be reset to :00.For example, if the MENU button and the
TUNE/SEEK button are pressed while the time
displayed is between 8:00 and 8:29, the display
will be reset to 8:00. If the buttons were pressed
while the time was between 8:30 and 8:59, the
display will be reset to 9:00. At the same time the
display will return to the audio.FM/AM radio operation
FM·AM button:
Press the FM·AM button to change from AMÃ!
FM reception.
The FM stereo indicator, ST, illuminates during
FM stereo reception. When the stereo broadcast
signal is weak, the radio automatically changes
from stereo to monaural reception.
TUNE/SEEK buttons:
Manual tuning
Press the
orbutton for less than 0.5
seconds for manual tuning.
SEEK tuning
Press the
orbutton for more than
1.5 seconds to seek through the frequencies.
Seek tuning begins from low to high frequencies,
or high to low frequencies depending on which
button is pressed, and stops at the next broad-
Heater, air conditioner, audio and phone systems4-17
ZREVIEW COPYÐ2008 Versa(vrs)
Owners ManualÐUSA_English(nna)
01/02/08Ðdebbie
X
Page 148 of 304

casting station. Once the highest broadcasting
station is reached, the radio continues in the seek
mode at the lowest broadcasting station.
Station memory operations:
18 stations can be set for the FM and AM radio to
the A, B and C preset button in any combination
of AM or FM stations.
1. Press the PRESET A·B·C button to change
between storage banks. The radio displays
the icon A, B or C to indicate which set of
presets are active.
2. Tune to the desired station using manual
TUNE or SEEK tuning. Press and hold any of
the desired station memory buttons (1 – 6)
until a beep sound is heard. (The radio mutes
when the select button is pressed.)
3. The channel indicator will then come on and
the sound will resume. Programming is now
complete.
4. Other buttons can be set in the same man-
ner.
If the battery cable is disconnected, or if the fuse
opens, the radio memory will be canceled. In that
case, reset the desired stations.Compact disc (CD) player operation
Turn the ignition key to the ACC or ON position,
and carefully insert the compact disc into the slot
with the label side up. The compact disc is auto-
matically pulled into the slot and starts to play.
If the radio is already operating, it automatically
turns off and the compact disc begins to play.
CD button:
When the CD button is pressed with a compact
disc loaded and the radio playing, the radio turns
off and the last used compact disc starts to play.
Rewind and Fast
Forward buttons:
When the
orbutton is pressed
while the compact disc is playing, the compact
disc plays at an increased speed while rewinding
or fast forwarding. When the button is released,
the compact disc returns to normal play speed.
SEEK/TRACK buttons:
When
is pressed while the compact disc
is playing, the next track following the present
one starts to play from the beginning.
Press
several times to skip several tracks.
Each time the button is pressed, the CD ad-
vances 1 additional track. The track number ap-pears in the display window. (When the last track
on the compact disc is skipped, the first track is
played) .
When
is pressed, the track being played
returns to the beginning. Pressseveral
times to skip back several tracks. Each time the
button is pressed the CD moves back 1 track.
RPT button:
When the RPT button is pressed while the com-
pact disc is being played, the play pattern can be
changed as follows:
1 TRACK RPTÃ!Normal
1 TRACK RPT: The track that is currently playing
will be repeated.
RDM button:
When the RDM button is pressed while the com-
pact disc is being played, the play pattern can be
changed as follows:
RDMÃ!Normal
RDM: Tracks from the disc that is currently play-
ing will be played randomly.
4-18Heater, air conditioner, audio and phone systems
ZREVIEW COPYÐ2008 Versa(vrs)
Owners ManualÐUSA_English(nna)
01/02/08Ðdebbie
X
Page 149 of 304

CD EJECT button:
When the
button is pressed with a com-
pact disc loaded, the compact disc will be
ejected.
When the
button is pressed twice with a
compact disc loaded, the compact disc will be
ejected further, for easier CD removal.
When the
button is pressed while the
compact disc is being played, the compact disc
will eject and the system will turn off.
CD IN indicator:
CD IN indicator appears on the display when the
CD is loaded with the system on.
Heater, air conditioner, audio and phone systems4-19
ZREVIEW COPYÐ2008 Versa(vrs)
Owners ManualÐUSA_English(nna)
01/02/08Ðdebbie
X