2008 NISSAN VERSA HATCHBACK parking brake
[x] Cancel search: parking brakePage 234 of 304
CHANGING ENGINE COOLANT
A NISSAN dealer can change the engine coolant.
The service procedure can be found in the
NISSAN Service Manual.
Improper servicing can result in reduced
heater performance and engine overheat-
ing.
WARNING
cTo avoid the danger of being scalded,
never change the coolant when the en-
gine is hot.
cNever remove the radiator cap when the
engine is hot. Serious burns could be
caused by high pressure fluid escaping
from the radiator.
cAvoid direct skin contact with used
coolant. If skin contact is made, wash
thoroughly with soap or hand cleaner
as soon as possible.
cKeep coolant out of the reach of chil-
dren and pets.
Engine coolant must be disposed of properly.
Check your local regulations.
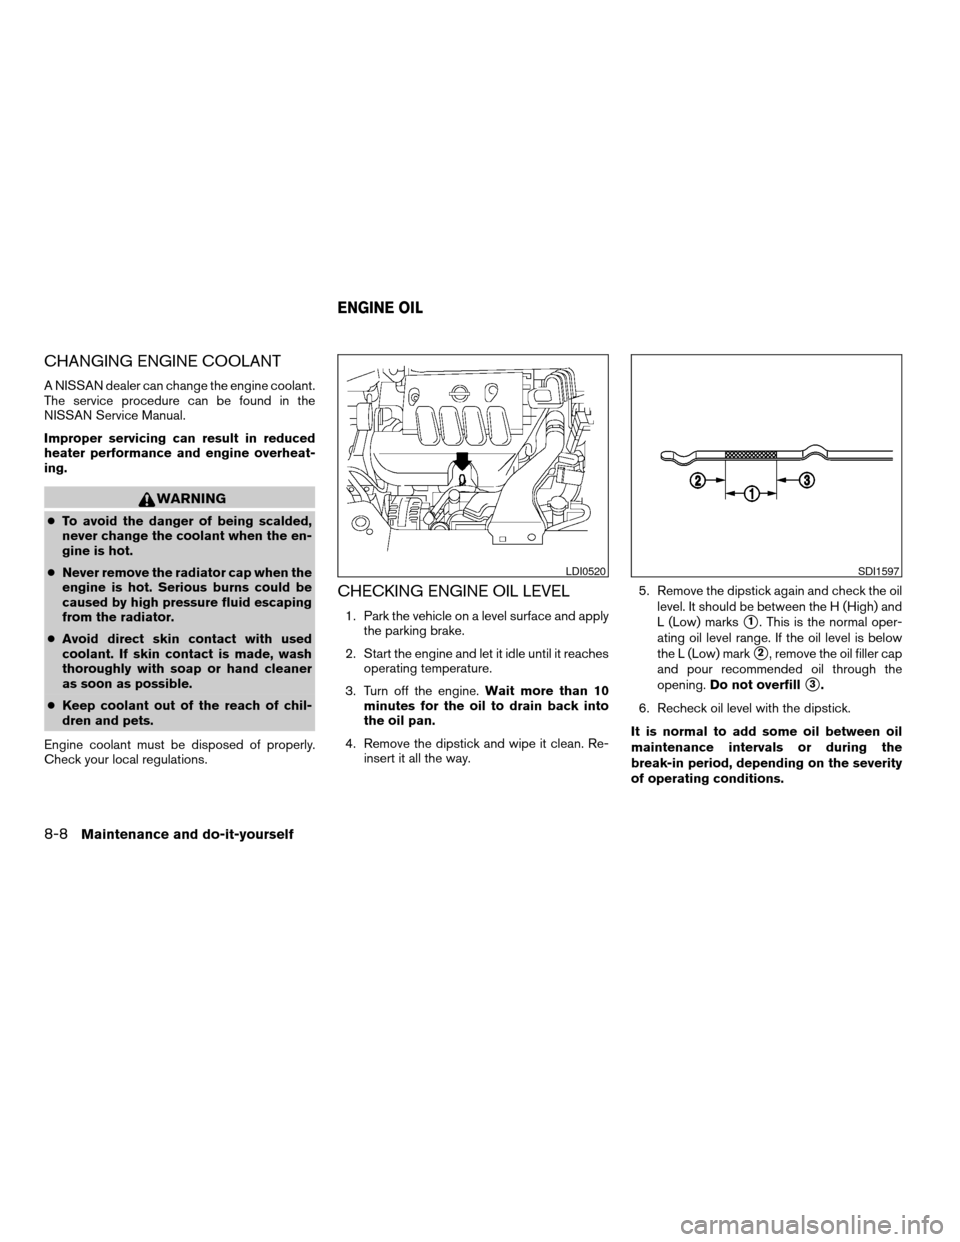
CHECKING ENGINE OIL LEVEL
1. Park the vehicle on a level surface and apply
the parking brake.
2. Start the engine and let it idle until it reaches
operating temperature.
3. Turn off the engine.Wait more than 10
minutes for the oil to drain back into
the oil pan.
4. Remove the dipstick and wipe it clean. Re-
insert it all the way.5. Remove the dipstick again and check the oil
level. It should be between the H (High) and
L (Low) markss1. This is the normal oper-
ating oil level range. If the oil level is below
the L (Low) mark
s2, remove the oil filler cap
and pour recommended oil through the
opening.Do not overfill
s3.
6. Recheck oil level with the dipstick.
It is normal to add some oil between oil
maintenance intervals or during the
break-in period, depending on the severity
of operating conditions.
LDI0520SDI1597
ENGINE OIL
8-8Maintenance and do-it-yourself
ZREVIEW COPYÐ2008 Versa(vrs)
Owners ManualÐUSA_English(nna)
01/02/08Ðdebbie
X
Page 235 of 304
CAUTION
Oil level should be checked regularly. Op-
erating the engine with an insufficient
amount of oil can damage the engine, and
such damage is not covered by warranty.
CHANGING ENGINE OIL
1. Park the vehicle on a level surface and apply
the parking brake.
2. Start the engine and let it idle until it reaches
operating temperature, then turn it off.
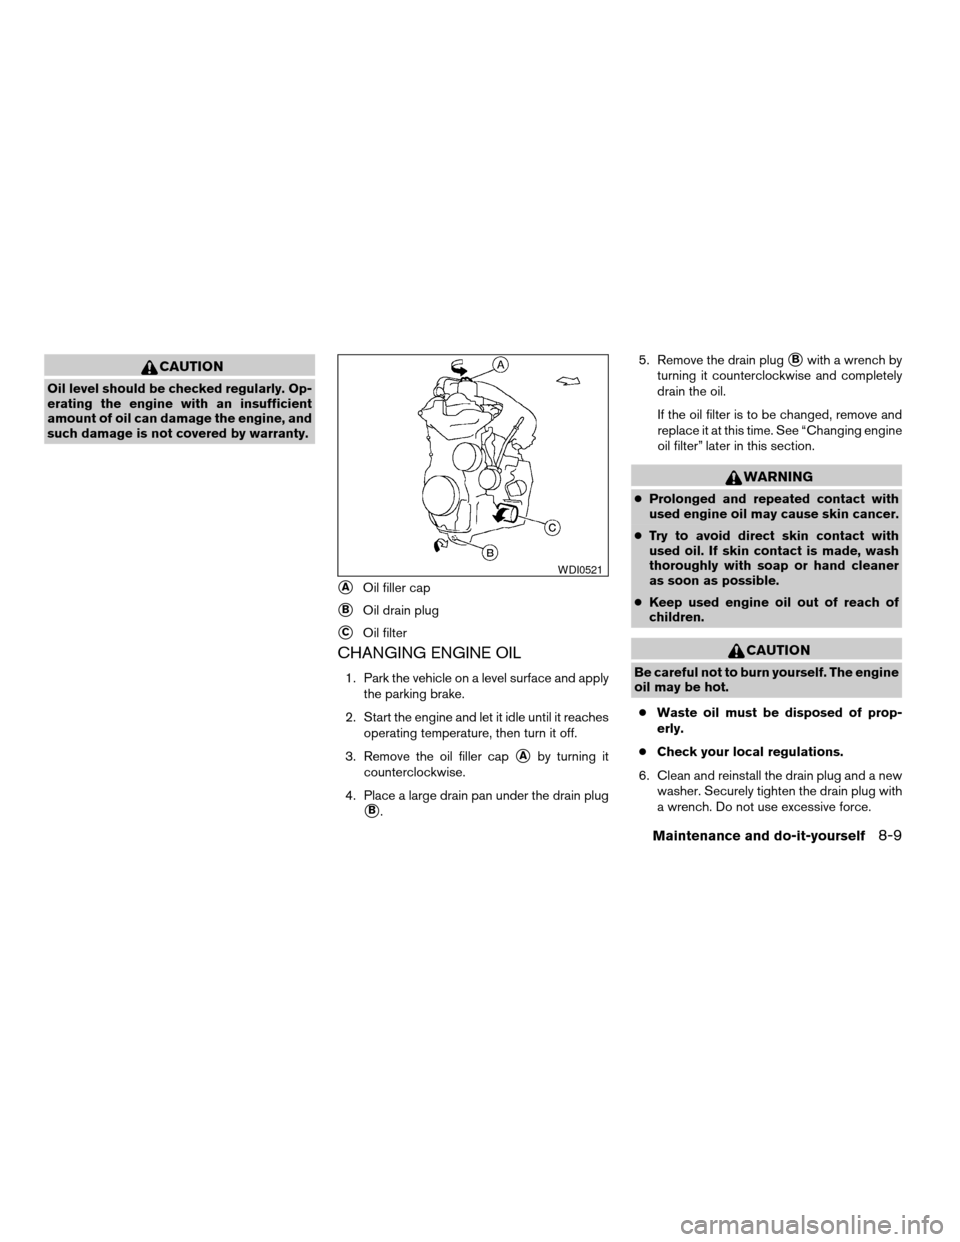
3. Remove the oil filler cap
sAby turning it
counterclockwise.
4. Place a large drain pan under the drain plug
sB.5. Remove the drain plug
sBwith a wrench by
turning it counterclockwise and completely
drain the oil.
If the oil filter is to be changed, remove and
replace it at this time. See “Changing engine
oil filter” later in this section.
WARNING
cProlonged and repeated contact with
used engine oil may cause skin cancer.
cTry to avoid direct skin contact with
used oil. If skin contact is made, wash
thoroughly with soap or hand cleaner
as soon as possible.
cKeep used engine oil out of reach of
children.
CAUTION
Be careful not to burn yourself. The engine
oil may be hot.
cWaste oil must be disposed of prop-
erly.
cCheck your local regulations.
6. Clean and reinstall the drain plug and a new
washer. Securely tighten the drain plug with
a wrench. Do not use excessive force.
sAOil filler cap
sBOil drain plug
sCOil filter
WDI0521
Maintenance and do-it-yourself8-9
ZREVIEW COPYÐ2008 Versa(vrs)
Owners ManualÐUSA_English(nna)
01/02/08Ðdebbie
X
Page 236 of 304
Drain plug tightening torque:
22 - 29 ft-lb (29 - 39 N·m)
7. Refill engine with recommended oil through
the oil filler opening, then install the oil filler
cap securely.
See “Capacities and recommended
fuel/lubricants” in the “Technical and con-
sumer information” section of this manual for
drain and refill capacity.
The drain and refill capacity depends on the
oil temperature and drain time. Use these
specifications for reference only. Always use
the dipstick to determine when the proper
amount of oil is in the engine.
8. Start the engine. Check for leakage around
the drain plug and oil filter. Correct as re-
quired.
9. Turn the engine off and wait more than 10
minutes. Check the oil level with the dipstick.
Add engine oil if necessary.
CHANGING ENGINE OIL FILTER
1. Park the vehicle on a level surface and apply
the parking brake.
2. Turn the engine off.
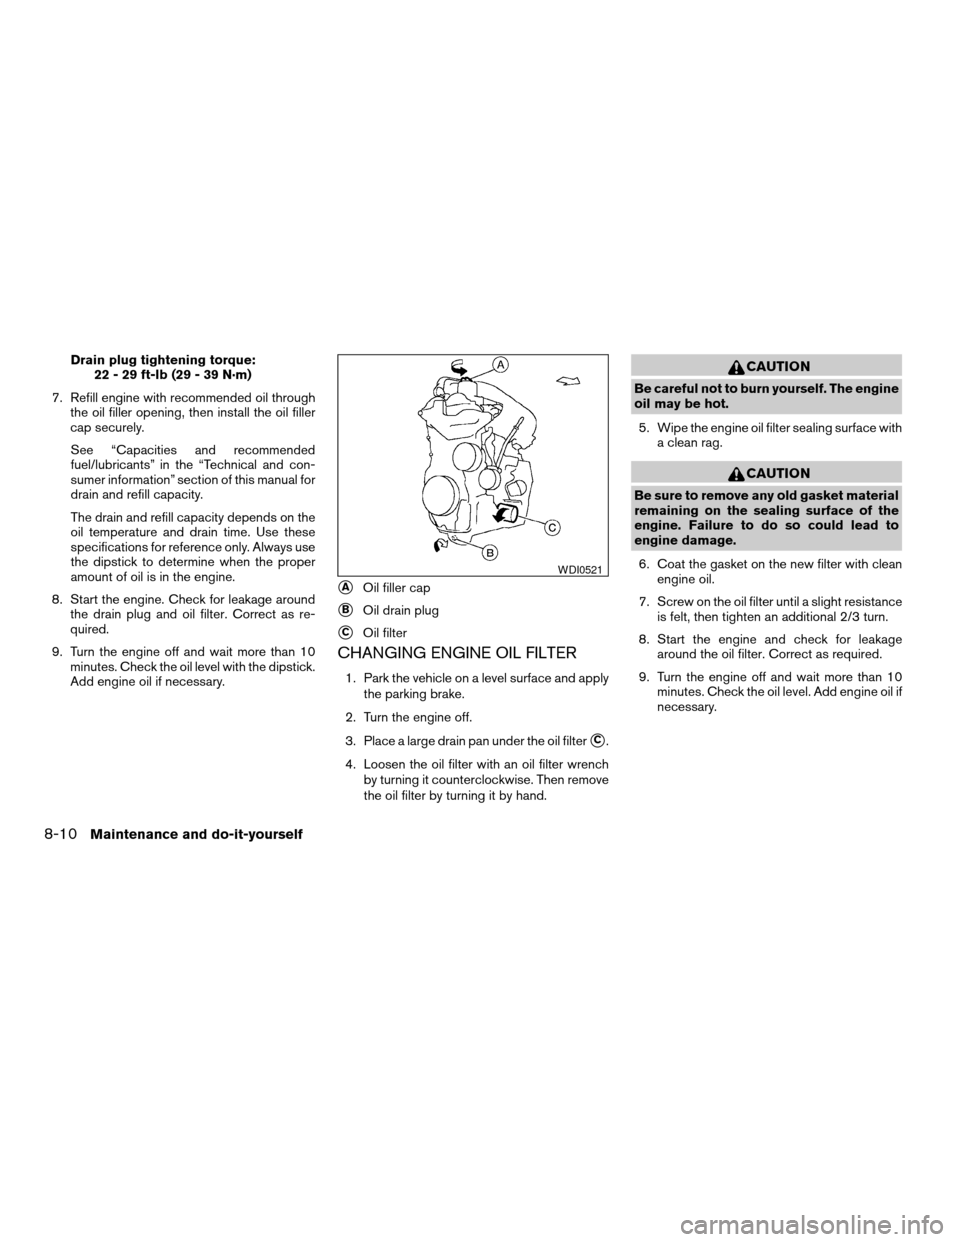
3. Place a large drain pan under the oil filter
sC.
4. Loosen the oil filter with an oil filter wrench
by turning it counterclockwise. Then remove
the oil filter by turning it by hand.
CAUTION
Be careful not to burn yourself. The engine
oil may be hot.
5. Wipe the engine oil filter sealing surface with
a clean rag.
CAUTION
Be sure to remove any old gasket material
remaining on the sealing surface of the
engine. Failure to do so could lead to
engine damage.
6. Coat the gasket on the new filter with clean
engine oil.
7. Screw on the oil filter until a slight resistance
is felt, then tighten an additional 2/3 turn.
8. Start the engine and check for leakage
around the oil filter. Correct as required.
9. Turn the engine off and wait more than 10
minutes. Check the oil level. Add engine oil if
necessary.
sAOil filler cap
sBOil drain plug
sCOil filter
WDI0521
8-10Maintenance and do-it-yourself
ZREVIEW COPYÐ2008 Versa(vrs)
Owners ManualÐUSA_English(nna)
01/02/08Ðdebbie
X
Page 237 of 304
WARNING
cWhen the engine is running, keep
hands, jewelry and clothing away from
any moving parts such as the cooling
fan and drive belts.
cAutomatic transmission fluid is poison-
ous and should be stored carefully in
marked containers out of the reach of
children.
TEMPERATURE CONDITIONS FOR
CHECKING
cThe fluid level should be checked using the
HOT range on the dipstick after the following
conditions have been met:
– The engine should be warmed up to op-
erating temperature.
– The vehicle should be driven at least 5
minutes.
– The automatic transmission fluid should
be warmed to 122 - 176°F (50 - 80°C) .cThe fluid can be checked at fluid tempera-
tures of 86 - 122°F (30 - 50°C) using the
COLD range on the dipstick after the engine
is warmed up and before driving. However,
the fluid should be re-checked using the
HOT range.
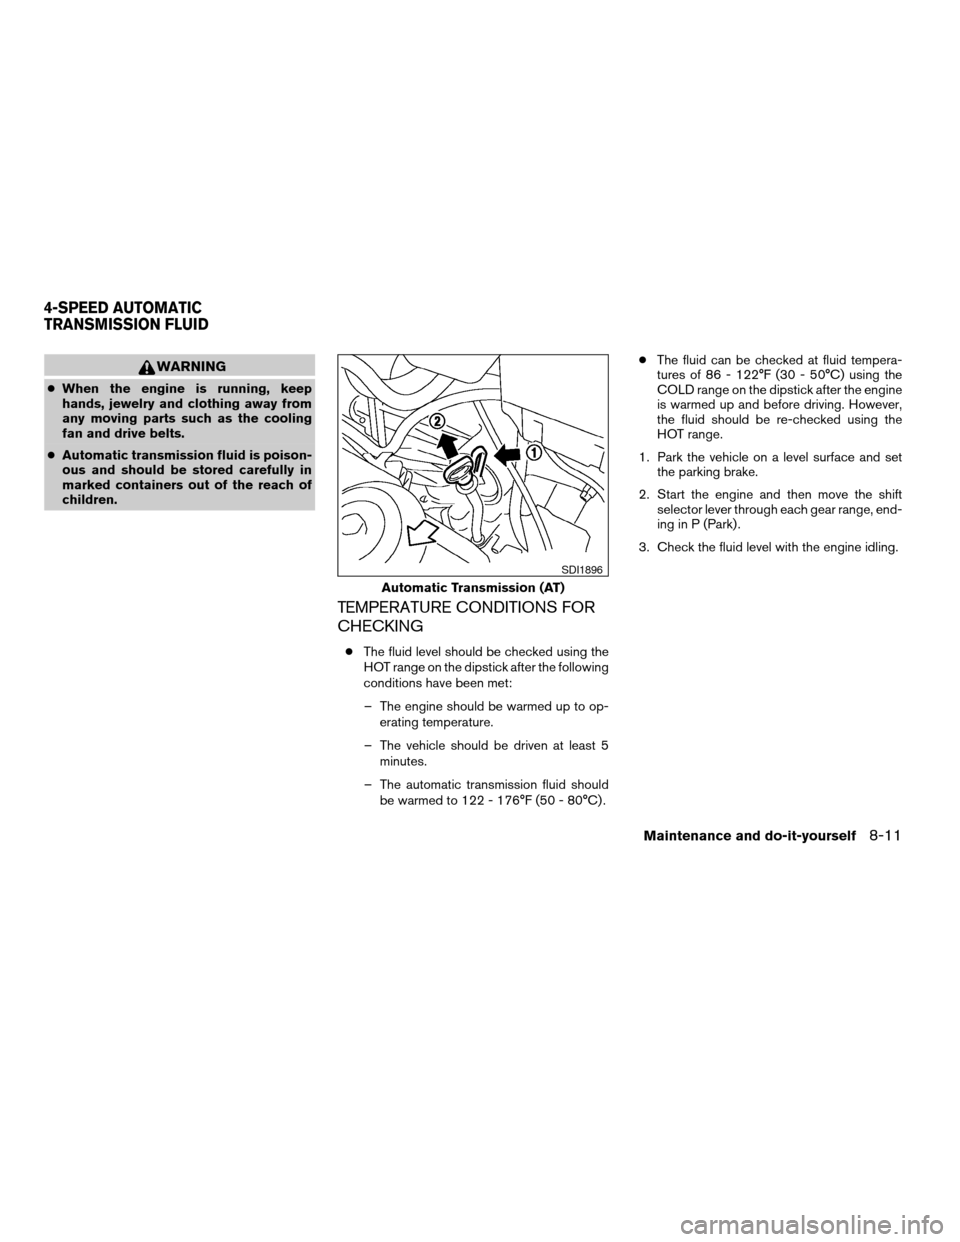
1. Park the vehicle on a level surface and set
the parking brake.
2. Start the engine and then move the shift
selector lever through each gear range, end-
ing in P (Park) .
3. Check the fluid level with the engine idling.
Automatic Transmission (AT)
SDI1896
4-SPEED AUTOMATIC
TRANSMISSION FLUID
Maintenance and do-it-yourself8-11
ZREVIEW COPYÐ2008 Versa(vrs)
Owners ManualÐUSA_English(nna)
01/02/08Ðdebbie
X
Page 244 of 304
WARNING
Be sure the engine and ignition switch are
off and that the parking brake is engaged
securely.
CAUTION
Be sure to use the correct socket to re-
move the spark plugs. An incorrect socket
can damage the spark plugs.
If replacement is required, see your NISSAN
dealer for assistance.
The air cleaner filter should not be cleaned and
reused. Replace it according to the maintenance
log shown in the “NISSAN Service and Mainte-
nance Guide.” When replacing the filter, wipe the
inside of the air cleaner filter housing and the
cover with a damp cloth.
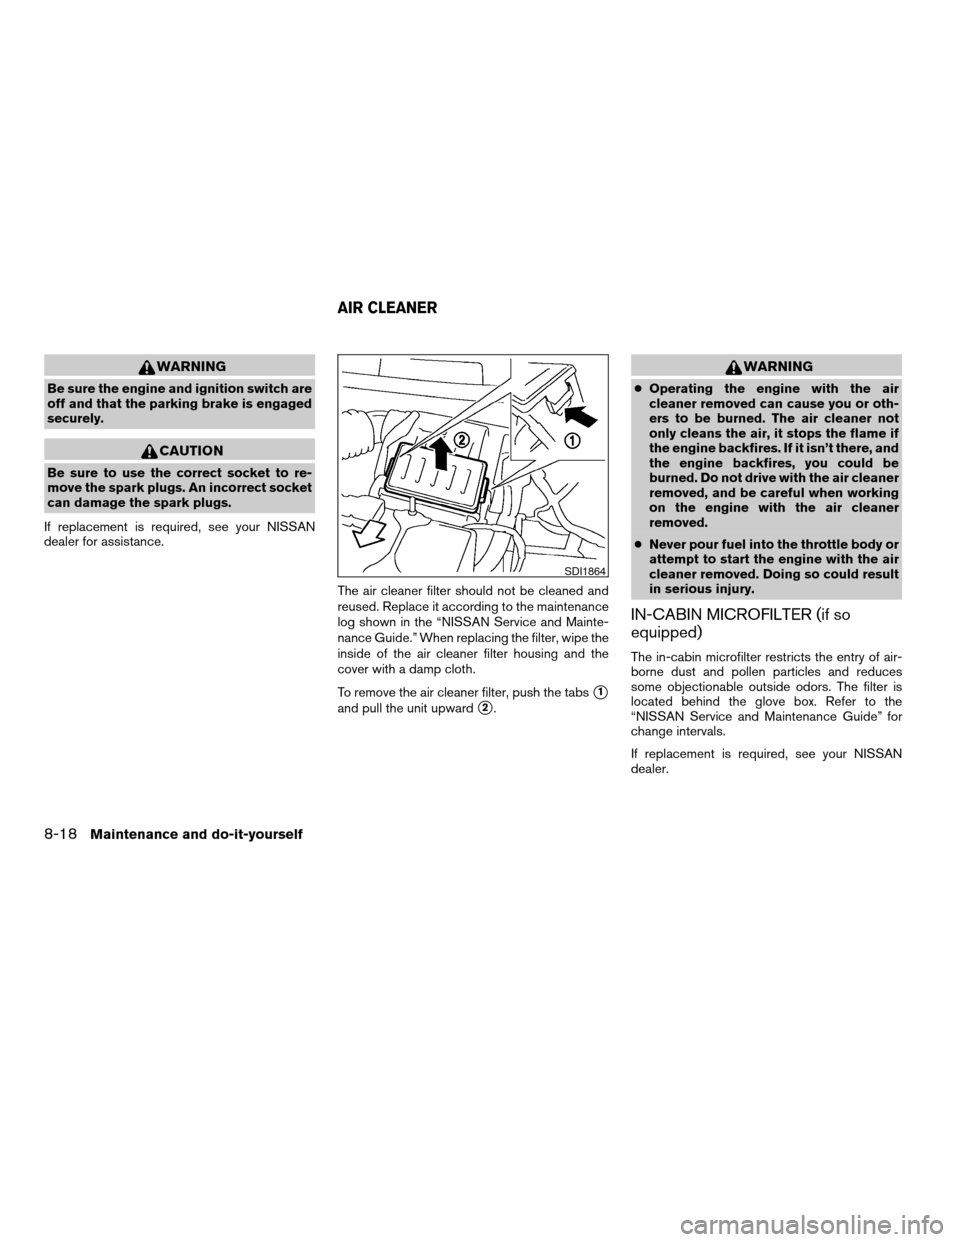
To remove the air cleaner filter, push the tabs
s1
and pull the unit upwards2.
WARNING
cOperating the engine with the air
cleaner removed can cause you or oth-
ers to be burned. The air cleaner not
only cleans the air, it stops the flame if
the engine backfires. If it isn’t there, and
the engine backfires, you could be
burned. Do not drive with the air cleaner
removed, and be careful when working
on the engine with the air cleaner
removed.
cNever pour fuel into the throttle body or
attempt to start the engine with the air
cleaner removed. Doing so could result
in serious injury.
IN-CABIN MICROFILTER (if so
equipped)
The in-cabin microfilter restricts the entry of air-
borne dust and pollen particles and reduces
some objectionable outside odors. The filter is
located behind the glove box. Refer to the
“NISSAN Service and Maintenance Guide” for
change intervals.
If replacement is required, see your NISSAN
dealer.
SDI1864
AIR CLEANER
8-18Maintenance and do-it-yourself
ZREVIEW COPYÐ2008 Versa(vrs)
Owners ManualÐUSA_English(nna)
01/02/08Ðdebbie
X
Page 291 of 304

10 Index
A
Active Head Restraint..............1-6
Air bag (See supplemental restraint
system).....................1-35
Air bag system
Front (See supplemental front impact air
bag system).................1-42
Side and curtain (See supplemental side
air bag and curtain side-impact air bag
system)...................1-46
Air bag warning labels.............1-49
Air bag warning light...........1-49, 2-11
Air cleaner housing filter............8-18
Air conditioner
Air conditioner operation...........4-5
Air conditioner service............4-9
Air conditioner specification label.....9-11
Air conditioner system refrigerant and oil
recommendations..............9-6
Heater and air conditioner controls.....4-3
Servicing air conditioner...........4-9
Air flow charts..................4-6
Alarm system
(See vehicle security system).........2-14
Anchor point locations.............1-19
Antenna.....................4-28
Anti-lock brake warning light..........2-7
Anti-lock Braking System (ABS)........5-28
Armrests.....................1-5
Audible reminders................2-13Audio system..................4-10
Compact Disc (CD) changer.......4-24
Compact disc (CD) player.........4-18
FM-AM radio with compact disc (CD)
player....................4-16
FM/AM/SAT radio with compact disc (CD)
changer...................4-20
Radio....................4-10
Steering wheel audio control switch. . . .4-27
Automatic
Automatic power window switch.....2-29
Automatic transmission fluid (ATF). . . .8-11
Driving with automatic transmission. . . .5-13
Transmission selector lever lock
release................5-15, 5-19
B
Battery......................8-14
Charge warning light.............2-8
Before starting the engine...........5-11
Belt (See drive belt)..............8-17
Block heater
Engine....................5-31
BluetoothThands-free phone system.....4-29
Booster seats..................1-30
Brake
Anti-lock Braking System (ABS)......5-28
Brake fluid..................8-13
Brake light (See stop light).........8-28
Brake system................5-27Brake warning light..............2-7
Brake wear indicators........2-13, 8-20
Parking brake operation..........5-22
Self-adjusting brakes............8-20
Brakes......................8-20
Break-in schedule................5-25
Brightness control
Instrument panel..............2-21
Bulb check/instrument panel..........2-7
Bulb replacement................8-28
C
Capacities and recommended
fuel/lubricants...................9-2
Car phone or CB radio.............4-28
Cargo (See vehicle loading information) . . .9-12
CD care and cleaning.............4-26
CD changer (See audio system)........4-24
CD player (See audio system).........4-18
Child restraint with top tether strap......1-19
Child restraints..........1-10, 1-15, 1-17
Precautions on child
restraints............1-15, 1-24, 1-30
Top tether strap anchor point locations . .1-19
Child safety rear door lock............3-6
Chimes, audible reminders...........2-13
Cleaning exterior and interior..........7-2
Clock...................4-17, 4-21
Clutch
Clutch fluid.................8-13
ZREVIEW COPYÐ2008 Versa(vrs)
Owners ManualÐUSA_English(nna)
01/03/08Ðdebbie
X
Page 294 of 304

Lights
Map lights..................2-33
Lock
Child safety rear door lock..........3-6
Door locks..................3-4
Fuel-filler door lock opener lever......3-26
Power door locks...............3-5
Low fuel warning light..............2-9
Low tire pressure warning light.........2-9
Low washer fluid warning light.........2-10
Luggage (See vehicle loading information) . .9-12
M
Maintenance
General maintenance............8-2
Inside the vehicle...............8-3
Maintenance precautions..........8-5
Outside the vehicle..............8-2
Seat belt maintenance...........1-15
Under the hood and vehicle.........8-4
Malfunction indicator light...........2-12
Manual front seat adjustment..........1-2
Manual windows................2-30
Map lights....................2-33
Map pocket...................2-23
Meters and gauges................2-3
Instrument brightness control.......2-21
Mirror
Inside mirror.................3-28
Outside mirror control...........3-29
Outside mirrors...............3-29
Vanity mirror.................3-28
Moonroof....................2-31N
NISSAN vehicle immobilizer
system................2-15, 3-2, 5-11
O
Octane rating (See fuel octane rating).....9-4
Odometer.....................2-4
Oil
Capacities and recommended
fuel/lubricants.................9-2
Changing engine oil.............8-9
Changing engine oil filter..........8-10
Checking engine oil level..........8-8
Engine oil...................8-8
Engine oil and oil filter recommendation . .9-5
Engine oil viscosity..............9-5
Outside mirror control.............3-29
Outside mirrors.................3-29
Overdrive switch................5-16
Overheat
If your vehicle overheats..........6-10
Owner’s manual order form..........9-20
Owner’s manual/service manual order
information....................9-20
P
Parking
Parking brake operation..........5-22
Parking/parking on hills...........5-26
Phone, BluetoothThands-free system. . . .4-29Power
Power door locks...............3-5
Power outlet.................2-23
Power rear windows............2-29
Power steering system...........5-27
Power windows...............2-28
Rear power windows............2-29
Precautions
Maintenance precautions..........8-5
Precautions on child
restraints............1-15, 1-24, 1-30
Precautions on seat belt usage.......1-7
Precautions on supplemental restraint
system....................1-35
Precautions when starting and driving . . .5-2
Push starting...................6-9
R
Radio
Car phone or CB radio...........4-28
Compact Disc (CD) changer.......4-24
FM-AM radio with compact disc (CD)
player....................4-16
FM/AM/SAT radio with compact disc
(CD) changer................4-20
Steering wheel audio control switch. . . .4-27
Readiness for inspection maintenance (I/M)
test........................9-18
Rear power windows..............2-29
Rear seat.....................1-4
Rear window and outside mirror defroster
switch......................2-19
Rear window wiper and washer switches . . .2-18
10-4
ZREVIEW COPYÐ2008 Versa(vrs)
Owners ManualÐUSA_English(nna)
01/03/08Ðdebbie
X