2008 NISSAN TITAN engine
[x] Cancel search: enginePage 197 of 408

cFor quick cooling when the outside tem-
perature is high, push thebutton to
the ON position. The indicator light on
the
button will come on. (will
appear on the display, if so equipped.) Be
sure to return the
to the OFF position
for normal cooling. The indicator light on
the
button will go off. (will ap-
pear on the display, if so equipped.) You may
also select MAX A/C for quick cooling.
Dehumidified heating
This mode is used to heat and dehumidify the air.
1. Push the
button to the OFF position.
The indicator light on thebutton will
go off. (will appear on the display, if so
equipped.)
2. Turn the air flow control dial to the
position.
3. Turn the fan control dial to the desired posi-
tion.
4. Push the
button on. The indicator
light on thebutton will come on. (A/C
will appear on the display, if so equipped.)5. Turn the temperature control dial to the de-
sired position.
Operating tips
cKeep the windows closed while the air con-
ditioner is in operation.
cAfter parking in the sun, drive for 2 or 3
minutes with the windows open to vent hot
air from the passenger compartment. Then,
close the windows. This allows the air con-
ditioner to cool the interior more quickly.
cThe air conditioning system should be
operated for approximately 10 minutes
at least once a month. This helps pre-
vent damage to the system due to lack
of lubrication.
cA visible mist may be seen coming from the
ventilators in hot, humid conditions as the air
is cooled rapidly. This does not indicate a
malfunction.
cIf the engine coolant temperature
gauge indicates engine coolant tem-
perature over the normal range, turn
the air conditioner off. See “If your
vehicle overheats” in the “In case of
emergency” section of this manual.
AIR FLOW CHARTS
The following charts show the button and dial
positions forMAXIMUM AND QUICKheating,
cooling or defrosting. For additional information
on heating and cooling see “Heater and air con-
ditioner” in this section.The air recirculation
(
) button should always be in the OFF
position for heating and defrosting.
Display screen, heater, air conditioner, audio and phone systems4-31
ZREVIEW COPYÐ2008 Titan(tzw)
Owners ManualÐUSA_English(nna)
03/06/07Ðtbrooks
X
Page 201 of 408
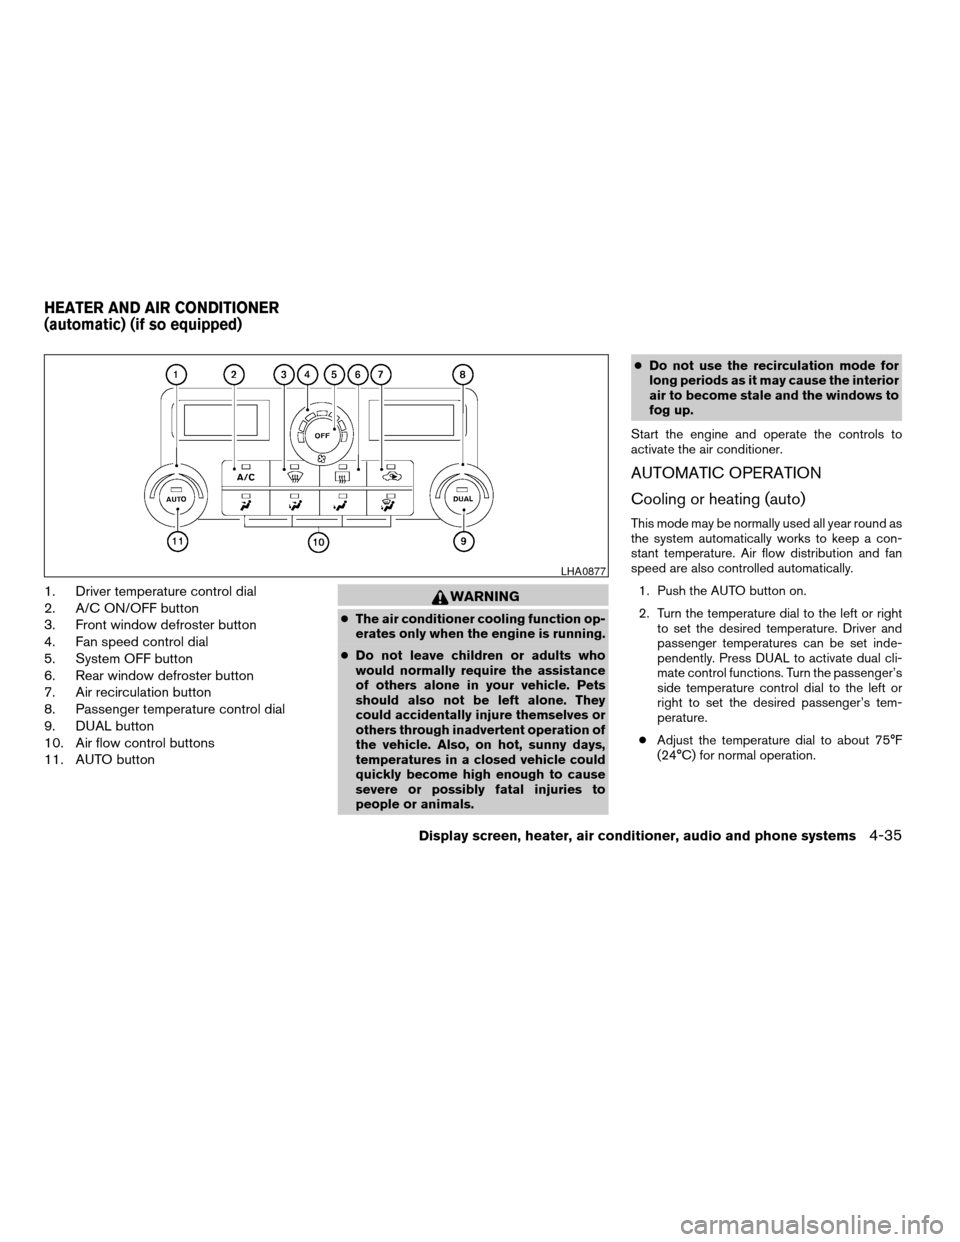
1. Driver temperature control dial
2. A/C ON/OFF button
3. Front window defroster button
4. Fan speed control dial
5. System OFF button
6. Rear window defroster button
7. Air recirculation button
8. Passenger temperature control dial
9. DUAL button
10. Air flow control buttons
11. AUTO buttonWARNING
cThe air conditioner cooling function op-
erates only when the engine is running.
cDo not leave children or adults who
would normally require the assistance
of others alone in your vehicle. Pets
should also not be left alone. They
could accidentally injure themselves or
others through inadvertent operation of
the vehicle. Also, on hot, sunny days,
temperatures in a closed vehicle could
quickly become high enough to cause
severe or possibly fatal injuries to
people or animals.cDo not use the recirculation mode for
long periods as it may cause the interior
air to become stale and the windows to
fog up.
Start the engine and operate the controls to
activate the air conditioner.
AUTOMATIC OPERATION
Cooling or heating (auto)
This mode may be normally used all year round as
the system automatically works to keep a con-
stant temperature. Air flow distribution and fan
speed are also controlled automatically.
1. Push the AUTO button on.
2. Turn the temperature dial to the left or right
to set the desired temperature. Driver and
passenger temperatures can be set inde-
pendently. Press DUAL to activate dual cli-
mate control functions. Turn the passenger’s
side temperature control dial to the left or
right to set the desired passenger’s tem-
perature.
cAdjust the temperature dial to about 75°F
(24°C) for normal operation.
LHA0877
HEATER AND AIR CONDITIONER
(automatic) (if so equipped)
Display screen, heater, air conditioner, audio and phone systems4-35
ZREVIEW COPYÐ2008 Titan(tzw)
Owners ManualÐUSA_English(nna)
03/06/07Ðtbrooks
X
Page 202 of 408

cThe temperature of the passenger compart-
ment will be maintained automatically. Air
flow distribution, fan speed and A/C on/off
are also controlled automatically.
cA visible mist may be seen coming from the
ventilators in hot, humid conditions as the air
is cooled rapidly. This does not indicate a
malfunction.
Dehumidified defrosting or defogging
1. Push the defroster control buttonto
turn the system on. The indicator light in the
button will illuminate.
2. Turn the temperature dial to the left or right
to set the desired temperature.
cTo quickly remove ice from the outside of the
windows, turn the manual fan control to the
maximum position.
cAs soon as possible after the windshield is
clean, push the AUTO button to return to the
auto mode.
cWhen the
control is activated, the air
conditioner will automatically be turned on at
outside temperatures above 36°F (2°C) . If in
defrost mode for more than one minute, the
air conditioning system will continue to op-
erate until the fan control is turned OFF, the
vehicle is shut off or the A/C button is usedto turn off the compressor even if an air flow
button other than
is selected. This
dehumidifies the air which helps defog the
windshield. The air recirculation mode auto-
matically turns off, allowing outside air to be
drawn into the passenger compartment to
further improve the defogging performance.
MANUAL OPERATION
Fan speed control dial
Turn the fan speed control dialleft or right
to manually control the fan speed or turn the
system on or off.
Push the AUTO button to return to automatic
control of the fan speed.
Air recirculation
Themode automatically turns off, allowing
outside air to be drawn into the passenger com-
partment to prevent fogging.
Push the air recirculation button
to recir-
culate interior air inside the vehicle. Push the
AUTO button to return to automatic mode.
The air recirculation button will not be activated
when the air conditioner is in DEF, floor, or
floor/defrost mode.
Air flow control
Push the air flow control buttons to manually
control air flow and select the air outlet:
— Air flows from center and side
ventilators.
— Air flows from center and side
ventilators and foot outlets.
— Air flows mainly from foot outlets.
— Air flows from defroster and foot
outlets.
— Air flows from defroster outlets.
To turn system off
Press the/OFF button.
OPERATING TIPS
cWhen the engine coolant temperature and
outside air temperature are low, the air flow
from the foot outlets may not operate for a
maximum of 150 seconds. However, this is
not a malfunction. After the coolant tempera-
ture warms up, air flow from the foot outlets
will operate normally.
4-36Display screen, heater, air conditioner, audio and phone systems
ZREVIEW COPYÐ2008 Titan(tzw)
Owners ManualÐUSA_English(nna)
03/06/07Ðtbrooks
X
Page 203 of 408
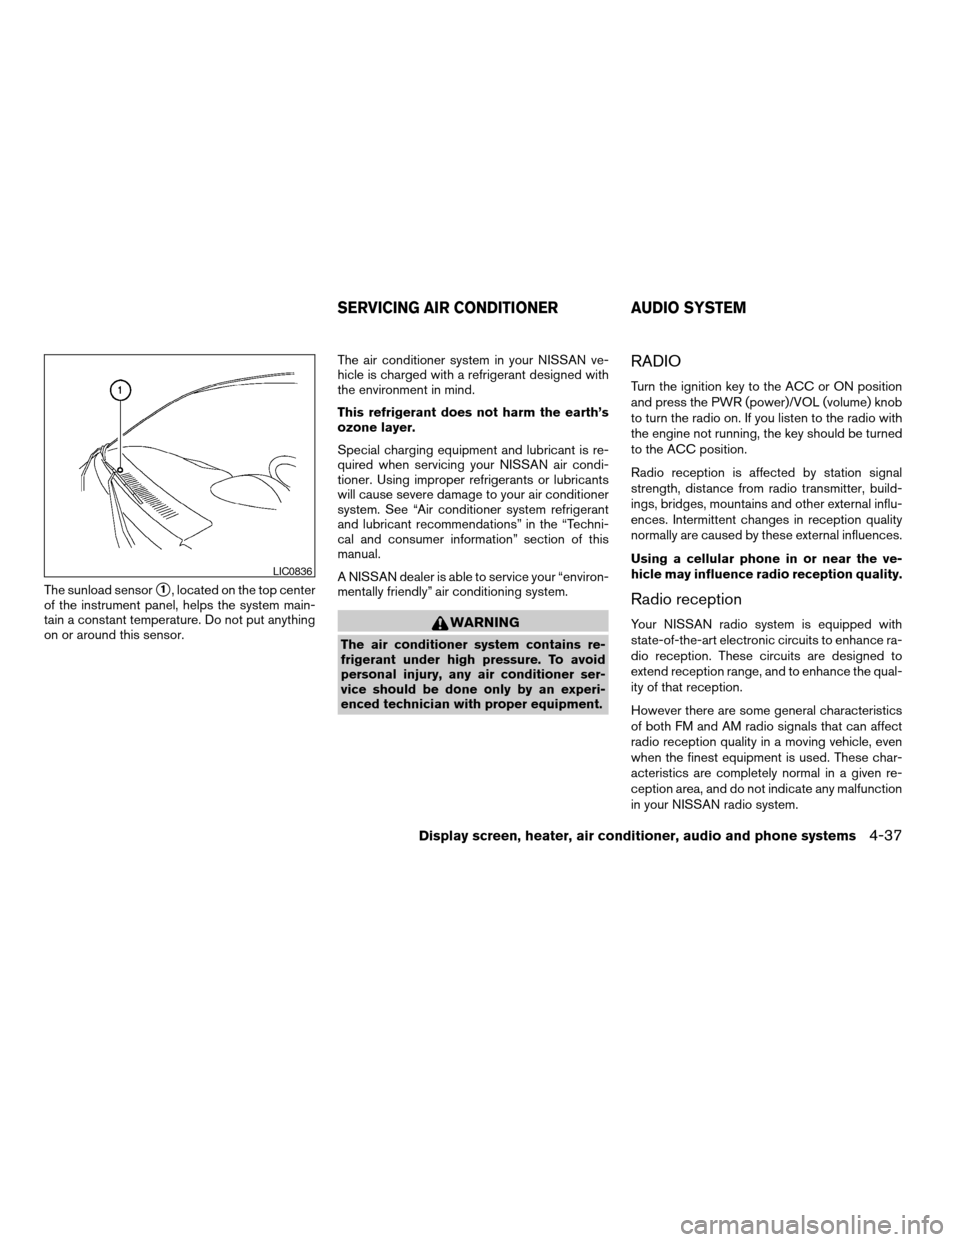
The sunload sensors1, located on the top center
of the instrument panel, helps the system main-
tain a constant temperature. Do not put anything
on or around this sensor.The air conditioner system in your NISSAN ve-
hicle is charged with a refrigerant designed with
the environment in mind.
This refrigerant does not harm the earth’s
ozone layer.
Special charging equipment and lubricant is re-
quired when servicing your NISSAN air condi-
tioner. Using improper refrigerants or lubricants
will cause severe damage to your air conditioner
system. See “Air conditioner system refrigerant
and lubricant recommendations” in the “Techni-
cal and consumer information” section of this
manual.
A NISSAN dealer is able to service your “environ-
mentally friendly” air conditioning system.
WARNING
The air conditioner system contains re-
frigerant under high pressure. To avoid
personal injury, any air conditioner ser-
vice should be done only by an experi-
enced technician with proper equipment.
RADIO
Turn the ignition key to the ACC or ON position
and press the PWR (power)/VOL (volume) knob
to turn the radio on. If you listen to the radio with
the engine not running, the key should be turned
to the ACC position.
Radio reception is affected by station signal
strength, distance from radio transmitter, build-
ings, bridges, mountains and other external influ-
ences. Intermittent changes in reception quality
normally are caused by these external influences.
Using a cellular phone in or near the ve-
hicle may influence radio reception quality.
Radio reception
Your NISSAN radio system is equipped with
state-of-the-art electronic circuits to enhance ra-
dio reception. These circuits are designed to
extend reception range, and to enhance the qual-
ity of that reception.
However there are some general characteristics
of both FM and AM radio signals that can affect
radio reception quality in a moving vehicle, even
when the finest equipment is used. These char-
acteristics are completely normal in a given re-
ception area, and do not indicate any malfunction
in your NISSAN radio system.
LIC0836
SERVICING AIR CONDITIONER AUDIO SYSTEM
Display screen, heater, air conditioner, audio and phone systems4-37
ZREVIEW COPYÐ2008 Titan(tzw)
Owners ManualÐUSA_English(nna)
03/06/07Ðtbrooks
X
Page 210 of 408

1. PRESET A·B·C button
2.
CD eject button
3. MENU button
4. CD insert slot
5. CD button
6. FM·AM button7. TUNE buttons
8. RPT button
9. Power/VOL control knob
10. RDM button
11. Station select (1 - 6) buttons
12. SEEK buttons
FM/AM RADIO WITH COMPACT
DISC (CD) PLAYER (if so equipped)
For all operation precautions, see9Audio opera-
tion precautions9earlier in this section.
Power button and VOL control knob
Turn the ignition key to the ACC or ON position,
then press the power button. If you listen to the
radio with the engine not running, turn the key to
the ACC position. The mode (radio or CD) that
was playing immediately before the system was
turned off resumes playing.
When no CD is loaded, the radio comes on.
Pressing the power button again turns the sys-
tem off.
Turn the VOL control knob to the right to increase
volume or to the left to decrease volume.
MENU button (BASS, TREBLE, FADE, BAL-
ANCE and CLOCK):
Press the MENU button to change the mode as
follows:
BAS!TRE!FAD!BAL!CLOCK!Audio
or OFF!BAS
To adjust Bass, Treble, Fade and Balance, press
the MENU button until the desired mode appears
in the display. Press the SEEK button to adjust
Bass and Treble to the desired level. You can also
LHA0858
4-44Display screen, heater, air conditioner, audio and phone systems
ZREVIEW COPYÐ2008 Titan(tzw)
Owners ManualÐUSA_English(nna)
03/06/07Ðtbrooks
X
Page 228 of 408
CAUTION
cThe glass screen on the liquid crystal
display may break if hit with a hard or
sharp object. If the glass breaks, do not
touch the liquid crystalline material,
which contains a small amount of mer-
cury. In case of contact with skin, wash
immediately with soap and water.
cUse a damp, soft cloth when cleaning
the Mobile Entertainment System com-
ponents. Do not use solvents or clean-
ing solutions.
Do not attempt to use the system in extreme
temperature conditions [below -4°F (-20°C) or
above 158°F (70°C)].
To avoid discharging the vehicle battery, do not
operate the system more than 15 minutes without
starting the engine.
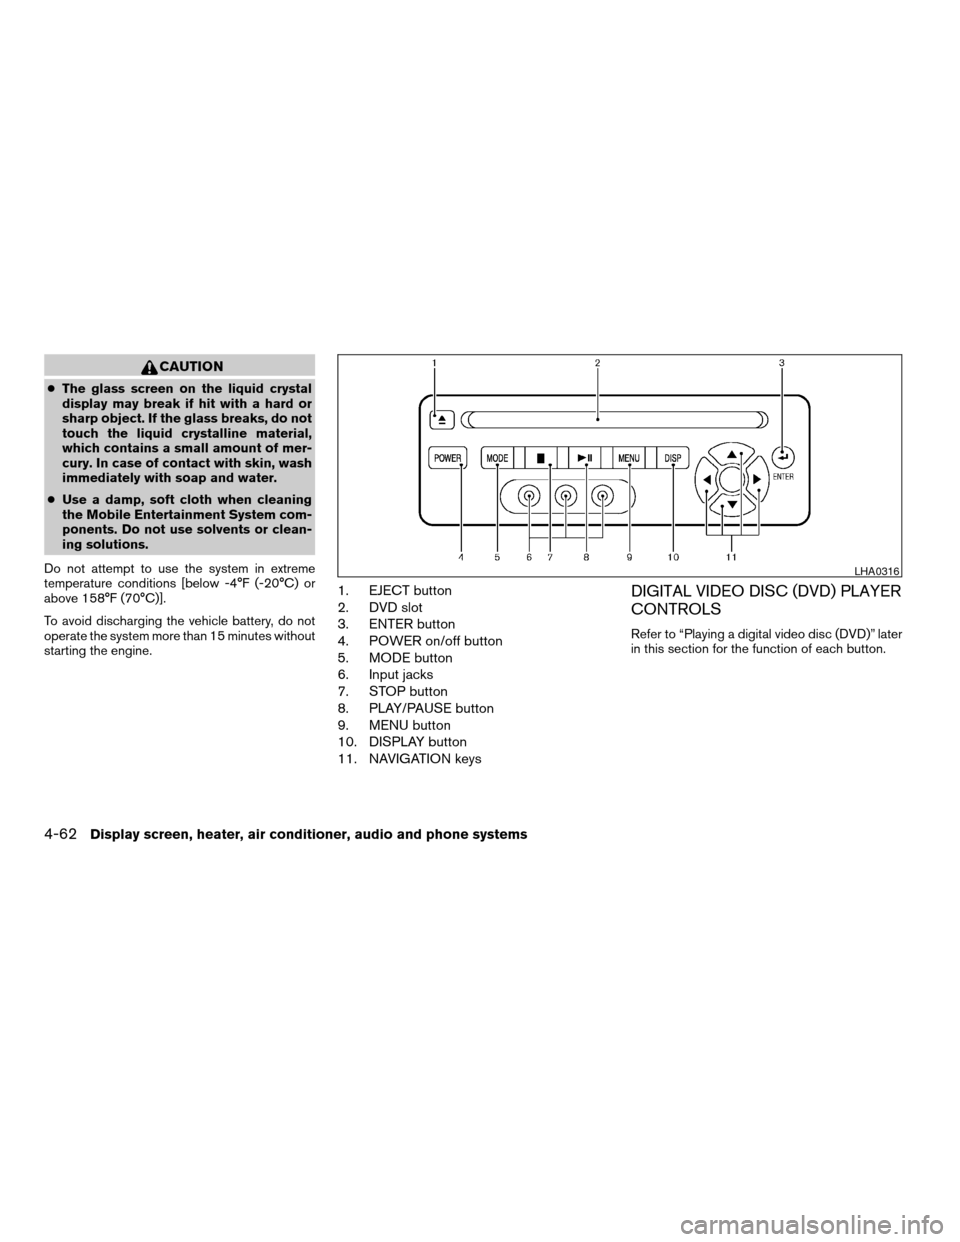
1. EJECT button
2. DVD slot
3. ENTER button
4. POWER on/off button
5. MODE button
6. Input jacks
7. STOP button
8. PLAY/PAUSE button
9. MENU button
10. DISPLAY button
11. NAVIGATION keysDIGITAL VIDEO DISC (DVD) PLAYER
CONTROLS
Refer to “Playing a digital video disc (DVD)” later
in this section for the function of each button.
LHA0316
4-62Display screen, heater, air conditioner, audio and phone systems
ZREVIEW COPYÐ2008 Titan(tzw)
Owners ManualÐUSA_English(nna)
03/06/07Ðtbrooks
X
Page 231 of 408
PLAYING A DIGITAL VIDEO DISC
(DVD)
CAUTION
cOnly operate the DVD while the vehicle
engine is running. Operating the DVD
for extended periods of time with the
engine OFF can discharge the vehicle
battery.
cDo not allow the system to get wet.
Excessive moisture such as spilled liq-
uids may cause the system to
malfunction.
The driver must not attempt to wear the head-
phones while the vehicle is in motion so that full
attention may be given to vehicle operation.
While playing video CD media, this DVD player
does not guarantee complete functionality of all
video CD formats.
With the DVD player, you can hear DVD videos,
video CDs and CDs using headphones. Passen-
gers in the rear seat can enjoy the sound inde-
pendently of the front seat.
Press the CD·DVD button located on the front
controls to hear the sound of the DVD play
through the speakers.Press the REAR ON·OFF button located on the
front controls to disable or enable rear seat audio
controls. For more information on rear seat audio
controls see, “Rear Audio Controls” earlier in this
section.
Pressing thebutton on the front controls
turns the rear speakers on or off and enables or
disables the wireless headphones .
It is possible to operate the DVD player by remote
control.
Headphones are a wireless type and no cables
are necessary. You can use them in almost all the
ranges in the rear seat. (It is not possible to use
the headphones in the front seat.)
POWER on/off button:
With the ignition switch turned to the ACC or ON
position, press the POWER button to turn the
DVD player on or off.
Insert the DVD into the slot with the label side
facing up. The DVD will be guided automatically
into the slot.
If the DVD player is off and a DVD is inserted, the
DVD player will automatically turn on.
CAUTION
Do not force the compact disc into the
slot. This could damage the player.
MODE select button:
Press the MODE button to select Audio/Video
source between DVD and AUX input (input jacks
on the faceplate, Red = right channel audio input,
White = left channel audio input, and Yellow =
Video input) .
The display will show the “AUX” in the upper left
corner of the display for 4 seconds once the
Mode is changed to AUX.
To use the input jacks, refer to “Auxiliary input
jacks” in this section.
orPLAY:
When the PLAY/PAUSE button on the player or
the PLAY button on the remote control is
pressed, the player will play.
In play mode, the display will briefly show
on the upper left corner of the display.
FF (Fast Forward) , REW
(Remote control only):
Press FAST FORWARD/FAST REVERSE but-
tons to carry out the fast forward or fast reverse
presentation at 5 times normal play speed.
Display screen, heater, air conditioner, audio and phone systems4-65
ZREVIEW COPYÐ2008 Titan(tzw)
Owners ManualÐUSA_English(nna)
03/06/07Ðtbrooks
X
Page 237 of 408
cWhen changing batteries, do not let dust or
oil get on the remote control and head-
phones.
FCC Notice:
Changes or modifications not expressly ap-
proved by the party responsible for compli-
ance could void the user’s authority to op-
erate the equipment. This device complies
with Part 15 of the FCC Rules and RSS-210
of Industry Canada. Operation is subject to
the following two conditions: (1) This de-
vice may not cause harmful interference,
and (2) this device must accept any inter-
ference received, including interference
that may cause undesired operation of the
device.When installing a CB, ham radio or car phone in
your NISSAN, be sure to observe the following
precautions, otherwise the new equipment may
adversely affect the engine control system and
other electronic parts.
WARNING
cA cellular telephone should not be used
while driving so full attention may be
given to vehicle operation. Some juris-
dictions prohibit the use of cellular tele-
phones while driving.
cIf you must make a call while your ve-
hicle is in motion, the hands free cellu-
lar phone operational mode (if so
equipped) is highly recommended. Ex-
ercise extreme caution at all times so
full attention may be given to vehicle
operation.
cIf a conversation in a moving vehicle
requires you to take notes, pull off the
road to a safe location and stop your
vehicle before doing so.
CAUTION
cKeep the antenna as far away as pos-
sible from the electronic control
modules.
cKeep the antenna wire more than 8 in
(20 cm) away from the electronic con-
trol system harnesses. Do not route the
antenna wire next to any harness.
cAdjust the antenna standing-wave ratio
as recommended by the manufacturer.
cConnect the ground wire from the CB
radio chassis to the body.
cFor details, consult a NISSAN dealer.
CAR PHONE OR CB RADIO
Display screen, heater, air conditioner, audio and phone systems4-71
ZREVIEW COPYÐ2008 Titan(tzw)
Owners ManualÐUSA_English(nna)
03/06/07Ðtbrooks
X