2008 NISSAN TITAN warning
[x] Cancel search: warningPage 135 of 408
operation when the ignition key is in the ON
position or for about 45 seconds after the ignition
key is turned to the OFF position.
Depending on the environment or driving
conditions, the auto reverse function may
be activated if an impact or load similar to
something being caught in the sunroof oc-
curs.
WARNING
There are some small distances immedi-
ately before the closed position which
cannot be detected. Make sure that all
passengers have their hands, etc., inside
the vehicle before closing the sunroof.
When closing:
If the control unit detects something caught in the
sunroof as it moves to the front, the sunroof will
immediately open backward.
When tilting down:
If the control unit detects something caught in the
sunroof as it tilts down, the sunroof will immedi-
ately tilt up.
If the auto reverse function malfunctions and re-
peats opening or tilting up the sunroof, keep
pushing the tilt down switch within 5 secondsafter it happens; the sunroof will fully close gradu-
ally. Make sure nothing is caught in the sunroof.
WARNING
cIn an accident you could be thrown from
the vehicle through an open sunroof.
Always use seat belts and child
restraints.
cDo not allow anyone to stand up or
extend any portion of their body out of
the sunroof opening while the vehicle is
in motion or while the sunroof is
closing.
CAUTION
cRemove water drops, snow, ice or sand
from the sunroof before opening.
cDo not place heavy objects on the sun-
roof or surrounding area.
Sunshade
Open and close the sunshade by sliding it for-
ward or backward.
If the sunroof does not close
Have your NISSAN dealer check and repair the
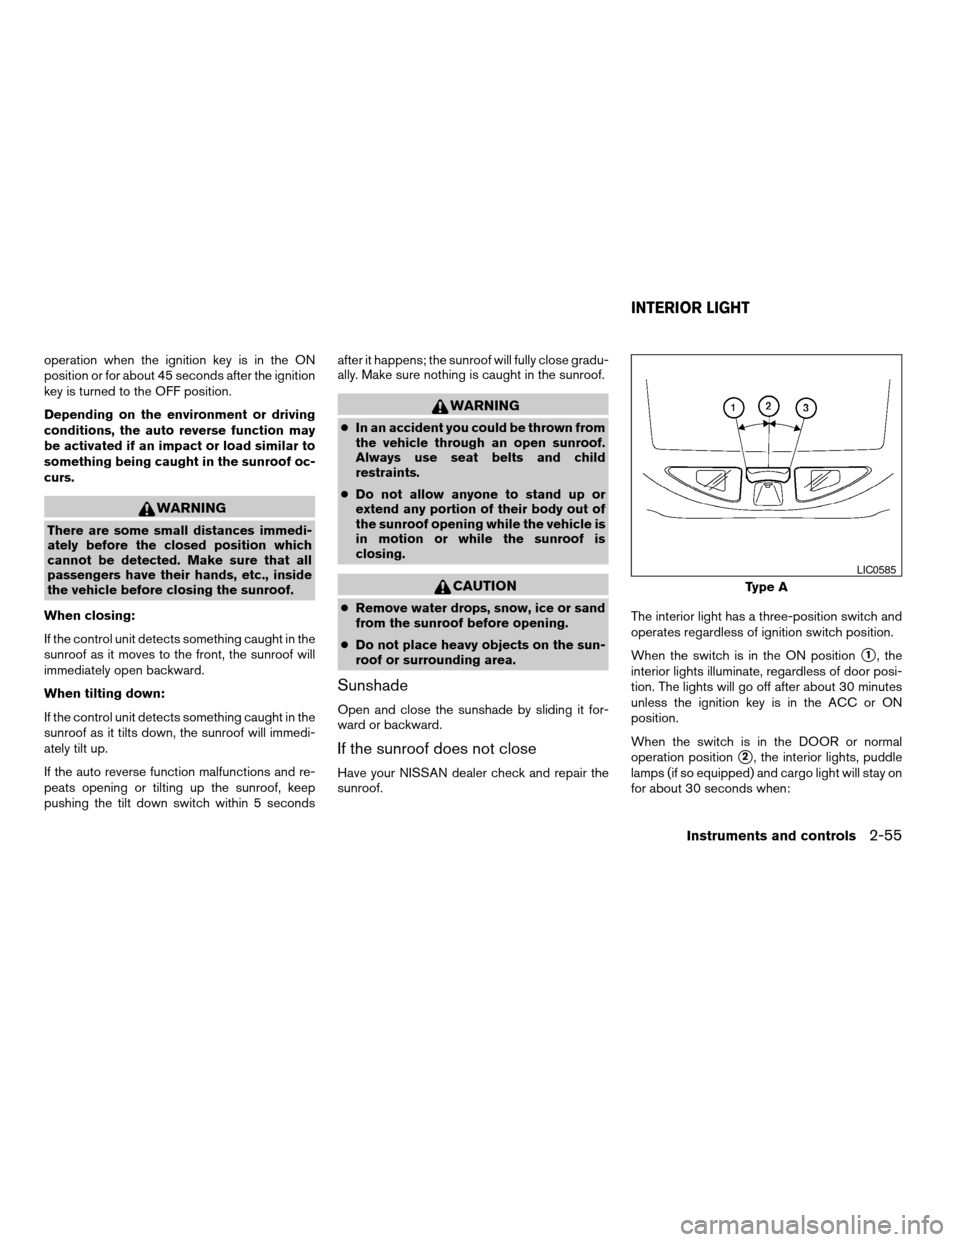
sunroof.The interior light has a three-position switch and
operates regardless of ignition switch position.
When the switch is in the ON position
s1, the
interior lights illuminate, regardless of door posi-
tion. The lights will go off after about 30 minutes
unless the ignition key is in the ACC or ON
position.
When the switch is in the DOOR or normal
operation position
s2, the interior lights, puddle
lamps (if so equipped) and cargo light will stay on
for about 30 seconds when:
Type A
LIC0585
INTERIOR LIGHT
Instruments and controls2-55
ZREVIEW COPYÐ2008 Titan(tzw)
Owners ManualÐUSA_English(nna)
03/05/07Ðtbrooks
X
Page 138 of 408
WARNING
cDo not use the HomeLinkTUniversal
Transceiver with any garage door
opener that lacks safety stop and re-
verse features as required by federal
safety standards. (These standards be-
came effective for opener models
manufactured after April 1, 1982) . A ga-
rage door opener which cannot detect
an object in the path of a closing garage
door and then automatically stop and
reverse, does not meet current federal
safety standards. Using a garage door
opener without these features in-
creases the risk of serious injury or
death.
cDuring the programming procedure
your garage door or security gate will
open and close (if the transmitter is
within range) . Make sure that people or
objects are clear of the garage door,
gate, etc. that you are programming.
cYour vehicle’s engine should be turned
off while programming the HomeLinkT
Universal Transceiver.
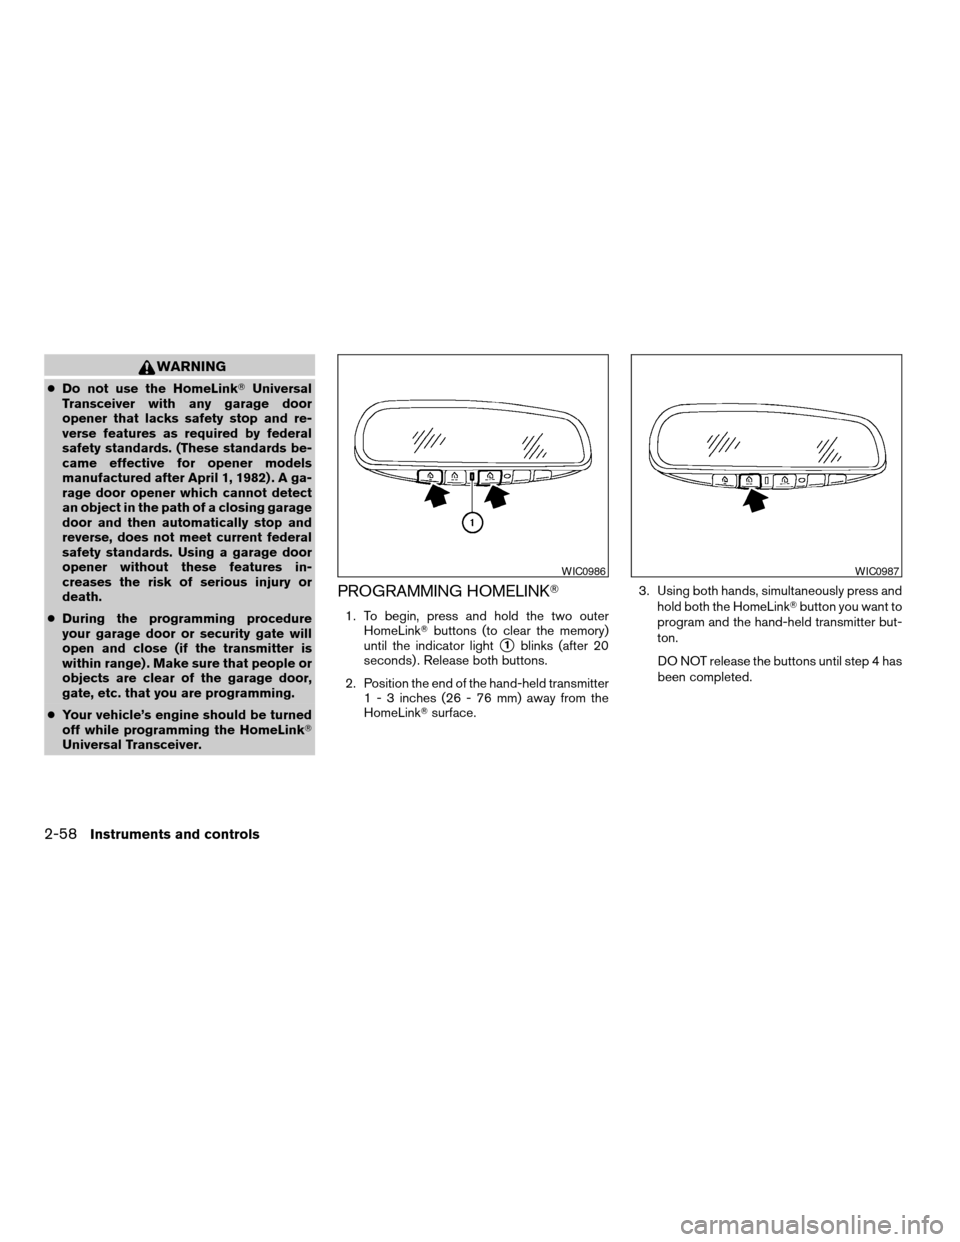
PROGRAMMING HOMELINKT
1. To begin, press and hold the two outer
HomeLinkTbuttons (to clear the memory)
until the indicator light
s1blinks (after 20
seconds) . Release both buttons.
2. Position the end of the hand-held transmitter
1 - 3 inches (26 - 76 mm) away from the
HomeLinkTsurface.3. Using both hands, simultaneously press and
hold both the HomeLinkTbutton you want to
program and the hand-held transmitter but-
ton.
DO NOT release the buttons until step 4 has
been completed.
WIC0986WIC0987
2-58Instruments and controls
ZREVIEW COPYÐ2008 Titan(tzw)
Owners ManualÐUSA_English(nna)
03/05/07Ðtbrooks
X
Page 145 of 408
WARNING
cAlways have the doors locked while
driving. Along with the use of seat belts,
this provides greater safety in the event
of an accident by helping to prevent
persons from being thrown from the
vehicle. This also helps keep children
and others from unintentionally open-
ing the doors, and will help keep out
intruders.
cBefore opening any door, always look
for and avoid oncoming traffic.
cDo not leave children unattended inside
the vehicle. They could unknowingly ac-
tivate switches or controls. Unattended
children could become involved in seri-
ous accidents.
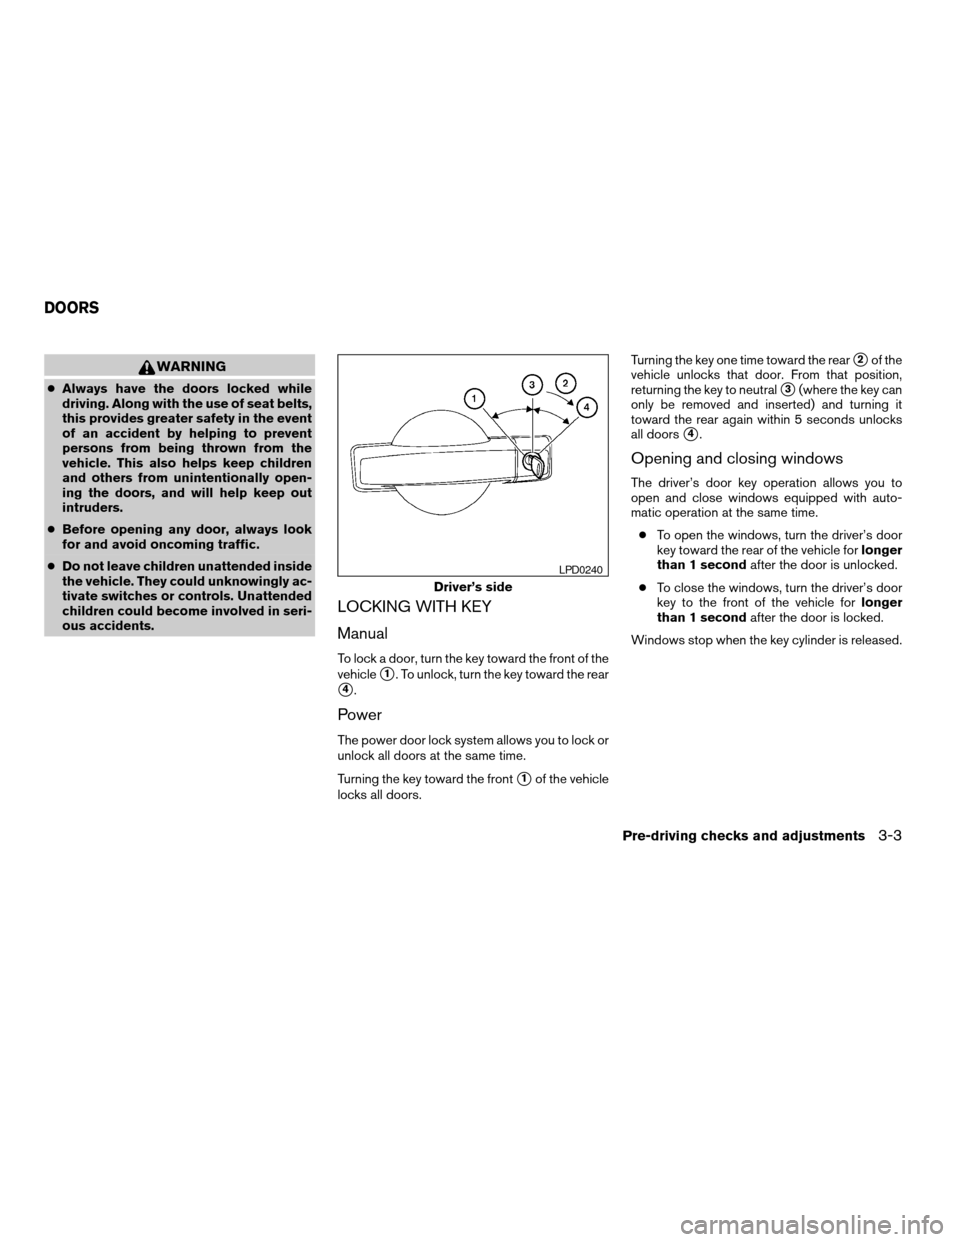
LOCKING WITH KEY
Manual
To lock a door, turn the key toward the front of the
vehicle
s1. To unlock, turn the key toward the rear
s4.
Power
The power door lock system allows you to lock or
unlock all doors at the same time.
Turning the key toward the front
s1of the vehicle
locks all doors.Turning the key one time toward the rear
s2of the
vehicle unlocks that door. From that position,
returning the key to neutral
s3(where the key can
only be removed and inserted) and turning it
toward the rear again within 5 seconds unlocks
all doors
s4.
Opening and closing windows
The driver’s door key operation allows you to
open and close windows equipped with auto-
matic operation at the same time.
cTo open the windows, turn the driver’s door
key toward the rear of the vehicle forlonger
than 1 secondafter the door is unlocked.
cTo close the windows, turn the driver’s door
key to the front of the vehicle forlonger
than 1 secondafter the door is locked.
Windows stop when the key cylinder is released.
Driver’s side
LPD0240
DOORS
Pre-driving checks and adjustments3-3
ZREVIEW COPYÐ2008 Titan(tzw)
Owners ManualÐUSA_English(nna)
03/05/07Ðtbrooks
X
Page 149 of 408
It is possible to lock/unlock all doors, turn on the
interior lights and puddle lamps (if so equipped) ,
and activate the panic alarm by using the keyfob
from outside the vehicle.
Some settings for the keyfob, such as horn beep,
can be adjusted. For vehicles without navigation
system, refer to “Silencing the horn beep feature”
later in this section. For vehicles with navigation
system, refer to “Vehicle electronic systems” in
the “Display screen, heater, air conditioner and
audio systems” section later in this manual.
Be sure to remove the key from the vehicle
before locking the doors.
The keyfob can operate at a maximum distance of
approximately 33 ft (10 m) from the vehicle. The
effective distance depends upon the conditions
around the vehicle.
As many as 5 keyfobs can be used with one
vehicle. For information concerning the purchase
and use of additional keyfobs, contact a NISSAN
dealer.
The keyfob will not function when:
cthe battery is discharged.
cthe distance between the vehicle and the
keyfob is over 33 ft (10 m) .
The panic alarm will not activate when the
key is in the ignition switch.CAUTION
Listed below are conditions or occur-
rences which will damage the keyfob:
cDo not allow the keyfob to become wet.
cDo not drop the keyfob.
cDo not strike the keyfob sharply against
another object.
cDo not place the keyfob for an extended
period in an area where temperatures
exceed 140°F (60°C) .
If a keyfob is lost or stolen, NISSAN rec-
ommends erasing the ID code of that key-
fob. This will prevent the keyfob from un-
authorized use to unlock the vehicle. For
information regarding the erasing proce-
dure, please contact a NISSAN dealer.
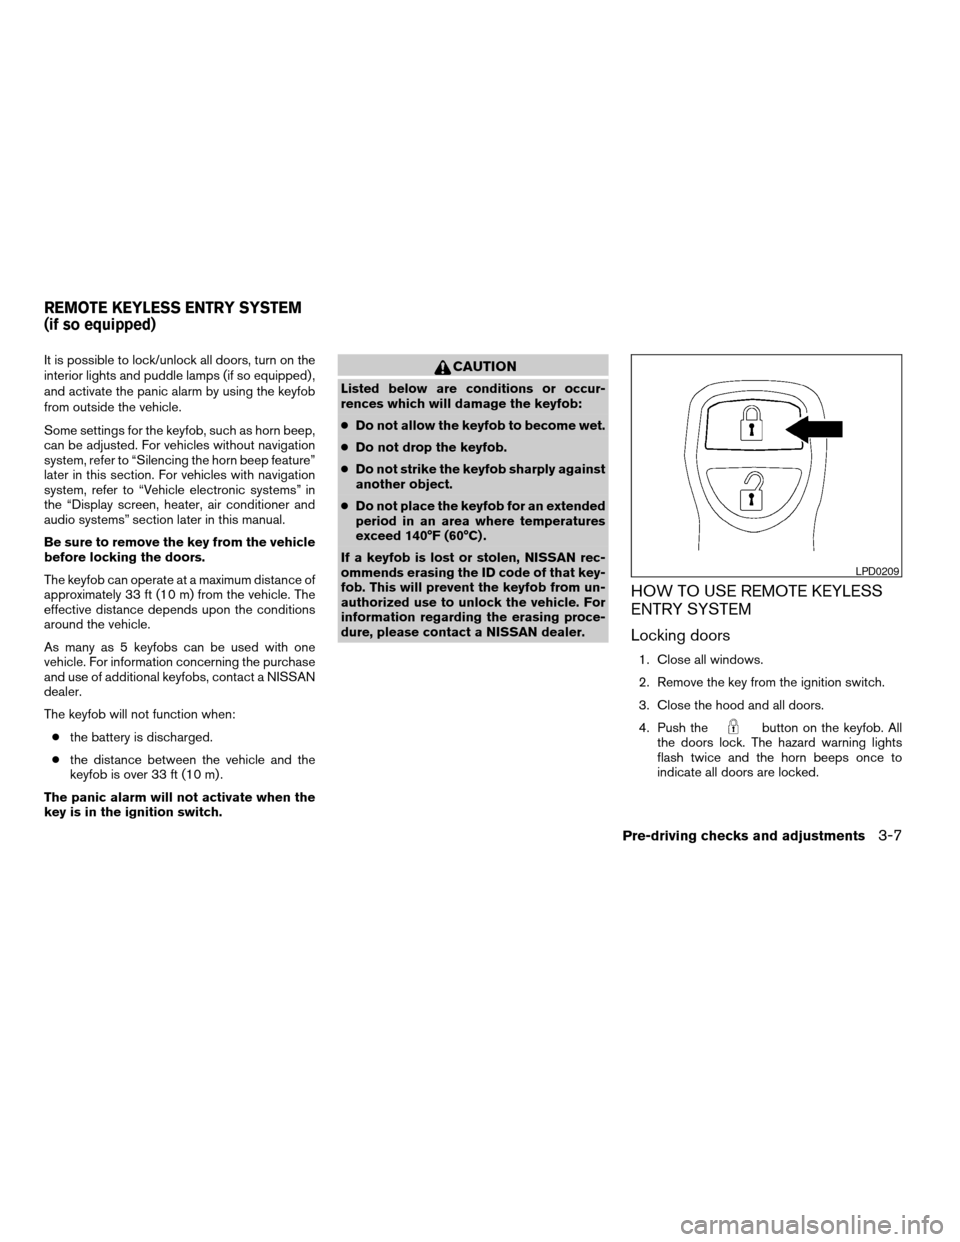
HOW TO USE REMOTE KEYLESS
ENTRY SYSTEM
Locking doors
1. Close all windows.
2. Remove the key from the ignition switch.
3. Close the hood and all doors.
4. Push the
button on the keyfob. All
the doors lock. The hazard warning lights
flash twice and the horn beeps once to
indicate all doors are locked.
LPD0209
REMOTE KEYLESS ENTRY SYSTEM
(if so equipped)
Pre-driving checks and adjustments3-7
ZREVIEW COPYÐ2008 Titan(tzw)
Owners ManualÐUSA_English(nna)
03/05/07Ðtbrooks
X
Page 150 of 408

cWhen thebutton is pushed with all
doors locked, the hazard warning lights flash
twice and the horn beeps once as a re-
minder that the doors are already locked.
cIf a door is open and you push the
button, the doors will lock but the horn will
not beep and the hazard warning lights will
not flash.
The horn may or may not beep. For vehicles
without navigation system, refer to “Silencing the
horn beep feature” later in this section. For ve-
hicles with navigation system, refer to “Comfort &
convenience settings” in the “Display screen,
heater, air conditioner and audio systems” sec-
tion later in this manual.
Unlocking doors
Push thebutton on the keyfob once.
cOnly the driver’s door unlocks.
cThe hazard warning lights flash once if all
doors are completely closed with the ignition
key in any position except the ON position.
cThe interior lights and puddle lamps (if so
equipped) turn on and the light timer acti-
vates for 30 seconds when the interior light
switch is in the DOOR position with the
ignition key in any position except the ON
position.Push the
button on the keyfob again within
5 seconds.
cAll doors unlock.
cThe hazard warning lights flash once if all
doors are completely closed.
The interior lights can be turned off without wait-
ing 30 seconds by inserting the key into the
ignition and turning to the ON or START position,
locking the doors with the keyfob or pushing the
interior light switch to the off position.
Auto relock
When thebutton on the keyfob is pushed,
all doors will lock automatically within 1 minute
unless one of the following operations is per-
formed:
cAny door is opened.
cA key is inserted into the ignition switch and
the key is turned from OFF to ON.
Linking the keyfob to automatic drive
positioner memory
If the vehicle is equipped with automatic drive
positioner, the keyfob can be linked to a memory
setting.
See “Automatic drive positioner” later in this sec-
tion.
LPD0210
3-8Pre-driving checks and adjustments
ZREVIEW COPYÐ2008 Titan(tzw)
Owners ManualÐUSA_English(nna)
03/05/07Ðtbrooks
X
Page 151 of 408

Using the panic alarm
If you are near your vehicle and feel threatened,
you may activate the panic alarm to call attention
by pushing and holding the
button on the
keyfob forlonger than 0.5 second.
The panic alarm and headlights will stay on for 25
seconds.
The panic alarm stops when:
cit has run for 25 seconds, or
cany button is pushed on the keyfob.
Silencing the horn beep feature
If desired, the horn beep feature can be deacti-
vated using the keyfob.
NOTE:
If you change the horn beep and lamp flash
feature with the keyfob, the display screen
(if so equipped) will not show the current
mode and cannot be used to change the
mode. Use the keyfob to return to the pre-
vious mode and re-enable the display
screen control.
To deactivate:Press and hold the
andbuttonsfor at least 2 seconds.The hazard warning lights will flash three times to
confirm that the horn beep feature has been
deactivated.
To activate:Press and hold the
andbuttonsfor at least 2 seconds
once more.
The hazard warning lights will flash once and the
horn will sound once to confirm that the horn
beep feature has been reactivated.
Deactivating the horn beep feature does not si-
lence the horn if the alarm is triggered.
Using the interior lights
Push thebutton on the keyfob once to turn
on the interior lights and puddle lamps (if so
equipped) .
For additional information, refer to “Interior light”
in the “Instruments and controls” section earlier in
this manual.LPD0211LPD0262
Pre-driving checks and adjustments3-9
ZREVIEW COPYÐ2008 Titan(tzw)
Owners ManualÐUSA_English(nna)
03/05/07Ðtbrooks
X
Page 152 of 408
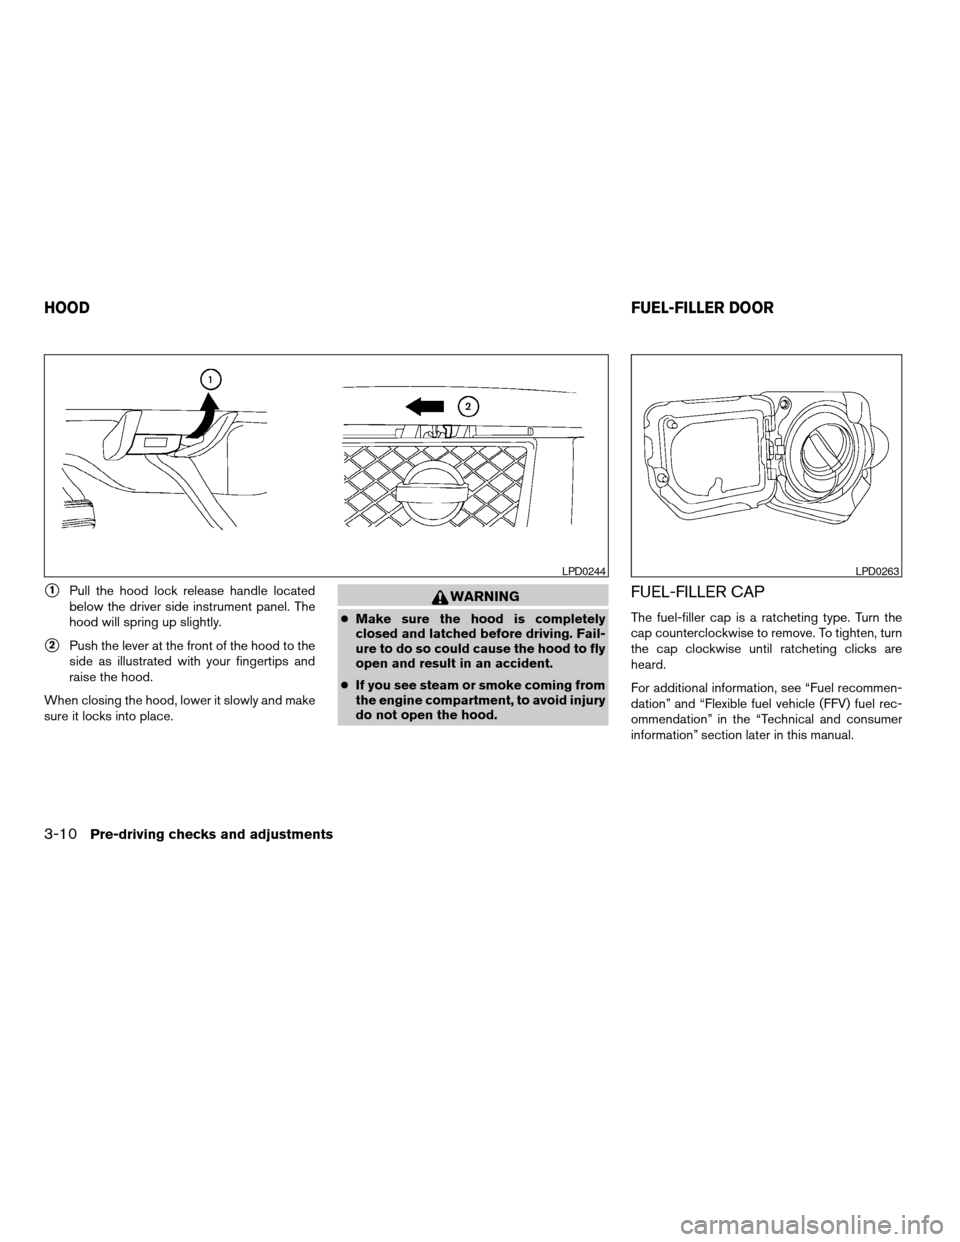
s1Pull the hood lock release handle located
below the driver side instrument panel. The
hood will spring up slightly.
s2Push the lever at the front of the hood to the
side as illustrated with your fingertips and
raise the hood.
When closing the hood, lower it slowly and make
sure it locks into place.
WARNING
cMake sure the hood is completely
closed and latched before driving. Fail-
ure to do so could cause the hood to fly
open and result in an accident.
cIf you see steam or smoke coming from
the engine compartment, to avoid injury
do not open the hood.
FUEL-FILLER CAP
The fuel-filler cap is a ratcheting type. Turn the
cap counterclockwise to remove. To tighten, turn
the cap clockwise until ratcheting clicks are
heard.
For additional information, see “Fuel recommen-
dation” and “Flexible fuel vehicle (FFV) fuel rec-
ommendation” in the “Technical and consumer
information” section later in this manual.
LPD0244LPD0263
HOODFUEL-FILLER DOOR
3-10Pre-driving checks and adjustments
ZREVIEW COPYÐ2008 Titan(tzw)
Owners ManualÐUSA_English(nna)
03/05/07Ðtbrooks
X
Page 153 of 408
WARNING
cGasoline is extremely flammable and
highly explosive under certain condi-
tions. You could be burned or seriously
injured if it is misused or mishandled.
Always stop the engine and do not
smoke or allow open flames or sparks
near the vehicle when refueling.
cDo not attempt to top off the fuel tank
after the fuel pump nozzle shuts off
automatically. Continued refueling may
cause fuel overflow, resulting in fuel
spray and possibly a fire.
cUse only an original equipment type
fuel-filler cap as a replacement. It has a
built-in safety valve needed for proper
operation of the fuel system and emis-
sion control system. An incorrect cap
can result in a serious malfunction and
possible injury. It could also cause the
malfunction indicator light to come on.
cNever pour fuel into the throttle body to
attempt to start your vehicle.cDo not fill a portable fuel container on a
truck bed liner, rubber truck bed mat, or
other insulating material. Static elec-
tricity can cause an explosion of flam-
mable liquid, vapor or gas in any vehicle
or trailer. To reduce the risk of serious
injury or death when filling portable fuel
containers:
– Always place the container on the
ground when filling.
– Do not use electronic devices when
filling.
– Keep the pump nozzle in contact
with the container while you are fill-
ing it.
– Use only approved portable fuel con-
tainers for flammable liquid.
CAUTION
cOnly vehicles with the E-85 filler door
label can operate on E-85. Fuel system
or other damage can occur if E-85 is
used in vehicles that are not designed
to run on E-85.
cIf fuel is spilled on the vehicle body,
flush it away with water to avoid paint
damage.cTighten until the fuel-filler cap clicks.
Failure to tighten the fuel-filler cap
properly may cause the
mal-
function indicator light (MIL) to illumi-
nate. If the
light illuminates be-
cause the fuel-filler cap is loose or
missing, tighten or install the cap and
continue to drive the vehicle.
The
light should turn off after a
few driving trips. If the
light
does not turn off after a few driving
trips, have the vehicle inspected by a
NISSAN dealer.
cFor additional information, see the
“Malfunction indicator light (MIL)” in
the “Instruments and Controls” section
earlier in this manual.
Pre-driving checks and adjustments3-11
ZREVIEW COPYÐ2008 Titan(tzw)
Owners ManualÐUSA_English(nna)
03/05/07Ðtbrooks
X