2008 NISSAN ROGUE transmission
[x] Cancel search: transmissionPage 194 of 309
Black plate (198,1)
Model "S35-D" EDITED: 2007/ 12/ 19
the R (Reverse) position.The brake pedal
must be depressed and the selector lever
button pushed in to move the selector
lever from P (Park) , N (Neutral) or any
driving position to R (Reverse) .
N (Neutral):
Neither forward nor reverse gear is engaged.
The engine can be started in this position. You
may shift to N (Neutral) and restart a stalled
engine while the vehicle is moving.
D (Drive):
Use this position for all normal forward driving.
L (Low) (if so equipped):
Use this position for maximum engine braking on
steep downhill gradients/climbing steep slopes
and whenever approaching sharp bends. Do not
use the L position in any other circumstances.
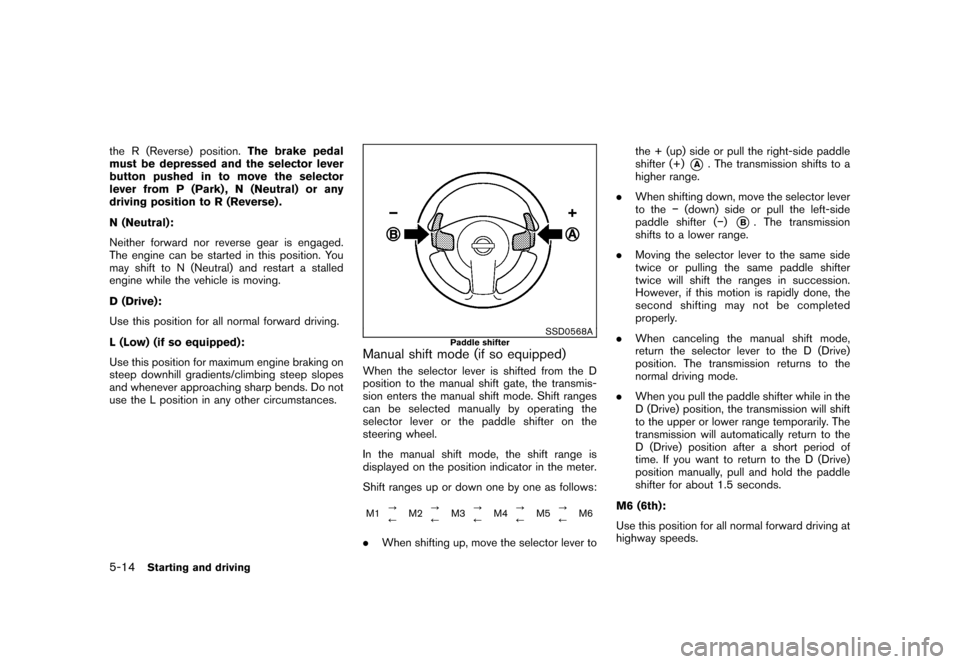
SSD0568A
Paddle shifter
Manual shift mode (if so equipped)When the selector lever is shifted from the D
position to the manual shift gate, the transmis-
sion enters the manual shift mode. Shift ranges
can be selected manually by operating the
selector lever or the paddle shifter on the
steering wheel.
In the manual shift mode, the shift range is
displayed on the position indicator in the meter.
Shift ranges up or down one by one as follows:M1?
/M2?
/M3?
/M4?
/M5?
/M6.When shifting up, move the selector lever tothe + (up) side or pull the right-side paddle
shifter (+)
*A
. The transmission shifts to a
higher range.
.When shifting down, move the selector lever
to the�(down) side or pull the left-side
paddle shifter (�)
*B. The transmission
shifts to a lower range.
.Moving the selector lever to the same side
twice or pulling the same paddle shifter
twice will shift the ranges in succession.
However, if this motion is rapidly done, the
second shifting may not be completed
properly.
.When canceling the manual shift mode,
return the selector lever to the D (Drive)
position. The transmission returns to the
normal driving mode.
.When you pull the paddle shifter while in the
D (Drive) position, the transmission will shift
to the upper or lower range temporarily. The
transmission will automatically return to the
D (Drive) position after a short period of
time. If you want to return to the D (Drive)
position manually, pull and hold the paddle
shifter for about 1.5 seconds.
M6 (6th):
Use this position for all normal forward driving at
highway speeds.
5-14
Starting and driving
Page 196 of 309
Black plate (200,1)
Model "S35-D" EDITED: 2007/ 12/ 19
Accelerator downshift
— In D position —For passing or hill climbing, fully depress the
accelerator pedal to the floor. This shifts the
transmission down into a lower gear, depending
on the vehicle speed.High fluid temperature protection modeThis transmission has a high fluid temperature
protection mode. If the fluid temperature be-
comes too high (for example, when climbing
steep grades in high temperature with heavy
loads, such as when towing a trailer) , engine
power and, under some conditions, vehicle
speed will be decreased automatically to reduce
the chance of transmission damage. Vehicle
speed can be controlled with the accelerator
pedal, but the engine and vehicle speed may be
limited.Fail-safeIf the vehicle is driven under extreme
conditions, such as excessive wheel spin-
ning and subsequent hard braking, the
fail-safe system may be activated. The MIL
may illuminate to indicate the fail-safe
mode is activated. (See “Malfunction In-
dicator Light (MIL)” in the “2. Instruments
and controls” section.) This will occur even
if all electrical circuits are functioning
properly. In this case, turn the ignition
switch to the OFF position and wait for 10seconds. Then turn the switch back to the
ON position. The vehicle should return to
its normal operating condition. If it does
not return to its normal operating condi-
tion, have a NISSAN dealer check the
transmission and repair if necessary.
WARNING
When the high fluid temperature pro-
tection mode or fail-safe operation
occurs, vehicle speed may be gradually
reduced. The reduced speed may be
lower than other traffic, which could
increase the chance of a collision. Be
especially careful when driving. If ne-
cessary, pull to the side of the road at a
safe place and allow the transmission
to return to normal operation, or have it
repaired if necessary.
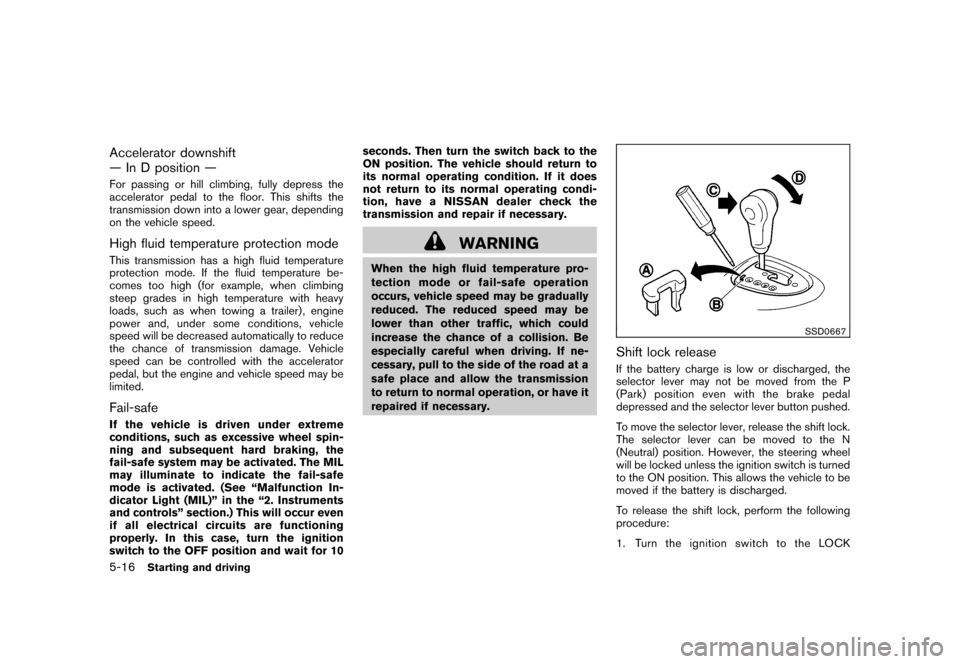
SSD0667
Shift lock releaseIf the battery charge is low or discharged, the
selector lever may not be moved from the P
(Park) position even with the brake pedal
depressed and the selector lever button pushed.
To move the selector lever, release the shift lock.
The selector lever can be moved to the N
(Neutral) position. However, the steering wheel
will be locked unless the ignition switch is turned
to the ON position. This allows the vehicle to be
moved if the battery is discharged.
To release the shift lock, perform the following
procedure:
1. Turn the ignition switch to the LOCK
5-16
Starting and driving
Page 201 of 309
Black plate (205,1)
Model "S35-D" EDITED: 2007/ 12/ 19
.Use the recommended viscosity engine oil.
(See “ENGINE OIL AND OIL FILTER
RECOMMENDATION” in the “9. Technical
and consumer information” section.)
WARNING
.For AWD equipped vehicles, do not
attempt to raise two wheels off the
ground and shift the transmission to
any drive or reverse position with
the engine running. Doing so may
result in drivetrain damage or un-
expected vehicle movement which
could result in serious vehicle da-
mage or personal injury.
.Do not attempt to test an AWD
equipped vehicle on a 2-wheel dy-
namometer (such as the dynam-
ometers used by some states for
emissions testing) or similar equip-
ment even if the other two wheels
are raised off the ground. Make sure
that you inform the test facility
personnel that your vehicle is
equipped with AWD before it is
placed on a dynamometer. Using
the wrong test equipment may re-
sult in drivetrain damage or unex-
pected vehicle movement which
could result in serious vehicle da-
mage or personal injury.
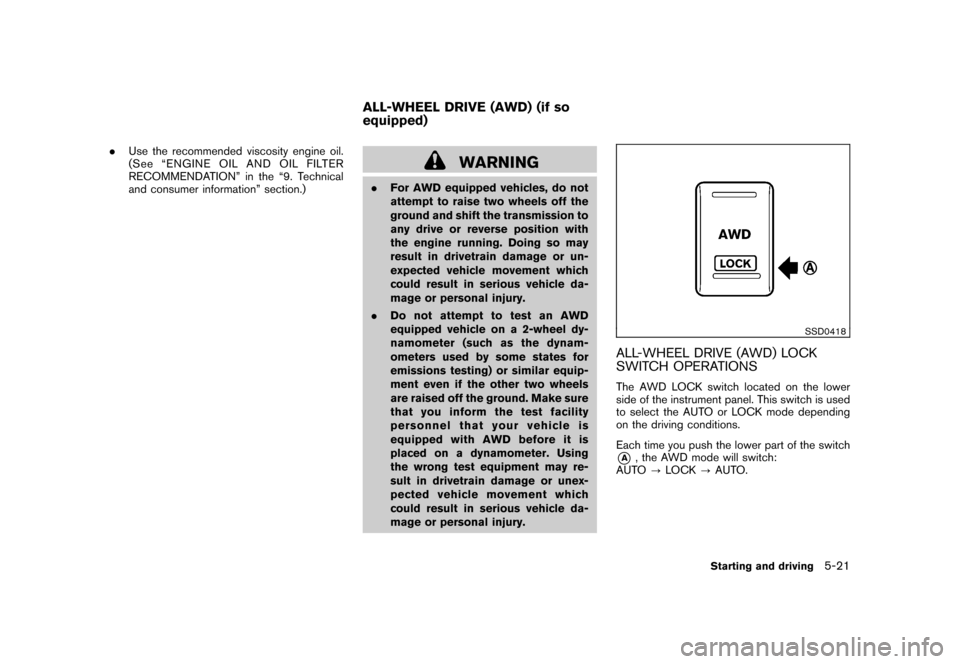
SSD0418
ALL-WHEEL DRIVE (AWD) LOCK
SWITCH OPERATIONSThe AWD LOCK switch located on the lower
side of the instrument panel. This switch is used
to select the AUTO or LOCK mode depending
on the driving conditions.
Each time you push the lower part of the switch*A
, the AWD mode will switch:
AUTO?LOCK?AUTO.
ALL-WHEEL DRIVE (AWD) (if so
equipped)
Starting and driving
5-21
Page 204 of 309
Black plate (208,1)
Model "S35-D" EDITED: 2007/ 12/ 19
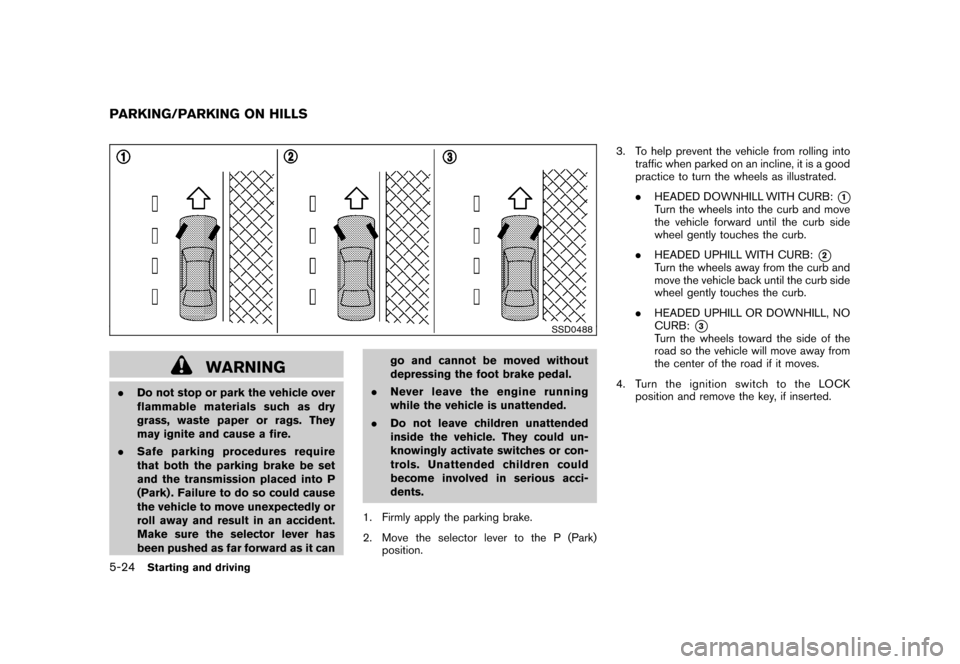
SSD0488
WARNING
.Do not stop or park the vehicle over
flammable materials such as dry
grass, waste paper or rags. They
may ignite and cause a fire.
.Safe parking procedures require
that both the parking brake be set
and the transmission placed into P
(Park) . Failure to do so could cause
the vehicle to move unexpectedly or
roll away and result in an accident.
Make sure the selector lever has
been pushed as far forward as it cango and cannot be moved without
depressing the foot brake pedal.
.Never leave the engine running
while the vehicle is unattended.
.Do not leave children unattended
inside the vehicle. They could un-
knowingly activate switches or con-
trols. Unattended children could
become involved in serious acci-
dents.
1. Firmly apply the parking brake.
2. Move the selector lever to the P (Park)
position.3. To help prevent the vehicle from rolling into
traffic when parked on an incline, it is a good
practice to turn the wheels as illustrated.
.HEADED DOWNHILL WITH CURB:
*1
Turn the wheels into the curb and move
the vehicle forward until the curb side
wheel gently touches the curb.
.HEADED UPHILL WITH CURB:
*2
Turn the wheels away from the curb and
move the vehicle back until the curb side
wheel gently touches the curb.
.HEADED UPHILL OR DOWNHILL, NO
CURB:
*3
Turn the wheels toward the side of the
road so the vehicle will move away from
the center of the road if it moves.
4. Turn the ignition switch to the LOCK
position and remove the key, if inserted.
PARKING/PARKING ON HILLS5-24
Starting and driving
Page 220 of 309
Black plate (226,1)
Model "S35-D" EDITED: 2007/ 12/ 19
unnecessary electrical systems (lights, hea-
ter, air conditioner, etc.) .
3. Remove vent caps on the battery (if so
equipped) . Cover the battery with a firmly
wrung out moist cloth to reduce explosion
hazard.
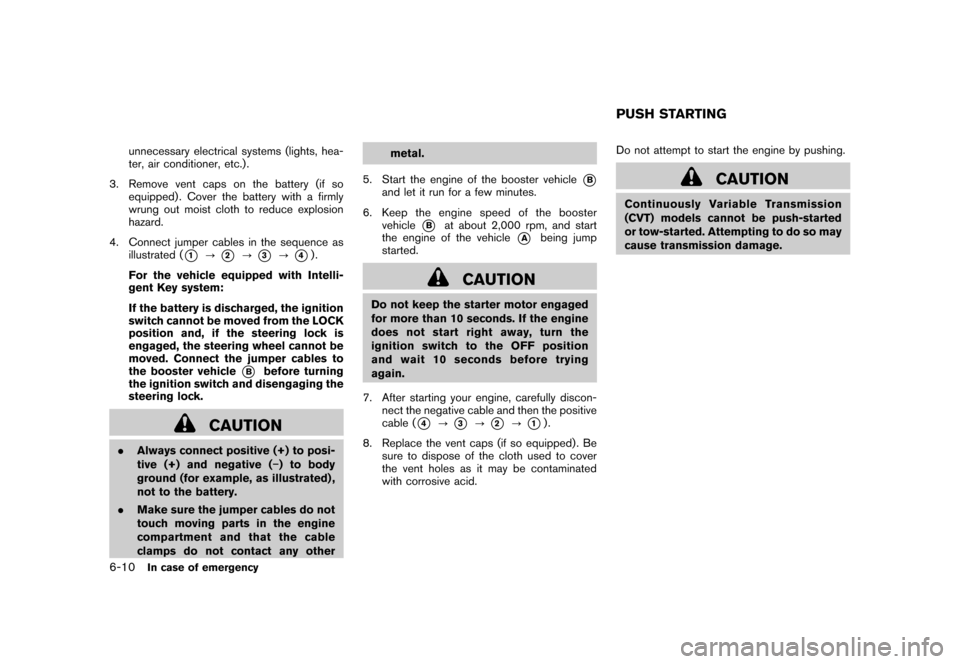
4. Connect jumper cables in the sequence as
illustrated (
*1
?
*2
?
*3
?
*4).
For the vehicle equipped with Intelli-
gent Key system:
If the battery is discharged, the ignition
switch cannot be moved from the LOCK
position and, if the steering lock is
engaged, the steering wheel cannot be
moved. Connect the jumper cables to
the booster vehicle
*B
before turning
the ignition switch and disengaging the
steering lock.
CAUTION
.Always connect positive (+) to posi-
tive (+) and negative (�) to body
ground (for example, as illustrated) ,
not to the battery.
.Make sure the jumper cables do not
touch moving parts in the engine
compartment and that the cable
clamps do not contact any othermetal.
5. Start the engine of the booster vehicle
*B
and let it run for a few minutes.
6. Keep the engine speed of the booster
vehicle
*B
at about 2,000 rpm, and start
the engine of the vehicle
*A
being jump
started.
CAUTION
Do not keep the starter motor engaged
for more than 10 seconds. If the engine
does not start right away, turn the
ignition switch to the OFF position
and wait 10 seconds before trying
again.
7. After starting your engine, carefully discon-
nect the negative cable and then the positive
cable (
*4
?
*3
?
*2
?
*1).
8. Replace the vent caps (if so equipped) . Be
sure to dispose of the cloth used to cover
the vent holes as it may be contaminated
with corrosive acid.Do not attempt to start the engine by pushing.
CAUTION
Continuously Variable Transmission
(CVT) models cannot be push-started
or tow-started. Attempting to do so may
cause transmission damage.PUSH STARTING
6-10
In case of emergency
Page 222 of 309
Black plate (228,1)
Model "S35-D" EDITED: 2007/ 12/ 19
When towing your vehicle, all State (Provincial in
Canada) and local regulations for towing must
be followed. Incorrect towing equipment could
damage your vehicle. Towing instructions are
available from a NISSAN dealer. Local service
operators are familiar with the applicable laws
and procedures for towing. To assure proper
towing and to prevent accidental damage to
your vehicle, NISSAN recommends that you
have a service operator tow your vehicle. It is
advisable to have the service operator carefully
read the following precautions.
WARNING
.Never ride in a vehicle that is being
towed.
.Never get under your vehicle after it
has been lifted by a tow truck.
CAUTION
.When towing, make sure that the
transmission, axles, steering system
and powertrain are in working con-
dition. If any unit is damaged, dol-
lies must be used.
.Always attach safety chains before
towing.For information about towing your vehicle behind
a recreational vehicle (RV) , see “FLAT TOW-
ING” in the “9. Technical and consumer
information” section of this manual.TOWING YOUR VEHICLE6-12
In case of emergency
Page 223 of 309
Black plate (229,1)
Model "S35-D" EDITED: 2007/ 12/ 19
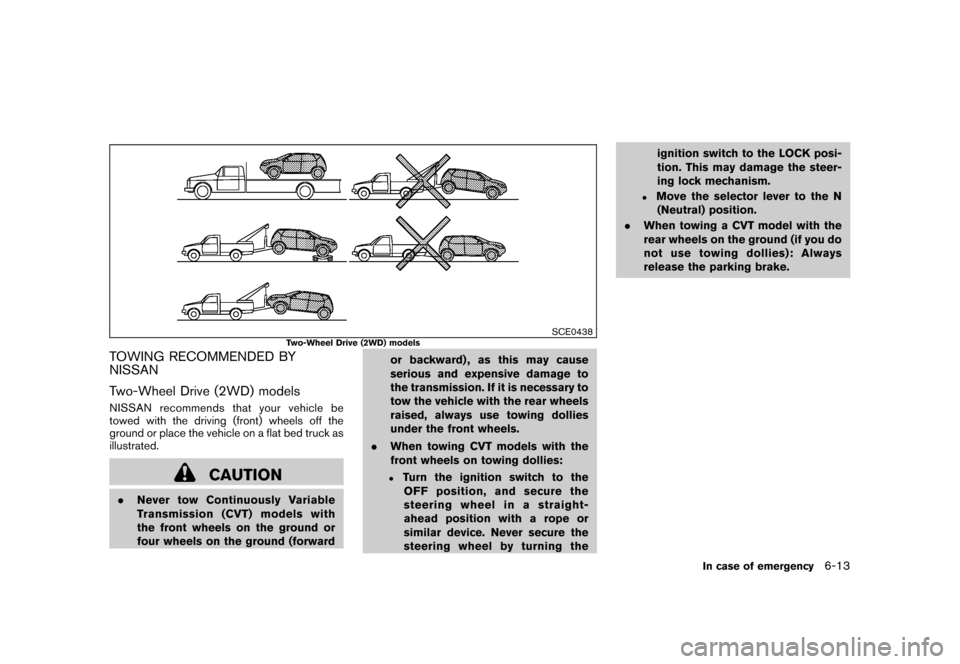
SCE0438
Two-Wheel Drive (2WD) models
TOWING RECOMMENDED BY
NISSAN
Two-Wheel Drive (2WD) modelsNISSAN recommends that your vehicle be
towed with the driving (front) wheels off the
ground or place the vehicle on a flat bed truck as
illustrated.
CAUTION
.Never tow Continuously Variable
Transmission (CVT) models with
the front wheels on the ground or
four wheels on the ground (forwardor backward) , as this may cause
serious and expensive damage to
the transmission. If it is necessary to
tow the vehicle with the rear wheels
raised, always use towing dollies
under the front wheels.
.When towing CVT models with the
front wheels on towing dollies:
.
Turn the ignition switch to the
OFF position, and secure the
steering wheel in a straight-
ahead position with a rope or
similar device. Never secure the
steering wheel by turning theignition switch to the LOCK posi-
tion. This may damage the steer-
ing lock mechanism.
.
Move the selector lever to the N
(Neutral) position.
.When towing a CVT model with the
rear wheels on the ground (if you do
not use towing dollies): Always
release the parking brake.
In case of emergency
6-13
Page 232 of 309
Black plate (25,1)
8 Maintenance and do-it-yourself
Model "S35-D" EDITED: 2007/ 12/ 25
Maintenance requirement..................................... 8-2
Scheduled maintenance ................................... 8-2
General maintenance ...................................... 8-2
Where to go for service ................................... 8-2
General maintenance .......................................... 8-2
Explanation of maintenance items ....................... 8-2
Maintenance precautions ..................................... 8-5
Engine compartment check locations ...................... 8-6
QR25DE engine ............................................ 8-6
Engine cooling system ......................................... 8-7
Checking engine coolant level ........................... 8-8
Changing engine coolant ................................. 8-8
Engine oil ......................................................... 8-8
Checking engine oil level ................................. 8-8
Changing engine oil and filter ............................ 8-9
Continuously Variable Transmission (CVT) fluid ........ 8-11
Brake fluid ...................................................... 8-11
Window washer fluid ........................................ 8-12
Battery .......................................................... 8-13
Jump starting .............................................. 8-14
Drive belts ...................................................... 8-14
Spark plugs .................................................... 8-15
Replacing spark plugs ................................... 8-15 Air cleaner
...................................................... 8-16
Windshield wiper blades .................................... 8-16
Cleaning .................................................... 8-16
Replacing ................................................... 8-17
Rear window wiper blade ................................... 8-18
Brakes ........................................................... 8-18
Self-adjusting brakes .................................... 8-18
Brake pad wear indicators .............................. 8-18
Fuses ............................................................ 8-19
Engine compartment ..................................... 8-19
Passenger compartment ................................ 8-20
Battery replacement .......................................... 8-21
Keyfob ....................................................... 8-21
Intelligent Key battery .................................... 8-22
Lights ............................................................ 8-24
Headlights .................................................. 8-25
Exterior and interior lights ............................... 8-26
Wheels and tires .............................................. 8-30
Tire pressure ............................................... 8-30
Tire labeling ................................................ 8-33
Types of tires .............................................. 8-35
Tire chains .................................................. 8-36
Changing wheels and tires ............................. 8-37